概要
フロントエンド勉強会
各課題を通して、DOM操作の感覚を掴む。
環境構築
parcelを用いるのでtsconfigは別に設定しなくていいのだが、私好みの設定があるので入れてある。
npm init -y
npm install parcel typescript
npx tsc --init
mkdir src
touch src/index.ts src/index.html
HTMLテンプレート
<!DOCTYPE html>
<html lang="ja">
<head>
    <meta charset="UTF-8">
    <meta name="viewport" content="width=device-width, initial-scale=1.0">
    <meta http-equiv="X-UA-Compatible" content="ie=edge">
    <title>title</title>
    <script src="./index.ts" async></script>
</head>
<body>
    <div id="main"></div>
</body>
</html>
動作確認方法
npx parcel src/index.html --open
課題
アイテム追加
「追加」ボタンを押下することで、フォームの入力値をリストに追加できる。

HTML
<div id="main">
  <label for="new-item">アイテム</label>
  <input type="text" id="new-item" />
  <button id="my-button">追加</button>
  <div id="append-item-box"></div>
</div>
TypeScript
function appendDom(): void {
  const appendItemBox = document.getElementById('append-item-box')!;
  const itemInput = document.getElementById('new-item')! as HTMLInputElement;
  const pElm = document.createElement('p');
  pElm.textContent = `- ${itemInput.value}`;
  appendItemBox.appendChild(pElm);
}

window.addEventListener('load', () => {
  const myButton = document.getElementById('my-button');
  if (myButton !== null) {
    myButton.addEventListener('click', () => {
      appendDom();
    });
  } else {
    window.alert('ボタンがありません!');
  }
});
addEventListenerについて
addEventListenerにあるようにターゲットに特定のイベントが配信されるたびに呼び出される関数を設定する。
第一引数に「特定のイベント」、第二引数に「イベントが配信されるたびに呼び出される関数」を与える。
このメソッドはwindowで指定するブラウザ自体にも、DOMツリー全体を示すdocumentにも、要素それぞれのElementにもメソッドとして存在する。
特定のイベントとして用意されているのはイベントリファレンスにある通り。
ここでは
の2つを定義している。
ただし、このloadイベントについては、
<script src="./index.ts" defer></script>
のように script に defer をつける場合、必要ないことのほうが多い。
textContentとinnerHTML
「textContent innerHTML」みたいに検索をかければ山ほど違いに関する記述が出てくるため飛ばすが、textContentを用いている理由はXSSを防ぐため。
注意
ここでのwindowやdocumentはWEB APIで、JavaScript自体の文法ではなく、ブラウザに組み込まれた機能なので注意。
補足
const myButton = document.getElementById('my-button');
if (myButton !== null) {
    myButton.addEventListener('click', () => {
        appendDom();
    });
} else {
    window.alert('ボタンがありません!');
}
ここでのみ id="my-button" が存在するかを見ている。
getElementByIdはIDが存在しないときnullを返却するため、返り値の型定義は HTMLElement | null である。
したがって型ガードを行っている。
なければalertを出している。
const appendItemBox = document.getElementById('append-item-box')!;
const itemInput = document.getElementById('new-item')! as HTMLInputElement;
それ以外は 面倒なので あるもの前提としてnon nullアサーション演算子でnullを消している。
また、getElementByIdはHTMLElement型で返却するため、より具体的な型にアサーションしている。
ちなみにだが、ここではID指定で取ってきているが、classやnameでも取れる。
さらにはクエリセレクタでも取れる。
HTML**Element
確認の仕方はいくつかあるが2つ紹介。
例えばdiv要素。
- MDNを見る
div技術的概要
のDOM インターフェイスに書かれている。

- createElementを用いて確認

カウンター
+を押したら表示された数字がインクリメント、-を押すとデクリメントされる。
特に処理はしていないので負の値も入る。

HTML
<div id="main">
  <div>
    <p>現在値</p>
    <p id="currentCount"></p>
  </div>
  <button id="decrement">-</button>
  <button id="increment">+</button>
</div>
TypeScript
window.addEventListener('load', () => {
  let currentCount = 0;
  const incrementButton = document.getElementById('increment')! as HTMLButtonElement;
  const decrementButton = document.getElementById('decrement')! as HTMLButtonElement;
  const currentCountRef = document.getElementById('currentCount')! as HTMLParagraphElement;

  currentCountRef.textContent = `${currentCount}`

  incrementButton.addEventListener('click', () => {
    currentCount++;
    currentCountRef.textContent = `${currentCount}`;
  });

  decrementButton.addEventListener('click', () => {
    currentCount--;
    currentCountRef.textContent = `${currentCount}`;
  });
});
Getter, Setterを使ったバージョン
TypeScript(HTMLは同じ)
window.addEventListener('load', () => {
  const incrementButton = document.getElementById('increment')! as HTMLButtonElement;
  const decrementButton = document.getElementById('decrement')! as HTMLButtonElement;

  const currentValueOrigin = {
    c: 0,
    currentCountRef: document.getElementById('currentCount')! as HTMLParagraphElement,
    get cnt(): number {
      return this.c;
    },
    set cnt(value: number) {
      this.c = value;
      this.currentCountRef.textContent = `${this.c}`;
    }
  };

  currentValueOrigin.cnt = 0;

  incrementButton.addEventListener('click', () => {
    const currentCount = currentValueOrigin.cnt;
    currentValueOrigin.cnt = currentCount + 1;
  });

  decrementButton.addEventListener('click', () => {
    const currentCount = currentValueOrigin.cnt;
    currentValueOrigin.cnt = currentCount - 1;
  });
});
this
thisは同オブジェクトを指す。
getおよびsetでは同じオブジェクトが持つ c や currentCountRef にアクセスしたい。
しかし c や currentCountRef とそのまま書いても、そのような変数は定義されていないので取ってこれない。
そこで、 this.c や this.currentCountRef として、同オブジェクトのプロパティ(メソッド)アクセスを行う。
バリデーション
入力された値に応じてバリデーション結果を出力する。
何も入力していない場合

英大文字、英小文字、数字のみで構成された文字列が入力されている場合

英大文字、英小文字、数字以外も文字列に含まれる場合

HTML
<div id="main">
	<label for="my-input">入力(英大文字、英小文字、数字のみ)</label>
	<input type="text" id="my-input" />
	<div id="validate-hint"></div>
</div>
TypeScript
window.addEventListener('load', () => {
  const inputForm = document.getElementById('my-input')!;
  const validateHint = document.getElementById('validate-hint')!;
  inputForm.addEventListener('input', (evt) => {
    const target = evt.target;
    if (target) {
      const inputValue = (target as HTMLInputElement).value;
      if (inputValue === '') {
        validateHint.textContent = '';
      } else if (/^[A-Za-z0-9]+$/.test(inputValue)) {
        validateHint.textContent = '正常';
      } else {
        validateHint.textContent = '英大文字、英小文字、数字以外を入力しないでください。';
      }
    }
  })
});
inputイベント
入力の変更のたびにバリデーションを変えたいのでinputイベント。
changeイベントもあるが、フォームからフォーカスが外れたタイミングだったりでないと発火しないので今回はinputイベントが適切。
また、addEventListenerでは第二引数にEventインターフェースの引数が与えられる。
その中にtargetがあり、ここにaddEventListenerを定義した要素の型が入るのだが、ドキュメントにある通りEventTargetとなっている。このままではHTMLInputElementにあるvalueを引っ張ってこれないのでキャストしている。
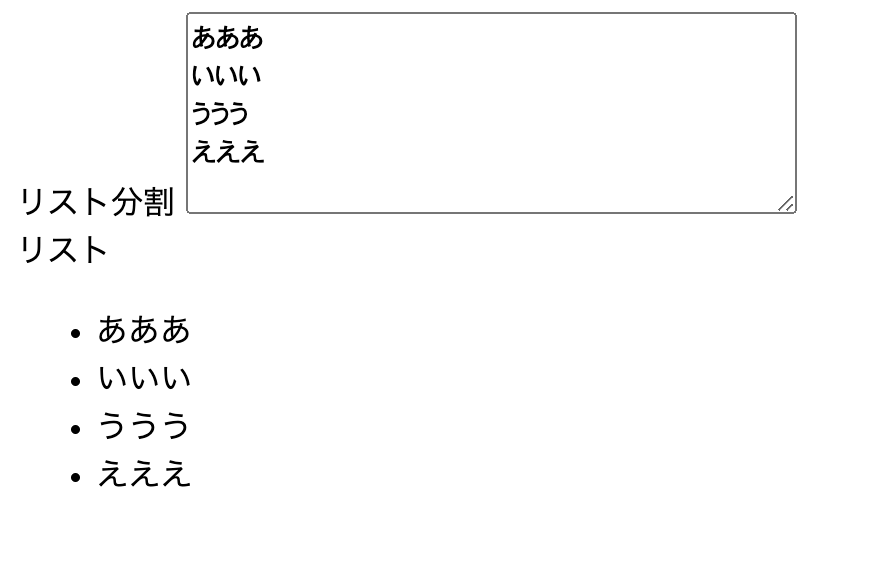
テキストエリアに改行区切りで入力されたものをリスト表示
タイトル通り。
改行区切りで文字をリスト表示する。
改行後何も入力されていなければリストに追加はしない。
HTML
<div id="main">
    <label for="multi-input-area">リスト分割</label>
    <textarea id="multi-input-area" rows="5" cols="40"> </textarea>

    <div>リスト</div>
    <ul id="list"></ul>
</div>
TypeScript
function removeAllChild(el: HTMLElement) {
  while (el.firstChild) {
    el.removeChild(el.firstChild);
  }
}

window.addEventListener('load', () => {
  const textarea = document.getElementById('multi-input-area')! as HTMLTextAreaElement;
  const listBox = document.getElementById('list')! as HTMLUListElement;
  textarea.addEventListener('input', (evt) => {
    const target = evt.target;
    if (target) {
      removeAllChild(listBox);
      (target as HTMLTextAreaElement)
        .value
        .split('\n')
        .filter((val) => val.trim())
        .forEach((val) => {
          const li = document.createElement('li');
          li.textContent = val;
          listBox.appendChild(li);
        });
    }
  })
});
-
\n: 改行コード - appendChild
removeAllChild
function removeAllChild(el: HTMLElement) {
  while (el.firstChild) {
    el.removeChild(el.firstChild);
  }
}
要素内の子要素を全て消している。
removeChildで対象子要素の削除をwhileでfirstChildが取れる限りぶん回している。
ちなみに、このfirstChildはCSSにも擬似クラスとして存在する。
入力されるたびにリストのDOMを全て作り直すのはかなり重たい処理になるため、昨今のUIフレームワークでは変更された箇所のみを書き換えるような仕組みになっている。
本来であれば本記事においてもそのような形にすべきなのだが、要素の削除について盛り込みたかったためそちらを優先した。