はじめに
Angular7のdrag and dropを触ってみたかったため、とりあえずToDoアプリで試してみました。drag and dropはCDKにて提供されおり、そちらを使用します。公式ドキュメント:https://material.angular.io/
動作環境
- Angular7
- Angular6以前の場合はupdateしてください
この記事の内容
- プロジェクトの作成
- 基本構成
- ToDo機能の実装
- まとめ
- 参考資料
プロジェクトの作成
Angular CLIでプロジェクトを作成します。
今回は最小限構成で良いのでオプションにminimalをつけます。
またアプリ名はtodo-appとします。
ng new todo-app --minimal
Angular Material CDK & Animationのインストール
npm install --save @angular/material @angular/cdk @angular/animations
ng addでAngularMaterialのセットアップ
ng add <packge>でパケージを指定し、Schematics機能でテンプレートの展開を行います。
ng add @angular/material
とりあえず起動確認
ng serve -o
基本構成
今回は小規模なアプリのため、app.component.tsとapp.component.tsに処理を直書きします。そのため、app.component.tsにOnInitを追加します。
import { Component, OnInit } from '@angular/core';
@Component({
  selector: 'app-root',
  templateUrl: './app.component.html',
  styleUrls: ['./app.component.css']
})
export class AppComponent implements OnInit {
  constructor() { }
  ngOnInit() {
  }
}
ToDo機能の実装
app.module.tsにmaterialモジュールをインポート
ついでにToDoの入力のためにReactiveFormsModuleもインポートしておきます。
import { BrowserModule } from '@angular/platform-browser';
import { NgModule } from '@angular/core';
import { AppComponent } from './app.component';

import { ReactiveFormsModule } from '@angular/forms'; // 入力フォーム用のモジュール

/* 今回使うmaterialのモジュール */
import { BrowserAnimationsModule } from '@angular/platform-browser/animations'; // 追加
import { MatButtonModule } from '@angular/material'; // 追加
import { MatInputModule } from '@angular/material/input'; // 追加
import { DragDropModule } from '@angular/cdk/drag-drop'; // 追加
import { MatCardModule } from '@angular/material/card'; // 追加

@NgModule({
  declarations: [
    AppComponent
  ],
  imports: [
    BrowserModule,
    BrowserAnimationsModule,
    MatButtonModule,
    MatInputModule,
    ReactiveFormsModule,
    MatCardModule,
    DragDropModule,
  ],
  providers: [],
  bootstrap: [AppComponent]
})
export class AppModule { }
todoリストの入力欄を作成します
app.component.html内を下記のソースコードに置き換えます。
<div>
  <form class="example-form" [formGroup]="myForm">
    <mat-form-field class="example-full-width">
      <input formControlName="title" matInput placeholder="title">
    </mat-form-field>

    <mat-form-field class="example-full-width">
      <textarea formControlName="description" matInput placeholder="description"></textarea>
    </mat-form-field>
    <button mat-raised-button color="primary">登録</button>
  </form>
</div>
app.component.tsに入力フォームの処理を記述します。
import { Component, OnInit } from '@angular/core';
import { FormBuilder, FormGroup, Validators } from '@angular/forms';

@Component({
  selector: 'app-root',
  templateUrl: './app.component.html',
  styleUrls: ['./app.component.css']
})
export class AppComponent implements OnInit {
  constructor(private formBuilder: FormBuilder, ) { }
  myForm: FormGroup;
  todo = [];
  done = [];
  ngOnInit() {
    this.myForm = this.formBuilder.group({
      title: ['', [Validators.required]],
      description: ['', [Validators.required]]
    });
  }
  taskRegist() {
    console.log(this.myForm.value);
    this.todo.push({
      title: this.myForm.controls.title.value,
      description: this.myForm.controls.description.value,
    });
  }
}
ここまでの結果をアプリを起動し確認します。
ng serve -o
 これで入力欄はできました。
ここまで完了したら次はDrag and Dropで入力欄を自由に動かせるようにします。
Drag and Dropを使用し入力フォームを自由に動かせるようにする
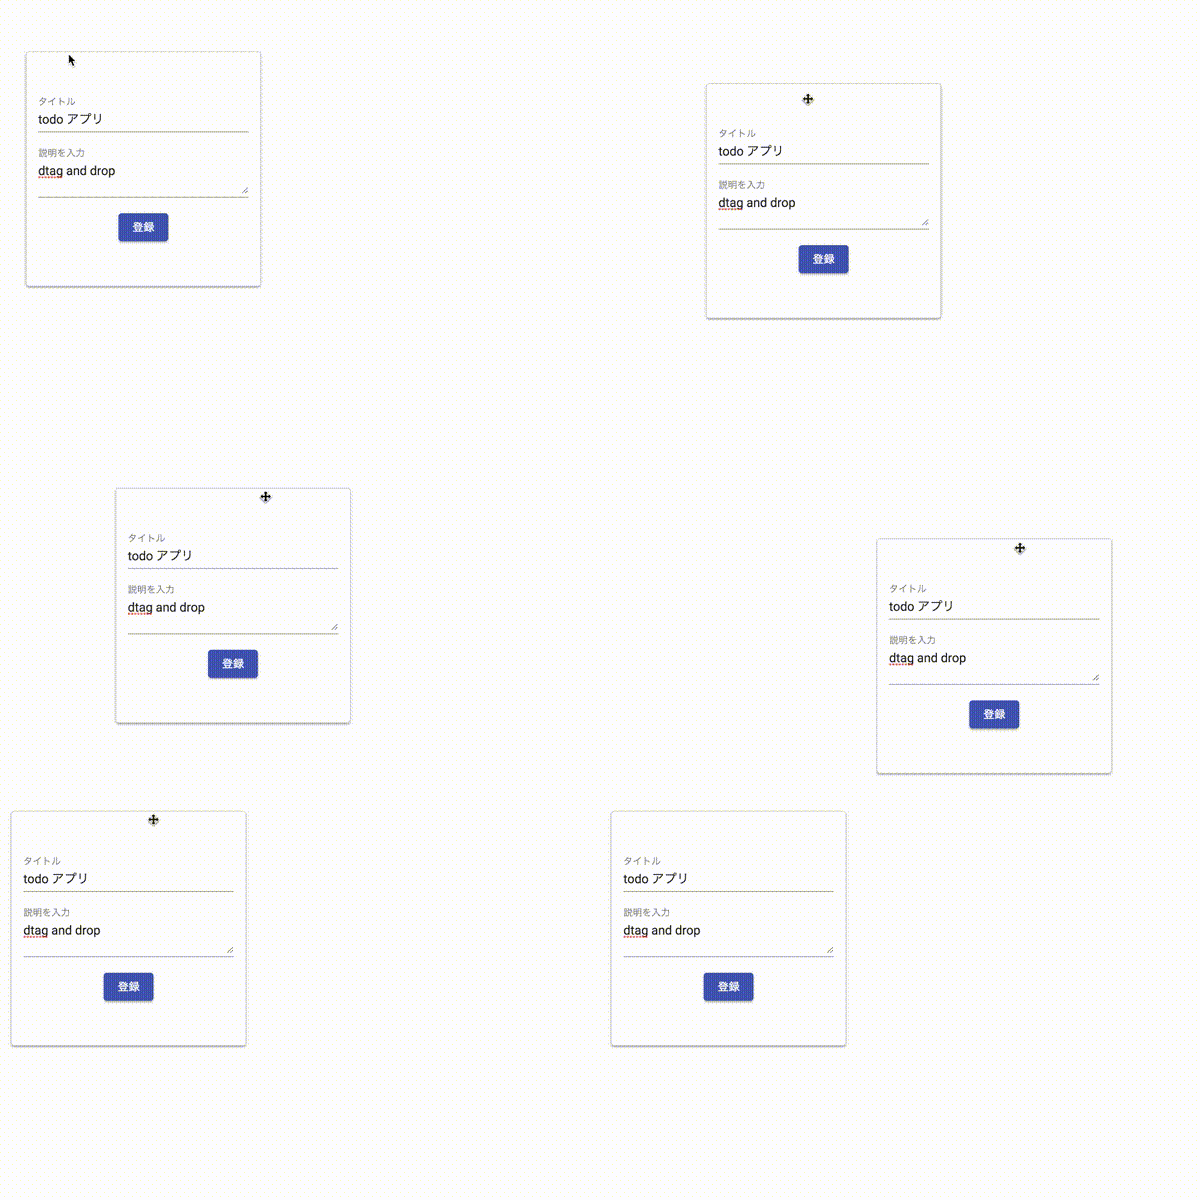
先程作成した入力フォームをcdkDragディレクティブが付加されたdivで囲みます。これだけで、入力フォームが画面内を自由に動かせるようになります。
<div class="input-box" cdkDrag> <!-- ←追加部分 -->
    <form class="input-form" [formGroup]="myForm">
      <mat-form-field class="example-full-width">
        <input formControlName="title" matInput placeholder="タイトル">
      </mat-form-field>

      <mat-form-field class="example-full-width">
        <textarea formControlName="description" matInput placeholder="説明を入力"></textarea>
      </mat-form-field>
      <button mat-raised-button color="primary" (click)="taskRegist()" [disabled]="myForm.invalid">登録</button>
    </form>
</div> <!-- ←追加部分 -->
- ドラッグを可能にするには
cdkDragディレクティブをタグに追加します。これだけでドラッグすることができます。 -
cdkDragディレクティブのみ付加した場合はページ内を自由に動かすことができます。
デザインを整えたら実行します。
cssはAngular Materialの公式ドキュメントを参考にしました。
.input-form {
    min-width: 300px;
    max-width: 300px;
    width: 90%;
  }

.example-full-width {
    width: 90%;
}
.input-box {
    width: 300px;
    height: 300px;
    border: solid 1px #ccc;
    color: rgba(0, 0, 0, 0.87);
    cursor: move;
    display: flex;
    justify-content: center;
    align-items: center;
    text-align: center;
    background: #fff;
    border-radius: 4px;
    position: relative;
    z-index: 1;
    transition: box-shadow 200ms cubic-bezier(0, 0, 0.2, 1);
    box-shadow: 0 3px 1px -2px rgba(0, 0, 0, 0.2),
                0 2px 2px 0 rgba(0, 0, 0, 0.14),
                0 1px 5px 0 rgba(0, 0, 0, 0.12);
  }
アプリを起動し確認
ng serve -o
入力フォームがドラッグできるのを確認できると思います。
todoリストを作成する
先ほど作成した入力フォームの下に追加します
<div class="example-container">
  <h2>やること</h2>

  <div cdkDropList #todoList="cdkDropList" [cdkDropListData]="todo" [cdkDropListConnectedTo]="[doneList]" class="example-list"
    (cdkDropListDropped)="drop($event)">
    <div class="example-box" [cdkDragData]="item" *ngFor="let item of todo" cdkDrag>
      {{item.title}}
      <div *cdkDragPreview>
        <mat-card class="example-card">
          <mat-card-content>
            <div>{{item.title}}</div>
            <hr>
            <p>{{item.description}}</p>
          </mat-card-content>
        </mat-card>
      </div>
    </div>
  </div>
</div>

<div class="example-container">
  <h2>完了</h2>
  <div cdkDropList #doneList="cdkDropList" [cdkDropListData]="done" [cdkDropListConnectedTo]="[todoList]" class="example-list"
    (cdkDropListDropped)="drop($event)">
    <div class="example-box" [cdkDragData]="item" *ngFor="let item of done" cdkDrag>{{item.title}}</div>
  </div>
</div>
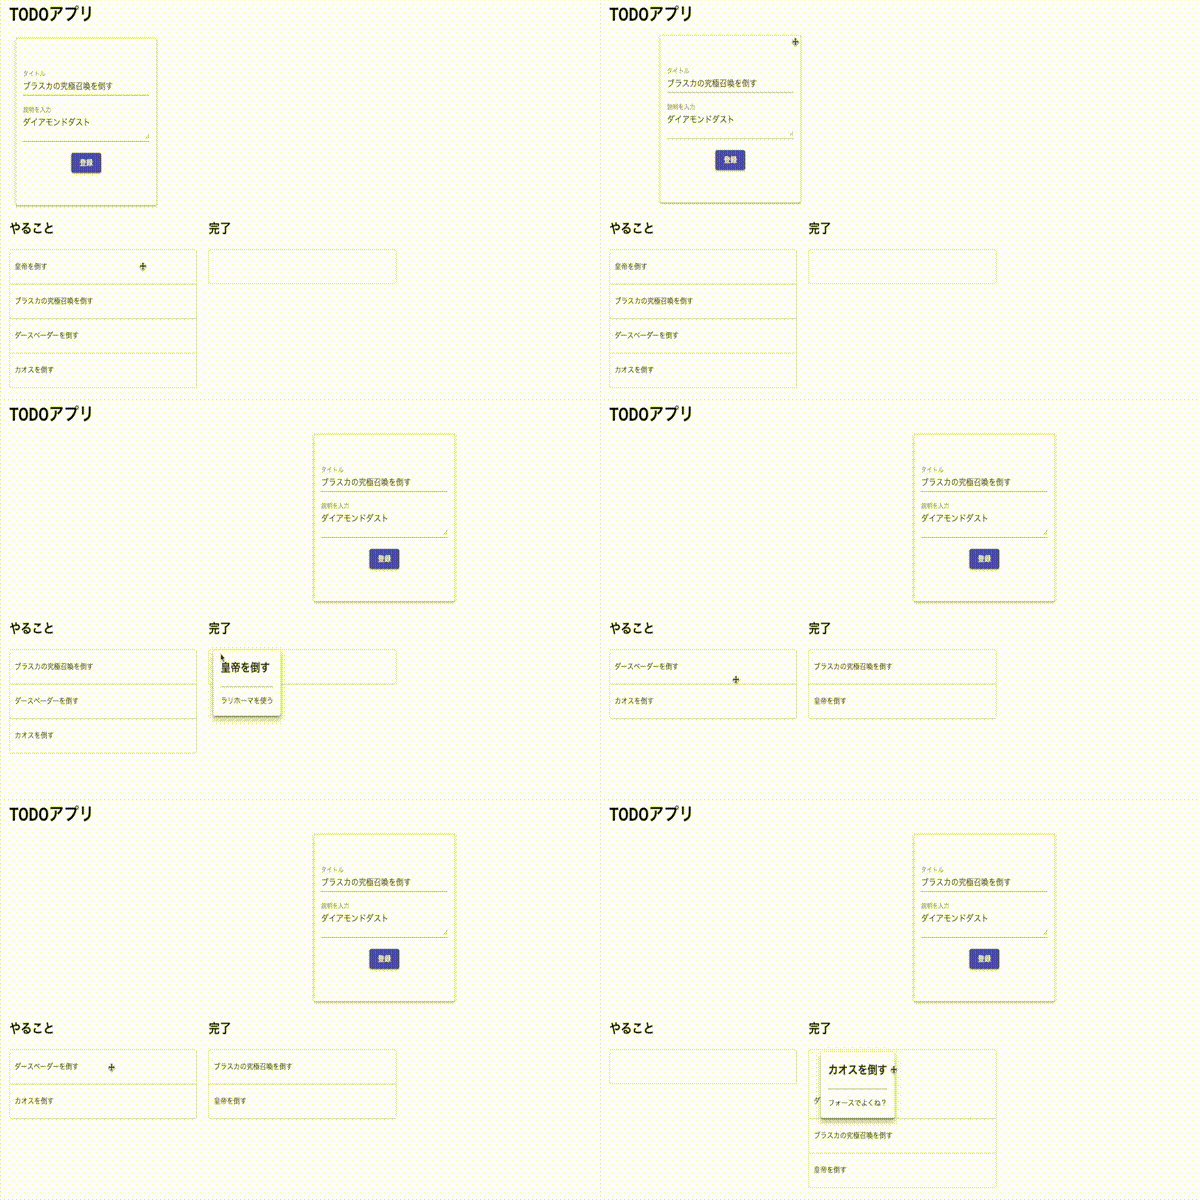
入力フォームは画面内を自由に動かせるようにしましたが、ToDoリストは整列させたいです。そこでcdkDropListを使用します。
cdkDropListはドロップする場所を制限することができます。これによりcdkDropList内の要素は自動で整列されます。
# <id名>="cdkDropList"
今回は他にもcdkDropListDataやcdkDropListDropped、cdkDropListConnectedToを使用しています。
-
cdkDragData 、cdkDropListData
cdkDragDataに値を設定することで要素にデータをもたせることができます。
今回のアプリの場合はdropイベントのevent.item.dataでデータにアクセスできます。
またデータを指定することで、ドロップ操作の発生元を特定するのに役立ちます。 -
cdkDropListDropped
ユーザーがドラッグを終了するとイベントが発生しデータモデルを更新します。またドラッグ中はデータモデルを更新しません。 -
cdkDropListConnectedTo
[cdkDropListConnectedTo]="[id名]"でドロップ先のコンテナを設定できます。ドロップ先を制限したいときに使用する感じですね。
またcdkDropListGroup配下でcdkDropListConnectedToを設定しない場合は好きなコンテナにドロップすることができます。 -
cdkDragPreview
cdkDragPreviewを付加することでドラッグ時のプレビューを作成することができます。
app.component.tsにメソッドを追加します
import { Component, OnInit } from '@angular/core';
import { FormBuilder, FormGroup, Validators } from '@angular/forms';
import { CdkDragDrop, moveItemInArray, transferArrayItem } from '@angular/cdk/drag-drop'; // <------------追加
@Component({
  selector: 'app-root',
  templateUrl: './app.component.html',
  styleUrls: ['./app.component.css']
})
export class AppComponent implements OnInit {
  constructor(private formBuilder: FormBuilder, ) { }
  todo = [];
  done = [];
  myForm: FormGroup;

  ngOnInit() {
    this.myForm = this.formBuilder.group({
      title: ['', [Validators.required]],
      description: ['', [Validators.required]]
    });
  }
/*--------------以下追加分----------------------*/
/*
 * ドロップしたcdkDropListが同じなら場所を入れ替えます
 * cdkDropListが違う場合はアイテムを移します
 */
  drop(event: CdkDragDrop<string[]>) {
    if (event.previousContainer === event.container) {
      moveItemInArray(event.container.data, event.previousIndex, event.currentIndex);
    } else {
      transferArrayItem(event.previousContainer.data,
        event.container.data,
        event.previousIndex,
        event.currentIndex);
    }
  }
/*--------------------------------------*/

/*タスク登録用のメソッド*/
  taskRegist() {
    console.log(this.myForm.value);
    this.todo.push({
      title: this.myForm.controls.title.value,
      description: this.myForm.controls.description.value,
    });
  }

}
-
moveItemInArray
同じコンテナ内で要素の場所を入れ替えるメソッドです -
transferArrayItem
ターゲットのコンテナに要素を移動するメソッドです -
copyArrayItem
今回は使用していませんが、ターゲットのコンテナに要素をコピーするメソッドもあるそうです
ここまでで、機能の実装は完了しました。あとはレイアウトを整えます。
先程作成したcssに追記します。
.example-card {
  max-width: 400px;
}
.example-container {
    width: 400px;
    max-width: 100%;
    margin: 0 25px 25px 0;
    display: inline-block;
    vertical-align: top;
  }

  .example-list {
    border: solid 1px #ccc;
    min-height: 60px;
    background: white;
    border-radius: 4px;
    overflow: hidden;
    display: block;
  }

  .example-box {
    padding: 20px 10px;
    border-bottom: solid 1px #ccc;
    color: rgba(0, 0, 0, 0.87);
    display: flex;
    flex-direction: row;
    align-items: center;
    justify-content: space-between;
    box-sizing: border-box;
    cursor: move;
    background: white;
    font-size: 14px;
  }

  .cdk-drag-preview {
    box-sizing: border-box;
    border-radius: 4px;
    box-shadow: 0 5px 5px -3px rgba(0, 0, 0, 0.2),
                0 8px 10px 1px rgba(0, 0, 0, 0.14),
                0 3px 14px 2px rgba(0, 0, 0, 0.12);
  }

  .cdk-drag-placeholder {
    opacity: 0;
  }

  .cdk-drag-animating {
    transition: transform 250ms cubic-bezier(0, 0, 0.2, 1);
  }

  .example-box:last-child {
    border: none;
  }

  .example-list.cdk-drop-list-dragging .example-box:not(.cdk-drag-placeholder) {
    transition: transform 250ms cubic-bezier(0, 0, 0.2, 1);
  }
アプリを起動し確認
ng serve -o
まとめ
思ったより簡単にdrag and dropの機能を実装でき驚きました。
Anguler7へのバージョンアップで他にも機能が追加されているので、そちらも触ってみたいと思います。
最後まで読んでいただき、ありがとうございました。


