はじめに
Linux で動作する仮想マシン環境 Xen は FreeBSD でも使用できます
本記事では、FreeBSD に Xen をインストールするところまでと、その際に遭遇した問題と対応方法に関して記述します。
FreeBSD のインストールとデスクトップ環境の設定
FreeBSD のインストール手順に関してはインストール手順 を参照してください。
FreeBSD に Desktop 環境を用意しなくても Xen による仮想マシン環境は使用可能です。
Windows などの Desktop 環境を使用する場合には、FreeBSD にも Desktop 環境をインストールしなければなりません。その際は、デスクトップ環境の設定 を参照してください。
注意事項
FreeBSD で Xen を使用するには UEFI の設定の 確認・変更 という作業が必要になることがあります。UEFI の設定操作に慣れていない方は、周りにいる有識者に指導していただくあるいは事前に UEFI に関する情報を調べた上で設定の 確認・変更 を行ってください。
参考文献
使用する PC の仕様
参考のため、使用している PC の仕様を記述しておきます。
MOUSE COUMPUTER AG400XN-M2S5
- FreeBSD 14.0 をインストール
- AMD Ryzen 7 3700X (8 cores, 16 Threads, 3.6 GHz)
- Memory 32 GiB
- HDD TOSHIBA DT01ACA2 (1863 GB)
MOUSE COMPUTER iH700XN
- FreeBSD 13.2 をインストール
- Intel Core i7-8700 (6 cores, 12 Threads, 3.2 GHz)
- Memory 48 GiB
- SSD AGI AGILITY AI178 480 (480 GB)
Xen のインストール
FreeBSD で Xen を使用するには、まずバイナリーパッケージから Xen をインストールします。
スーパーユーザー権限 (ユーザー名: root) で以下のコマンドを実行してください。
- ports あるいはバイナリーパッケージから sudo コマンドあるいは doas コマンドをインストールしている場合には、sudo あるいは doas を使用しても構いません。
- 「sudo あるいは doas を使用しても構いません。」というよりは、sudo コマンドあるいは doas コマンドのように、一般ユーザー権限で一時的にスーパーユーザー権限でコマンドを実行できるツールを使用するという運用形態が推奨されていると思います。
# pkg install -y xen-kernel xen-tools
コマンドを実行すると、以下のような情報が表示されると思います。
We trust you have received the usual lecture from the local System
Administrator. It usually boils down to these three things:

    #1) Respect the privacy of others.
    #2) Think before you type.
    #3) With great power comes great responsibility.

For security reasons, the password you type will not be visible.

Password:
Updating FreeBSD repository catalogue...
FreeBSD repository is up to date.
All repositories are up to date.
The following 10 package(s) will be affected (of 0 checked):

New packages to be INSTALLED:
        argp-standalone: 1.5.0
        edk2-xen-x64: g202308_4
        glib: 2.78.3,2
        libxml2: 2.10.4_1
        lzo2: 2.10_1
        pixman: 0.42.2
        seabios: 1.16.1_1
        xen-kernel: 4.17.0_1
        xen-tools: 4.17.0_1
        yajl: 2.1.0

Number of packages to be installed: 10

The process will require 386 MiB more space.
42 MiB to be downloaded.
[1/10] Fetching edk2-xen-x64-g202308_4.pkg: 100%  978 KiB   1.0MB/s    00:01
[2/10] Fetching libxml2-2.10.4_1.pkg: 100%    1 MiB   1.2MB/s    00:01
[3/10] Fetching xen-kernel-4.17.0_1.pkg: 100%    1 MiB   1.1MB/s    00:01
[4/10] Fetching pixman-0.42.2.pkg: 100%  329 KiB 336.4kB/s    00:01
[5/10] Fetching yajl-2.1.0.pkg: 100%   59 KiB  60.4kB/s    00:01
[6/10] Fetching glib-2.78.3,2.pkg: 100%    3 MiB   3.6MB/s    00:01
[7/10] Fetching lzo2-2.10_1.pkg: 100%  113 KiB 115.8kB/s    00:01
[8/10] Fetching argp-standalone-1.5.0.pkg: 100%   30 KiB  30.6kB/s    00:01
[9/10] Fetching xen-tools-4.17.0_1.pkg: 100%   35 MiB   9.2MB/s    00:04
[10/10] Fetching seabios-1.16.1_1.pkg: 100%   97 KiB  99.6kB/s    00:01
Checking integrity... done (0 conflicting)
[1/10] Installing libxml2-2.10.4_1...
[1/10] Extracting libxml2-2.10.4_1: 100%
[2/10] Installing edk2-xen-x64-g202308_4...
[2/10] Extracting edk2-xen-x64-g202308_4: 100%
[3/10] Installing pixman-0.42.2...
[3/10] Extracting pixman-0.42.2: 100%
[4/10] Installing yajl-2.1.0...
[4/10] Extracting yajl-2.1.0: 100%
[5/10] Installing glib-2.78.3,2...
[5/10] Extracting glib-2.78.3,2: 100%
[6/10] Installing lzo2-2.10_1...
[6/10] Extracting lzo2-2.10_1: 100%
[7/10] Installing argp-standalone-1.5.0...
[7/10] Extracting argp-standalone-1.5.0: 100%
[8/10] Installing seabios-1.16.1_1...
[8/10] Extracting seabios-1.16.1_1: 100%
[9/10] Installing xen-kernel-4.17.0_1...
[9/10] Extracting xen-kernel-4.17.0_1: 100%
[10/10] Installing xen-tools-4.17.0_1...
[10/10] Extracting xen-tools-4.17.0_1: 100%
==> Running trigger: gio-modules.ucl
Generating GIO modules cache
==> Running trigger: glib-schemas.ucl
Compiling glib schemas
No schema files found: doing nothing.
=====
Message from xen-kernel-4.17.0_1:

--
Please add the following entries in order to boot the xen kernel

In /etc/sysctl.conf:
        vm.max_wired=-1

Or if running FreeBSD 13 or newer:
        vm.max_user_wired=-1

In /etc/ttys:
        xc0     "/usr/libexec/getty Pc"         xterm   onifconsole  secure

In /boot/loader.conf for a dom0 with 2G memory and 4 vcpus:
        xen_kernel="/boot/xen"
        xen_cmdline="dom0_mem=2048M dom0_max_vcpus=4 dom0=pvh com1=115200,8n1 guest_loglvl=all loglvl=all"

Add to the above xen_cmdline in order to activate the serial console:
        console=vga,com1

Note that you will have to enable multicons on FreeBSD if you want to get
output on both the serial and the VGA consoles. The following should be added
to /boot/loader.conf in that case:
        boot_multicons="YES"
        boot_serial="YES"
        console="comconsole,vidconsole"
上記の pkg install コマンドを実行した時に表示された情報に従って、各設定ファイルに Xen で必要な設定を追加します。以下のコマンドは、すべてユーパーユーザー権限で実行してください。
- 以下の各コマンドの実行例の行頭に表示されている "# " は、スーパーユーザーのプロンプトを示すものなので、コマンド実行時に "# " は入力しないでください。
/etc/rc.conf
# echo 'xencommons_enable="YES"' >> /etc/rc.conf
# echo 'cloned_interfaces="bridge0"' >> /etc/rc.conf
# echo 'ifconfig_bridge0="addm bge0 SYNCDHCP"' >> /etc/rc.conf
# echo 'ifconfig_bge0="up"' >> /etc/rc.conf
この /etc/rc.conf への設定の追加は、上記の Xen のインストール時には表示されないのですが忘れずに追加しておいてください。
/etc/sysctl.conf
FreeBSD 13 よりも古いバージョンを使用している場合:
# echo "vm.max_wired=-1" >> /etc/sysctl.conf
FreeBSD 13.0 以降のバージョンを使用している場合。
# echo "vm.max_user_wired=-1" >> /etc/sysctl.conf
/etc/ttys
以下のコマンドを実行して、
# grep ^xc0 /etc/ttys
以下のように「xc0」から始まる文字列が表示されていればすでに必要な設定が追加されているので、何もする必要はありません。
- FreeBSD 13.x 以降では、/etc/ttys に以下の行が追加されるようになっているようです。
xc0 "/usr/libexec/getty Pc" xterm onifconsole secure
表示されなかった場合には、以下のコマンドを実行して設定を追加してください。
# echo "xc0 "/usr/libexec/getty Pc" xterm onifconsole secure" >> /etc/ttys
/boot/loader.conf
(echo 'xen_kernel="/boot/xen"'; echo 'xen_cmdline="dom0_mem=2048M dom0_max_vcpus=4 dom0=pvh com1=115200,8n1 guest_loglvl=all loglvl=all"') > /boot/loader.conf
上記の設定では、Xen の dom0 に「4 つの仮想 CPU と 2048MiB のメモリーを割り当てる」という意味になります。
- dom0 に関しては、Xen (仮想化ソフトウェア) などを参照してください。
以上で FreeBSD で Xen を使用する環境を用意できたので、スーパーユーザー権限で以下のコマンドを実行し、FreeBSD を再起動してください。
# shutdown -r now
無事 FreeBSD が再起動できれば、Xen のインストールは成功しています。
bridge インターフェースの確認
pkg install の直後に /etc/rc.conf に追加した bridge0 インターフェースが正しく作成されていることを確認するために、以下のコマンドを実行し bridge0 インターフェースが正しく設定されていることを確認してください。
$ ifconfig bridge0
bridge0: flags=1008843<UP,BROADCAST,RUNNING,SIMPLEX,MULTICAST,LOWER_UP> metric 0 mtu 1500
        options=0
        ether 58:9c:fc:10:ff:e4
        id 00:00:00:00:00:00 priority 32768 hellotime 2 fwddelay 15
        maxage 20 holdcnt 6 proto rstp maxaddr 2000 timeout 1200
        root id 00:00:00:00:00:00 priority 32768 ifcost 0 port 0
        groups: bridge
        nd6 options=9<PERFORMNUD,IFDISABLED>
$
トラブルシューティング
今回 FreeBSD に Xen をインストールして遭遇した問題を記載しておきます。
iommu must be enabled
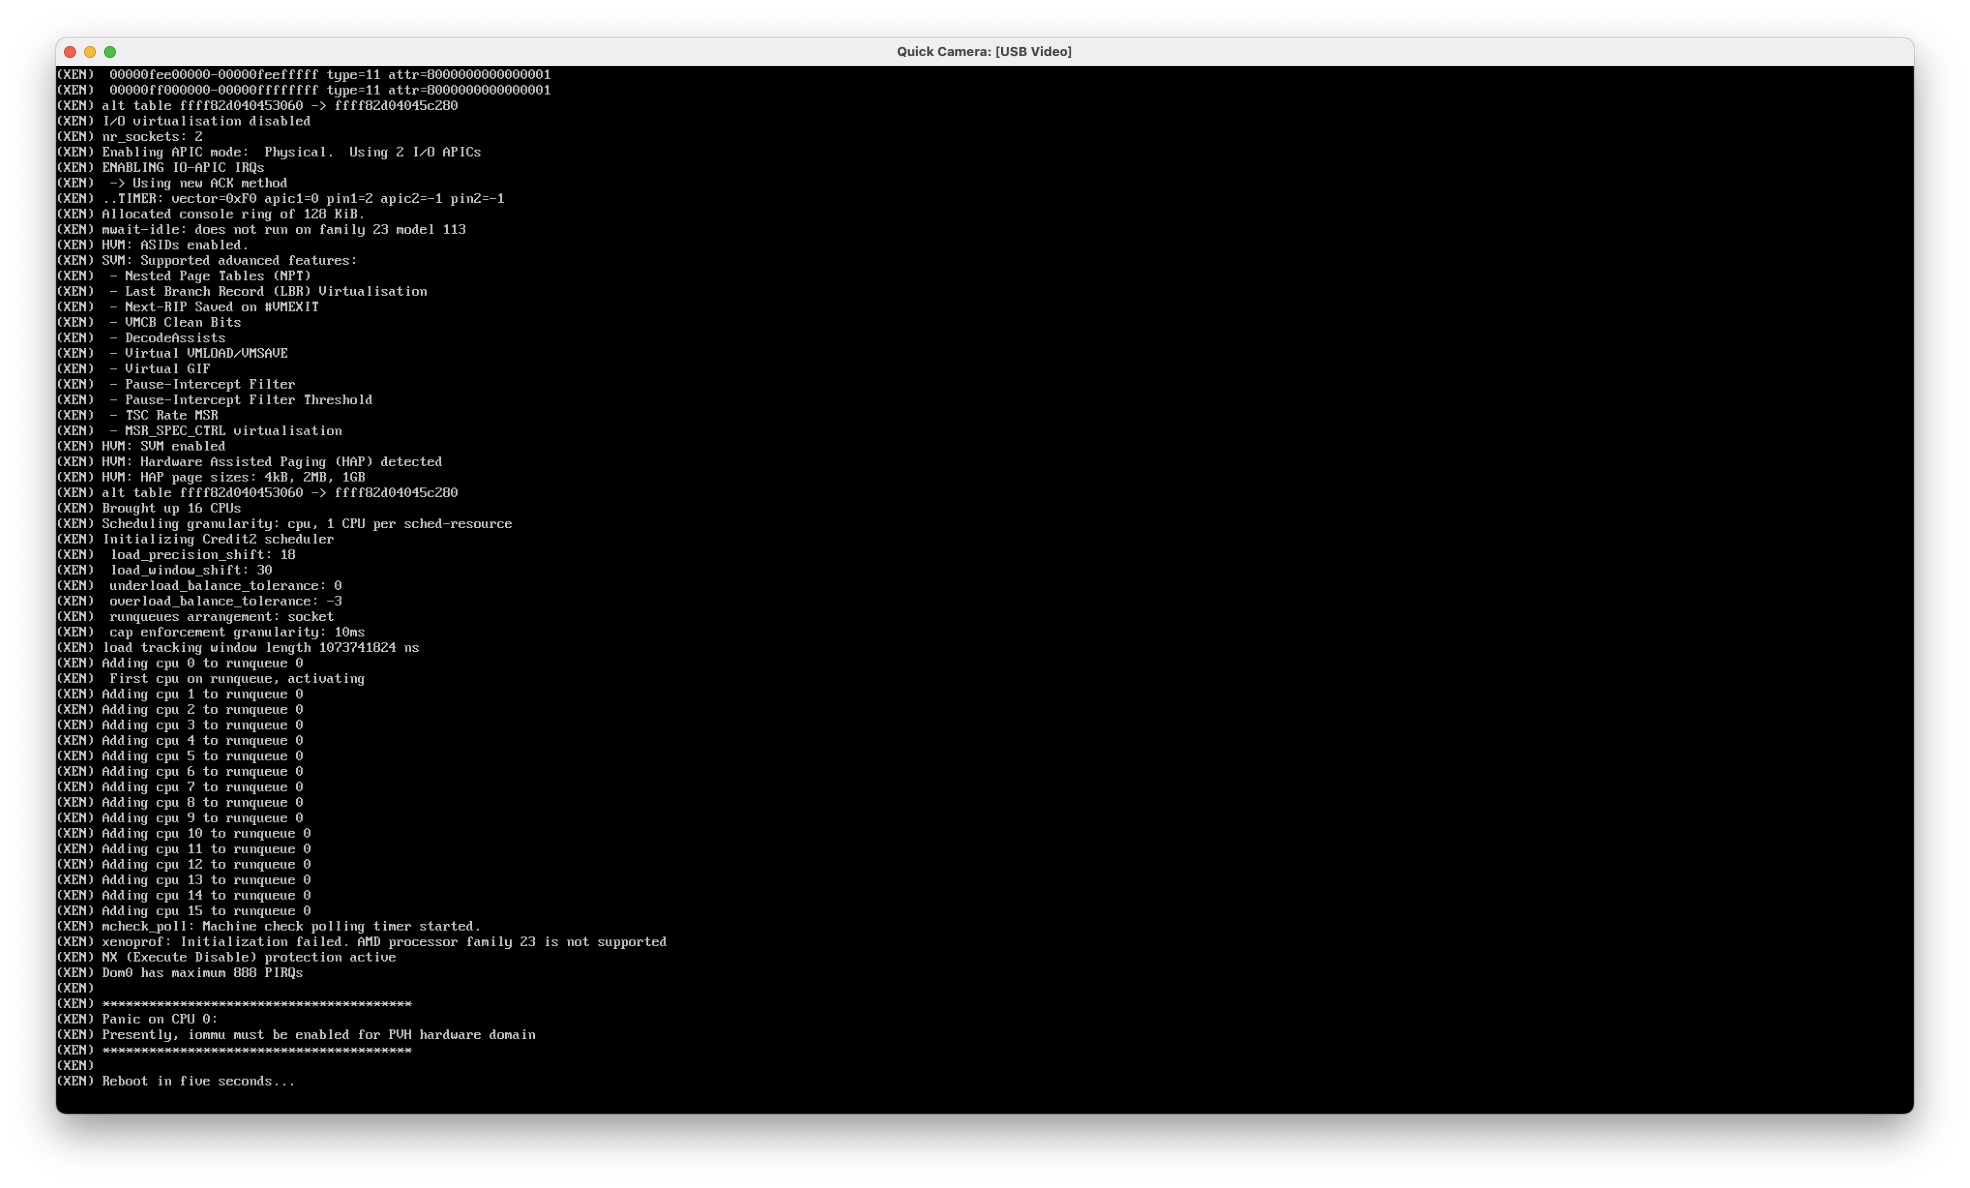
AG400XN-M2S5 に FreeBSD 14.0-RELEASE および Xen をインストールした後に FreeBSD を再起動すると、コンソールに Xen の起動中を示すメッセージが表示されますがすぐに PC が再起動してしまいました。コンソールをよくみていると、以下のように「iommu must be enabled for PVH hardware domain」と表示され数秒後に再起動してしまいます。
解決方法
PC を再起動した際に UEFI の設定を確認したところ、以下のように「IOMMU」の設定が「Disable」になっていたので、これを「Enable」に変更し設定を保存して PC を再起動したところ FreeBSD を起動できました。

なお、UEFI で「IOMMU」を「Enable」に変更して PC を再起動すると、Xen の起動画面に以下のように「*** Building a PVH Dom0 ***」と表示された後に FreeBSD の起動画面が表示されます。
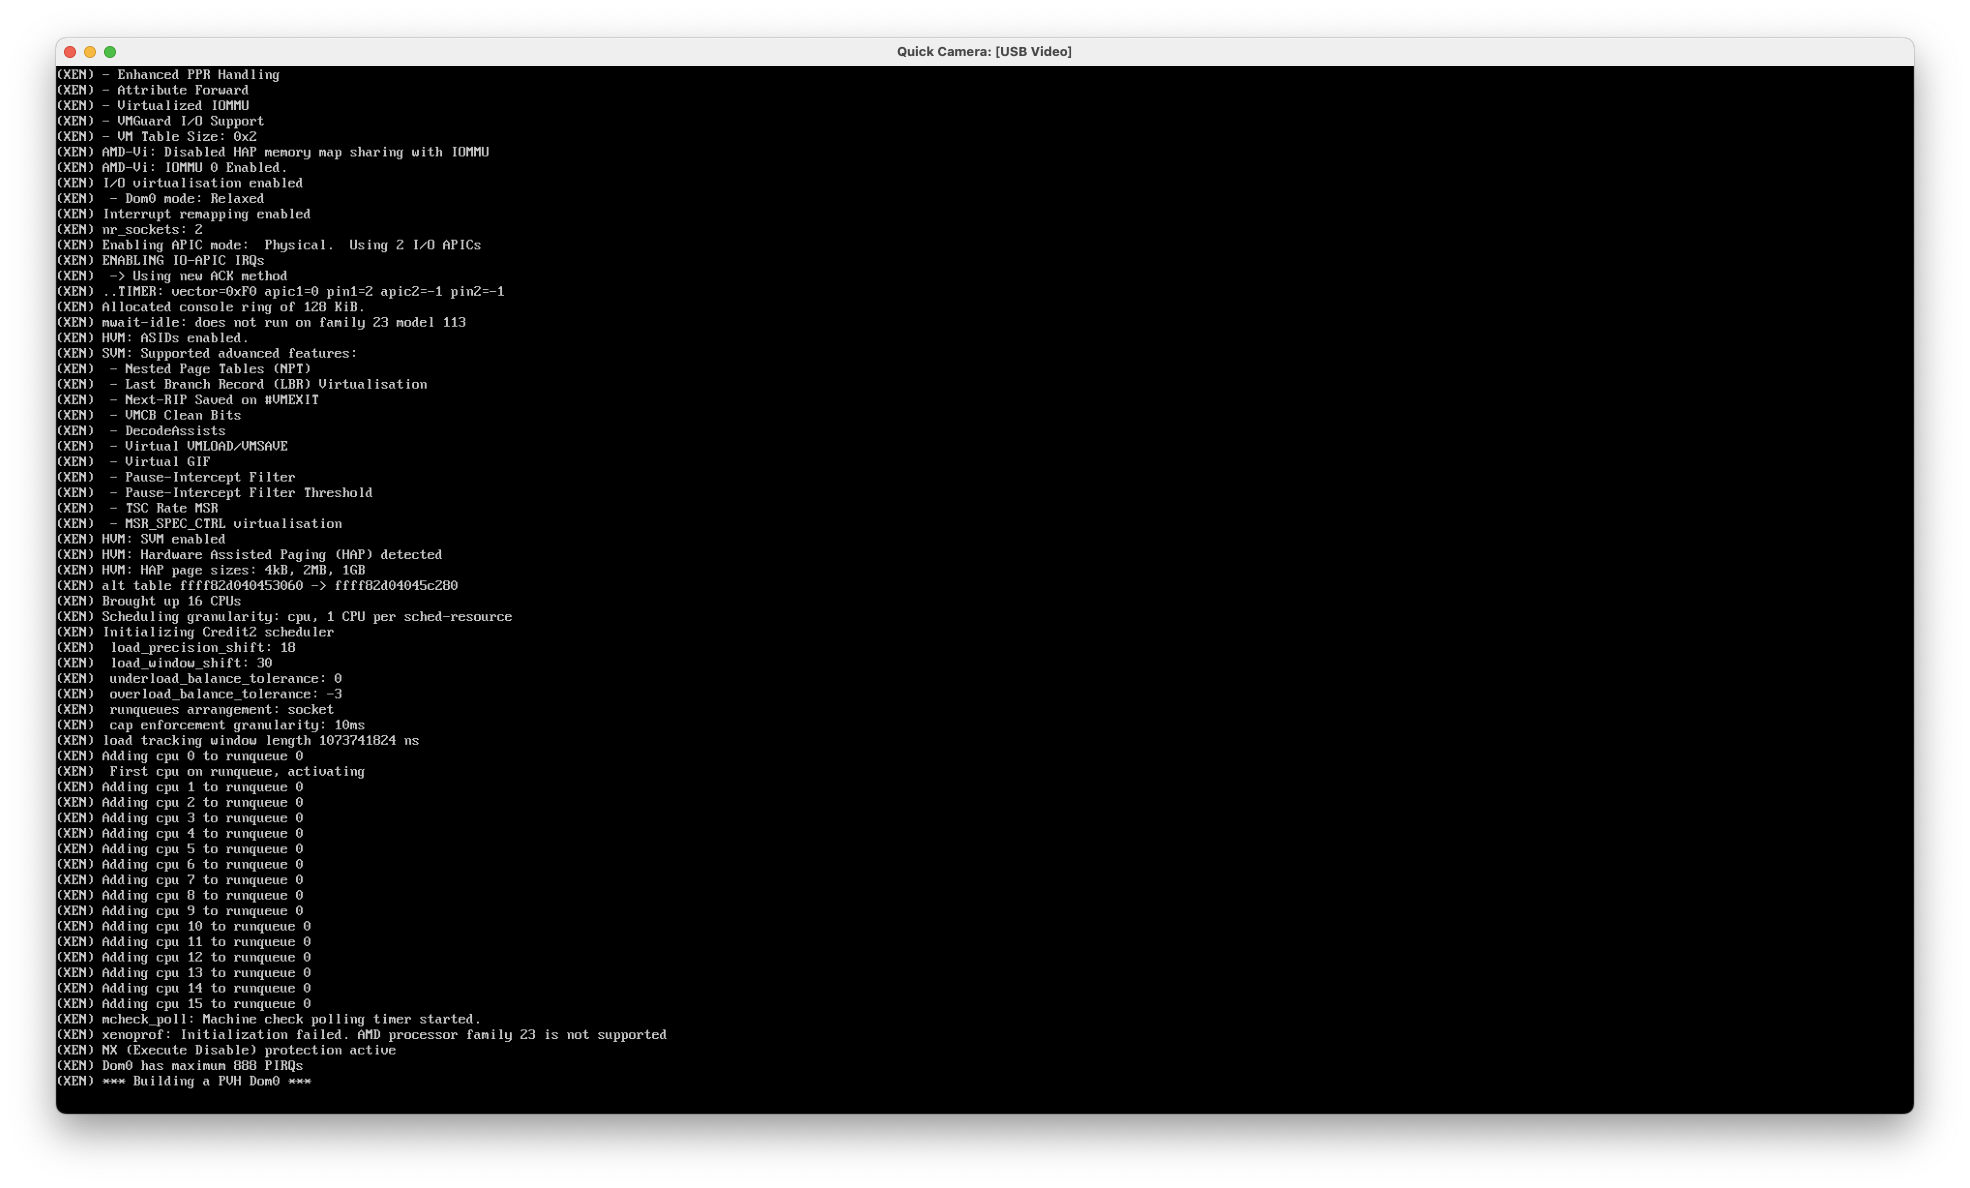
この「*** Building a PVH Dom0 ***」の表示後にすぐに FreeBSD の起動画面に切り替わってしまうので、注意して見ていないと見落としてしまうかもしれません。
cannot connect to xenstore
Xen をインストールして FreeBSD を再起動し FreeBSD にログインできるようになった状態で、FreeBSD が Xen の dom0 として動作していることを確認するためスーパーユーザー権限で xl list コマンドを実行したところ、以下のように「cannot connect to xenstore」と表示され、xl コマンドがエラー終了してしまいました。
# xl list
libxl: error: libxl.c:108:libxl_ctx_alloc: cannot connect to xenstore: No such file or directory
cannot init xl context
#
解決方法
Xen をインストールした後に /etc/rc.conf に以下の設定を追加するべきだったのですが、これをやり忘れていたので追加して FreeBSD を再起動する。
# echo 'xencommons_enable="YES"' >> /etc/rc.conf
なお、この時 dmesg | grep -i xen で確認したところ、以下の出力を得ました。
$ dmesg | grep -i xen
XEN: Hypervisor version 4.17 detected.
Hypervisor: Origin = "XenVMMXenVMM"
xenpv0: <Xen PV bus>
granttable0: <Xen Grant-table Device> on xenpv0
xen_et0: <Xen PV Clock> on xenpv0
Event timer "XENTIMER" frequency 1000000000 Hz quality 950
Timecounter "XENTIMER" frequency 1000000000 Hz quality 950
xen_et0: registered as a time-of-day clock, resolution 0.000001s
xenstore0: <XenStore> on xenpv0
xsd_dev0: <Xenstored user-space device> on xenpv0
evtchn0: <Xen event channel user-space device> on xenpv0
privcmd0: <Xen privileged interface user-space device> on xenpv0
gntdev0: <Xen grant-table user-space device> on xenpv0
debug0: <Xen debug handler> on xenpv0
上記の設定を /etc/rc.conf に追加して FreeBSD を再起動した後に確認すると、以下のように Domain-0 の情報が表示されます。
# xl list
Name                                        ID   Mem VCPUs	State	Time(s)
Domain-0                                     0  2047     4     r-----       5.1
#
なお、この状態で dmesg | grep -i xen コマンドを実行して確認したところ、最後の五行に先ほどは表示されていなかった行「xenballoon0:…」〜「xenbusb_back0:…」が表示されていました。
$ dmesg | grep -i xen
XEN: Hypervisor version 4.17 detected.
Hypervisor: Origin = "XenVMMXenVMM"
xenpv0: <Xen PV bus>
granttable0: <Xen Grant-table Device> on xenpv0
xen_et0: <Xen PV Clock> on xenpv0
Event timer "XENTIMER" frequency 1000000000 Hz quality 950
Timecounter "XENTIMER" frequency 1000000000 Hz quality 950
xen_et0: registered as a time-of-day clock, resolution 0.000001s
xenstore0: <XenStore> on xenpv0
xsd_dev0: <Xenstored user-space device> on xenpv0
evtchn0: <Xen event channel user-space device> on xenpv0
privcmd0: <Xen privileged interface user-space device> on xenpv0
gntdev0: <Xen grant-table user-space device> on xenpv0
debug0: <Xen debug handler> on xenpv0
xenballoon0: <Xen Balloon Device> on xenstore0
xctrl0: <Xen Control Device> on xenstore0
xs_dev0: <Xenstore user-space device> on xenstore0
xenbusb_front0: <Xen Frontend Devices> on xenstore0
xenbusb_back0: <Xen Backend Devices> on xenstore0
$
vulnerable hardware with SMT/Hyperthreading enabled.
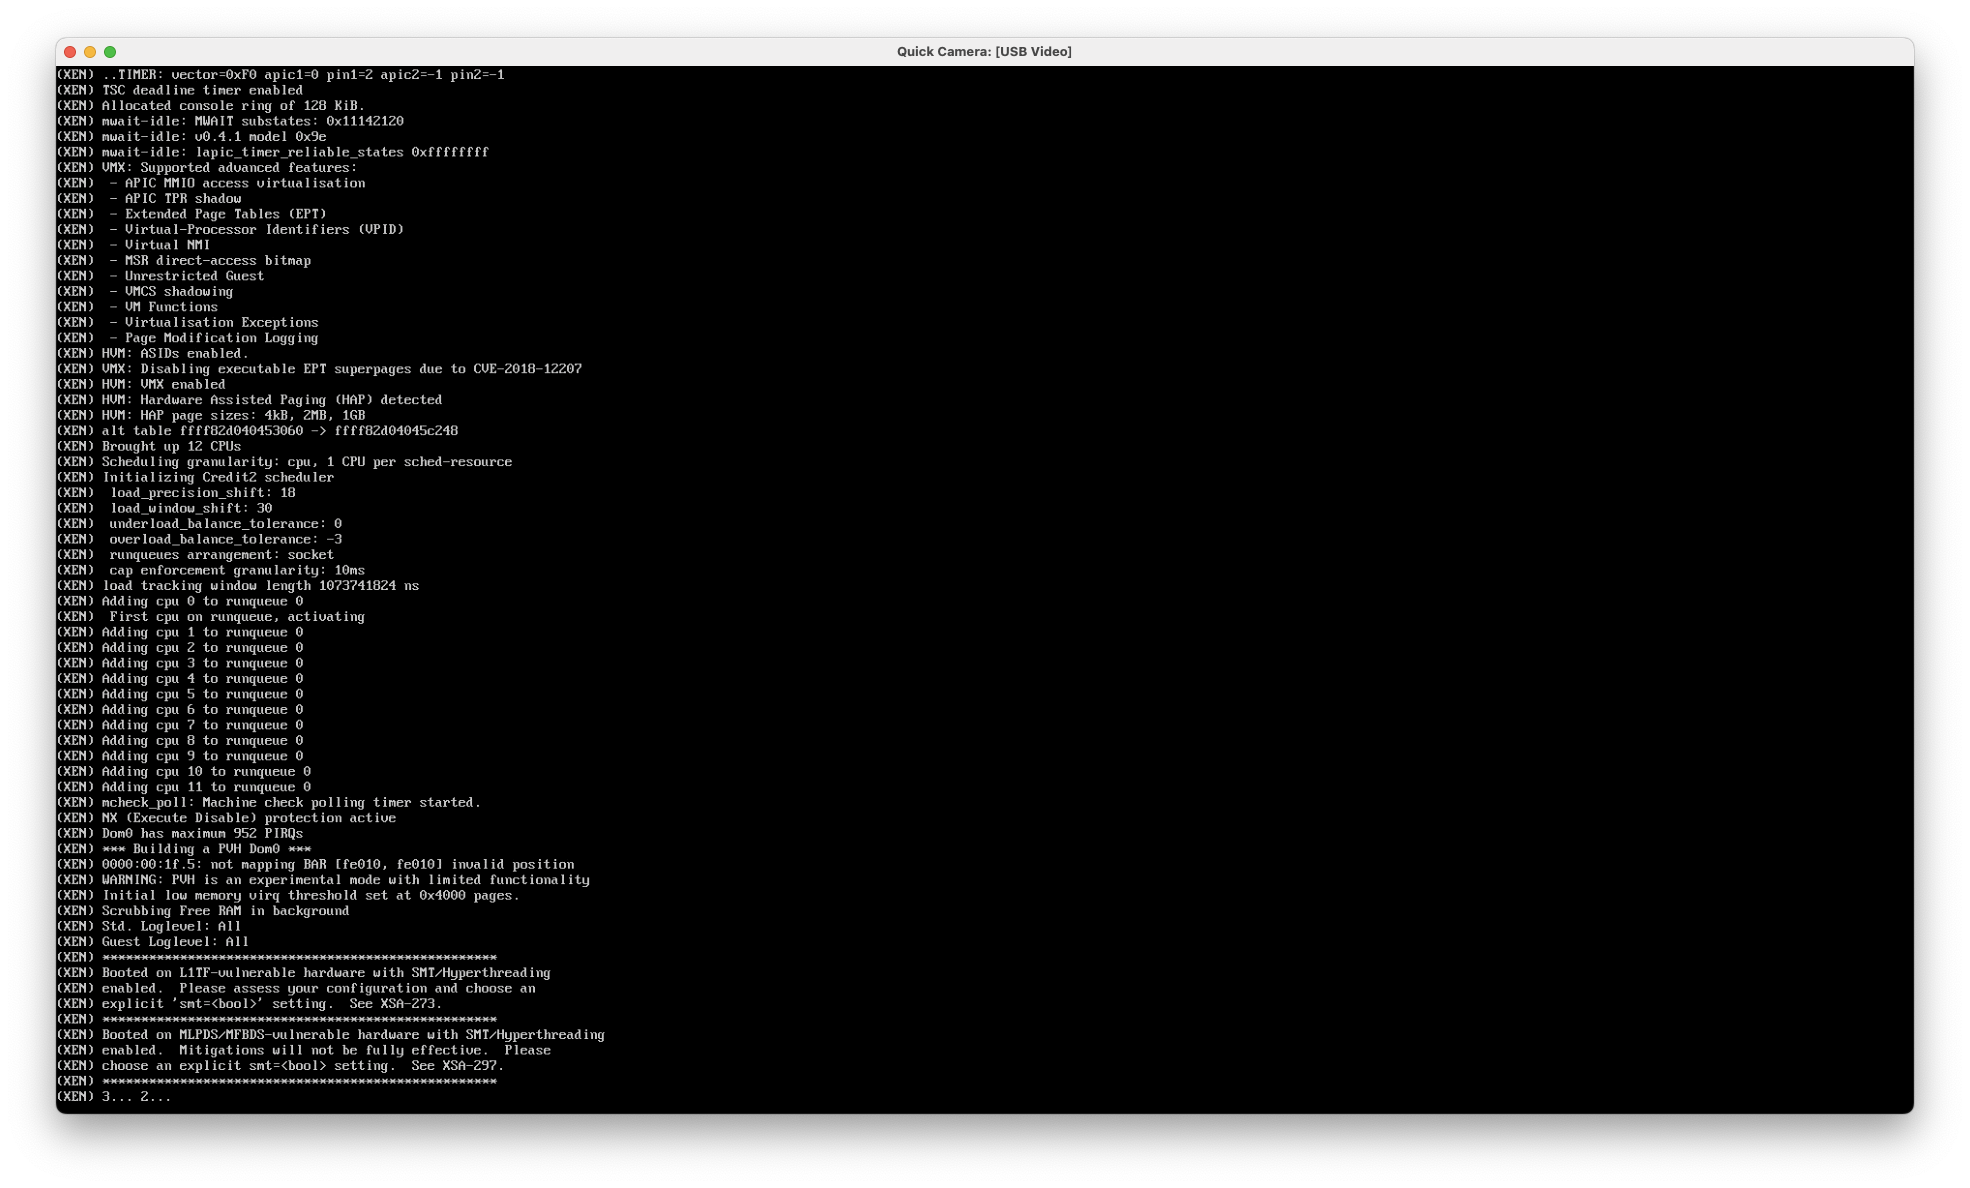
iH700XN に FreeBSD 13.2-RELEASE および Xen をインストールした後に FreeBSD を再起動すると、Xen の起動メッセージが表示されている際に、以下のように「vulnerable hardware…」という脆弱性を報告するメッセージが表示されます。
Xen を使用する上で表面的に問題が発生するわけではありませんが、危険なので対応することを推奨します。
解決方法
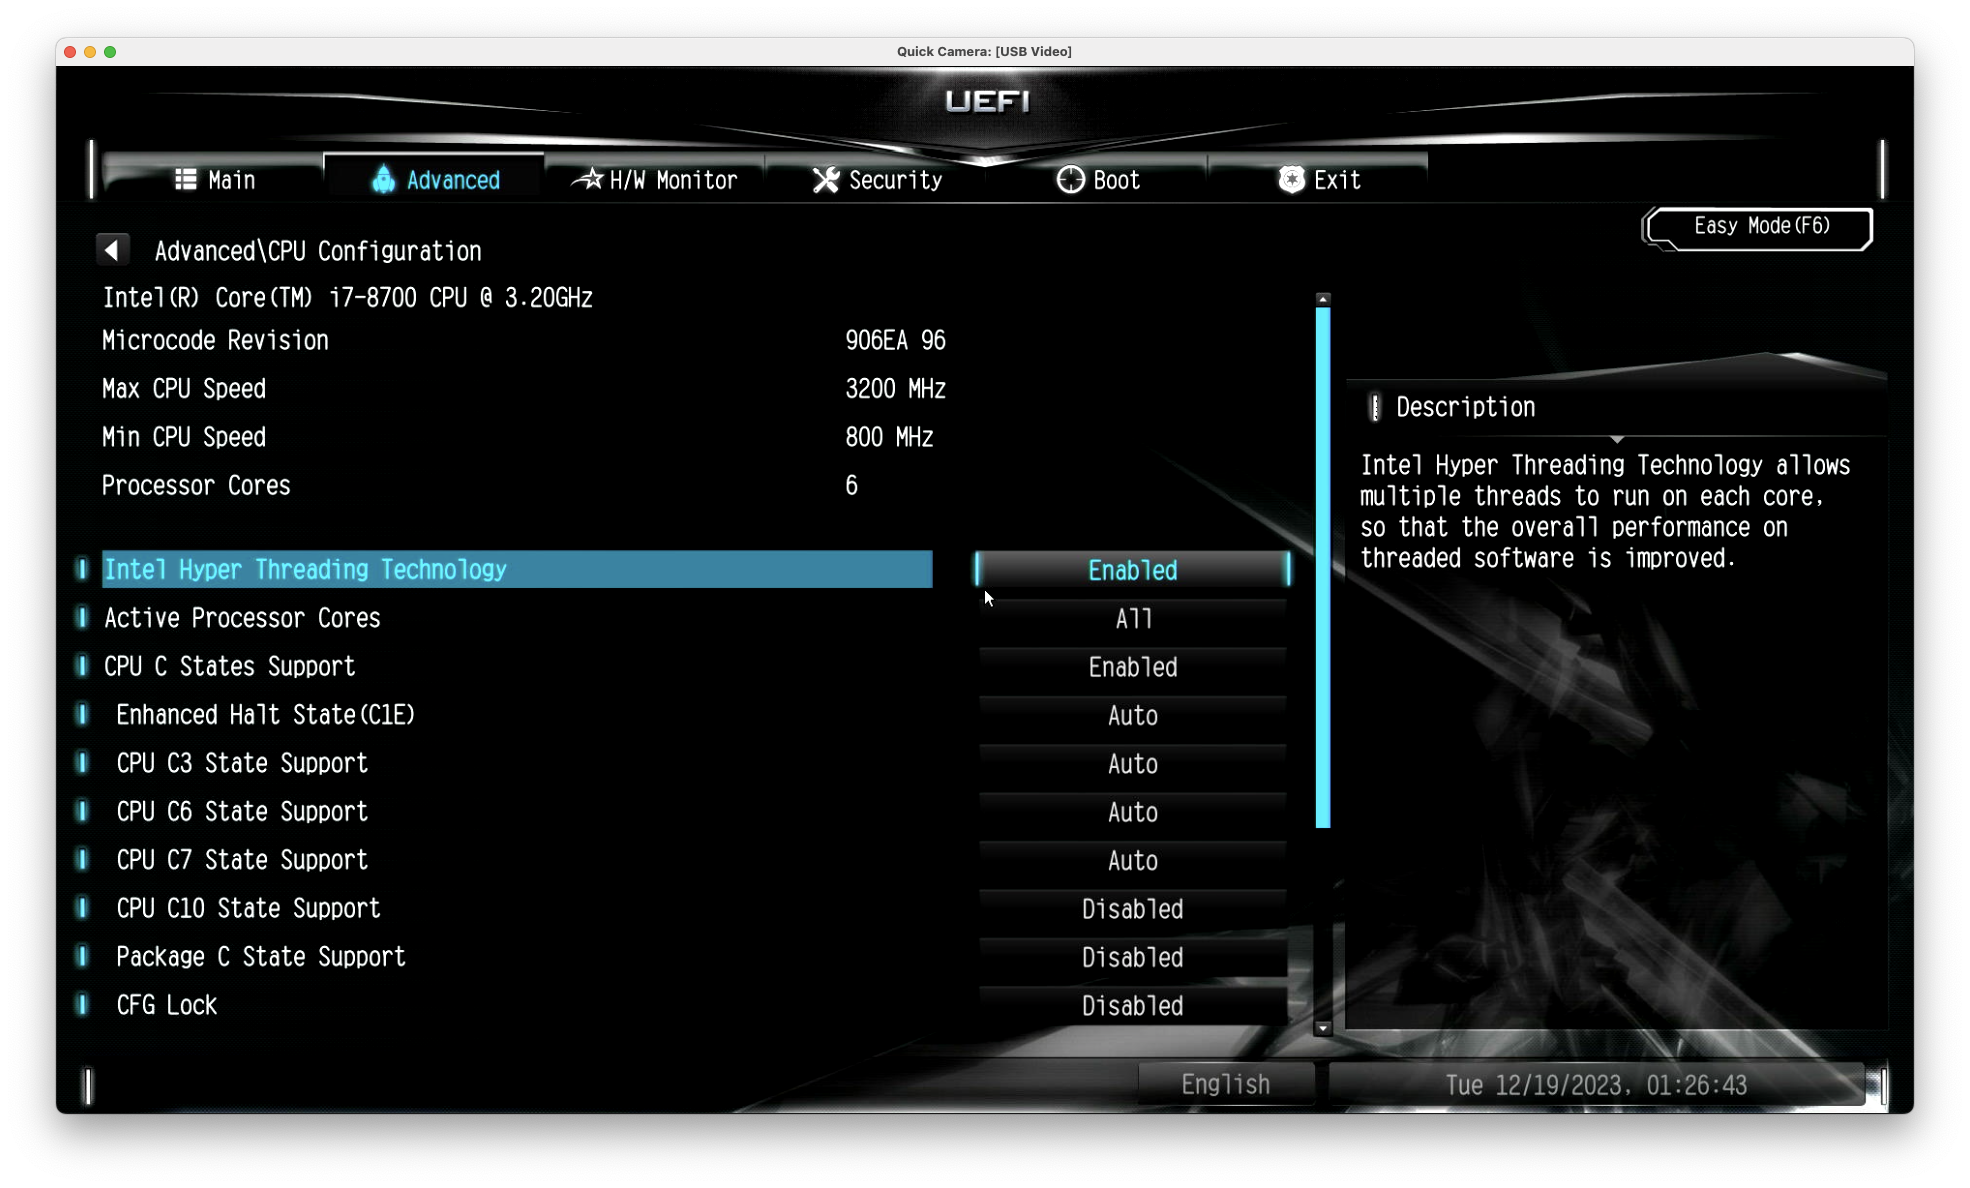
PC を再起動した際に UEFI の設定を確認したところ、以下のように「Intel Hyper Threading Technology」が「Enable」になっていたので、これを「Disable」に変更し設定を保存して PC を再起動したところ上記の「vulnerable hardware…」は表示されなくなりました。
getting domain info list: Cannot allocate memory
sudo xl list コマンドを実行すると、以下のように「getting domain info list: Cannot allocate memory」と表示され sudo xl list コマンドがエラー終了してしまう。
$ sudo xl list
Password:
libxl: error: libxl_domain.c:335:libxl_list_domain: getting domain info list: Cannot allocate memory
libxl_list_domain failed.
$
解決方法
以下のように、sudo コマンドを使用せずに su コマンドでスーパーユーザー権限を取得した上で xl list コマンドを実行する。
$ su
Password:
# xl list
Name                                        ID   Mem VCPUs	State	Time(s)
Domain-0                                     0  2047     4     r-----       4.7
#
ifconfig: interface bridge0 does not exist
以下のように ifconfig bridge0 コマンドを実行して bridge インターフェースの存在を確認したところ、「interface bridge0 does not exist」と表示され bridge0 インターフェースの情報が表示されない。
$ ifconfig bridge0
ifconfig: interface bridge0 does not exist
$
解決方法
Xen をインストールした後に /etc/rc.conf に以下の設定を追加するべきだったのですが、これをやり忘れていたので追加して FreeBSD を再起動する。
# echo 'cloned_interfaces="bridge0"' >> /etc/rc.conf
# echo 'ifconfig_bridge0="addm bge0 SYNCDHCP"' >> /etc/rc.conf
# echo 'ifconfig_bge0="up"' >> /etc/rc.conf