PubNubはConnected Devices用のリアルタイムアプリを構築するためBaaSです。リアルタイムメッセージに強いので、FirebaseやRealtime.co、SyncanoといったBaaSに近い感じです。今回はWebブラウザをクライアントにして、Ember.jsのSDKを使ったチュートリアルを進めていきます。AngularJSよりEmber.jsの方が昔から好きなのでコードを書いていて楽しいです。
PubNubの特徴
Data Stream Network
世界中にデータセンターがありスケールするData Stream Networkを持っているのが特徴です。信頼性が高く、レイテンシの低いリアルタイムメッセージが可能です。CDNに近いようです。データセンターがダウンしても、トラフィックは他のデータセンターに迂回されるためユーザーは気づかないそうです。
豊富なSDK
SDKが豊富で60種類以上あります。IoTデバイス向けにはArduinoやRaspberry Piなどの他にも、mbedやKinoma CreateのSDKも揃っています。
Ember.js 101
PubNubのブログに投稿されている、Ember.js 101: From Zero to Ember in PubNub Secondsのチュートリアルを進めていきます。
Docker開発環境
Node.jsのDocker開発環境を使います。Bowerが必要なのでdockerfile/nodejs-bower-gulpのイメージを使います。テスト用のため使い捨てのコンテナを起動します。
$ docker pull dockerfile/nodejs-bower-gulp
$ docker run -it --rm dockerfile/nodejs-bower-gulp
Node.jsとnpmのバージョンを確認します。
$ node -v
v0.10.35
$ npm -v
2.2.0
Ember.js SDKのインストール
パッケージマネージャのBowerを使いpubnub-emberをインストールします。このDockerコンテナはrootユーザーでログインしているので、--allow-rootフラグを付けます。
$ bower install pubnub-ember --allow-root
チャットアプリの作成
index.html
最初に今回作成するチャットアプリのindex.htmlです。オリジナルはGitHubのリポジトリにあります。Ember.jsのバージョンやDEPRECATEDになったコードなど、若干修正しています。
<!doctype html>
<html>
  <head>
    <script src="http://code.jquery.com/jquery-1.11.2.min.js"></script>
    <script src="http://cdn.pubnub.com/pubnub.min.js"></script>
    <script src="http://builds.handlebarsjs.com.s3.amazonaws.com/handlebars-v2.0.0.js"></script>
    <script src="http://builds.emberjs.com/release/ember.js"></script>
    <script src="bower_components/pubnub-ember/lib/pubnub-ember.js"></script>
    <link rel="stylesheet" href="//netdna.bootstrapcdn.com/bootstrap/3.3.2/css/bootstrap.min.css">
  </head>
  <body>
    <script type="text/x-handlebars" data-template-name="application">
      <div class="container">
        <h4>Online Users</h4>
        <ul>
        {{#each user in users}}
          <li>{{user}}</li>
        {{/each}}
        </ul>
        <br />
        <h4>Chat History({{messages.length}})</h4>
        <form>
          {{input type="text" value=new_message placeholder="Enter a message"}}
          <input type="submit" {{action 'publish'}}/>
        </form>
        <br />
        <div class="well">
          <ul>
          {{#each message in messages}}
            <li>{{message}}</li>
          {{/each}}
          </ul>
        </div>
      </div>
    </script>
    <script>
      window.Mini = Ember.Application.create();
      var user_id = "User " + Math.round(Math.random() * 1000);

      Mini.PubNub = PubNubEmber.extend({
        cfg: {
          subscribe_key: 'xxx',
          publish_key: 'xxx',
          uuid: user_id
        }
      });

      Mini.ApplicationController = Ember.Controller.extend({
        needs: ['pubnub:main'],
        channel: 'The EmberJS Channel',
        new_message: '',
        user_id: user_id,
        messages: Ember.ArrayProxy.create({content: Ember.A(['Welcome to The EmberJS Channel']) }),
        users: Ember.ArrayProxy.create({content: Ember.A([]) }),
        init: function() {
          var pn = this.get('pubnub');
          var chan = this.get('channel');
          var self = this;

          // Subscribe to the Channel
          pn.emSubscribe({ channel: chan });

          // Register for message events
          pn.on(pn.emMsgEv(chan), function(payload){
            self.get('messages').pushObject(payload.message);
          });

          // Register for presence events
          pn.on(pn.emPrsEv(chan), function(payload){
            self.get('users').set('content', pn.emListPresence(chan));
          });

          // Pre-Populate the user list (optional)
          pn.emHereNow({ channel: chan });

          // Populate messae history (optional)
          pn.emHistory({
            channel: chan,
            count: 500
          });
        },
        actions: {
          // set up an Ember Action to publish a message
          publish: function(){
            this.get('pubnub').emPublish({
              channel: this.get('channel'),
              message: "[" + this.get('user_id') + "] " + this.get('new_message')
            });
            this.set('new_message','');
          }
        }
      });
    </script>
  </body>
</html>
headerのscriptタグ
...
    <script src="bower_components/pubnub-ember/lib/pubnub-ember.js"></script>
bower_components/pubnub-ember/pubnub-ember.jsは bower installでインストールしたディレクトリです。
Handlebarsテンプレート
Ember.jsのテンプレートはHandlebarsが統合されています。今回のテンプレートはindex.htmlのscriptタグの中にインラインで記述しています。
  <body>
    <script type="text/x-handlebars" data-template-name="application">
      <div class="container">
        <h4>Online Users</h4>
        <ul>
        {{#each user in users}}
          <li>{{user}}</li>
        {{/each}}
...
      </div>
    </script>
  </body>
PubNubEmberサービスの作成
PubNub Developer Portalにログインして、アカウントに紐付いたsubscribe_keyとpublish_keyを確認して記述します。
    <script>
      window.Mini = Ember.Application.create();
      var user_id = "User " + Math.round(Math.random() * 1000);
      Mini.PubNub = PubNubEmber.extend({
        cfg: {
          subscribe_key: 'xxx',
          publish_key: 'xxx',
          uuid: user_id
        }
      });
ApplicationControllerの作成
Ember.js controllerオブジェクトにアプリケーションロジックを記述していきます。コントローラーにはビューで使用するコレクションなどの変数や関数を定義します。コレクションに使っているArrayProxyクラスは予め用意されています。プロパティに変化があると、ビューに自動的に反映してくれます。
ApplicationControllerのinit関数
イベントリスナーの登録と、イベントハンドラ関数の定義の簡単な説明です。
-
emSubscribe関数
-
アプリ用のsubscriptionチャンネルを作成する
-
channel名はEmber.Controller.extendの最初で定義している
-
emMsgEv関数
-
messageイベントハンドラをイベントにバインドする
-
PubNub Ember.jsライブラリはチャンネルから受信したイベントを Ember.jsのイベントに変換してくれる
-
messageを受信したら、controllerのmessagesコレクションにpushする
-
emPrsEv関数
-
presenseイベントに、イベントリスナを登録する
-
コントローラーのusersコレクションを動的にアップデートする
-
emHereNow関数
-
presenceイベントをfireする
-
登録したpresenceイベントハンドラよって処理される
-
emHistory関数
-
messageイベントをfireする
-
登録したmessaegsイベントハンドラによって処理される
確認
local-web-serverの起動
local-web-serverはNode.js製の開発用HTTPサーバーです。local-web-serverを起動します。
$ npm install -g local-web-server
ブラウザで確認します。
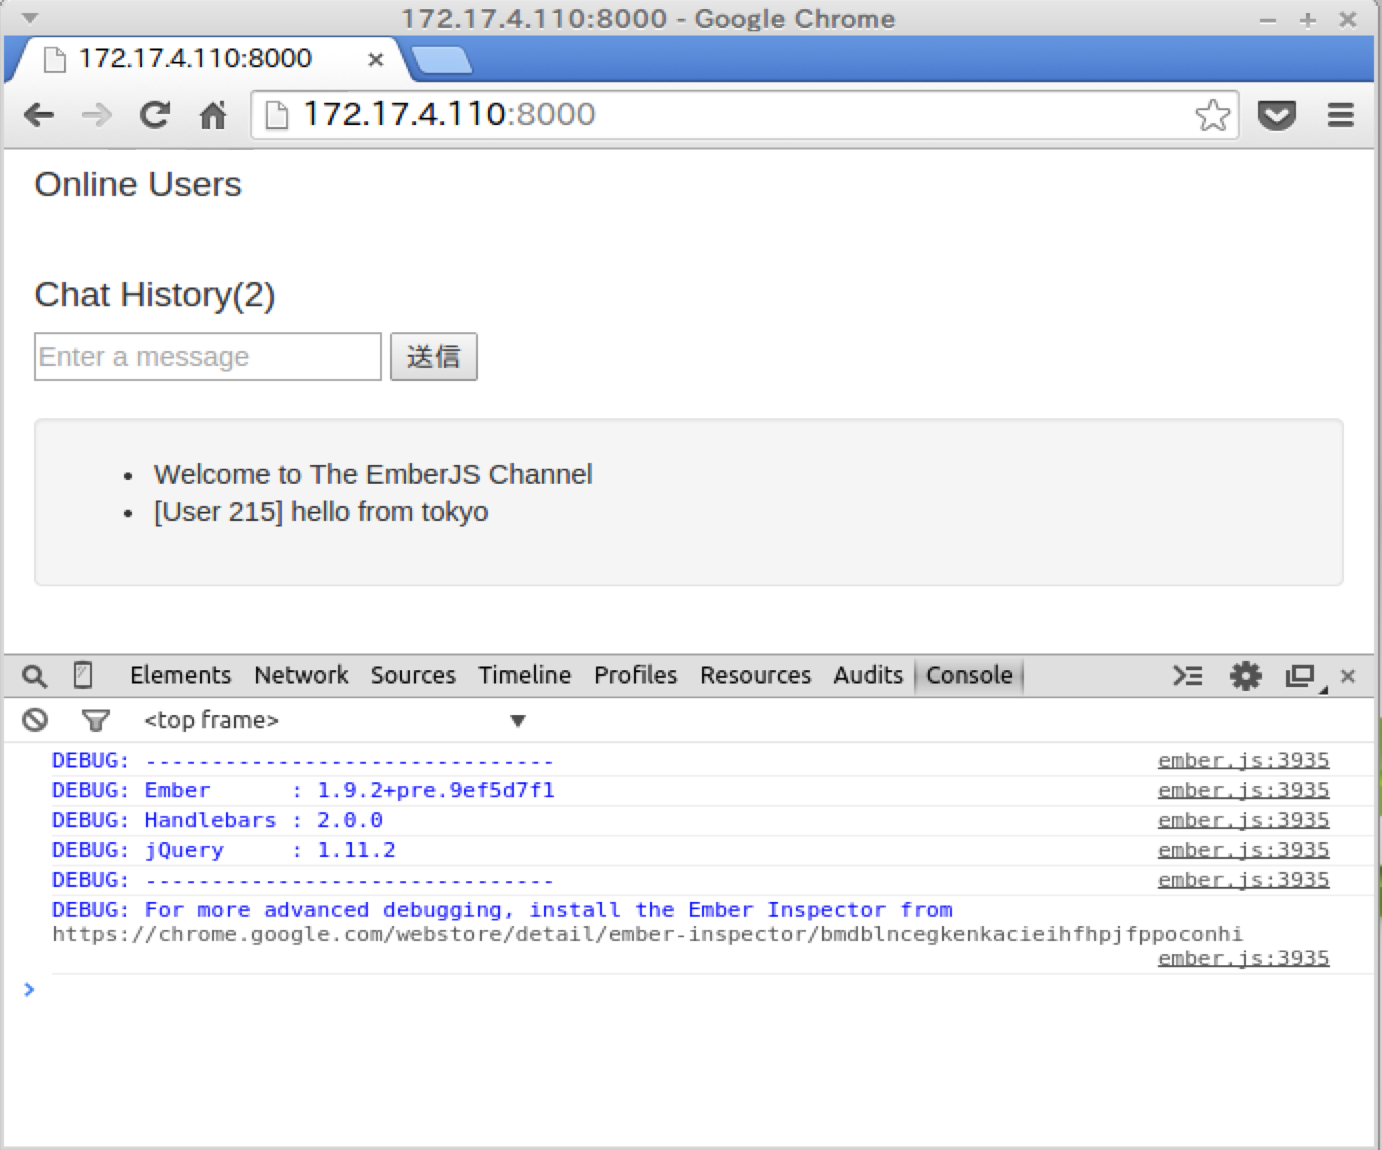
画面にメッセージが表示されていますが、Storage & Playbackサービスが有効になっていないので、フォームをsubmitしてもメッセージは保存されません。
Storage & Playbackサービスを有効にする
PubNub Developer Portalにログインして、FreaturesからStorage & Playbackのセクションに移動します。
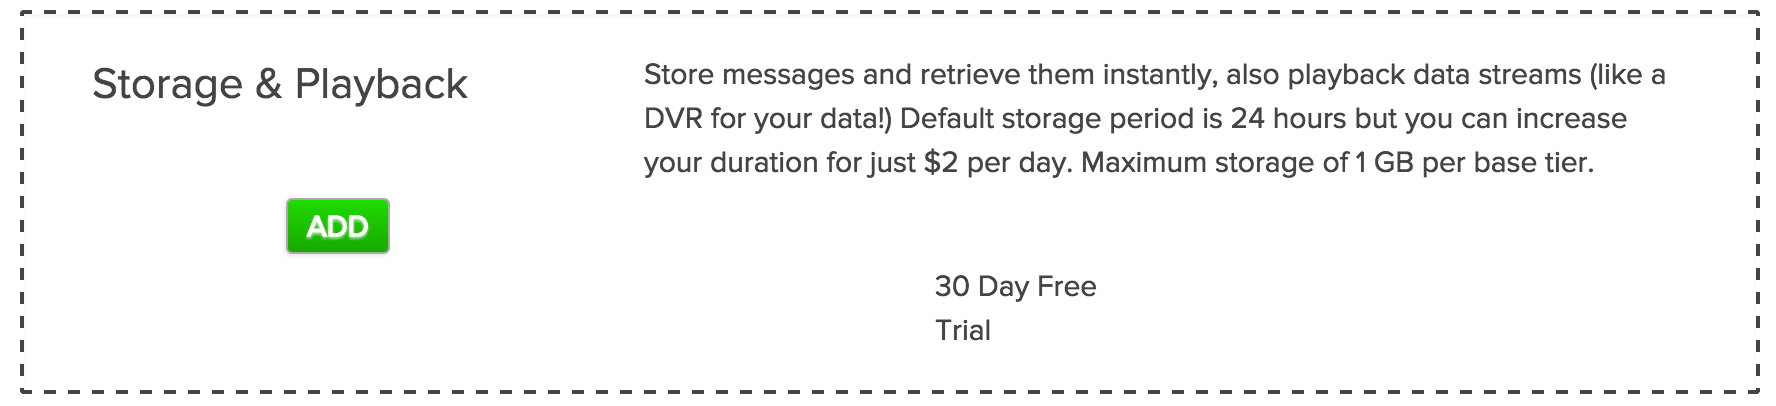
addボタンを押して有効にします。
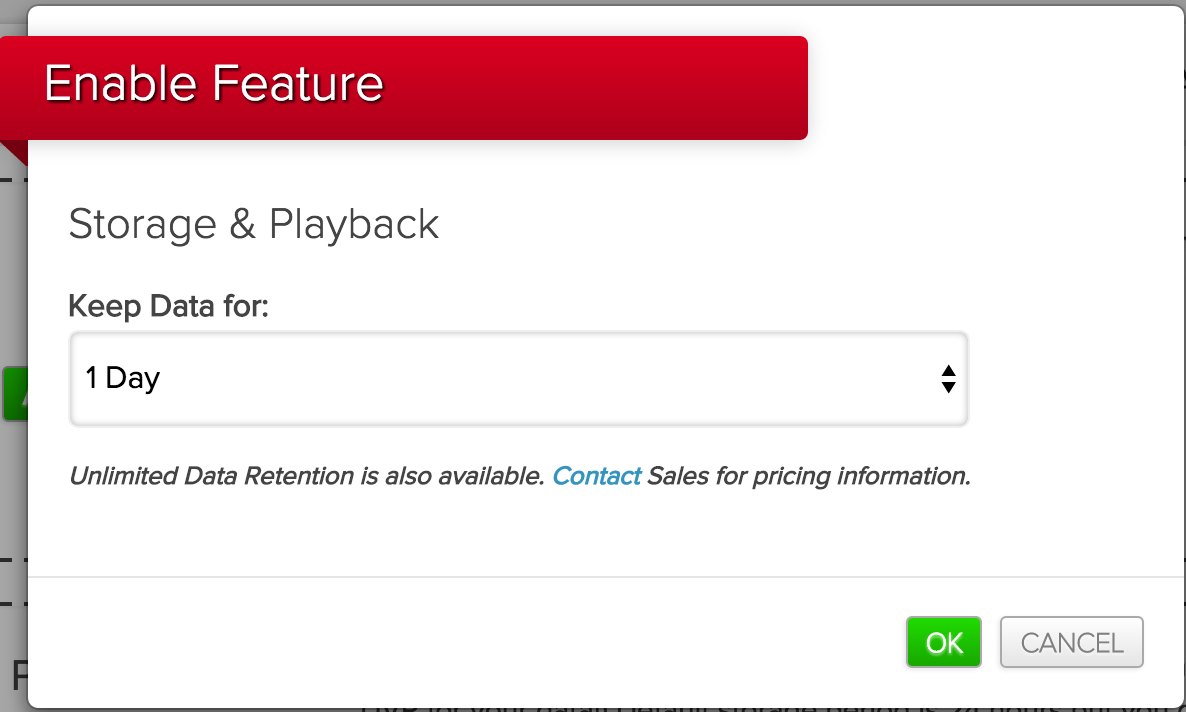
料金表によると、FREEプランの30日トライアルは1日分のメッセージを保存してくれるそうです。
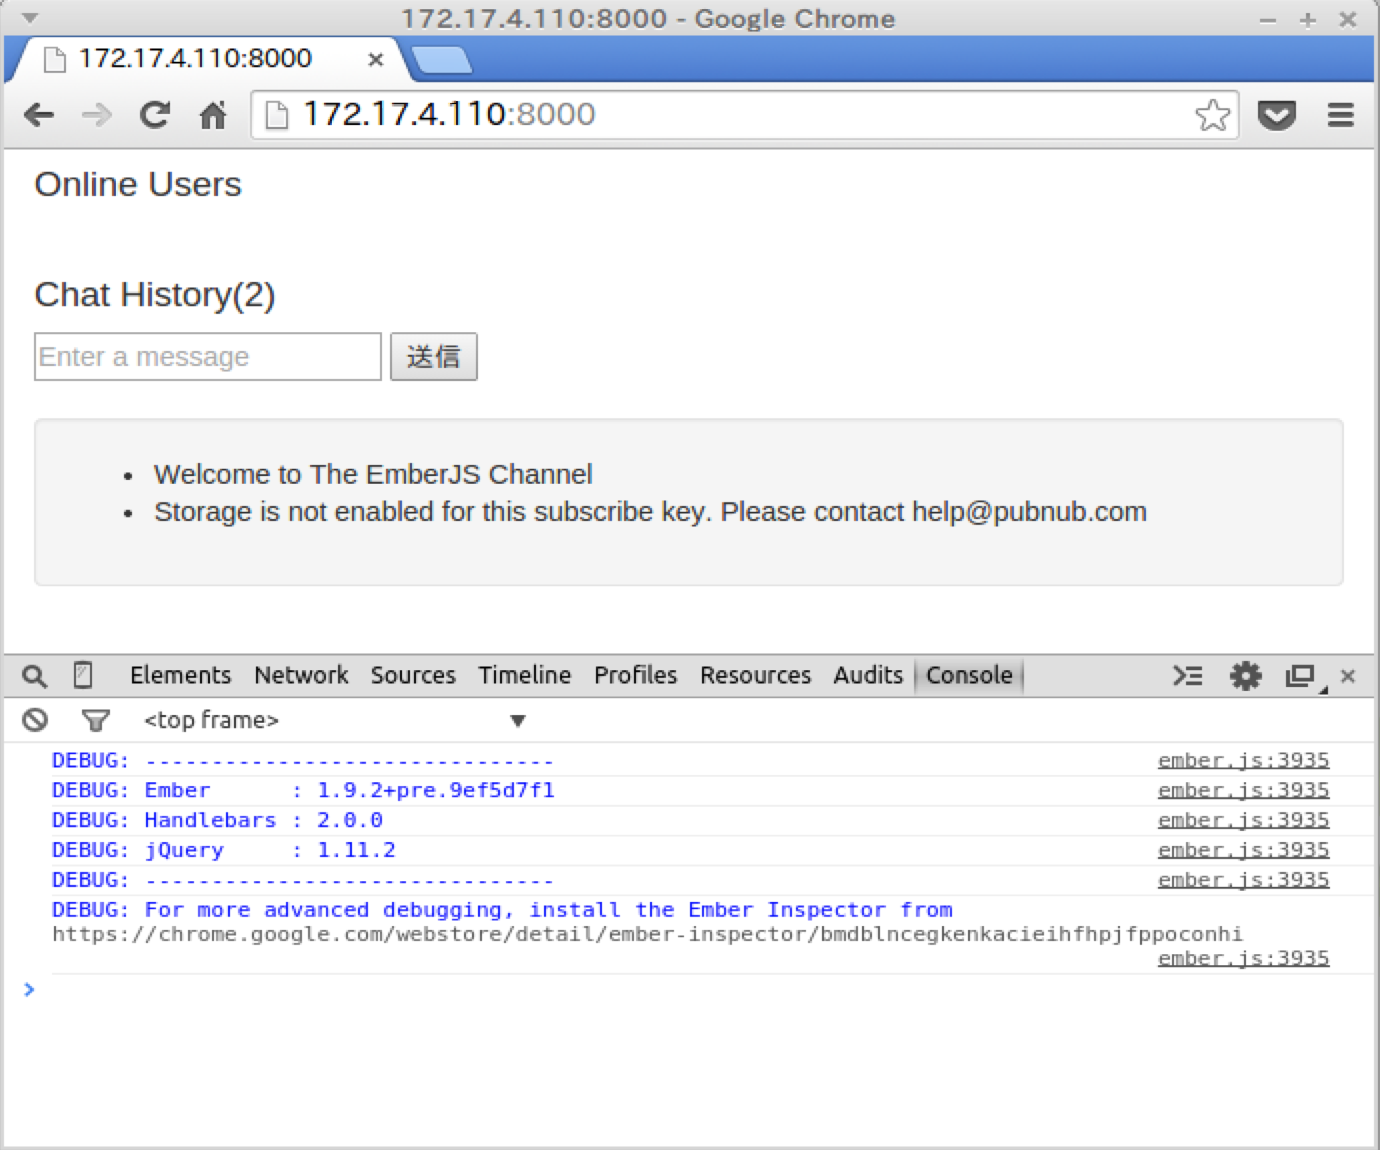
画面からsubmitしたメッセージはブラウザをリフレッシュしても消えずに、Storageに保存されました。