はじめに
前回の記事では、「ActiveReportsJS」と「SharePoint Online」を利用した帳票システムを開発の為、使用する環境の準備や「SharePoint Online」の情報の取得方法、レポートファイルの作成について解説しました。
今回の記事では、SharePoint Onlineを活用した、Web帳票システムの構築の第2回目として、SharePoint Online上に配置したレポートファイルを参照し、複数の帳票を表示可能なWebアプリケーションの作成方法について解説していきます。
アプリケーションの登録
今回のWebアプリケーションでは、前回の記事で解説したとおり、SharePoint Onlineからのデータ取得に「Microsoft Graph API」を利用します。こちらのAPIを利用するにあたり、作成するWebアプリケーションを「Microsoft Entra(旧Azure AD)」上に登録し、そのAPIの利用を許可しておく必要がありますので、まずはこちらの設定から行っていきます。
まず、管理者権限のあるアカウントで以下の「Microsoft Entra 管理センター」へアクセスし、左のメニュー「アプリケーション」項目から「アプリの登録」を選択します。

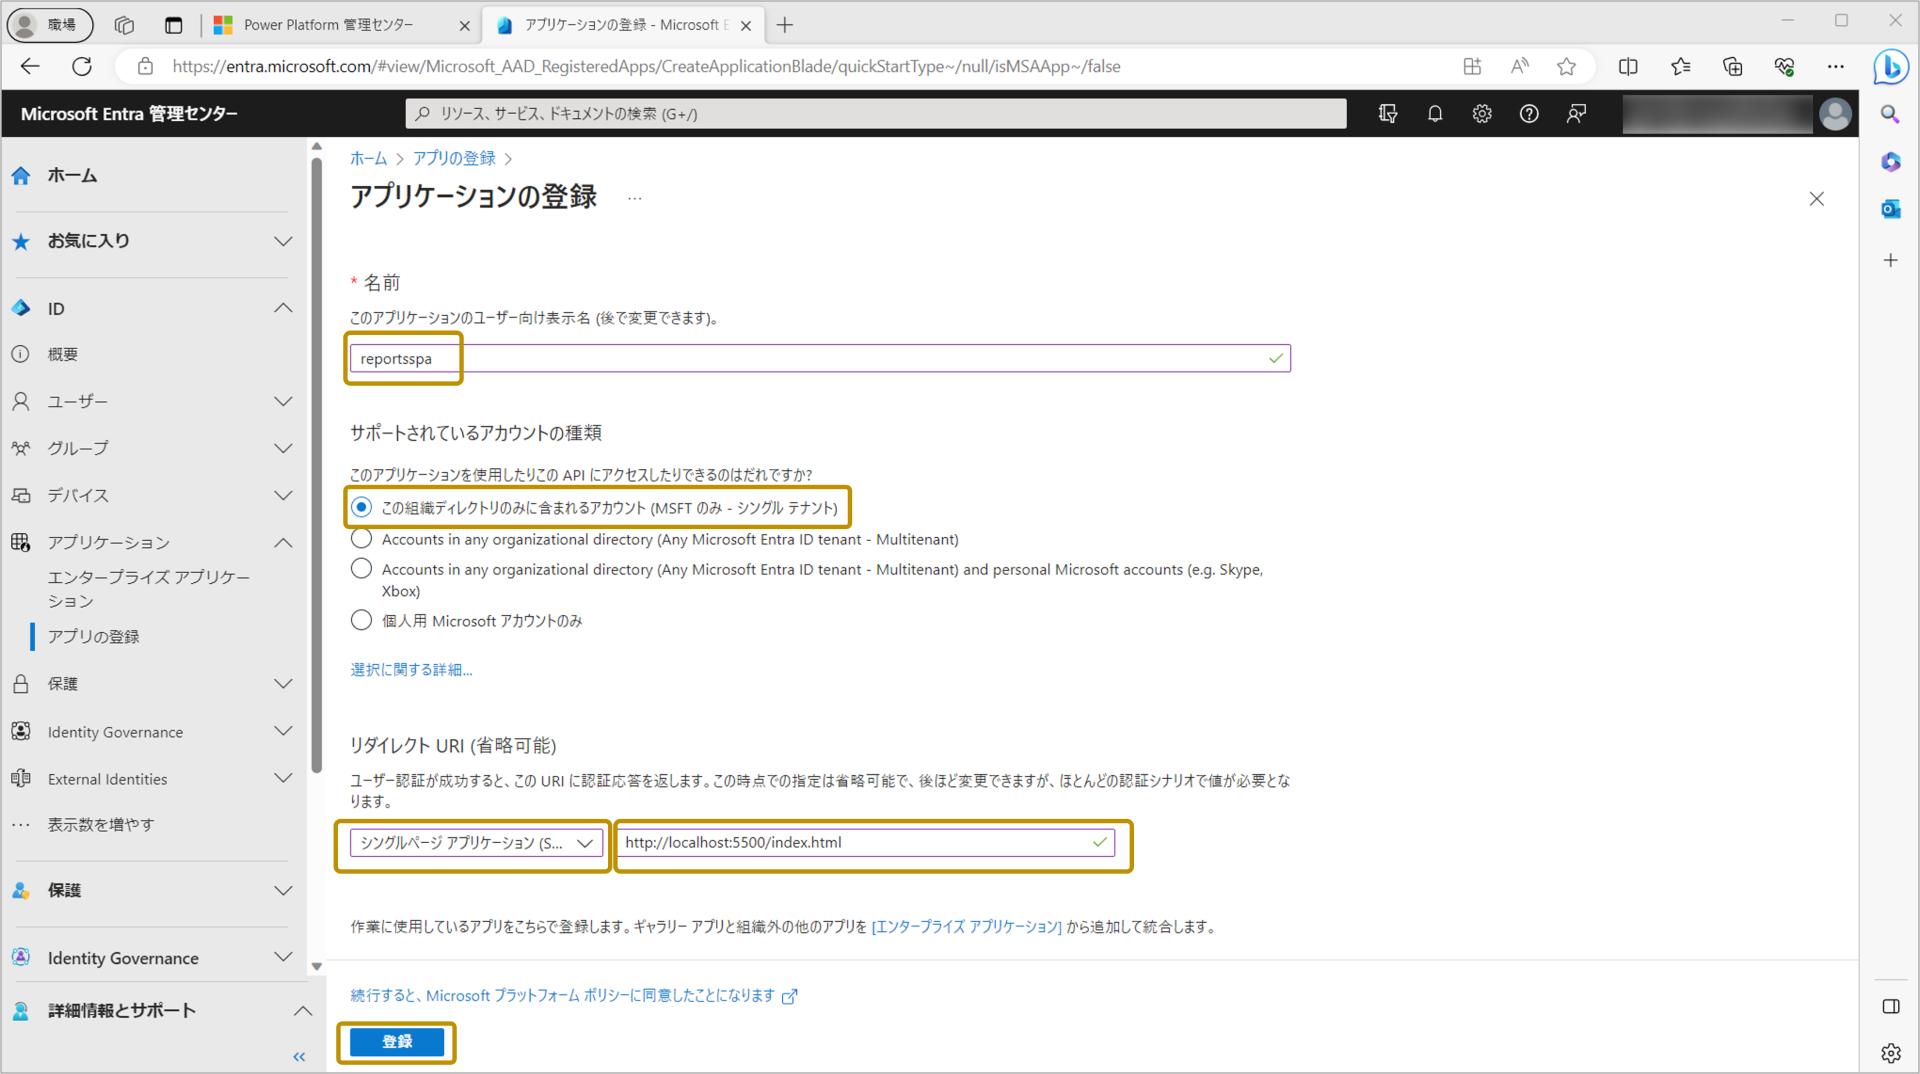
続いて「アプリケーションの登録」画面に遷移しますので、「名前」、「サポートされているアカウントの種類」、「リダイレクトURI」を以下のように設定し、[登録]を行います。

| 項目 | 設定値 |
|---|---|
| 名前 | reportsspa |
| サポートされているアカウントの種類 | 「この組織ディレクトリのみに含まれるアカウント(MSFTのみーシングルテナント)」を選択 |
| リダイレクトURI(プラットフォームの選択) | 「シングルページアプリケーション(SPA)」を選択 |
| リダイレクト URI | http://localhost:5500/index.html |
アプリケーションが登録されると、以下の画面へ遷移します。ここには概要として各種情報が表示され、「アプリケーション(クライアント ID)」、「ディレクトリ(テナント)ID」という2つのIDも表示されています。この情報はWebアプリケーションに認証処理を作成する際に必要となりますので予めメモしておいてください。

続いて登録したアプリケーション設定にAPIのアクセス許可を設定します。次の画像のように「APIのアクセス許可」タブを選択後、「アクセス許可の追加」を選択します。

右側に「APIアクセス許可の要求」画面が表示されますので、ここから「Microsoft Graph」を選択します。

選択後、「アクセス許可」設定が可能となりますので、「email」、「Sites.Read.All」、「User.Read」にチェックを入れ[アクセス許可の追加]を行います。

次の画像のように「Microsoft Graph」のアクセス許可が追加されていればアプリケーションの登録は完了です。

Webアプリケーションの作成
それでは、Webアプリケーションの作成を行っていきます。今回のWebアプリケーションでは、主にSharePoint上のストレージ上に配置されているActiveReportJSのレポートファイルを取得し、そのレポートファイルを用いて、ビューワー上にレポートを表示するといった内容です。これを整理すると、必要となる処理は次のようになります。
- Graph APIを利用する為の認証処理・アクセストークン取得する処理
- SharePoint Onlineからファイルリストを取得する処理
- SharePoint Onlineからファイルを取得する処理
- ActiveReportsJSを使ったレポート表示処理
Graph APIを利用する為の認証処理・アクセストークン取得する処理
まず、認証関係の処理を実装します。複雑になりがちな認証処理・アクセストークン取得処理となりますので、今回は、認証処理のみを別のJSファイルとして作成していきます。
// MSAL設定オブジェクト
const msalConfig = {
    auth: {
        clientId: 'your-clientid', // ここにEntra管理センターで取得したクライアントIDを入力
        authority: 'your-tenant-id', // ここにテナントIDを入力
        redirectUri: location.origin
    }
};

// MSALインスタンスの作成
const msalInstance = new msal.PublicClientApplication(msalConfig);

// ログイン要求の設定
const loginRequest = {
    scopes: ["User.Read", "Sites.Read.All"] // 必要なスコープを指定
};

/**
 * アクセストークンを取得する非同期関数。
 * @returns {Promise<string>} アクセストークンを返す。
 * @throws {Error} ユーザーがログインしていない場合やトークン取得に失敗した場合。
 */
async function getAccessToken() {
    const activeAccount = msalInstance.getActiveAccount();
    if (!activeAccount) {
        // アクティブアカウントがない場合、セッションストレージから取得を試みる
        const accounts = msalInstance.getAllAccounts();
        if (accounts.length > 0) {
            msalInstance.setActiveAccount(accounts[0]);
        } else {
            // アクティブアカウントがない場合、リダイレクトによるログインを開始
            await msalInstance.loginRedirect(loginRequest);
            throw new Error("ユーザーがログインしていません。リダイレクトによるログインが開始されました。");
        }
    }

    try {
        const response = await msalInstance.acquireTokenSilent({
            ...loginRequest,
            account: msalInstance.getActiveAccount()
        });
        return response.accessToken;
    } catch (error) {
        console.error('サイレントトークン取得エラー:', error);
        // トークン取得エラーが発生した場合、リダイレクトによるログインを開始
        if (error instanceof msal.InteractionRequiredAuthError) {
            await msalInstance.loginRedirect(loginRequest);
        }
        throw new Error("サイレントトークン取得に失敗しました。リダイレクトによるログインが開始されました。");
    }
}

/**
 * リダイレクト後の認証結果を処理する関数。
 * @returns {Promise<void>}
 */
function handleRedirect() {
    return msalInstance.handleRedirectPromise().then(response => {
        if (response !== null) {
            msalInstance.setActiveAccount(response.account);
        }
        // URLをクリーンアップ
        if (window.history.replaceState) {
            const cleanUrl = window.location.origin + window.location.pathname;
            window.history.replaceState(null, null, cleanUrl);
        }
    }).catch(error => {
        console.error('認証エラー:', error);
        document.getElementById('result').textContent = `認証エラー: ${error.message}`;
    });
}

/**
 * ページロード時にアクティブアカウントを設定する関数。
 */
function setActiveAccountOnLoad() {
    if (msalInstance.getAllAccounts().length > 0) {
        msalInstance.setActiveAccount(msalInstance.getAllAccounts()[0]);
    }
}

// 関数とインスタンスのエクスポート
export { getAccessToken, handleRedirect, setActiveAccountOnLoad, msalInstance };
こちらの処理は、Microsoftで提供されている、ユーザー認証・トークン取得のJavascriptライブラリ「MSAL.js(Microsoft Authentication Library)」を利用して、アクセストークン取得のタイミングでユーザー認証を行っています。認証を行うためにEntra上でアプリ登録時に取得した「アプリケーション(クライアント ID)」、「ディレクトリ(テナント)ID」をMSAL設定オブジェクトに設定しています。実装した「auth.js」のコード上で定義した「getAccessToken」を、「index.html」上から呼び出すことで、「Graph API」 のSharePoint OnlineのWeb APIを簡単に実行できます。
SharePoint Onlineからファイルリストを取得する処理
それでは、続いて、ファイルリスト取得処理を実装します。次のコードは、「index.html」上の記述します。
import { getAccessToken, handleRedirect, setActiveAccountOnLoad, msalInstance } from './auth.js';
const siteId = 'your-site-id'; // ここにサイトIDを入力
const driveId = 'your-drive-id'; // ここにドライブIDを入力
const folderId = 'your-folder-id'; // ここにフォルダーIDを入力

/**
 * SharePointフォルダ内のファイルリストを取得する非同期関数。
 * @returns {Array} .rdlx-jsonファイルのリストを返す。
 */
async function getFileList() {
    const accessToken = await getAccessToken();
    const endpoint = `https://graph.microsoft.com/v1.0/sites/${siteId}/drives/${driveId}/items/${folderId}/children`;
    const response = await fetch(endpoint, {
        headers: {
            'Authorization': `Bearer ${accessToken}`
        }
    });
    const data = await response.json();
    return data.value.filter(item => item.name.endsWith('.rdlx-json'));
}
ここでの処理は、前回の記事で解説していた「サイトIDの取得」、「ドライブIDの取得」、「フォルダIDの取得」でそれぞれ取得した、各IDを定数として設定し、それをもとにGraph APIを呼び出してSharePoint Online上に配置されているファイルリストを取得します。このコードが実行されると、次の画像のように、SharePoint Online上のファイルがリストとして取得されます。


続いて、取得したファイルリストをページ上に表示し、対象のファイルが選択された際にレポート表示処理を実行する以下の処理も追加します。
/**
 * ファイルリストを作成し、クリックイベントを設定する関数。
 * @param {Array} files - ファイルオブジェクトのリスト。
 */
function createFileList(files) {
    const fileList = document.getElementById('file-list');
    fileList.innerHTML = '';
    files.forEach(file => {
        const listItem = document.createElement('div');
        listItem.textContent = file.name;
        listItem.style.cursor = 'pointer';
        listItem.onclick = () => previewReport(file.id);  //レポート表示処理
        fileList.appendChild(listItem);
    });
}
SharePoint Onlineからファイルを取得する処理
続いて、ファイルの取得処理を実装します。こちらも「サイトID」、「ドライブID」、「フォルダID」の定数を使用し、さらに先ほどの処理で取得したファイルリスト内の「ファイルID」を引数として渡し、そのファイルを取得します。
/**
 * 指定されたファイルIDに基づいてファイルの内容を取得する非同期関数。
 * @param {string} fileId - 取得するファイルのID。
 * @returns {Object} ファイルの内容をJSON形式で返す。
 */
async function fetchFileContent(fileId) {
    const accessToken = await getAccessToken();
    const endpoint = `https://graph.microsoft.com/v1.0/sites/${siteId}/drives/${driveId}/items/${fileId}/content`;
    const response = await fetch(endpoint, {
        headers: {
            'Authorization': `Bearer ${accessToken}`
        }
    });
    console.log(response);
    if (!response.ok) {
        throw new Error('ファイルの取得に失敗しました');
    }
    return await response.json();
}
ActiveReportsJSを使ったレポート表示処理
続いて、ActiveReportJSを使いレポート表示処理を実装していきます。この処理は「createFileList」メソッドから実行され、「fileId」が引数として渡されます。受け取った「fileId」をもとに、「fetchFileContent」メソッドを実行しレポートファイルを取得。
ActiveReportJSのビューワを作成し、ビューワに対して、レポートファイル、とレポートパラメーターに「accessToken」を渡し、レポートの表示処理を行います。
/**
 * 指定されたファイルIDに基づいてレポートをプレビューする非同期関数。
 * @param {string} fileId - プレビューするファイルのID。
 */
async function previewReport(fileId) {
    try {
        const fileContent = await fetchFileContent(fileId);
        const viewerHost = document.getElementById("viewer-host");
        const viewer = new MESCIUS.ActiveReportsJS.ReportViewer.Viewer(viewerHost, { language: "ja" });
        MESCIUS.ActiveReportsJS.Core.setLicenseKey("YOUR LICENSE KEY GOES HERE"); //ライセンスキーを設定します

        const accessToken = await getAccessToken();
        viewer.open(fileContent, {
            ReportParams: [
                { Name: "Bearer", Value: accessToken }
            ]
        });
    } catch (error) {
        console.error('レポート表示エラー:', error);
        document.getElementById('result').textContent = `レポート表示エラー: ${error.message}`;
    }
}
index.htmlの処理全体
それぞれの処理を解説してきましたが、画面の構成なども記述した処理の全体としては以下となります。
<!DOCTYPE html>
<html lang="ja">
<head>
    <meta charset="UTF-8">
    <meta name="viewport" content="width=device-width, initial-scale=1.0">
    <title>SharePoint Online 帳票システム</title>
    <!-- ActiveReportsJS CSS/jsライブラリの読込 -->
    <link rel="stylesheet" href="https://cdn.grapecity.com/activereportsjs/5.0.3/styles/ar-js-ui.css" />
    <link rel="stylesheet" href="https://cdn.grapecity.com/activereportsjs/5.0.3/styles/ar-js-viewer.css" />
    <script type="text/javascript" src="https://cdn.grapecity.com/activereportsjs/5.0.3/dist/ar-js-core.js"></script>
    <script type="text/javascript" src="https://cdn.grapecity.com/activereportsjs/5.0.3/dist/ar-js-viewer.js"></script>
    <script type="text/javascript" src="https://cdn.grapecity.com/activereportsjs/5.0.3/dist/ar-js-xlsx.js"></script>
    <script type="text/javascript" src="https://cdn.grapecity.com/activereportsjs/5.0.3/dist/ar-js-html.js"></script>
    <script type="text/javascript" src="https://cdn.grapecity.com/activereportsjs/5.0.3/dist/ar-js-tabular-data.js"></script>
    <script type="text/javascript" src="https://cdn.grapecity.com/activereportsjs/5.0.3/dist/locales/ar-js-locales.js"></script>
    <!-- MSAL.jsの読み込み -->
    <script src="https://alcdn.msauth.net/browser/2.14.2/js/msal-browser.min.js"></script>
    <!-- 認証用スクリプトの読み込み -->
    <script type="module" src="auth.js"></script>
    <style>
        #container {
            display: flex;
        }
        #file-list {
            width: 200px;
            border-right: 1px solid #ccc;
            padding: 10px;
            overflow-y: auto;
        }
        #viewer-host {
            flex-grow: 1;
            height: 90vh;
            padding: 10px;
        }
    </style>
</head>
<body>
    <h1>ActiveReportsJS x SharePoint Online Lists</h1>
    <pre id="result"></pre>
    <div id="container">
        <div id="file-list"></div>
        <div id="viewer-host"></div>
    </div>
    <script type="module">
        import { getAccessToken, handleRedirect, setActiveAccountOnLoad, msalInstance } from './auth.js';
        const siteId = 'your-site-id'; // ここにサイトIDを入力
        const driveId = 'your-drive-id'; // ここにドライブIDを入力
        const folderId = 'your-folder-id'; // ここにフォルダーIDを入力


        /**
         * SharePointフォルダ内のファイルリストを取得する非同期関数。
         * @returns {Array} .rdlx-jsonファイルのリストを返す。
         */
        async function getFileList() {
            const accessToken = await getAccessToken();
            const endpoint = `https://graph.microsoft.com/v1.0/sites/${siteId}/drives/${driveId}/items/${folderId}/children`;
            const response = await fetch(endpoint, {
                headers: {
                    'Authorization': `Bearer ${accessToken}`
                }
            });
            const data = await response.json();
            return data.value.filter(item => item.name.endsWith('.rdlx-json'));
        }

          /**
         * ファイルリストを作成し、クリックイベントを設定する関数。
         * @param {Array} files - ファイルオブジェクトのリスト。
         */
         function createFileList(files) {
            const fileList = document.getElementById('file-list');
            fileList.innerHTML = '';
            files.forEach(file => {
                const listItem = document.createElement('div');
                listItem.textContent = file.name;
                listItem.style.cursor = 'pointer';
                listItem.onclick = () => previewReport(file.id);
                fileList.appendChild(listItem);
            });
        }

        /**
         * 指定されたファイルIDに基づいてファイルの内容を取得する非同期関数。
         * @param {string} fileId - 取得するファイルのID。
         * @returns {Object} ファイルの内容をJSON形式で返す。
         */
        async function fetchFileContent(fileId) {
            const accessToken = await getAccessToken();
            const endpoint = `https://graph.microsoft.com/v1.0/sites/${siteId}/drives/${driveId}/items/${fileId}/content`;
            const response = await fetch(endpoint, {
                headers: {
                    'Authorization': `Bearer ${accessToken}`
                }
            });
            console.log(response);
            if (!response.ok) {
                throw new Error('ファイルの取得に失敗しました');
            }
            return await response.json();
        }

        /**
         * 指定されたファイルIDに基づいてレポートをプレビューする非同期関数。
         * @param {string} fileId - プレビューするファイルのID。
         */
        async function previewReport(fileId) {
            try {
                const fileContent = await fetchFileContent(fileId);
                const viewerHost = document.getElementById("viewer-host");
                const viewer = new MESCIUS.ActiveReportsJS.ReportViewer.Viewer(viewerHost, { language: "ja" });
                MESCIUS.ActiveReportsJS.Core.setLicenseKey("YOUR LICENSE KEY GOES HERE"); //ライセンスキーを設定します

                const accessToken = await getAccessToken();
                viewer.open(fileContent, {
                    ReportParams: [
                        { Name: "Bearer", Value: accessToken }
                    ]
                });
            } catch (error) {
                console.error('レポート表示エラー:', error);
                document.getElementById('result').textContent = `レポート表示エラー: ${error.message}`;
            }
        }

        /**
         * ページロード時にファイルリストを取得して表示する非同期関数。
         */
        window.onload = async () => {
            setActiveAccountOnLoad();
            handleRedirect().then(async () => {
                try {
                    const files = await getFileList();
                    createFileList(files);
                } catch (error) {
                    console.error('ファイルリスト取得エラー:', error);
                    document.getElementById('result').textContent = `ファイルリスト取得エラー: ${error.message}`;
                }
            });
        };
    </script>
</body>
</html>
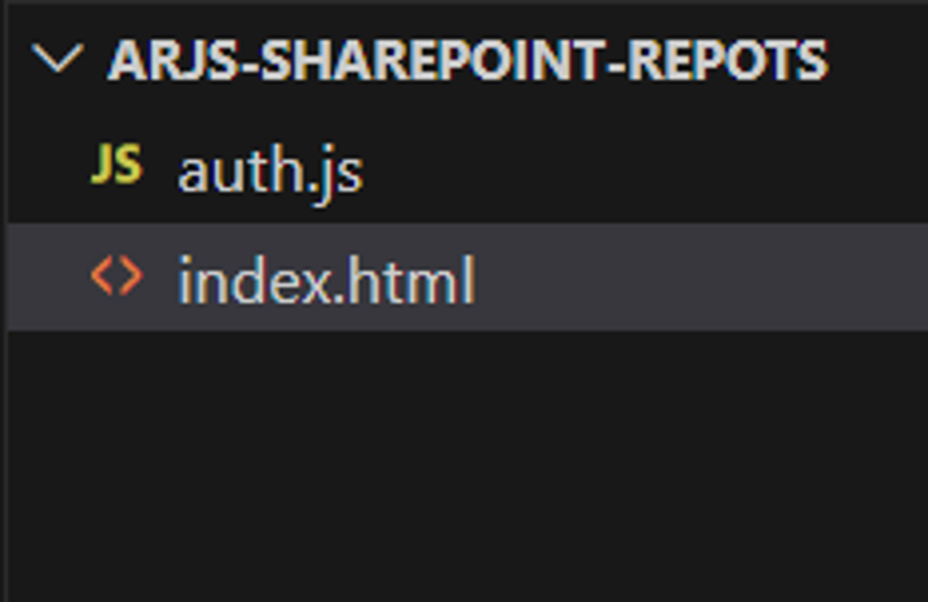
ActiveReportsJSや、MSAL.jsなどのJSライブラリはCDNから参照しているため、最終的なファイル構成は以下「index.html」と「auth.js」のみと非常にシンプルな構成で構築することができました。

動作確認
それでは、最後に動作確認をしていきます。VSCodeの拡張機能「Live Server※」を使用して実行します。※拡張機能がインストールされていない場合はインストールして動作確認を行ってください。
SharePoint Online上のフォルダからファイルリストを取得し、さらに対象のレポートの表示が行えました。今度は、別のユーザーでログインして動作を確認してみます。
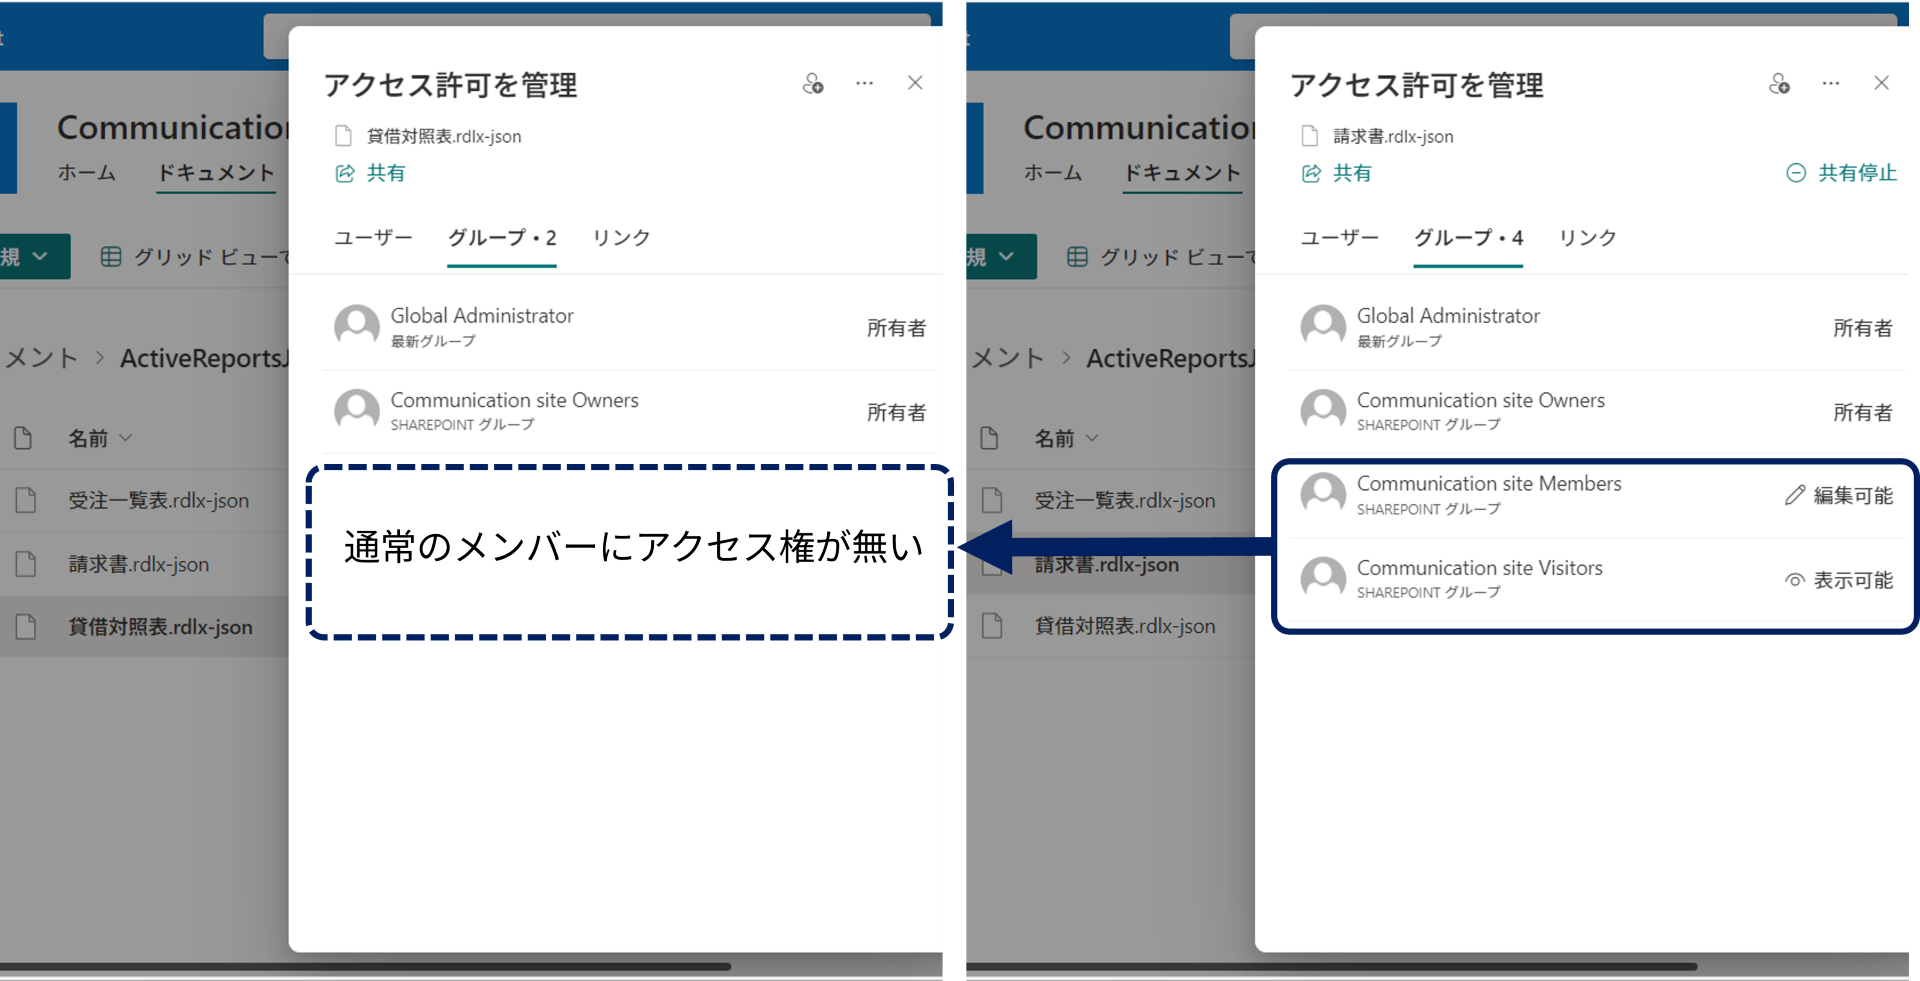
別のユーザーでは、先ほど表示されていた「貸借対照表.rdlx-json」ファイルが表示されなくなりました。この動作は不具合ではなく、次の画像で設定しているSharePoint Onlineのファイルアクセス権に基づくものです。
さらに、以下のように同じ帳票の表示においても、別のユーザーでログインした場合に一部のレコードが表示されていません。この動作もListsのレコードのアクセス権の設定に基づく動作です。
さいごに
全2回にわたり、「SharePoint Online」とJavaScript帳票ライブラリ「ActiveReportsJS」を利用した帳票システムの構築方法を紹介いたしました。
「SharePoint Online」を活用することで、「Microsoft 365」の強力なセキュリティ機能を利用することができます。また帳票機能・認証機能などをもつ強力なJavascriptライブラリを利用することで、フロントエンド側の「index.html」と「auth.js」の2つのファイルのみで非常にシンプルな帳票システムを構築することが可能です。
「SharePoint Online」上の「Microsoft Lists」でデータ管理をしているような場合は、データソースをそのまま活用することで、低コストで帳票システムの開発を行えますので。ぜひ、こちらの記事を参考にしてみてください。!


