はじめに
UITableViewに異なる配列を表現するには、どうするのか色々調べましたが、なかなか有益な情報が無かった為、記事として残しておき、同じような疑問にぶつかった人が本記事を見て少しでも理解を早めて頂ければなと思った次第です。
1.TableViewの設置
TableViewを画面いっぱいに表示します。

2.TableViewの紐付け

3.配列の表示
今回は、fruitsとvegetableを異なる配列で表現したいと思います。
ViewController
import UIKit
class ViewController: UIViewController {
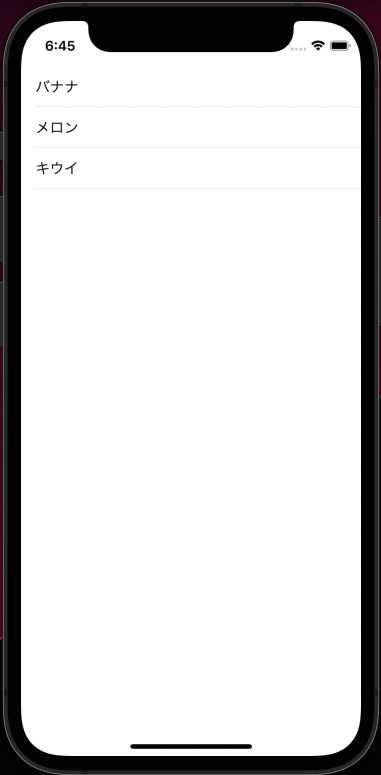
let fruits = ["バナナ","メロン","キウイ"]
let vegetable = ["玉ねぎ","大根","ニンジン"]
@IBOutlet weak var tableView: UITableView!
override func viewDidLoad() {
super.viewDidLoad()
tableView.delegate = self
tableView.dataSource = self
}
}
extension ViewController: UITableViewDelegate, UITableViewDataSource {
func tableView(_ tableView: UITableView, numberOfRowsInSection section: Int) -> Int {
return fruits.count
}
func tableView(_ tableView: UITableView, cellForRowAt indexPath: IndexPath) -> UITableViewCell {
let cell = UITableViewCell(style: .default, reuseIdentifier: "cell")
cell.textLabel?.text = fruits[indexPath.row]
return cell
}
}
このままだと、vegetableの配列がまだ表示出来ていないので、コードを書いて、表示できるようにしていきます。
ViewController
import UIKit

class ViewController: UIViewController {

    let fruits = ["バナナ","メロン","キウイ"]
    let vegetable = ["玉ねぎ","大根","ニンジン"]


    @IBOutlet weak var tableView: UITableView!
    override func viewDidLoad() {
        super.viewDidLoad()
        tableView.delegate = self
        tableView.dataSource = self
    }
}
extension ViewController: UITableViewDelegate, UITableViewDataSource {
//セクション数の指定
    func numberOfSections(in tableView: UITableView) -> Int {
        2
    }
//それぞれのセルの表示数を指定
    func tableView(_ tableView: UITableView, numberOfRowsInSection section: Int) -> Int {
        if section == 0 {
            return fruits.count
        }
        else if section == 1 {
            return vegetable.count
        }
        else {
            return 0
        }
    }
//それぞれのセルに表示される内容を指定
func tableView(_ tableView: UITableView, cellForRowAt indexPath: IndexPath) -> UITableViewCell {
    let cell = UITableViewCell(style: .default, reuseIdentifier: "cell")
    cell.textLabel?.text = fruits[indexPath.row]
    if indexPath.section == 0 {
        cell.textLabel?.text = fruits[indexPath.row]
    }
    else if indexPath.section == 1 {
        cell.textLabel?.text = vegetable[indexPath.row]
}
    return cell
}
}
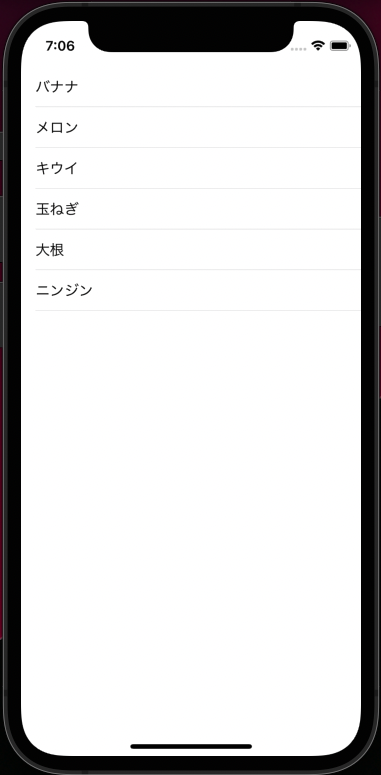
こんな感じで二つの配列を表示できました!!
4.おまけ
もう少しコードを書いて、配列表示をわかりやすくしましょう!!
ViewController
import UIKit

class ViewController: UIViewController {
//セクションのタイトルを定義
    let sectionTitle: NSArray = ["フルーツ", "野菜"]
    let fruits = ["バナナ","メロン","キウイ"]
    let vegetable = ["玉ねぎ","大根","ニンジン"]

    @IBOutlet weak var tableView: UITableView!
    override func viewDidLoad() {
        super.viewDidLoad()
        tableView.delegate = self
        tableView.dataSource = self
    }
}
extension ViewController: UITableViewDelegate, UITableViewDataSource {
//セクション数の指定
    func numberOfSections(in tableView: UITableView) -> Int {
        2
    }
//セクションタイトルを指定
        func tableView(_ tableView: UITableView, titleForHeaderInSection section: Int) -> String? {
            return sectionTitle[section] as? String
        }
//それぞれのセルの表示数を指定
    func tableView(_ tableView: UITableView, numberOfRowsInSection section: Int) -> Int {
        if section == 0 {
            return fruits.count
        }
        else if section == 1 {
            return vegetable.count
        }
        else {
            return 0
        }
    }
//それぞれのセルに表示される内容を指定
func tableView(_ tableView: UITableView, cellForRowAt indexPath: IndexPath) -> UITableViewCell {
    let cell = UITableViewCell(style: .default, reuseIdentifier: "cell")
    cell.textLabel?.text = fruits[indexPath.row]
    if indexPath.section == 0 {
        cell.textLabel?.text = fruits[indexPath.row]
//セルの色を指定
        cell.textLabel?.textColor = UIColor.red
//セルのフォントを指定
        cell.textLabel?.font = UIFont.boldSystemFont(ofSize: 30)
    }
    else if indexPath.section == 1 {
        cell.textLabel?.text = vegetable[indexPath.row]
        cell.textLabel?.textColor = UIColor.blue
        cell.textLabel?.font = UIFont.boldSystemFont(ofSize: 30)
}
    return cell
}
}

以上です!!