3行で
- GestureDetectorの
onVerticalDragUpdateでドラッグの位置が取得できる - 取得したドラッグの位置を
ValueNotifier<double>とValueListenableBuilder<double>でWidgetの位置とサイズを調整する - SplitView や Multi-Window のような画面が実装できるが、ユーザビリティはアプリをインストールして各自で判断してください
画面の仕様
| onVerticalDragUpdateでWidgetサイズを調整(英語の長文問題) |
|---|
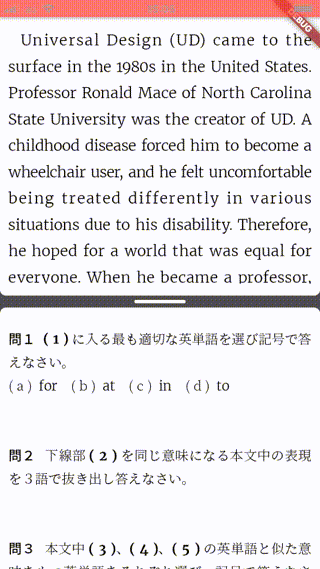 |
- 黒いバーをドラッグして上下に移動させることで、上下のWidgetのサイズを変更する
- 黒いバーをダブルタップすると、初期位置(中央)に黒いバーが戻る
- 黒いバーの移動に合わせて、上下のWidgetのスクロール範囲を調整する
- スマホのみで、回転対応とタブレットは非対応です

画面は英語の長文問題です。上が問題文で、下が設問文です。
問題と設問を同時に見ながら解きたいというニーズがあると思い実装しました。
実際に使いやすいかどうかは、アプリをインストールして体験してみてください。
この画面は無料で利用でき、iOSもAndroidも仕様は同じです。
実装のポイント
1. StackでListView.builderを重ねる
この画面は2つのListView.builderを重ねて実装しています。
上に重なっている側の画面(_downView)に黒いバーを実装しています。
そして、上下の画面に ValueListenableBuilder から伝達されるドラッグ位置(y)を渡してWidgetの位置やサイズを調整します。
Widget _createParagraphView({
  @required Paragraph paragraph,
}) {
  return ValueListenableBuilder<double>(
    valueListenable: _dragPositionNotifier,
    builder: (_, y, __) {
      return Stack(
        children: [
          _upView(paragraph: paragraph, y: y), // 上の画面
          _downView(paragraph: paragraph, y: y), // 下の画面
        ],
      );
    },
  );
}
2. paddingでスクロールの領域を調整する
上の画面は、複数の画像を表示するListView.builderが定義されているだけです。
サイズを調整する黒いバーは下の画面に実装されています。
上の画面は、黒いバーに従って下の画面の高さが変わるので、その値に従って上の画面のpaddingのbottomを調整します。
この調整をしないと、上の画面を下までスクロールしたとき表示する最後の画像が途中で切れてしまいます。
しかし、下の画面の高さ分だけbottomに余白をつくることで、スクロールしても画像が領域内に収まって表示されます。
Widget _upView({
  @required Paragraph paragraph,
  @required double y,
}) {
  final downViewVisibleHeight = screenHeight(
        context,
        reducedBy: _dragPositionThreshold + _safeAreaBottomHeight,
      ) -
      y;
  return Container(
    color: Colors.white,
    child: ListView.builder(
      padding: EdgeInsets.only(
        top: 16,
        bottom: 8 + downViewVisibleHeight,
        left: 8,
        right: 8,
      ),
      shrinkWrap: true,
      scrollDirection: paragraph.scrollDirection,
      reverse: paragraph.isReverse,
      itemCount: paragraph.paragraphImageUrls.length,
      itemBuilder: (_, index) {
        return NetworkPlaceholderCacheImage.load(
          imageUrl: paragraph.paragraphImageUrls[index],
        );
      },
    ),
  );
}
3. Containerのtransformで下の画面の初期位置を決める
下の画面は上の画面にStackで重なったWidgetです。
下の画面には、Columnで「黒いバー」と「複数の画像を表示するListView.builder」を実装しています。
Widget _downView({
  @required Paragraph paragraph,
  @required double y,
}) {
  return Container(
    transform: Matrix4.identity()..translate(0.0, y),
    color: Colors.white,
    child: Column(
      children: <Widget>[
        _dragBorderControl(),
        Expanded(
          child: ListView.builder(
            padding: EdgeInsets.only(
              top: 16,
              bottom: y,
              left: 8,
              right: 8,
            ),
            shrinkWrap: true,
            scrollDirection: paragraph.scrollDirection,
            reverse: paragraph.isReverse,
            itemCount: paragraph.questionImageUrls.length,
            itemBuilder: (_, index) {
              return NetworkPlaceholderCacheImage.load(
                imageUrl: paragraph.questionImageUrls[index],
              );
            },
          ),
        ),
      ],
    ),
  );
}
初期表示のために、Containerのtransformに Matrix4.identity()..translate(0.0, y) を渡します。
このときのyの初期値は「画面の高さの半分から黒いバーのドラッグ領域を省いた高さ(_dragDefaultPosition)」です。
_dragDefaultPosition = screenHeight(
      context,
      ratio: 0.5,
      reducedBy: _dragPositionThreshold,
    )
_dragPositionNotifier = ValueNotifier<double>(_dragDefaultPosition);
少し話はそれますが、screenHeightのメソッドは下記のブログで紹介されています。
画面サイズを軸に任意のサイズが欲しい場合は、とても便利な方法なので参考になります。
そして、下の画面でも黒いバーの移動分(上の画面の高さ分)だけ、下に余白を設けてスクロールしても画像が途中で切れてしまわないようにします。
4. GestureDetectorのonVerticalDragUpdateを黒いバーに定義する
黒いバーのレイアウトは、StackとContainerでデザインできます。
onDoubleTapは黒いバーをダブルタップすると、黒いバーを初期位置(_dragDefaultPosition)にする処理です。
onVerticalDragUpdateは、ドラック中の黒いバーの位置を取得する処理です。
_dragPositionThreshold は黒いバーの高さにドラックしやすく余分に領域をもたせた高さです。
この _dragPositionThreshold に従ってドラック中に画面外へ黒いバーが飛び出さないように、上下でバーの移動の限界値を調整します。
Widget _dragBorderControl() {
  final borderControl = Stack(
    alignment: Alignment.center,
    children: <Widget>[
      Container(
        height: _dragPositionThreshold,
        color: Colors.black.withOpacity(0.7),
        child: Center(
          child: Container(
            width: 60,
            height: 4,
            decoration: BoxDecoration(
              color: Colors.white,
              border: Border.all(color: Colors.white),
              borderRadius: BorderRadius.circular(4),
            ),
          ),
        ),
      ),
      Container(
        height: 14,
        transform: Matrix4.identity()..translate(0.0, 14),
        decoration: const BoxDecoration(
          color: Colors.white,
          borderRadius: BorderRadius.vertical(
            top: Radius.circular(7),
          ),
        ),
      ),
      Container(
        height: 14,
        transform: Matrix4.identity()..translate(0.0, -14),
        decoration: const BoxDecoration(
          color: Colors.white,
          borderRadius: BorderRadius.vertical(
            bottom: Radius.circular(7),
          ),
        ),
      ),
    ],
  );

  return GestureDetector(
    onDoubleTap: () {
      _dragPositionNotifier.value = _dragDefaultPosition;
    },
    onVerticalDragUpdate: (drag) {
      final dy = screenHeight(context, reducedBy: drag.globalPosition.dy);
      if (dy > _dragPositionThreshold + _safeAreaBottomHeight &&
          dy < screenHeight(context, reducedBy: _dragPositionThreshold)) {
        _dragPositionNotifier.value =
            drag.globalPosition.dy - _dragPositionThreshold;
      }
    },
    child: borderControl,
  );
}
おわりに
当初、企画側からこの画面仕様がきたとき「面倒なことになりそうなだな」と思いました ![]()
しかし、Flutterの表現力は凄まじく、1日もかからずiOSとAndroidの両方で実装できました ![]()
この画面のユーザビリティは賛否両論ありそうですが、企画側の意図を出来るだけ早く実現できるのは、Flutterの強みであり、それを実感できたプロジェクトでした。
私だけでなく、皆さんからも「Flutterでこんな画面を作れるぞ!作ったぞ!」という面白い企画や実装お待ちしております ![]()