前回の続き
Vue.jsと比較しながら覚えるAngular -構成編- その2
ここからゴリゴリコードを書いていこうと思う。
まずは何作るの?
ページ遷移を比較したいので
トップページ、一覧ページ、詳細ページの3ページを作って行こうと思う
一覧ページと詳細ページではAPIから取得したデータを表示する
デザインはこんな感じ
トップページ
一覧ページ

詳細ページ

何はともあれ、遷移ページ
まずは空のページを作成していきたいと思う
Vueの場合
<template>
  <div class="top">
    Top
  </div>
</template>

<script>

export default {
  name: 'Top',
}
</script>
<template>
  <div class="list">
    List
  </div>
</template>

<script>

export default {
  name: 'List',
}
</script>
<template>
  <div class="detail">
    Detail
  </div>
</template>

<script>

export default {
  name: 'Detail',
}
</script>
次にコンポーネントと遷移を紐づけていく
URLは以下の3つにする
- / トップページ
- /list 一覧ページ
- /detail/[id] 詳細ページ
import Vue from 'vue'
import VueRouter from 'vue-router'
import Top from '@/views/Top.vue'

Vue.use(VueRouter)

const routes = [
  {
    path: '/',
    name: 'Top',
    component: Top
  },
  {
    path: '/list',
    name: 'List',
    component: () => import(/* webpackChunkName: "list" */ '@/views/List.vue')
  },
  {
    path: '/detail/:id',
    name: 'Detail',
    component: () => import(/* webpackChunkName: "detail" */ '@/views/Detail.vue')
  }
]

const router = new VueRouter({
  mode: 'history',
  base: process.env.BASE_URL,
  routes
})

export default router
便宜的に、webpackchunkを利用しているがここでは説明について割愛する
URLで各ページが以下の表示なっていれば成功


Angularの場合
Angularも空のページを作成していこう
Vueではファイルを複製しながらページを作成したが
Angular CLIにはファイルとディレクトリを生成するコマンドがあるので以下のコマンドを実行する
$ ng generate component top # 省略形のコマンド ng g c top
$ ng generate component list
$ ng generate component detal
3つのコマンドを叩くと
3つのファイルが入ったディレクトリが3つ生成されているのが確認できる
Topディレクトリからの抜粋
<p>top works!</p>
// 空のファイル
import { Component, OnInit } from '@angular/core';

@Component({
  selector: 'app-top',
  templateUrl: './top.component.html',
  styleUrls: ['./top.component.scss']
})
export class TopComponent implements OnInit {

  constructor() { }

  ngOnInit() {
  }

}
もう1つ注目して欲しいところが
/src/app/app.module.tsファイルに追記されている項目が存在する
moduleファイルはコンポーネントが関係するものを記載するファイルである
import { BrowserModule } from '@angular/platform-browser';
import { NgModule } from '@angular/core';

import { AppRoutingModule } from './app-routing.module';
import { AppComponent } from './app.component';
import { TopComponent } from './top/top.component';
import { ListComponent } from './list/list.component';
import { DetailComponent } from './detail/detail.component';

@NgModule({
  declarations: [
    AppComponent,
+    TopComponent,
+    ListComponent,
+    DetailComponent
  ],
  imports: [
    BrowserModule,
    AppRoutingModule,
  ],
  bootstrap: [AppComponent]
})
export class AppModule { }
コンポーネント内で使いたいファイルを
declarationsにコンポーネントファイルを読み込ませることによって他のコンポーネントを利用することができる
次に、遷移のためのルーティングファイルを記載していく
import { NgModule } from '@angular/core';
import { Routes, RouterModule } from '@angular/router';
+ import { TopComponent } from './top/top.component';
+ import { ListComponent } from './list/list.component';
+ import { DetailComponent } from './detail/detail.component';


const routes: Routes = [
+  {
+    path: '',
+    component: TopComponent
+  },
+  {
+    path: 'list',
+    component: ListComponent
+  },
+  {
+    path: 'detail/:id',
+    component: DetailComponent
+  }
];

@NgModule({
  imports: [RouterModule.forRoot(routes)],
  exports: [RouterModule]
})
export class AppRoutingModule { }
ここはvueとほとんど変わらない
URLでアクセスして画面を確認してみて下の画像が表示されていれば成功


CSSレイアウト
ファイルの作成が完了したので、CSSのレイアウトを行っていく
まずは、ブラウザ間のレイアウトの差異を埋めるために
normalize.scssと共通CSSを書き込んでいく
Vueの場合
normallize.scssをインストール
yarn add normalize.scss
or
npm install normalize.scss
nomalize.scssのインポート
<template>
  <div id="app">
    <router-view/>
  </div>
</template>

+ <script>
+ import 'normalize.scss/normalize.scss'
+
+ export default{
+   name: 'App'
+ }
+ </script>
共通CSSの記載
<template>
  <div id="app">
    <router-view/>
  </div>
</template>

<script>
import 'normalize.scss/normalize.scss'

export default{
  name: 'App'
}
</script>

<style>
body {
  font-family: YuGothic,'Yu Gothic','Hiragino Kaku Gothic ProN','ヒラギノ角ゴ ProN W3','メイリオ', + Meiryo,'MS ゴシック',sans-serif;
  font-weight: 400;
  font-size: 12px;
}
</style>
Angularの場合
normalize.scssのインストールは変わらないので割愛
Angularには環境の設定ファイルにangular.jsonというものが存在する
node_modulesフォルダにインストールされたファイルをscssで読み込みたいので
"node_modules/normalize.scss/normalize.scss
をstylesに追記する
{
  "$schema": "./node_modules/@angular/cli/lib/config/schema.json",
  "version": 1,
  "newProjectRoot": "projects",
  "projects": {
    "sample-angular": {
      ...
      "architect": {
        "build": {
          "builder": "@angular-devkit/build-angular:browser",
          "options": {
            ...
            "styles": [
+               "node_modules/normalize.scss/normalize.scss",
              "src/styles.scss"
            ],
            ...
}
Angularには共通のスタイルを設定するために
styles.scssが用意されているのでここにnomalize.scssの読み込みと共通スタイルの記述を記述していく
@import '~normalize.scss';

body {
  font-family: YuGothic,'Yu Gothic','Hiragino Kaku Gothic ProN','ヒラギノ角ゴ ProN W3','メイリオ', + Meiryo,'MS ゴシック',sans-serif;
  font-weight: 400;
  font-size: 12px;
}
これで下準備は両方ともできた
Topページを作成
トップページを作成する
トップページの構成は
共通で利用できるコンポーネントを用意し、トップページに読み込ませていく
共通コンポーネント
- ボタン
- ヘッダー
Vueの場合
ボタンコンポーネントはpropsを利用して親コンポーネントからデータを受け渡しできるように作成する
<template>
  <router-link :to="path" class="button">{{ text }}</router-link>
</template>

<script>

export default {
  name: 'BaseButton',
  props: {
    /**
     * @param text buttonに表示させる文字列
     * @param path 遷移先のURLのパス
     */
    text: {
      type: String,
      required: true
    },
    path: {
      type: String,
      required: true
    }
  }
}
</script>

<style lang="scss" scoped>
.button{
  display: block;
  font-size: 22px;
  width: 400px;
  height: 70px;
  padding: 25px;
  box-sizing: border-box;
  color: #fff;
  background: #000;
  font-weight: 700;
  text-align: center;
  line-height: 1;
  transition: all .3s ease;
  border: 1px solid transparent;
  &:hover {
    background-color: #fff;
    border-color: #000;
    color: #000;
  }
}
</style>
ヘッダーコンポーネントはrouter-link-activeを利用して遷移したページに対してCSSのクラスを適用できるようにしている
<template>
  <header class="header">
    <nav>
      <ul class="navList">
        <li class="navItem">
          <router-link to="/" class="navLink" exact>トップ</router-link>
        </li>
        <li class="navItem">
          <router-link to="/list" class="navLink" exact>商品一覧</router-link>
        </li>
      </ul>
    </nav>
  </header>
</template>

<script>

export default {
  name: 'TheHeader',
}
</script>

<style lang="scss" scoped>
.header{
  padding: 60px 0;
}

.navList{
  display: flex;
  justify-content: center;
}
.navLink{
  color: #ccc;
  font-weight: 700;
  line-height: 1;
}

.navItem{
  padding: 0 20px;
  &:not(:first-child){
    border-left: 1px solid #000;
  }
}

.router-link-active{
  color: #000;
}
</style>
トップでは共通コンポーネントをimportでファイルを読み込み
componentsでvueテンプレートで利用できるように記述する
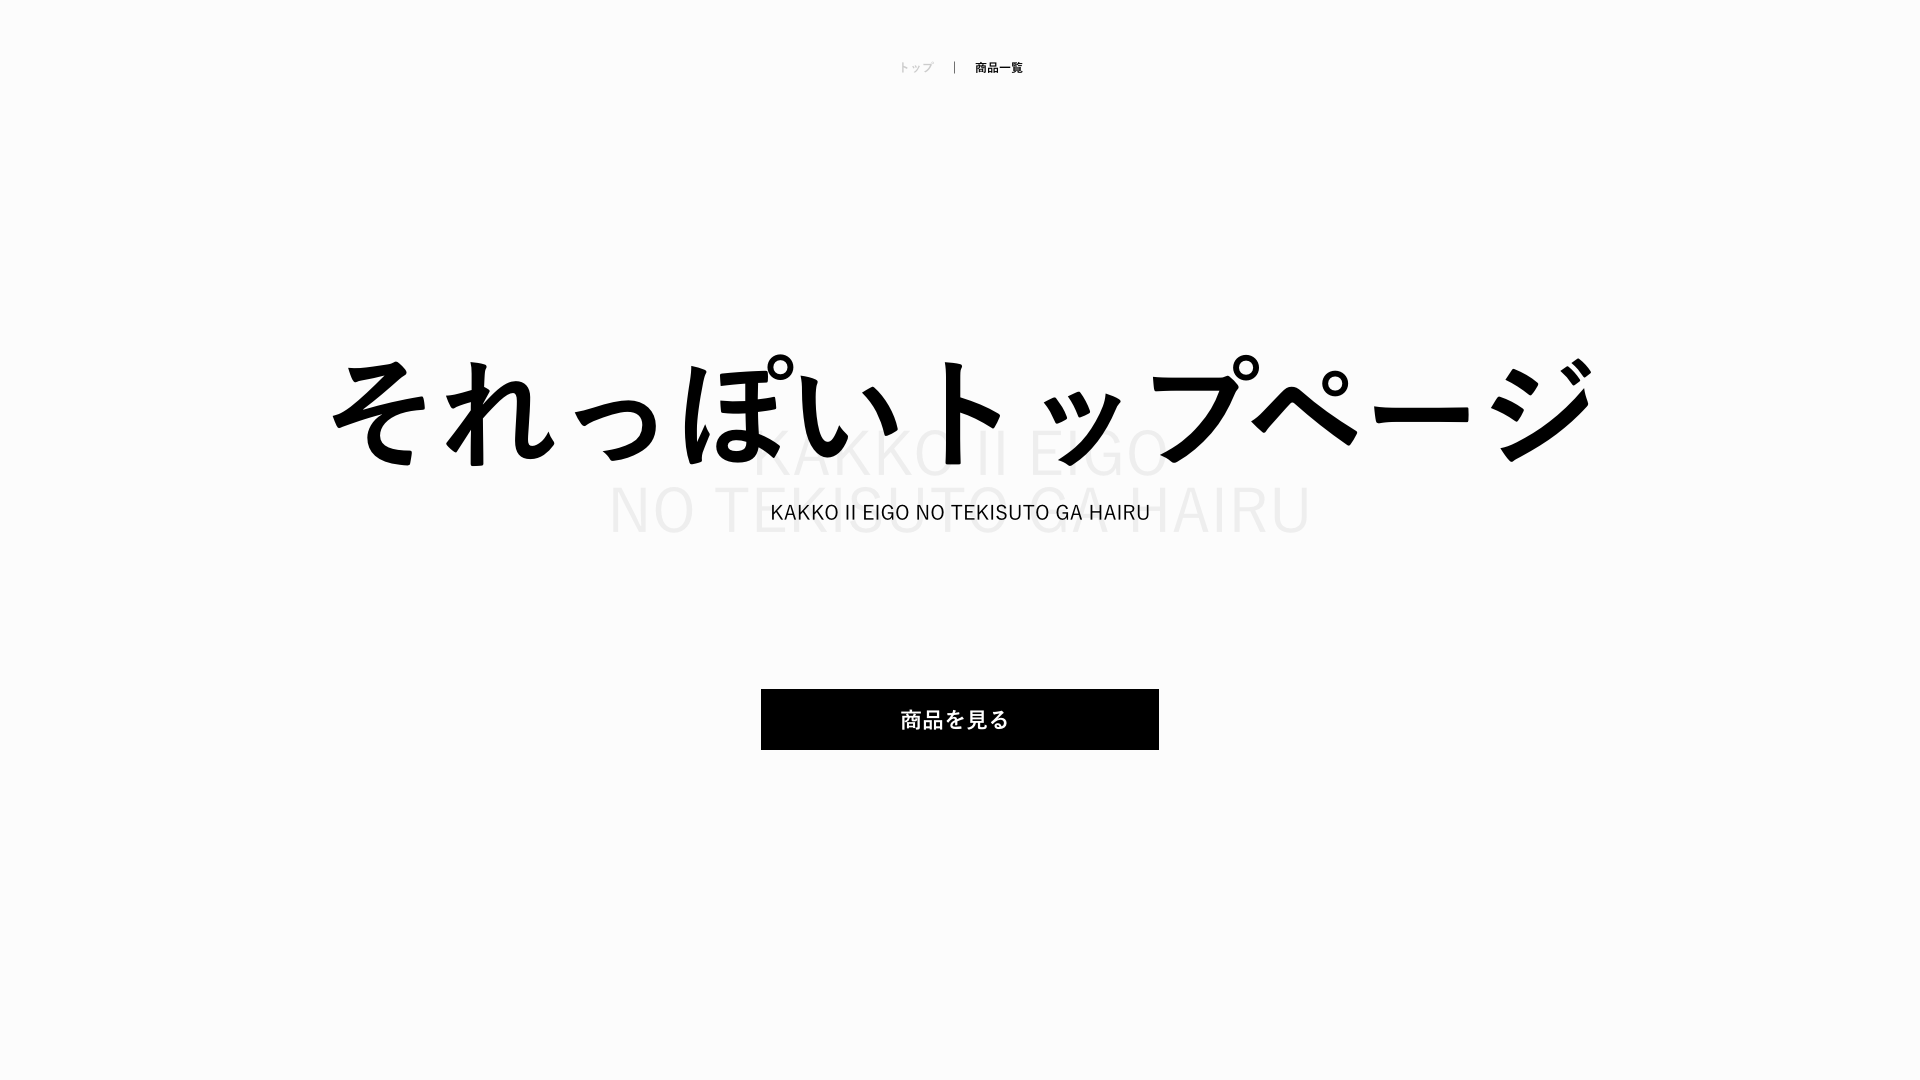
<template>
  <div class="top">
    <TheHeader></TheHeader>
    <div class="titleWrap">
      <h1 class="title">それっぽいトップページ</h1>
      <p class="subTitle">KAKKO II EIGO NO TEKISUTO GA HAIRU</p>
      <p class="subTitleBg">KAKKO II EIGO<br>NO TEKISUTO GA HAIRU</p>
    </div>
    <div class="button">
      <BaseButton text="商品を見る" path="/list"></BaseButton>
    </div>
  </div>
</template>

<script>
import TheHeader from '@/components/TheHeader'
import BaseButton from '@/components/BaseButton'

export default {
  name: 'Top',
  components: {
    TheHeader,
    BaseButton
  }
}
</script>

<style lang="scss" scoped>
.titleWrap{
  position: relative;
  margin-top: 200px;
}
.title{
  font-size: 120px;
  line-height: 1;
  font-weight: 700;
  text-align: center;
}
.subTitle{
  margin-top: 30px;
  font-size: 20px;
  text-align: center;
}
.subTitleBg{
  position: absolute;
  top: 70px;
  left: 50%;
  z-index: -1;
  font-size: 60px;
  line-height: 1.05;
  color: #eee;
  text-align: center;
  transform: translateX(-50%);
}

.button{
  width: 400px;
  margin: 150px auto 0;
}
</style>
AppでリセットCSSを追記してトップページは完成
<template>
  <div id="app">
    <router-view/>
  </div>
</template>

<script>
import 'normalize.scss/normalize.scss'

export default{
  name: 'App'
}
</script>

<style>
body {
  font-family: YuGothic,'Yu Gothic','Hiragino Kaku Gothic ProN','ヒラギノ角ゴ ProN W3','メイリオ', Meiryo,'MS ゴシック',sans-serif;
  font-weight: 400;
  font-size: 12px;
  height: 100%;
  background: #FCFCFC;
}
h1, p, ul{
  margin: 0;
}
ul{
  list-style-type: none;
  padding-left: 0;
}
a{
  text-decoration: none;
}
</style>
Angularの場合
Angularの場合も、ほとんど似ているが
今回は共通ファイルが利用しやすくするためにsharedフォルダを作成して、コンポーネントを管理していきたいと思う
まずはcliコマンドで管理するためのフォルダを作成
ng generate module shared # 省略形はng g m shared
生成されるファイル
import { NgModule } from '@angular/core';
import { CommonModule } from '@angular/common';

@NgModule({
  declarations: [],
  imports: [
    CommonModule
  ]
})
export class SharedModule { }
今回はコンポーネントファイルを共通ファイルとして管理するが
後々に他の機能も共通化する場合があるので
share/componentフォルダを作成して管理しやすいようにする
ng generate module shared/component
生成されるファイル
import { NgModule } from '@angular/core';
import { CommonModule } from '@angular/common';

@NgModule({
  declarations: [],
  imports: [
    CommonModule
  ]
})
export class ComponentModule { }
ファイルを作成したら、次にAppコンポーネントで利用できるように
Appモジュール←sharedモジュール←shared/compoentモジュールの順で紐づけていく
一番始めにappモジュールに対してsharedモジュールファイルを紐づけていく
モジュールファイルを紐づけは
imports: []の中に読み込む
import { BrowserModule } from '@angular/platform-browser';
import { NgModule } from '@angular/core';

import { AppRoutingModule } from './app-routing.module';
import { AppComponent } from './app.component';
import { TopComponent } from './top/top.component';
import { ListComponent } from './list/list.component';
import { DetailComponent } from './detail/detail.component';
+ import { SharedModule } from './shared/shared.module';

@NgModule({
  declarations: [
    AppComponent,
    TopComponent,
    ListComponent,
    DetailComponent
  ],
  imports: [
    BrowserModule,
    AppRoutingModule,
+    SharedModule
  ],
  bootstrap: [AppComponent]
})
export class AppModule { }
次にsharedモジュールにshared/componentモジュールを読み込んでいく
import { NgModule } from '@angular/core';
import { CommonModule } from '@angular/common';
import { ComponentModule } from './component/component.module';

@NgModule({
  declarations: [],
  imports: [
    CommonModule,
+    ComponentModule
  ]
})
export class SharedModule { }
次に少し特殊なのだが
読み込んだモジュールをappモジュールのような外部で利用する場合はexports:[]に
外部で利用したモジュールファイルを記述する必要があるので
exportsにshared/componentモジュールを記述していく
import { NgModule } from '@angular/core';
import { CommonModule } from '@angular/common';
import { ComponentModule } from './component/component.module';

@NgModule({
  declarations: [],
  imports: [
    CommonModule,
    ComponentModule
  ],
+  exports: [
+    ComponentModule
+  ]
})
export class SharedModule { }
これでsharedフォルダの作成は完成
次にcliコマンドでボタンコンポーネントとヘッダーコンポーネントのファイルを作成していく
ng generate component shared/component/button # 省略形はng g c shared/component/button
ng g c shared/component/header
コマンドが成功するとts、html、scssファイルが生成される
import { Component, OnInit } from '@angular/core';

@Component({
  selector: 'app-button',
  templateUrl: './button.component.html',
  styleUrls: ['./button.component.scss']
})
export class ButtonComponent implements OnInit {

  constructor() { }

  ngOnInit() {
  }

}
import { Component, OnInit } from '@angular/core';

@Component({
  selector: 'app-header',
  templateUrl: './header.component.html',
  styleUrls: ['./header.component.scss']
})
export class HeaderComponent implements OnInit {

  constructor() { }

  ngOnInit() {
  }

}
ファイルの生成が成功すると親の直近のmoduleファイルのdeclarationsに自動的にコンポーネントが読み込まれているのが確認できる
import { NgModule } from '@angular/core';
import { CommonModule } from '@angular/common';
import { ButtonComponent } from './button/button.component';
import { HeaderComponent } from './header/header.component';

@NgModule({
+  declarations: [ButtonComponent, HeaderComponent],
  imports: [
    CommonModule
  ]
})
export class ComponentModule { }
しかし、このままではsharedモジュールでは呼び出すことができないのでexportを追記する
import { NgModule } from '@angular/core';
import { CommonModule } from '@angular/common';
import { ButtonComponent } from './button/button.component';
import { HeaderComponent } from './header/header.component';

@NgModule({
  declarations: [
    ButtonComponent,
    HeaderComponent
  ],
  imports: [
    CommonModule
  ],
+  exports: [
+    ButtonComponent,
+    HeaderComponent
+  ]
})
export class ComponentModule { }
sharedモジュールからちゃんとbuttonコンポーネントとheaderコンポーネントが読み込めているか
topコンポーネントから呼び出して確認してみる
<app-header></app-header>
<app-button></app-button>
コンポーネントをテンプレートで埋め込む場合はコンポーネントファイルのselectorに記載されている名前で呼び出すことができる
次にbuttonコンポーネントを作成していく
import { NgModule } from '@angular/core';
import { CommonModule } from '@angular/common';
import { ButtonComponent } from './button/button.component';
import { HeaderComponent } from './header/header.component';
+ import { RouterModule } from '@angular/router';

@NgModule({
  declarations: [
    ButtonComponent,
    HeaderComponent
  ],
  imports: [
    CommonModule,
+    RouterModule
  ],
  exports: [
    ButtonComponent,
    HeaderComponent
  ]
})
export class ComponentModule { }
Vueで遷移するためのタグ<router-link>を利用したい場合は、特に意識することなく
タグを追加するだけで利用することができたが
AngularではmoduleファイルにRouterModuleを読み込ませる必要がある
RouterModuleは独自Moduleではなくフレームワークに用意されたModuleファイルだ
<a [routerLink]="path" class="button">{{ text }}</a>
moduleファイルを読み込ませた場合、routerLink="ファイルパス"という形で遷移先を指定することができる
今回の場合は、文字列ではなく変数を追加しておきたかったので[routerLink]="ファイルパスの入る変数"という形でデータをバインディングしている
.button{
  display: block;
  font-size: 22px;
  width: 400px;
  height: 70px;
  padding: 25px;
  box-sizing: border-box;
  color: #fff;
  background: #000;
  font-weight: 700;
  text-align: center;
  line-height: 1;
  transition: all .3s ease;
  border: 1px solid transparent;
  &:hover {
    background-color: #fff;
    border-color: #000;
    color: #000;
  }
}
scssの説明は割愛
+ import { Component, OnInit, Input } from '@angular/core';

@Component({
  selector: 'app-button',
  templateUrl: './button.component.html',
  styleUrls: ['./button.component.scss']
})
export class ButtonComponent implements OnInit {
  /** Vueで言う所のpropsに該当するもの
   * @param text buttonに表示させる文字列
   * @param path 遷移先のURLのパス
  */
+  @Input() text: string;
+  @Input() path: string;

  constructor() { }

  ngOnInit() {
  }

}
Vueではpropsを利用することで親コンポーネントからデータを渡すことができた
AngularではInputを利用しすることでデータを受け渡すことができる
import { Input } from '@angular/core';

class Hoge {
  @Input() val: type; // @Input() 変数: 型の名前
}
次にheaderコンポーネントを作成
<header class="header">
  <nav>
    <ul class="navList">
      <li class="navItem">
        <a routerLink="/" class="navLink" routerLinkActive="router-link-active" [routerLinkActiveOptions]="{exact: true}">トップ</a>
      </li>
      <li class="navItem">
        <a routerLink="/list" class="navLink" routerLinkActive="router-link-active" [routerLinkActiveOptions]="{exact: true}">商品一覧</a>
      </li>
    </ul>
  </nav>
</header>
先ほどのbuttonコンポーネントとは異なりrouterLinkは文字列を入れていく
routerLinkActiveはrouterLinkで指定した場所に遷移した場合にclassを渡してくれるもの
routerLinkActiveのなかにclassを指定することでactive時に指定したclassが入る
[routerLinkActiveOptions]="{exact: true}"
上記のコードは遷移先のパスを正確だった場合にactiveになる設定
あとはscssを書き込む
.header{
  padding: 60px 0;
}

.navList{
  display: flex;
  justify-content: center;
}
.navLink{
  color: #ccc;
  font-weight: 700;
  line-height: 1;
}

.navItem{
  padding: 0 20px;
  &:not(:first-child){
    border-left: 1px solid #000;
  }
}

.router-link-active{
  color: #000;
}
@import '~normalize.scss';

body {
  font-family: YuGothic,'Yu Gothic','Hiragino Kaku Gothic ProN','ヒラギノ角ゴ ProN W3','メイリオ', Meiryo,'MS ゴシック',sans-serif;
  font-weight: 400;
  font-size: 12px;
  height: 100%;
  background: #FCFCFC;
}
h1, p, ul{
  margin: 0;
}
ul{
  list-style-type: none;
  padding-left: 0;
}
a{
  text-decoration: none;
}
次にトップページを作成する
<app-button>には親からデータを渡している
<div class="top">
  <app-header></app-header>
  <div class="titleWrap">
    <h1 class="title">それっぽいトップページ</h1>
    <p class="subTitle">KAKKO II EIGO NO TEKISUTO GA HAIRU</p>
    <p class="subTitleBg">KAKKO II EIGO<br>NO TEKISUTO GA HAIRU</p>
  </div>
  <div class="button">
    <app-button text="商品を見る" path="/list"></app-button>
  </div>
</div>
トップ用のレイアウトのcssを記載
.titleWrap{
  position: relative;
  margin-top: 200px;
}
.title{
  font-size: 120px;
  line-height: 1;
  font-weight: 700;
  text-align: center;
}
.subTitle{
  margin-top: 30px;
  font-size: 20px;
  text-align: center;
}
.subTitleBg{
  position: absolute;
  top: 70px;
  left: 50%;
  z-index: -1;
  font-size: 60px;
  line-height: 1.05;
  color: #eee;
  text-align: center;
  transform: translateX(-50%);
}

.button{
  width: 400px;
  margin: 150px auto 0;
}
Angularのトップページが完成
まとめ
ソースコードを書くと記事としてとても長くなってしまった
SPAフレームワークをコードレベルで比較していくと
同じ機能を持っていることがわかった
もしかしたら、Vueの製作者のエヴァン・ヨーさんがAngularJSの開発に関わってたため
機構が似ているのかもしれない
次の章では
商品一覧ページと詳細ページを作成したいと思う
最終章になるといいなぁ(願望)