まだまだコードは書きません
前回のお話、Vue.jsと比較しながら覚えるAngular -環境構築編- その1
御託はいい、ささっとこい!!と豪語しておきながらもコマンドツールについて
くどくどと説明してしまったのだが、今回はディレクトリについてまたくどくど説明していこうと思う。
ウッセーな黙ってソースコードみせろよっていうせっかちな人のためのソースコード
ディレクトリ構造
.
├── README.md
├── babel.config.js // javascriptのコンパイルに関する設定ファイル
├── package.json
├── postcss.config.js
├── public
│   ├── favicon.ico
│   └── index.html
├── src
│   ├── App.vue // エントリーファイル
│   ├── assets
│   │   └── logo.png
│   ├── components
│   │   └── HelloWorld.vue
│   ├── main.js
│   ├── router
│   │   └── index.js // ルーティングファイル
│   ├── store
│   │   └── index.js // vuexファイル
│   └── views
│       ├── About.vue
│       └── Home.vue
└── yarn.lock
Vue.jsはsrc配下に.vue拡張子のファイルが生成されている
主にこのファイルを編集して開発していく
.
├── README.md
├── angular.json // angular全体の設定ファイル
├── browserslist // サイトの対象ブラウザを設定するファイル(https://github.com/browserslist/browserslist)
├── package-lock.json
├── package.json
├── src
│   ├── app
│   │   ├── app-routing.module.ts // メインルーティングファイル
│   │   ├── app.component.ts
│   │   └── app.module.ts
│   ├── assets
│   ├── environments
│   │   ├── environment.prod.ts
│   │   └── environment.ts
│   ├── favicon.ico
│   ├── index.html
│   ├── main.ts
│   ├── polyfills.ts
│   └── styles.scss
├── tsconfig.app.json
└── tsconfig.json
一方、Angularの方は.tsファイルが生成されている
主にこのファイルを編集し、開発していく
コンポーネントファイル
.vueと.tsファイルを比較していく
vueファイル
<template>
  <div class="hello">
    <h1>{{ msg }}</h1>
    <p>
      For a guide and recipes on how to configure / customize this project,<br>
      check out the
      <a href="https://cli.vuejs.org" target="_blank" rel="noopener">vue-cli documentation</a>.
    </p>
    ...
</template>

<script>
export default {
  name: 'HelloWorld',
  props: {
    msg: String
  }
}
</script>

<!-- Add "scoped" attribute to limit CSS to this component only -->
<style scoped lang="scss">
h3 {
  margin: 40px 0 0;
}
ul {
  list-style-type: none;
  padding: 0;
}
li {
  display: inline-block;
  margin: 0 10px;
}
a {
  color: #42b983;
}
</style>
環境構築直後のsrc/components/HelloWorld.vueを見てみると
HTML,CSS,javascriptが一つのファイルに記述されているのがわかる
<template>部分にはHTML
<script>部分にはjavascript(記法としてはオブジェクトパターン*1を採用しているみたい)
<style>部分にはCSSが記述されています。lang属性を指定することによってscssで書き込むことが出来る
一つのファイルにまとめられてるの気持ち悪りぃーーーー!!!!という人は
それぞれのファイルを外部ファイルとして読み込みたい場合は以下のようにすることも可能
<template src="./template.html"></template>
<style src="./style.css"></style>
<script src="./script.js"></script>
*1 オブジェクトパターンとはjavascriptのデザインパターン(ある一定のルールに基づいてコードの書くこと)の一つ
知っておきたいデザインパターン 1.モジュールパターン
tsファイル
import { Component } from '@angular/core';

@Component({
  selector: 'app-root',
  template: `
    <!--The content below is only a placeholder and can be replaced.-->
    <div style="text-align:center" class="content">
      <h1>
        Welcome to {{title}}!
      </h1>
      ...
    <router-outlet></router-outlet>
  `,
  styles: []
})
export class AppComponent {
  title = 'sample-angular';
}
こっちは環境構築直後のAngularのファイル
templateの部分にはHTML
stylesの部分にはCSS([]の中にCSSを記述出来る)
export class [コンポーネント名]の部分にjavascriptを記述していきます(こちらはクラス構文で記述する)
Vue.jsはデフォルトだと、babelをトランスコンパイラしていて
AngularはTypescriptをトランスコンパイラとしている。
ルーティングファイル
ルーティングファイルとはサイトのページ遷移を定義するもの。
「このURLでアクセスしたらこの画面を表示する〜〜」ということを記載していくファイル。
Vue Router
import Vue from 'vue'
import VueRouter from 'vue-router'
import Home from '../views/Home.vue'

Vue.use(VueRouter)

const routes = [
  {
    path: '/',
    name: 'home',
    component: Home
  },
  ...
]

const router = new VueRouter({
  mode: 'history',
  base: process.env.BASE_URL,
  routes
})

export default router
routes変数の中で定義している
pathはURLのパス
nameはルーティングの名前をつけることができる
componentは表示したいコンポーネントを記述する
ルーティングで定義したコンポーネントは
<router-view/>タグの部分で表示される
<template>
  <div id="app">
    <div id="nav">
      <router-link to="/">Home</router-link> |
      <router-link to="/about">About</router-link>
    </div>
    <router-view/> // ここ!!!!
  </div>
</template>
Angualr Router
import { NgModule } from '@angular/core';
import { Routes, RouterModule } from '@angular/router';
import { TestComponent } from './test/test.component';


const routes: Routes = [
  {
    path: 'test/',
    component: TestComponent
  }
];

@NgModule({
  imports: [RouterModule.forRoot(routes)],
  exports: [RouterModule]
})
export class AppRoutingModule { }
ルーティングの定義にはapp-routing.module.tsファイルを利用する
routes変数に
pathはURLのパス
componentは表示したいコンポーネントを記述する
ここはvueファイルとほとんど変わりがないみたい
import { Component } from '@angular/core';

@Component({
  selector: 'app-root',
  template: `
    <!--The content below is only a placeholder and can be replaced.-->
    <div style="text-align:center" class="content">
      <h1>
        Welcome to {{title}}!
      </h1>
      ...
    <router-outlet></router-outlet> // ここ!!!!
  `,
  styles: []
})
export class AppComponent {
  title = 'sample-angular';
}
Angularでは
<router-outler></router-outlet>のタグでコンポーネントが表示される
コンポーネント共通データファイル
SPAフレームワークの多くはコンポーネント指向で設計されている
しかし、大規模な開発を行っていくと、コンポーネント間のデータのやりとりだけでは
開発が冗長で難しくなることがある。
そこで各種フレームワークにはコンポーネント間共通(サイト全体)でデータを保存する仕組みが存在する。
Vuex
Vue.jsのコンポーネントデータ更新の流れ
// view
<template>
  <div>
    <p>{{counter}}</p>
    <button @click="increment()">count up</button>
  </div>
</template>

<script>
export default {
  name: 'Sample',
  // state
  data() {
    return {
      counter: 0
    }
  },
  // actions
  methods: {
    increment() {
      this.counter++
    }
  }
}
</script>
通常、Vuexを利用しないコンポーネントのデータの受け渡しは以下の図

コンポーネントのデータはstateに保存され、actionsでstateの中身を変更する。
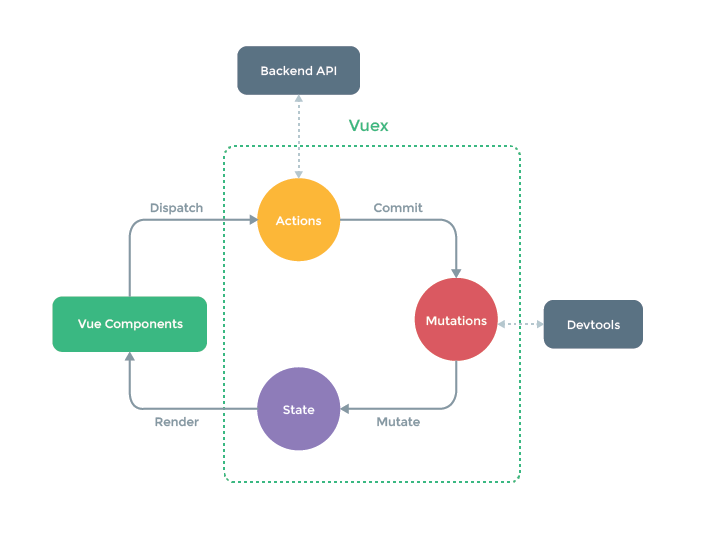
Vuexのデータ更新の流れ
一方、Vuexではstate,mutaions,actionsでデータの更新を行う。
import Vue from 'vue'
import Vuex from 'vuex'

Vue.use(Vuex)

export default new Vuex.Store({
  state: {
    counter: 0
  },
  mutations: {
    addCounter(state) {
      state.counter++
    }
  },
  actions: {
    increment({commit}) {
      commit('addCounter')
    }
  }
})
通常のコンポーネントデータと同様、stateにデータが保存され、actionsで実行するが、
通常コンポーネントと1点だけ異なる部分として、mutationsの存在がある。
Vuexではstateに値を入れたりなどの、stateへの変更はmutationsのみで行われるようにルールがある。
また、vuexのstateを表示する場合は、以下のように記述すると表示することが出来る
<template>
   <div>
+    <p>{{this.$store.counter}}</p>
    <button @click="$store.dispatch('increment')">count up</button>
  </div>
</template>

<script>
export default {
  name: 'Sample',
}
</script>
this.$store.counterの冗長な記述が嫌な場合はmapStateという機能を利用し短く記述することも可能
<template>
  <div>
+    <p>{{counter}}</p>
    <button @click="$store.dispatch('increment')">count up</button>
  </div>
</template>

<script>
import { mapState } from 'vuex'

export default {
  name: 'Sample',
  computed: mapState([
    'counter'
  ]),
}
</script>
Vueはデータを更新するだけでviewも描画されるようになった
データを更新するだけで、表示をすることにあまり意識する必要がないというメリットがある
Angular Serivce
Vuexではいい感じにデータを更新すれば、stateの値も書き換わってくれた
Angularではseriveファイルというものを利用する
最小単位のソースコードだとvuexとそこまで記述量も変わらないのだが
今後、待ち受ける壁は置いといて最小単位でserivceを作っていく
Angular CLIで雛形となるファイルを生成することができる
Angularのプロジェクトのpackage.jsonがあるディレクトリまでcdで移動して
$ ng g s service/counter
を実行してみよう
import { Injectable } from '@angular/core';

@Injectable({
  providedIn: 'root'
})
export class CounterService {

  constructor() { }
}
上記のファイルが生成される
@Injectableの部分は、serviceファイルが利用できるところを記述する必要がある
'root'を指定すると全体で利用することができる
全体以外で利用したい場合は、読み込みたいcomponent対してにmoduleファイルを作成し
serviceを利用する場所を限定することができる
import { SampleModule } from './sample.module.ts'

@Injectable({
  providedIn: SampleModule,
})
2種類の定義の仕方
サービスの定義はserviceファイルでも可能だが
他のやり方としてmoduleファイルからprovidersの中で定義することも可能である
import { TestService } from './test.serivce.ts'

providers: [TestService]
今回は、'root'で定義して作成していく。
Vuexファイルと同様にserviceを作成
Vuexと比較するためにstateと似た振る舞いをする変数を定義します
import { Injectable } from '@angular/core';

@Injectable({
  providedIn: 'root'
})
export class CounterService {
  // vuex で言う所のstate
+  public counter: number = 0

  constructor(
  ) { }
}
次に、Vuexにはデータを更新するルールが存在したが、
Angularは定義した変数に対して代入するだけで共通のデータを更新することができる
今回の場合は、共通で利用する変数をcounterに対して代入する関数を作る
import { Injectable } from '@angular/core';

@Injectable({
  providedIn: 'root'
})
export class ProductService {
  // vuex で言う所のstate
  public counter: number = 0

  constructor(
  ) { }

  // vuex で言う所のactionsのようなもの
  // 注意: AngularにはVuexで決められたような
  // stateのような振る舞いをする変数に対してルールは存在しないため関数を自由を作ることができる

  /**
   * @func increment
   * @description this.count++でインクリメントを実行しようとすると増加できなかったので、this.counter += 1に変更
   * @link https://stackoverflow.com/questions/33404307/angular-js-increment-a-counter-in-a-service-from-controller
   */
+  increment(){
+    this.counter += 1;
+  }
}
他にもServiceに関してRxjsなどの話もあるのだが
後述するとして、これが最小単位のソースコード
表示する際はserviceファイルをcomponentファイルで読み込むことで表示することができる
import { Component } from '@angular/core';
+ import { ProductService } from './service/product.service';

@Component({
  selector: 'app-root',
  template: `
    <div>
+      <p>{{this.productService.counter}}</p>
+      <button (click)="this.productService.increment()">count up</button>
    </div>
    <router-outlet></router-outlet>
  `,
  styles: []
})
export class AppComponent {

  constructor(
+    private productService: ProductService
  ) {}
}
まとめ
VuexとAngular Serivceを比較して、大まかなデータの保存の流れについて今回は説明していった
共通データの保存に関しては、Vuexの方が厳格なルールがあるのに対して
AngularのSerivceは比較的に自由に書くことができることがわかった
次はいよいよ実装編!!!
商品一覧ページを実際に作成して、実装の違いについて見ていこうと思う