Cognitive Toolkit (CNTK) 2.2 を Azure Linux GPU 仮想マシンにインストール
0. 概要
Microsoft Cognitive Toolkit (CNTK) 最新版 2.2 が9月15日にリリースされました :
そこで早速、Azure GPU 仮想マシン (N シリーズ NC 仮想マシン) にインストールして試してみましたので、具体的な手順を掲載しておきます。Azure も CNTK も初めての方でもインストール可能なように説明しましたので少し冗長かもしれませんが、慣れれば 30 分程度で Python による動作確認までできます。
内容は :
- Azure NC 仮想マシンの起動
- NVIDIA GPU 環境の構築
- GPU 対応 CNTK のインストール
- CNTK の動作確認
環境の主な仕様は :
- Azure NC 仮想マシン with NVIDIA Tesla® K80 GPU
- Ubuntu 16.04 LTS
- NVIDIA CUDA 8.0
- NVIDIA cuDNN 6.0
- Anaconda 3 4.1.1
- CNTK 2.2 (for GPU)
1. Azure GPU 装備仮想マシンの起動
1.1 Azure N シリーズ NC 仮想マシン概要
Azure では深層学習用に GPU が有効な仮想マシンとして N シリーズの NC 仮想マシンが用意されています。
この NC 仮想マシンを起動してその上で CNTK をインストールしていくことになります。N シリーズについては以下の記事がわかりやすいです :
該当箇所を抜粋しておくと :
Azure NC 仮想マシン – GPU コンピューティング
Azure NC の各インスタンスは NVIDIA Tesla® K80 GPU の性能を活用し、HPC や AI のワークロードの高速化に必要なコンピューティング能力を提供します。これらのインスタンスを活用することで、深層学習のトレーニング ジョブ、HPC シミュレーション、レンダリング、リアルタイムのデータ分析、DNA 塩基配列解析、CUDA® によるアクセラレーションを活用したさまざまなタスクを実行できるようになります。また、InfiniBand による RDMA を使用して複数のインスタンスにジョブをスケーリングすることも可能です。このため、Microsoft Cognitive Toolkit (CNTK) などのフレームワークを使用した緊密に連携したジョブを作成し、自然言語処理、画像認識、オブジェクト検出のトレーニングを行うことができます。
1.2 NC 仮想マシンの起動
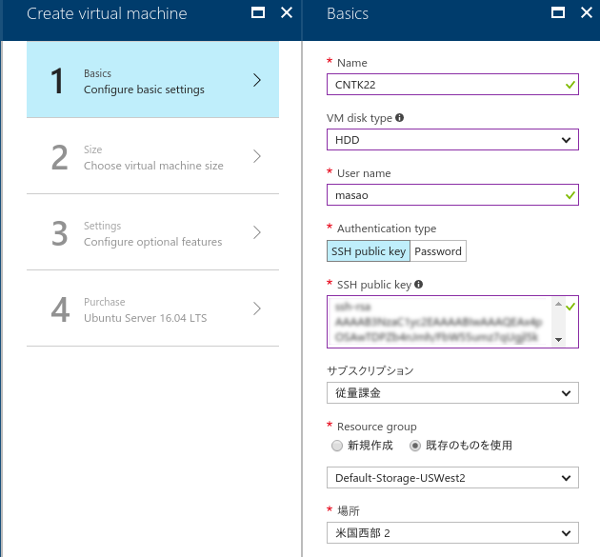
Azure ポータルから「新規」メニューを選択して Azure Marketplace として 「Compute」、Featured として「Ubuntu Server 16.04 LTS」を選択します。
(1) Basic - Configure basic settings
注意点が2つあって、「VM Disk Type」と「場所」の選択です。
- VM Disk type : (SSD ではなく) HDD を選択します。SSD のままだと (2) で N シリーズが表示されません。
- 場所 (リージョン) : "米国西部2" を選択しました。N シリーズが利用可能なリージョンは リージョン別の利用可能な製品 で確認しましょう。
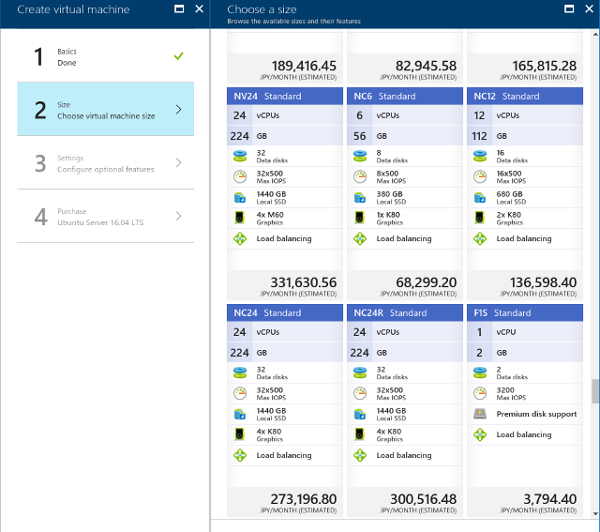
(2) Size - Choose virtual machine size
"すべて表示" を選択すると N シリーズも表示されます。インストールを試すだけなので NC6 Standard を選択します。
主な仕様は 6 vCPUs, メモリ 56 GB, 380 GB Local SSD そして 1 x K80 Graphics です。
良ければ「選択」ボタンを押します。
(3) Settings - Configure optional features
デフォルトのまま「OK」します
(4) Purchaes - Ubuntu Server 16.04 LTS
要件を確認して「購入」します。
1-3 GPU デバイスの確認
仮想マシンの起動がかかったら ssh で接続して GPU デバイスを確認しましょう :
$ lspci | grep -y nvidia
9ec9:00:00.0 3D controller: NVIDIA Corporation GK210GL [Tesla K80] (rev a1)
2. NVIDIA GPU 環境の構築
2-1. Ubuntu 環境の確認と初期化
最初に Ubuntu 環境を簡単に確認しておきます :
$ cat /etc/os-release
NAME="Ubuntu"
VERSION="16.04.3 LTS (Xenial Xerus)"
ID=ubuntu
ID_LIKE=debian
PRETTY_NAME="Ubuntu 16.04.3 LTS"
VERSION_ID="16.04"
HOME_URL="http://www.ubuntu.com/"
SUPPORT_URL="http://help.ubuntu.com/"
BUG_REPORT_URL="http://bugs.launchpad.net/ubuntu/"
VERSION_CODENAME=xenial
UBUNTU_CODENAME=xenial

$ uname -a
Linux CNTK22 4.4.0-92-generic #115-Ubuntu SMP Thu Aug 10 09:04:33 UTC 2017 x86_64 x86_64 x86_64 GNU/Linux
$ uname -r
4.4.0-92-generic
$ uname -m
x86_64

$ cat /proc/cpuinfo | grep processor | wc -l
6

$ free -h
              total        used        free      shared  buff/cache   available
Mem:            55G        252M         53G        8.6M        945M         54G
Swap:            0B          0B          0B

$ lsblk
NAME   MAJ:MIN RM  SIZE RO TYPE MOUNTPOINT
fd0      2:0    1    4K  0 disk
sda      8:0    0   30G  0 disk
`-sda1   8:1    0   30G  0 part /
sdb      8:16   0  340G  0 disk
`-sdb1   8:17   0  340G  0 part /mnt
sr0     11:0    1  628K  0 rom

$ df -h
Filesystem      Size  Used Avail Use% Mounted on
udev             28G     0   28G   0% /dev
tmpfs           5.6G  8.7M  5.5G   1% /run
/dev/sda1        30G  1.5G   28G   6% /
tmpfs            28G     0   28G   0% /dev/shm
tmpfs           5.0M     0  5.0M   0% /run/lock
tmpfs            28G     0   28G   0% /sys/fs/cgroup
/dev/sdb1       335G   67M  318G   1% /mnt
tmpfs           5.6G     0  5.6G   0% /run/user/1000
初期化を幾つか実行。ロケール、タイムゾーン、スワップ領域等の設定はお好みで :
$ sudo apt-get update

$ sudo apt-get upgrade

$ sudo apt-get install ntp
2-2. CUDA 8.0 のインストール
NVIDIA の CUDA Toolkit Download から Installer for Linux Ubuntu 16.04 x86_64 をダウンロードしてインストールすれば CUDA のインストールが可能になります (必ず、最新版を取得してください) :
$ wget https://developer.download.nvidia.com/compute/cuda/repos/ubuntu1604/x86_64/cuda-repo-ubuntu1604_8.0.61-1_amd64.deb

$ sudo dpkg -i cuda-repo-ubuntu1604_8.0.61-1_amd64.deb

$ sudo apt-get update

$ sudo apt-get install cuda
インストールが完了したらインストール先の /usr/local を確認します :
$ ls /usr/local -F
bin/  cuda@  cuda-8.0/  etc/  games/  include/  lib/  man@  sbin/  share/  src/

$ ls /usr/local/cuda/ -F
bin/  extras/   lib64@      libnvvp/  nvml/  README    share/  targets/  version.txt
doc/  include@  libnsight/  LICENSE   nvvm/  samples/  src/    tools/
~/.bashrc に以下を追記します :
export CUDA_HOME=/usr/local/cuda
export PATH=$PATH:$CUDA_HOME/bin
export LD_LIBRARY_PATH=$LD_LIBRARY_PATH:$CUDA_HOME/lib64
2-3. 動作確認
再起動したらドライバがロードされていることを確認します :
$ lsmod | grep -y nvidia
nvidia_uvm            688128  0
nvidia_drm             49152  0
nvidia_modeset        843776  1 nvidia_drm
nvidia              13115392  2 nvidia_modeset,nvidia_uvm
drm_kms_helper        155648  1 nvidia_drm
drm                   364544  3 drm_kms_helper,nvidia_drm
nvidia-smi も利用可能です :
$ nvidia-smi
Wed Sep 20 13:47:18 2017
+-----------------------------------------------------------------------------+
| NVIDIA-SMI 384.66                 Driver Version: 384.66                    |
|-------------------------------+----------------------+----------------------+
| GPU  Name        Persistence-M| Bus-Id        Disp.A | Volatile Uncorr. ECC |
| Fan  Temp  Perf  Pwr:Usage/Cap|         Memory-Usage | GPU-Util  Compute M. |
|===============================+======================+======================|
|   0  Tesla K80           Off  | 00009EC9:00:00.0 Off |                    0 |
| N/A   40C    P0    73W / 149W |      0MiB / 11439MiB |      0%      Default |
+-------------------------------+----------------------+----------------------+

+-----------------------------------------------------------------------------+
| Processes:                                                       GPU Memory |
|  GPU       PID  Type  Process name                               Usage      |
|=============================================================================|
|  No running processes found                                                 |
+-----------------------------------------------------------------------------+
サンプルの devicequery を make して実行してみます :
$ cp -a /usr/local/cuda/samples ./samples.cuda

$ pwd
/home/masao/samples.cuda/1_Utilities/deviceQuery

$ make

$ ./deviceQuery
./deviceQuery Starting...

 CUDA Device Query (Runtime API) version (CUDART static linking)

Detected 1 CUDA Capable device(s)

Device 0: "Tesla K80"
  CUDA Driver Version / Runtime Version          9.0 / 8.0
  CUDA Capability Major/Minor version number:    3.7
  Total amount of global memory:                 11440 MBytes (11995578368 bytes)
  (13) Multiprocessors, (192) CUDA Cores/MP:     2496 CUDA Cores
  GPU Max Clock rate:                            824 MHz (0.82 GHz)
  Memory Clock rate:                             2505 Mhz
  Memory Bus Width:                              384-bit
  L2 Cache Size:                                 1572864 bytes
  Maximum Texture Dimension Size (x,y,z)         1D=(65536), 2D=(65536, 65536), 3D=(4096, 4096, 4096)
  Maximum Layered 1D Texture Size, (num) layers  1D=(16384), 2048 layers
  Maximum Layered 2D Texture Size, (num) layers  2D=(16384, 16384), 2048 layers
  Total amount of constant memory:               65536 bytes
  Total amount of shared memory per block:       49152 bytes
  Total number of registers available per block: 65536
  Warp size:                                     32
  Maximum number of threads per multiprocessor:  2048
  Maximum number of threads per block:           1024
  Max dimension size of a thread block (x,y,z): (1024, 1024, 64)
  Max dimension size of a grid size    (x,y,z): (2147483647, 65535, 65535)
  Maximum memory pitch:                          2147483647 bytes
  Texture alignment:                             512 bytes
  Concurrent copy and kernel execution:          Yes with 2 copy engine(s)
  Run time limit on kernels:                     No
  Integrated GPU sharing Host Memory:            No
  Support host page-locked memory mapping:       Yes
  Alignment requirement for Surfaces:            Yes
  Device has ECC support:                        Enabled
  Device supports Unified Addressing (UVA):      Yes
  Device PCI Domain ID / Bus ID / location ID:   40649 / 0 / 0
  Compute Mode:
     < Default (multiple host threads can use ::cudaSetDevice() with device simultaneously) >

deviceQuery, CUDA Driver = CUDART, CUDA Driver Version = 9.0, CUDA Runtime Version = 8.0, NumDevs = 1, Device0 = Tesla K80
Result = PASS
2-4. cuDNN 6.0 のインストール
特に指定はないのですが、念のために cuDNN 6.0 を入れておきます。cuDNN は cuDNN Download からダウンロード可能です。"Download cuDNN v6.0 (April 27, 2017), for CUDA 8.0" から "cuDNN v6.0 Library for Linux" をダウンロードすれば良いです。
※ cuDNN のダウンロードのためには、(ご存知かと思いますが) デベロッパー登録が必要です。
ダウンロードしたら次のようにすれば /usr/local/cuda 下に展開されます。
$ sudo tar xfz cudnn-8.0-linux-x64-v6.0.tgz -C /usr/local
3. GPU 対応 CNTK 2.2 のインストール
3-1. 準備
NVIDIA GPU 環境の構築が完了したら、GPU 対応の CNTK のインストールが可能になります。
CNTK のインストールは Setup Linux Python - Installing CNTK for Python on Linux (Ubuntu 14.04 or Ubuntu 16.04) に従っています。
CNTK は OpenMPI 1.10.x を必要とします。また、import 時に libjasper1 も必要となりますので、補完しておきます :
$ sudo apt-get install openmpi-bin

$ sudo apt-get install libjasper1
3-2. Anaconda 3 のインストール
Python はここでは Anaconda 3 を利用します。ドキュメントによれば、以下の組み合わせがテストされているようです :
- Anaconda3 4.1.1 & Python versions 2.7, 3.4, 3.5
- Anaconda3 4.3.1 & Python version 3.6
ダウンロード先が示されている Anaconda3 4.1.1 Python for Linux (64-bit) を使用してインストールを実行します。(最新版でも問題ありませんでした。)
$ wget https://repo.continuum.io/archive/Anaconda3-4.1.1-Linux-x86_64.sh

$ bash Anaconda3-4.1.1-Linux-x86_64.sh
3-3. GPU 対応 CNTK 2.2 Python パッケージのインストール
Python のバージョンを確認後、該当する wheel パッケージをインストールします。
Python 3.5 GPU Flavor の場合には以下のパッケージを利用します :
バージョンを確認して pip も更新しておきます :
$ python --version
Python 3.5.2 :: Anaconda 4.1.1 (64-bit)

$ pip install -U pip
CNTK インストール :
$ pip install https://cntk.ai/PythonWheel/GPU/cntk-2.2-cp35-cp35m-linux_x86_64.whl
Collecting cntk==2.2 from https://cntk.ai/PythonWheel/GPU/cntk-2.2-cp35-cp35m-linux_x86_64.whl
  Downloading https://cntk.ai/PythonWheel/GPU/cntk-2.2-cp35-cp35m-linux_x86_64.whl (354.3MB)
    100% |████████████████████████████████| 354.3MB 4.2kB/s
Requirement already satisfied (use --upgrade to upgrade): numpy>=1.11 in ./anaconda3/lib/python3.5/site-packages (from cntk==2.2)
Requirement already satisfied (use --upgrade to upgrade): scipy>=0.17 in ./anaconda3/lib/python3.5/site-packages (from cntk==2.2)
Installing collected packages: cntk
Successfully installed cntk-2.2
4. CNTK 動作確認
4-1. バージョン確認
CNTK インストールの最後に "Successfully installed cntk-2.2" と出力されたのでインストールが成功したようですが、
cntk を import してバージョンを確認してみます :
$ python -c "import cntk; print(cntk.__version__)"
2.2
問題ないようです。これで CNTK を利用して開発、訓練、評価を Python で実行できます。
4-2. サンプルのインストール
ついでにサンプルをインストールしておきます。
$ python -m cntk.sample_installer
INFO: retrieving https://cntk.ai/Samples/CNTK-Samples-2-2.zip

INFO: unzipping to directory CNTK-Samples-2-2

INFO: installing requirements

Requirement already satisfied: h5py>=2.6.0 in ./anaconda3/lib/python3.5/site-packages (from -r CNTK-Samples-2-2/requirements.txt (line 1))
Requirement already satisfied: jupyter>=1.0.0 in ./anaconda3/lib/python3.5/site-packages (from -r CNTK-Samples-2-2/requirements.txt (line 2))
Collecting matplotlib>=1.5.3 (from -r CNTK-Samples-2-2/requirements.txt (line 3))
  Downloading matplotlib-2.0.2-cp35-cp35m-manylinux1_x86_64.whl (14.6MB)
    100% |████████████████████████████████| 14.6MB 98kB/s
Collecting pandas>=0.19.1 (from -r CNTK-Samples-2-2/requirements.txt (line 4))
  Downloading pandas-0.20.3-cp35-cp35m-manylinux1_x86_64.whl (24.0MB)
    100% |████████████████████████████████| 24.0MB 61kB/s
Collecting pandas-datareader>=0.2.1 (from -r CNTK-Samples-2-2/requirements.txt (line 5))
  Downloading pandas_datareader-0.5.0-py2.py3-none-any.whl (74kB)
    100% |████████████████████████████████| 81kB 11.7MB/s
Collecting pillow>=3.4.2 (from -r CNTK-Samples-2-2/requirements.txt (line 6))
  Downloading Pillow-4.2.1-cp35-cp35m-manylinux1_x86_64.whl (5.8MB)
    100% |████████████████████████████████| 5.8MB 268kB/s
Requirement already satisfied: pip>=8.1.2 in ./anaconda3/lib/python3.5/site-packages (from -r CNTK-Samples-2-2/requirements.txt (line 7))
Collecting seaborn>=0.7.1 (from -r CNTK-Samples-2-2/requirements.txt (line 8))
  Downloading seaborn-0.8.1.tar.gz (178kB)
    100% |████████████████████████████████| 184kB 7.7MB/s
Requirement already satisfied: six>=1.10.0 in ./anaconda3/lib/python3.5/site-packages (from -r CNTK-Samples-2-2/requirements.txt (line 9))
Collecting gym>=0.5.2 (from -r CNTK-Samples-2-2/requirements.txt (line 10))
  Downloading gym-0.9.3.tar.gz (157kB)
    100% |████████████████████████████████| 163kB 8.6MB/s
Requirement already satisfied: numpy>=1.6.1 in ./anaconda3/lib/python3.5/site-packages (from h5py>=2.6.0->-r CNTK-Samples-2-2/requirements.txt (line 1))
Requirement already satisfied: pytz in ./anaconda3/lib/python3.5/site-packages (from matplotlib>=1.5.3->-r CNTK-Samples-2-2/requirements.txt (line 3))
Requirement already satisfied: pyparsing!=2.0.0,!=2.0.4,!=2.1.2,!=2.1.6,>=1.5.6 in ./anaconda3/lib/python3.5/site-packages (from matplotlib>=1.5.3->-r CNTK-Samples-2-2/requirements.txt (line 3))
Requirement already satisfied: cycler>=0.10 in ./anaconda3/lib/python3.5/site-packages (from matplotlib>=1.5.3->-r CNTK-Samples-2-2/requirements.txt (line 3))
Requirement already satisfied: python-dateutil in ./anaconda3/lib/python3.5/site-packages (from matplotlib>=1.5.3->-r CNTK-Samples-2-2/requirements.txt (line 3))
Requirement already satisfied: requests>=2.3.0 in ./anaconda3/lib/python3.5/site-packages (from pandas-datareader>=0.2.1->-r CNTK-Samples-2-2/requirements.txt (line 5))
Collecting requests-file (from pandas-datareader>=0.2.1->-r CNTK-Samples-2-2/requirements.txt (line 5))
  Downloading requests-file-1.4.2.tar.gz
Collecting requests-ftp (from pandas-datareader>=0.2.1->-r CNTK-Samples-2-2/requirements.txt (line 5))
  Downloading requests-ftp-0.3.1.tar.gz
Collecting olefile (from pillow>=3.4.2->-r CNTK-Samples-2-2/requirements.txt (line 6))
  Downloading olefile-0.44.zip (74kB)
    100% |████████████████████████████████| 81kB 12.2MB/s
Collecting pyglet>=1.2.0 (from gym>=0.5.2->-r CNTK-Samples-2-2/requirements.txt (line 10))
  Downloading pyglet-1.2.4-py3-none-any.whl (964kB)
    100% |████████████████████████████████| 972kB 1.6MB/s
Building wheels for collected packages: seaborn, gym, requests-file, requests-ftp, olefile
  Running setup.py bdist_wheel for seaborn ... done
  Stored in directory: /home/masao/.cache/pip/wheels/29/af/4b/ac6b04ec3e2da1a450e74c6a0e86ade83807b4aaf40466ecda
  Running setup.py bdist_wheel for gym ... done
  Stored in directory: /home/masao/.cache/pip/wheels/2b/16/05/14202d3528fb14912254fe7062bfc8b061ade8de9409f1abd0
  Running setup.py bdist_wheel for requests-file ... done
  Stored in directory: /home/masao/.cache/pip/wheels/3e/34/3a/c2e634ca7b545510c1b3b7d94dea084e5fdb5f33558f3c3a81
  Running setup.py bdist_wheel for requests-ftp ... done
  Stored in directory: /home/masao/.cache/pip/wheels/76/fb/0d/1026eb562c34a4982dc9d39c9c582a734eefe7f0455f711deb
  Running setup.py bdist_wheel for olefile ... done
  Stored in directory: /home/masao/.cache/pip/wheels/20/58/49/cc7bd00345397059149a10b0259ef38b867935ea2ecff99a9b
Successfully built seaborn gym requests-file requests-ftp olefile
Installing collected packages: matplotlib, pandas, requests-file, requests-ftp, pandas-datareader, olefile, pillow, seaborn, pyglet, gym
  Found existing installation: matplotlib 1.5.1
    Uninstalling matplotlib-1.5.1:
      Successfully uninstalled matplotlib-1.5.1
  Found existing installation: pandas 0.18.1
    Uninstalling pandas-0.18.1:
      Successfully uninstalled pandas-0.18.1
  Found existing installation: Pillow 3.2.0
    Uninstalling Pillow-3.2.0:
      Successfully uninstalled Pillow-3.2.0
Successfully installed gym-0.9.3 matplotlib-2.0.2 olefile-0.44 pandas-0.20.3 pandas-datareader-0.5.0 pillow-4.2.1 pyglet-1.2.4 requests-file-1.4.2 requests-ftp-0.3.1 seaborn-0.8.1
4-3. 実行
サンプルの中から FeedForwardNet.py を実行してみます。
$ pwd
/home/masao/CNTK-Samples-2-2/Tutorials/NumpyInterop
masao@CNTK22:~/CNTK-Samples-2-2/Tutorials/NumpyInterop$ python FeedForwardNet.py
Selected GPU[0] Tesla K80 as the process wide default device.
-------------------------------------------------------------------
Build info:

                Built time: Sep 15 2017 07:30:54
                Last modified date: Fri Sep 15 04:28:48 2017
                Build type: release
                Build target: GPU
                With 1bit-SGD: no
                With ASGD: yes
                Math lib: mkl
                CUDA version: 9.0.0
                CUDNN version: 6.0.21
                Build Branch: HEAD
                Build SHA1: 23878e5d1f73180d6564b6f907b14fe5f53513bb
                MPI distribution: Open MPI
                MPI version: 1.10.7
-------------------------------------------------------------------
Learning rate per minibatch: 0.5
 Minibatch[   1- 128]: loss = 0.614628 * 3200, metric = 29.25% * 3200;
 Minibatch[ 129- 256]: loss = 0.332382 * 3200, metric = 13.31% * 3200;
 Minibatch[ 257- 384]: loss = 0.298804 * 3200, metric = 11.59% * 3200;
 Minibatch[ 385- 512]: loss = 0.271270 * 3200, metric = 10.44% * 3200;
 Minibatch[ 513- 640]: loss = 0.247776 * 3200, metric = 9.03% * 3200;
 Minibatch[ 641- 768]: loss = 0.231604 * 3200, metric = 9.06% * 3200;
 Minibatch[ 769- 896]: loss = 0.229529 * 3200, metric = 8.62% * 3200;
 Minibatch[ 897-1024]: loss = 0.214106 * 3200, metric = 8.25% * 3200;
Finished Epoch[1]: loss = 0.305012 * 25600, metric = 12.45% * 25600 4.119s (6215.1 samples/s);
 error rate on an unseen minibatch 0.040000
以上

