内容
タイマーアプリを作成するためのポイントを複数記事に分けて掲載しています。
この記事では、アラーム音の選択画面の実装について掲載します。
環境
- OS: macOS 10.15.7 (Catalina)
- エディタ: Xcode 12.1
- 言語: Swift
- 主な使用ライブラリ: SwiftUI
Gitリポジトリ
以下のGitリポジトリのURLからサンプルコードをご覧いただけます。
https://github.com/msnsk/Qiita_Timer.git
手順
- アラーム音の構造体に必要な要素(プロパティ)を検討する
- Data にアラーム音の Struct を作成する
- アラーム音のリストを作成する
- アラーム音を試聴できるようにする
- 選択したアラーム音を TimeManager クラスのプロパティに反映させる
- 設定画面、アラーム音リスト間の画面遷移を実装する
1. アラーム音の構造体に必要な要素(プロパティ)を検討する
現時点では、アラーム音がデフォルトで指定されたものになっており、変更できません。これをいくつかのアラーム音を用意し、設定画面から変更可能にしていきます。
アラーム音のオブジェクトとして必要な要素は何か考えると、以下の2つがあれば成立します。
- サウンドID:AudioToolbox ライブラリのメソッドで音を鳴らすために必要
- サウンド名:設定画面やリスト画面に表示するために必要
2. Data にアラーム音の Struct を作成する
Data.swift ファイルに Sound という名前の構造体を作成し、そのプロパティとして、手順1で考えた2つの要素を含めます。
このとき、サウンドIDプロパティのデータ型は SystemSoundID でなければなりません。このデータ型は AudioToolbox ライブラリに含まれますので、必ずインポートします。
サウンドIDによって、この構造体から作成されたインスタンスが一意である必要があるので、 Identifiable プロトコル を継承します。
import SwiftUI
import AudioToolbox //追加import

//(他のenum省略)

struct Sound: Identifiable {
    let id: SystemSoundID
    let soundName: String
}
3. アラーム音のリストを作成する
SoundListView という名前の新しい Swift ファイルを SwiftUI テンプレートから作成します。システムサウンドを利用するため、AudioToolbox ライブラリをインポートしておきます。
ほかの View と同様に、TimeManager クラスのプロパティを常に参照したいので、そのインスタンスを作成します。@EnvironmentObject プロパティラッパーを var の前につけます。
import SwiftUI
import AudioToolbox

struct SoundListView: View {
    @EnvironmentObject var timeManager: TimeManager

    var body: some View {
        Text("Hello, World!")
    }
}
次に、アラーム音のデータを用意します。
手順1で作成した Sound 構造体から id プロパティと soundName プロパティを指定しながら、インスタンスを作成し、それを Sounds と名付けた Array に格納します。具体的なサウンド ID は以下のリソースを参考にします。soundName もリソースにあるファイル名を参考に、わかりやすいものにします。
https://github.com/TUNER88/iOSSystemSoundsLibrary
struct SoundListView: View {
    @EnvironmentObject var timeManager: TimeManager

    let sounds: [Sound] = [
        Sound(id: 1151, soundName: "Beat"),
        Sound(id: 1304, soundName: "Alert"),
        Sound(id: 1309, soundName: "Glass"),
        Sound(id: 1310, soundName: "Horn"),
        Sound(id: 1313, soundName: "Bell"),
        Sound(id: 1314, soundName: "Electronic"),
        Sound(id: 1320, soundName: "Anticipate"),
        Sound(id: 1327, soundName: "Minuet"),
        Sound(id: 1328, soundName: "News Flash"),
        Sound(id: 1330, soundName: "Sherwood Forest"),
        Sound(id: 1333, soundName: "Telegraph"),
        Sound(id: 1334, soundName: "Tiptoes"),
        Sound(id: 1335, soundName: "Typewriterst"),
        Sound(id: 1336, soundName: "Update")
    ]

    var body: some View {
        Text("Hello, World!")
    }
}
body{} 内の一番外枠には List{} を用意します。この List は SettingView で利用した Form に似ていて、表形式でたくさんのアイテムを罫線で区切って表示するときに利用します。
List{} 内に、Array 内のアイテムを順番に並べるときは、ForEach が便利です。ForEach(sounds) とすることで、sounds 内のアイテムに対して、順番にループ処理してくれます。処理内容は{}内に記述します。
まずは {} 内にテキストでサウンド名を表示するように記述します。
struct SoundListView: View {
    @EnvironmentObject var timeManager: TimeManager

    let sounds: [Sound] = [
        //(各サウンドオブジェクト省略)
    ]

    var body: some View {
        List {
            ForEach(sounds) {sound in
                //soundNameの値でリストに表示する
                Text(("\(sound.soundName)"))
            }
        }
    }
}
4. アラーム音を試聴できるようにする
実際のアプリの操作として、アラームを選択するときにどんな音なのかを確認したいものです。
試聴用のアイコンをリストの各行の左端に表示させて、それをタップするとサウンドが再生される、という仕様にしていきます。
ForEach{} 内に HStack{} を追加して、各行ごとにコンポーネントが横並びになるようにします。
HStack{} の一番最初に、アイコンとして Image コンポーネントを追加します。SF Symbols から "speaker.2.fill" を選びました。そして、.onTapGesture {} モディファイアを追加し、クロージャ {} 内に AudioToolbox ライブラリのメソッド AudioServicesPlayAlertSoundWithCompletion() を記述します。引数を sound.id とすることで、タップした行の id を soundID として拾って再生されます。第二引数は nil で構いません。
struct SoundListView: View {
    //(プロパティ省略)

    var body: some View {
        List {
            ForEach(sounds) {sound in
                //リストの行に関する記述
                HStack {
                    //試聴用のアイコン
                    Image(systemName: "speaker.2.fill")
                        .onTapGesture {
                            AudioServicesPlayAlertSoundWithCompletion(sound.id, nil)
                    }
                    //soundNameの値でリストに表示する
                    Text(("\(sound.soundName)"))
                }
            }
        }
        .navigationBarTitle("Alarm Sound Setting", displayMode: .automatic)
    }
}
5. 選択したアラーム音をTimeManagerクラスのプロパティに反映させる
行をタップすると、そのサウンドが選択されるようにします。
具体的には、HStack{} がリスト内の行に相当するので、そのモディファイアとして .onTapGesture{} を追加します。.onTapGesture{} のクロージャ {} 内には、TimeManagerクラスのすでに用意されている soundID プロパティと soundName プロパティに選択した行のサウンドIDとサウンド名がそれぞれ代入されるようにします。
ただし、これだけだと、サウンドリスト上のサウンド名の表示をタップしないと選択できません。行の空白部分をタップしても無反応です。細かいですが、ここも修正していきます。
HStackのモディファイアとして、.onTapGesture{} より前に、.contentShape(Rectangle()) を追加します。これにより、HStackが四角いオブジェクトとみなされる、つまり行の全体がひとつのオブジェクトになり、空白箇所をタップしても、アラーム音を選択できるようになります。
struct SoundListView: View {
    //(プロパティ省略)

    var body: some View {
        List {
            ForEach(sounds) {sound in
                //リストの行に関する記述
                HStack {
                    //試聴用のアイコン
                    Image(systemName: "speaker.2.fill")
                        .onTapGesture {
                            AudioServicesPlayAlertSoundWithCompletion(sound.id, nil)
                    }
                    //soundNameの値でリストに表示する
                    Text(("\(sound.soundName)"))
                }
                //HStackを四角いオブジェクトとみなす
                .contentShape(Rectangle())
                //行をタップでサウンド選択(IDと名前をTimeManagerへ反映)
                .onTapGesture {
                    self.timeManager.soundID = sound.id
                    self.timeManager.soundName = sound.soundName
                }
            }
        }
    }
}
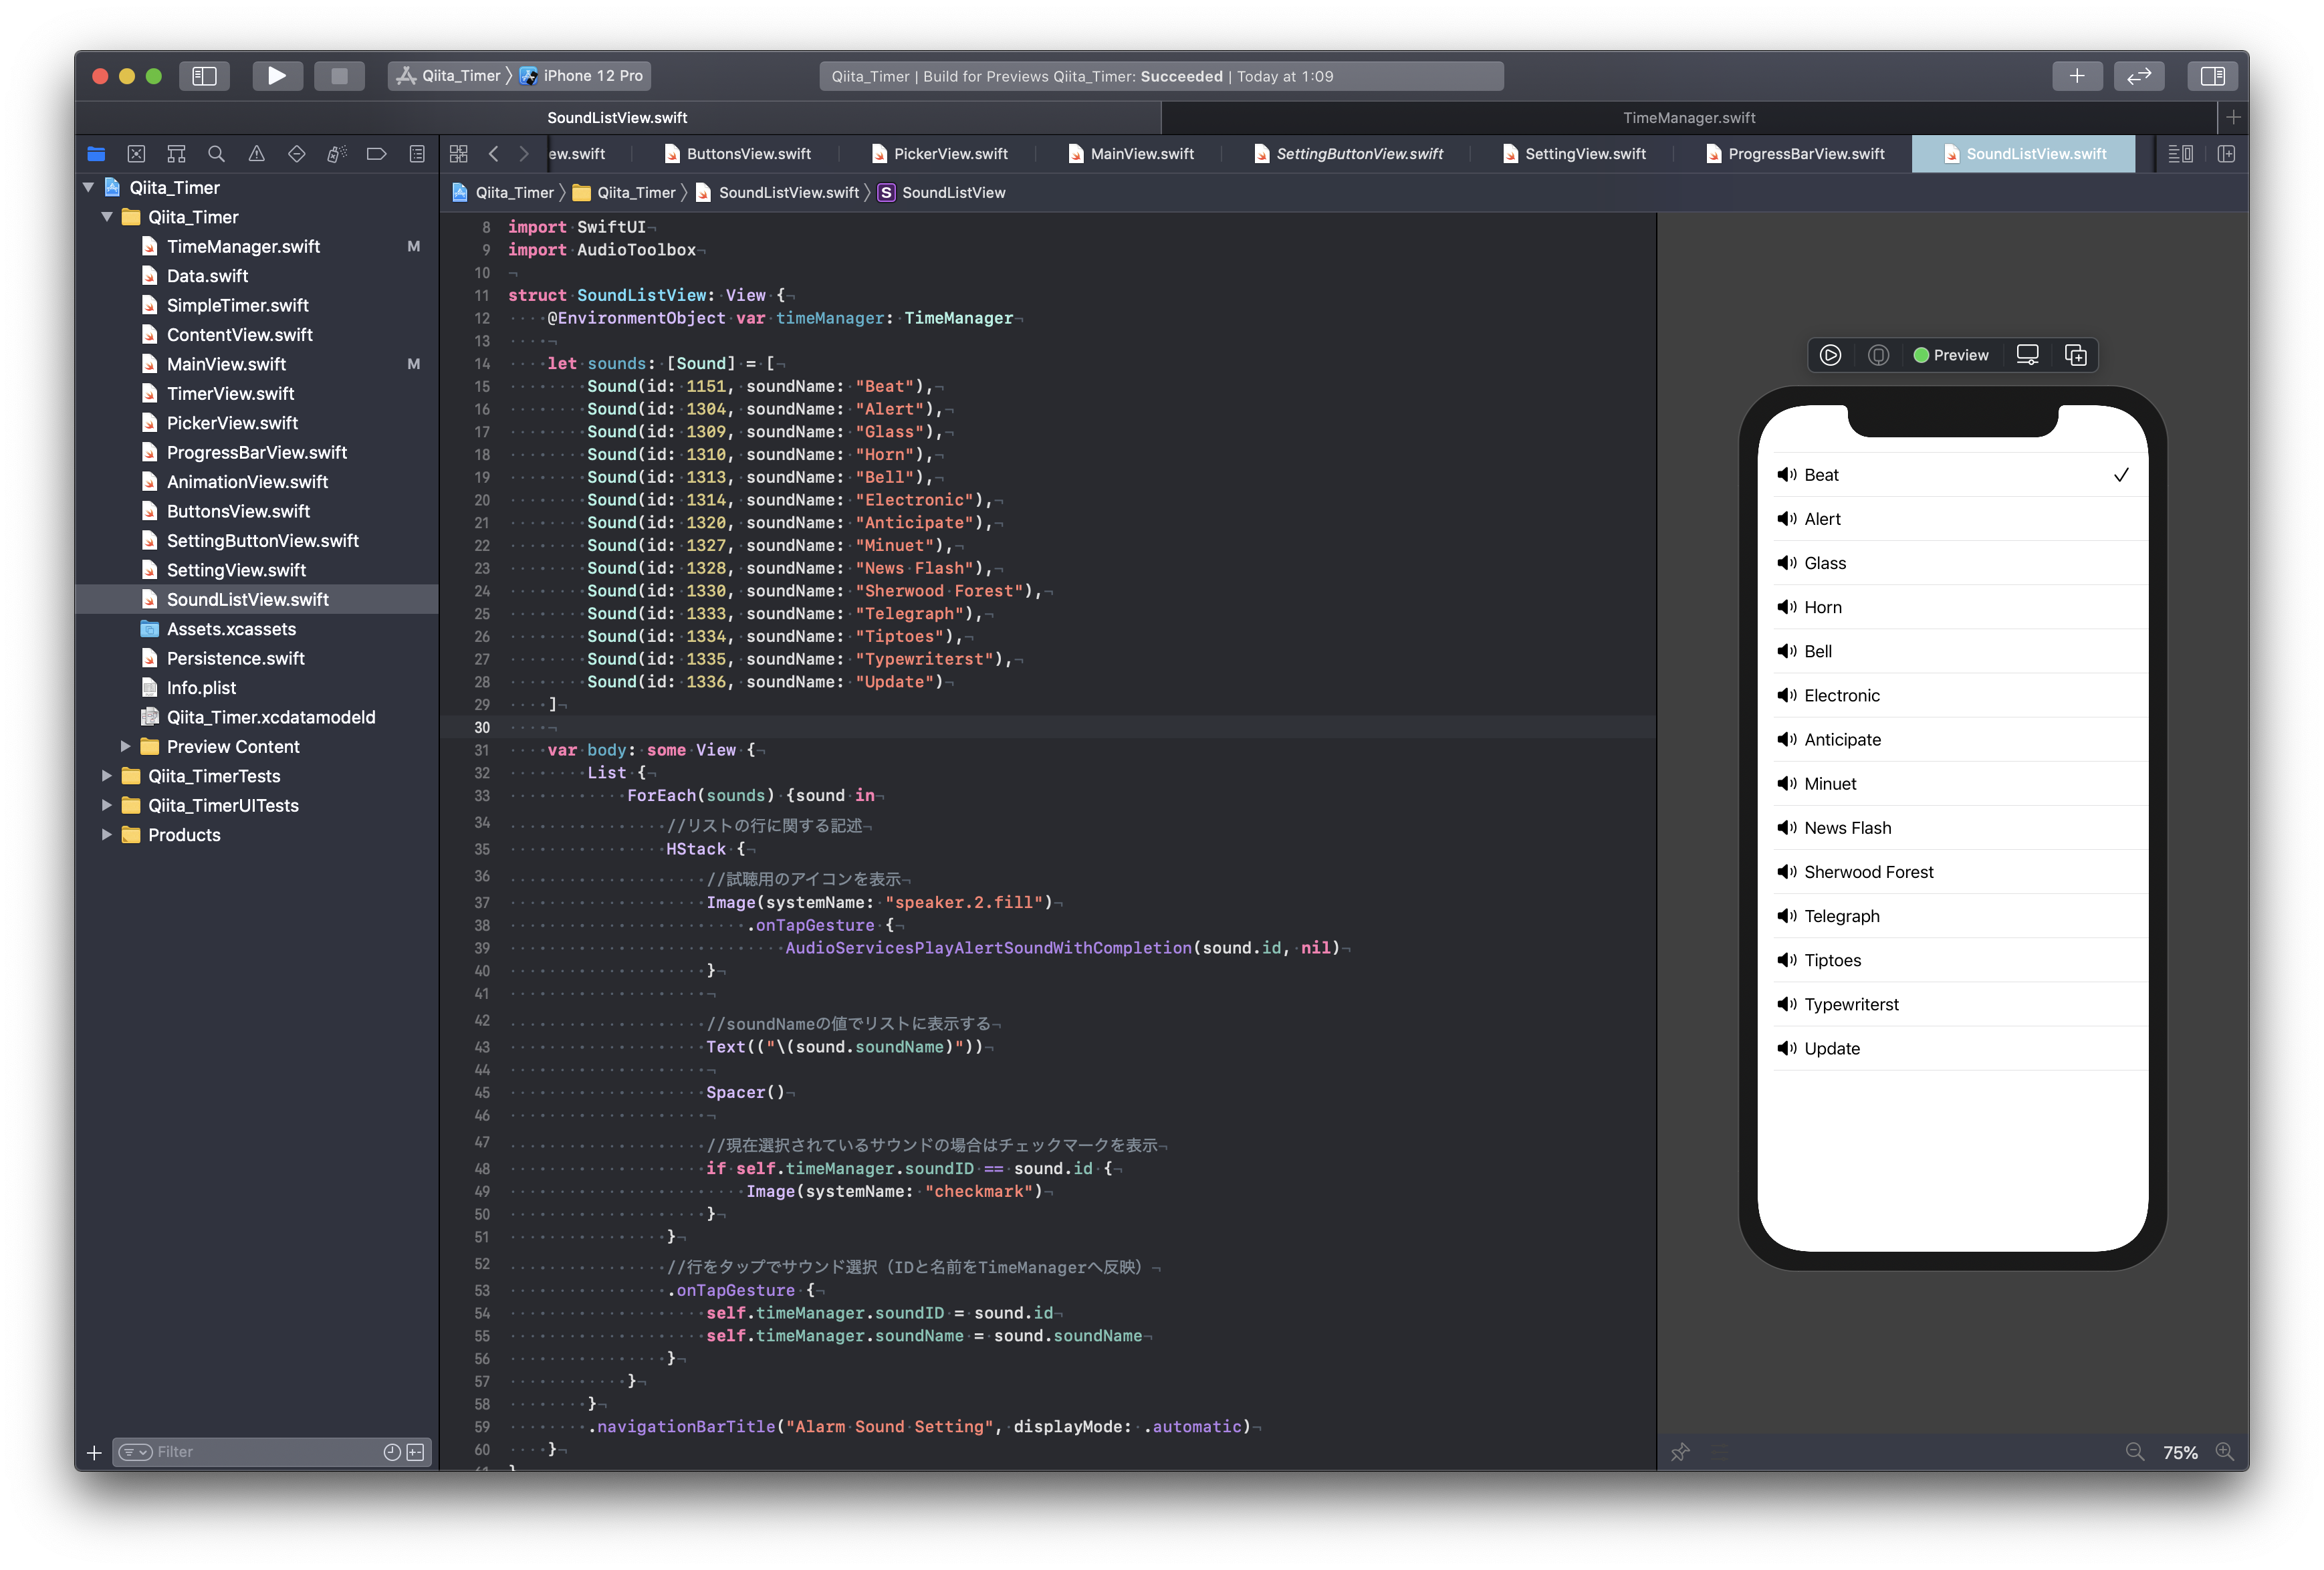
さらに、現在選択されているサウンド名の右側にはチェックマークが表示されるように、 if 構文で記載します。チェックマークは行の右端に寄せたいので、サウンド名とチェックマークの間に Spacer() を入れます。
struct SoundListView: View {
    //(プロパティ省略)

    var body: some View {
        List {
            ForEach(sounds) {sound in
                //リストの行に関する記述
                HStack {
                    //試聴用のアイコン
                    Image(systemName: "speaker.2.fill")
                        .onTapGesture {
                            AudioServicesPlayAlertSoundWithCompletion(sound.id, nil)
                    }
                    //soundNameの値でリストに表示する
                    Text(("\(sound.soundName)"))

                    Spacer()

                    //現在選択されているサウンドの場合はチェックマークを表示
                    if self.timeManager.soundID == sound.id {
                        Image(systemName: "checkmark")
                    }
                }
                //HStackを四角いオブジェクトとみなす
                .contentShape(Rectangle())
                //行をタップでサウンド選択(IDと名前をTimeManagerへ反映)
                .onTapGesture {
                    self.timeManager.soundID = sound.id
                    self.timeManager.soundName = sound.soundName
                }
            }
        }
    }
}
Canvas で SoundListView を確認します。以下はプレビュー用のコードです。
struct SoundListView_Previews: PreviewProvider {
    static var previews: some View {
        SoundListView()
            .environmentObject(TimeManager())
    }
}

6. 設定画面、アラーム音リスト間の画面遷移を実装する
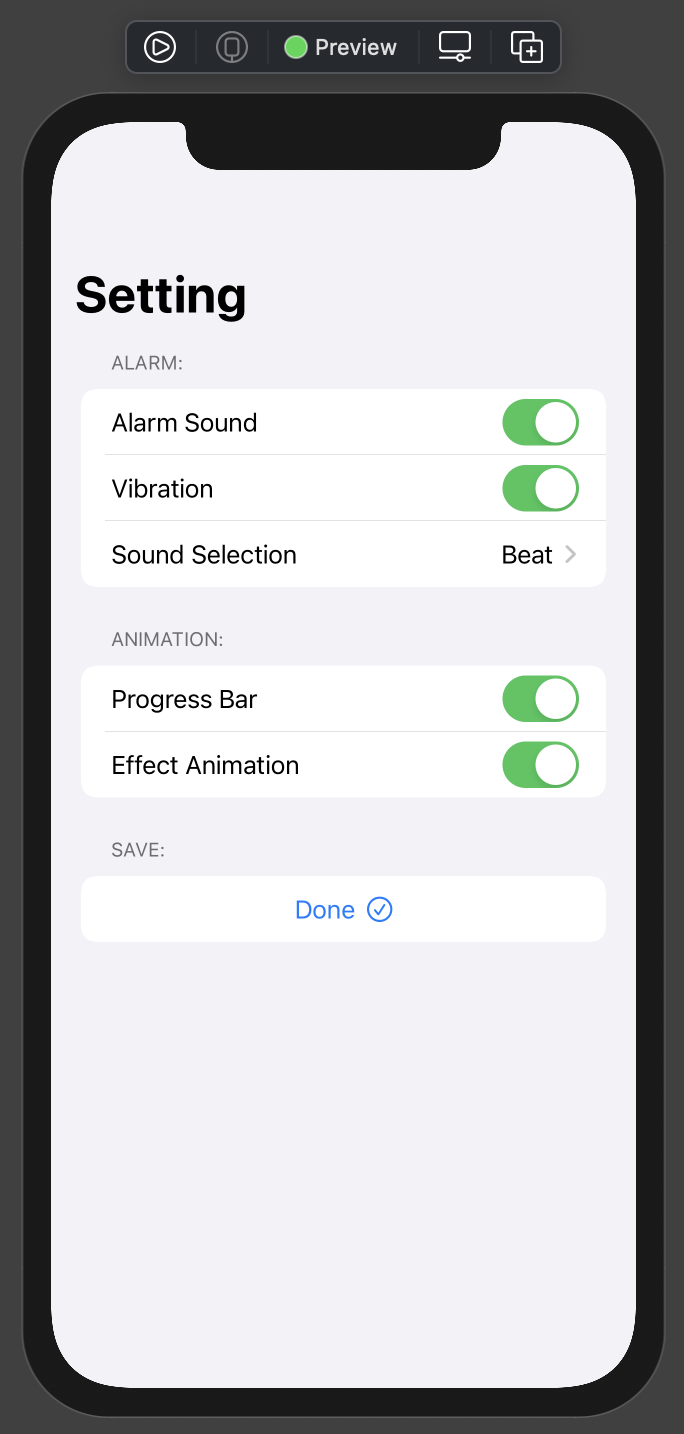
メインの設定画面 SettingView にアラーム音選択の項目を追加し、サウンドリスト画面 SoundListView へ遷移するようにします。
SettingView の body{} 内の一番外側は NavigationView{} で囲った状態になっています。これにより、その中の Form{} 内に NavigationLink{} を追加することで画面をさらに次の階層に遷移させることができます。
設定項目名を Text() にて "Sound Selection" とし、その行の右端に、現在選択中のアラーム音の名前が表示されるように Spacer() を間に挟んで、 Text() にて TimeManagerクラスのプロパティ soundName を指定します。
Form のモディファイアとして、以下の2つを追加し、NavigationBar(画面上部)の表示と、NavigationView全体の表示スタイルを指定します。
.navigationBarTitle()
.navigationViewStyle()
struct SettingView: View {
    //(プロパティ省略)

    var body: some View {
        NavigationView {
            Form {
                Section(header: Text("Alarm:")) {
                    Toggle(isOn: $timeManager.isAlarmOn) {
                        Text("Alarm Sound")
                    }
                    Toggle(isOn: $timeManager.isVibrationOn) {
                        Text("Vibration")
                    }
                    //サウンド選択画面へ画面遷移
                    NavigationLink(destination: SoundListView()) {
                        HStack {
                            //設定項目名
                            Text("Sound Selection")
                            Spacer()
                            //現在選択中のアラーム音
                            Text("\(timeManager.soundName)")
                        }
                    }
                }
                Section(header: Text("Animation:")) {
                    //(Animationセクションの内容省略)
                }
                Section(header: Text("Save:")) {
                    //(Saveセクションの内容省略)
                }
            }
            .navigationBarTitle("Setting", displayMode: .automatic)
            .navigationViewStyle(DefaultNavigationViewStyle())
        }
    }
}
そして、SoundListView の List{} に .navigationBarTitle モディファイアを追加し、画面のタイトル "Alarm Sound Setting" をつけます。
struct SoundListView: View {
    //(プロパティ省略)

    var body: some View {
        List {
            ForEach(sounds) {sound in
                //リストの行に関する記述
                HStack {
                    //試聴用のアイコン
                    Image(systemName: "speaker.2.fill")
                        .onTapGesture {
                            AudioServicesPlayAlertSoundWithCompletion(sound.id, nil)
                    }
                    //soundNameの値でリストに表示する
                    Text(("\(sound.soundName)"))

                    Spacer()

                    //現在選択されているサウンドの場合はチェックマークを表示
                    if self.timeManager.soundID == sound.id {
                        Image(systemName: "checkmark")
                    }
                }
                //行をタップでサウンド選択(IDと名前をTimeManagerへ反映)
                .onTapGesture {
                    self.timeManager.soundID = sound.id
                    self.timeManager.soundName = sound.soundName
                }
            }
        }
        .navigationBarTitle("Alarm Sound Setting", displayMode: .automatic)
    }
}
これで、アラーム音選択を含めた設定画面の実装ができあがりました。SettingView を Canvas で確認します。下の画像のようになっているはずです。

次回は視覚的に楽しいプログレスバーの実装について掲載します。
