底辺プログラマーMasalibです。
自分のブログ( masalibの日記 )にあまりにもアクセスがないのででQiitaにも記載させてもらいます。Qiitaではあまり書かないので文化が違っていたらすいません

目次
- Firebase Emulator Suiteとは
- 事前準備
- Firebase Emulatorのインストール
- Firebase Emulatorの起動
- Firebase Emulator Suiteを開く
- ローカルのReactで使ってみる
- Reactで確認する
- 感想
Firebase Emulator Suiteとは
ローカルでFirebaseをエミュレートしてくれる機能です。
今まではAuth機能の開発をおこなう時はプロジェクト+ dev みたいな形でプロジェクトを作って検証していました。それを今後はローカルのみで完結できるみたいです。テストのclも回せるみたいなのでテストツールを導入している所だと重宝されそう。
事前準備
Firebase Emulator Suiteは以下の条件がそろっていないと動きません
- Node.js バージョン 8.0 以降。
- Java バージョン 1.8 以降。
- Firebase CLI 7.8.0 以降
NodeはReactを作っているのでバージョンは余裕でクリアできるのですがjavaやFirebase CLIは新しいマシンだと全然使っていなかったのでインストールしないといけなかった。
javaのインストール
本編とは関係ないのでjavaをインストールしている人はスキップしてください。
- 本家からバイナリーをダウンロードする
https://jdk.java.net/archive/
 2. ダウンロードしたファイルをローカルのPCにダウンロードする。私の場合は
「C:\java\jdk-15」です
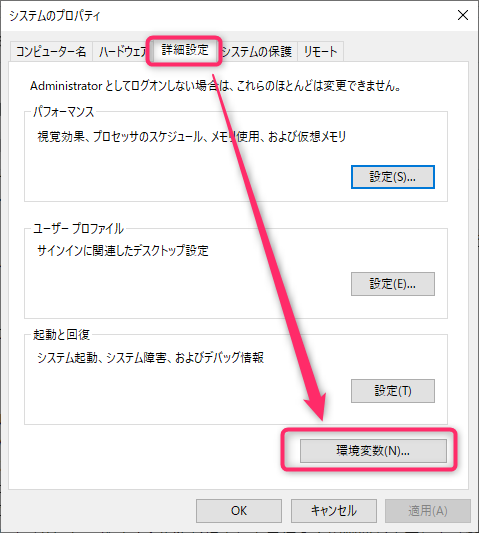
3. 「Windowsキー」+「R」キーでファイル名を指定して実行するの画面を表示して「control sysdm.cpl」を入力する。システムのプロパティが開く
2. ダウンロードしたファイルをローカルのPCにダウンロードする。私の場合は
「C:\java\jdk-15」です
3. 「Windowsキー」+「R」キーでファイル名を指定して実行するの画面を表示して「control sysdm.cpl」を入力する。システムのプロパティが開く
 4. 詳細設定のタブをクリックして環境変数のボタンを押す
 5. JAVA_HOMEを設定
6. pathの編集をおこなう
5. JAVA_HOMEを設定
6. pathの編集をおこなう
 7. コマンドラインを開いていたら閉じてから開く。
8. 確認コマンドでjavaが認識している事を確認する
7. コマンドラインを開いていたら閉じてから開く。
8. 確認コマンドでjavaが認識している事を確認する
javac -version
# => javac 15
java -version
# => openjdk version "15" 2020-09-15
# => OpenJDK Runtime Environment (build 15+36-1562)
# => OpenJDK 64-Bit Server VM (build 15+36-1562, mixed mode, sharing)
どうでもいいけどPathの編集画面がかわったのね。
この記事を参考にjavaをインストールしました
https://www.javadrive.jp/start/install/index1.html
https://www.javadrive.jp/start/install/index4.html
Firebase CLIのインストールと設定
- 管理者権限でコマンドラインを開く。
 1. npmでインストールする
npm install -g firebase-tools
-
firebaseにloginにする。(ブラウザが立ち上がるので認証を許可する)
$ firebase login i Firebase optionally collects CLI usage and error reporting information to help improve our products. Data is # collected in accordance with Google's privacy policy (https://policies.google.com/privacy) and is not used to identify you. ? Allow Firebase to collect CLI usage and error reporting information? Yes i To change your data collection preference at any time, run `firebase logout` and log in again. Visit this URL on this device to log in: https://accounts.google.com/o/oauth2/auth?client_id=xxxxxxxxx・・・・ Waiting for authentication... + Success! Logged in as masalib@gmail.com -
確認のためにプロジェクトリストを表示する
 √ Preparing the list of your Firebase projects
 ┌────────────────────────┬
 │ Project Display Name   │ Project ID
 ├────────────────────────┼
 │ angular-study-chat     │ angular-study-chat
 ├────────────────────────┼
 │ Learn-Firebase-masalib │ learn-firebase-masalib
 ├────────────────────────┼
 │ masalib-hosting        │ masalib-hosting
 ├────────────────────────┼
 │ testpwa                │ testpwa-32138
 └────────────────────────┴
Firebase Emulatorのインストール
自分のプロジェクトに移動して初期化のコマンドを実行する
firebase init
進む準備はできていますか?と聞かれるのでyを入力してEnterキーを押す
Are you ready to proceed Y
このフォルダに設定したいFirebase CLIの機能をSpaceキーを押して機能を選択し、Enterキーを押して設定します。Emulatorsが*になるようにします
? Which Firebase CLI features do you want to set up for this folder? Press Space to select features, then Enter to confi
 rm your choices. Emulators: Set up local emulators for Firebase features
>( ) Database: Deploy Firebase Realtime Database Rules
 ( ) Firestore: Deploy rules and create indexes for Firestore
 ( ) Functions: Configure and deploy Cloud Functions
 ( ) Hosting: Configure and deploy Firebase Hosting sites
 ( ) Storage: Deploy Cloud Storage security rules
 (*) Emulators: Set up local emulators for Firebase features
 ( ) Remote Config: Get, deploy, and rollback configurations for Remote Config
プロジェクトのオプションを聞かれるの既存のプロジェクトを選択します。自分の場合は「learn-firebase-masalib」でした
=== Project Setup

First, let's associate this project directory with a Firebase project.
You can create multiple project aliases by running firebase use --add,
but for now we'll just set up a default project.

? Please select an option:
> Use an existing project
  Create a new project
  Add Firebase to an existing Google Cloud Platform project
  Don't set up a default project

? Select a default Firebase project for this directory: (Use arrow keys)
> angular-study-chat (angular-study-chat)
  learn-firebase-masalib (Learn-Firebase-masalib)
  masalib-hosting (masalib-hosting)
  testpwa-32138 (testpwa)
どのエミュレータをインストールするのかを聞かれるのでめんどくさいの全部選択します
=== Emulators Setup
? Which Firebase emulators do you want to set up? Press Space to select emulators, then Enter to confirm your choices. (
Press <space> to select, <a> to toggle all, <i> to invert selection)
>( ) Authentication Emulator
 ( ) Functions Emulator
 ( ) Firestore Emulator
 ( ) Database Emulator
 ( ) Hosting Emulator
 ( ) Pub/Sub Emulator
エミュレータのport番号を聞かれるので答えていく
? Which port do you want to use for the auth emulator? 9099
? Which port do you want to use for the functions emulator? 5001
? Which port do you want to use for the firestore emulator? 8080
? Which port do you want to use for the database emulator? 9000
? Which port do you want to use for the hosting emulator? 5000
? Which port do you want to use for the pubsub emulator? 8085
? Would you like to enable the Emulator UI? (Y/n) y
? Which port do you want to use for the Emulator UI (leave empty to use any available port)? 8000
? Would you like to download the emulators now? (y/N) y
「Which port do you want to use for the Emulator UI (leave empty to use any available port)?」は8000と入力したgoogle先生のマニュアルだと4000だった。
Firebase Emulatorの起動
起動コマンドで起動する
firebase emulators:start
問題がなけば下記のような画面が表示される

Firebase Emulator Suiteを開く
エミュレーターにはUIが用意されているのでブラウザで http://localhost:8000 を開く
(google先生のマニュアルだと http://localhost:4000 です)

Authの画面

ローカルのReactで使ってみる
Firebaseの設定ファイルの部分を変更する
import firebase from "firebase/app"
import "firebase/auth"
import "firebase/storage";
import 'firebase/firestore';

const app = firebase.initializeApp({
    apiKey: process.env.REACT_APP_APIKEY,
    authDomain: process.env.REACT_APP_AUTHDOMAIN,
    databaseURL: process.env.REACT_APP_DATABASEURL,
    projectId: process.env.REACT_APP_PROJECT_ID,
    storageBucket: process.env.REACT_APP_STORAGE_BUCKET,
    messagingSenderId: process.env.REACT_APP_MESSAGING_SENDER_ID,
    appId: process.env.REACT_APP_APP_ID,
    measurementId: process.env.REACT_APP_MEASUREMENT_ID
});

var db_obj = firebase.firestore();
if (process.env.REACT_APP_HOST === "localhost") {
  db_obj.useEmulator("localhost", 8080);
  console.log("useEmulator:firestore")
}

var auth_obj = firebase.auth();
if (process.env.REACT_APP_HOST === "localhost") {
    console.log("useEmulator:auth")
    auth_obj.useEmulator("http://localhost:9099")
}

var storage_obj = firebase.storage();
/* storage_obj.useEmulator is not a functionというエラーがでたのでコメントアウト
if (process.env.REACT_APP_HOST === "localhost") {
    console.log("useEmulator:storage")
    storage_obj.useEmulator("http://localhost:9099")
}
*/

export const db = db_obj;
export const auth = auth_obj;
export const storage = storage_obj;
export default app
Reactで確認する
起動するとログにエミュレートのログが表示される

SingUPしてみると通信先がlocalhostになっている

Firebase Emulator Suiteで確認もできました
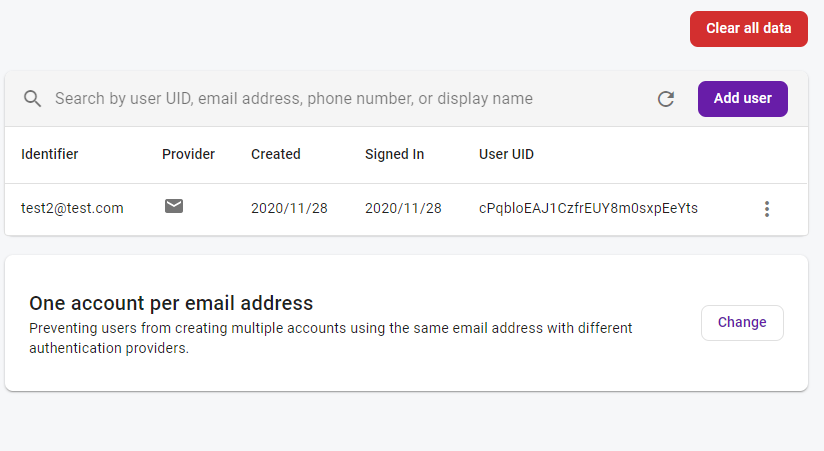

入力した内容も確認できます。
なおメールアドレスの有効化は2020/11/28の時点はできない
感想
- メールアドレスの有効化ができないとちょっと困るので早く直してほしい
- 切り替えも楽なのでいいかも。アプリでも多分できると思う。