この記事では、フロントエンドにNext.js、バックエンドにLaravelを使ったWebアプリでユーザーのパスワードを再設定する機能をどのように作成するのかを解説していきます。
今回実装するパスワード再設定機能は
- ユーザーにパスワード再設定のためのメールを送信
- ユーザーがそのメールのリンクを開いてパスワードを再設定する
という流れでパスワードを更新するというものです。
また、今回の実装ではNext.jsはバージョン13、Laravelはバージョン10を使っています。
開発環境
- macOS Venture 13.2.1
- Laravel 10.15.0
- Next.js 13.4.16
今回の画面のデザインはTailwind CSSを使って整えています。
パスワード再設定機能の全体的なロジック
まずは、この記事で実装していくパスワード再設定機能の全体的なロジックについて説明しますね。全体的は以下のようになっています。
1、Next.jsのパスワードを忘れた場合の画面にメールアドレスを入力して送信ボタンを押すとLaravelのパスワード再設定申請のルーティングにリクエストが送られる
- パスワードを忘れた画面からメールアドレスが送信された時点で、ユーザートークンテーブルにトークンが保存される
- トークンには1時間の有効期限がある
2、Laravelのパスワード再設定申請のメソッドが実行されて、申請されたメールアドレスにパスワード再設定ページのリンクがメールで送られる
※パスワード再設定ページのリンクはNext.jsのリンクで、動的ルーティングのところがトークンになっていて、パラメータでメールアドレスがついている
3、メールのリンクをクリックして、パスワード再設定画面を開く
このときに、
- トークンとメールアドレスが申請されたものと一致しなかった場合
- トークンの有効期限が切れていた場合
は再設定画面を表示しない
→これはページが読み込まれたときに、Next.jsのパスワード再設定画面からLaravelにリクエストを送って、Laravel側の処理で判別する
4、パスワード再設定画面からパスワードと確認パスワードを入力して、送信ボタンを押す
- パスワードと確認パスワードが一致していて
- トークンが有効期限内で
- トークンとメールアドレスが申請されたものと一致している
という場合に、パスワードを更新して、パスワード更新完了画面を表示する
このようなパスワード再設定機能を、この記事で実装していきます。
Laravel Sanctumを使ってログイン機能を作成する
パスワードの再設定機能を実装する前に、まずはログインやユーザー登録のための機能も実装していきます。CSRF対策を行うために、ここではLaravel Sanctumを使って実装しています。
Next.jsとLaravelを使ったログインやユーザー登録の機能をどうやって実装するかはこちらの記事で詳しく実装しているので参考にしてみてください。
上記の記事のようなログイン機能ができたら、実際にパスワード再設定の機能を作成していきます。
パスワード再設定のトークンや有効期限のデーブルを作成する
まずは、パスワード再設定を追なうためのトークンを保存するためのテーブルを作成します。
ターミナルでLaravelのコンテナの中に入り、以下のコマンドを入力してください。
php artisan make:migration create_user_tokens_table --create=user_tokens
これでuser_tokensというマイグレーションが作成されます。マイグレーションができたら、中身を以下のように変更します。
<?php

use Illuminate\Database\Migrations\Migration;
use Illuminate\Database\Schema\Blueprint;
use Illuminate\Support\Facades\Schema;

return new class extends Migration
{
    /**
     * Run the migrations.
     */
    public function up(): void
    {
        Schema::create('user_tokens', function (Blueprint $table) {
            $table->id();
            $table->unsignedBigInteger('user_id');
            $table->string('token')->unique();
            $table->dateTime('expire_at')->nullable();
            $table->timestamps();

            // 外部キーの設定
            $table->foreign('user_id')->references('id')->on('users');
        });
    }

    /**
     * Reverse the migrations.
     */
    public function down(): void
    {
        Schema::dropIfExists('user_tokens');
    }
};
このテーブルにパスワード再設定のリクエストを行ったユーザーのID、パスワードの再設定に必要なトークン、トークンの有効期限が保存されます。
UserTokenのモデルも以下のコマンドで作成しておいてください。
php artisan make:model UserToken
以下の項目がfillableに指定されていればOKです。
protected $fillable = [
    'user_id',
    'token',
    'expire_at',
];
Laravelでパスワード再設定メールを送信する処理を作成する
次は、LaravelのAPIに、リクエストとして送られたメールアドレスにパスワード再設定画面のリンクが記載されているメールを送信する機能を作成していきます。
まずは、実際にユーザーに送信するメールのテンプレートを作成します。
resourcesにあるviewsディレクトリの中にmailsというディレクトリを新しく作り、その中にpassword_reset_mail.blade.phpというファイルを作成してください。
password_reset_mail.blade.phpの中身は以下のようにしておきます。
<p>パスワード再設定のリクエストを受け取りました。下のリンクをクリックして、新しいパスワードを設定してください。</p>
<br/>
<a href="{{ $url }}">{{ $url }}</a><br>
<br/>
<p>1時間以内に上記のURLにアクセスし、パスワード再設定の手続きをお願いいたします。</p>
<br/>
<p>このメールは自動送信されております。</p>
<p>ご返信できませんのでご了承ください。</p>
<br/>
<br/>
<br/>
このファイルがパスワード再設定メールのテンプレートです。
次は、以下のLaravelのコンテナの中で以下のコマンドを実行して、Notificationを作成してください。
php artisan make:notification CustomPasswordReset
Laravelでメールを送信するために、このNotificationが必要になります。ここで作成したCustomPasswordReset.phpの中身は以下のようにしておいてください。
<?php

namespace App\Notifications;

use Illuminate\Bus\Queueable;
use Illuminate\Contracts\Queue\ShouldQueue;
use Illuminate\Notifications\Messages\MailMessage;
use Illuminate\Notifications\Notification;

class CustomPasswordReset extends Notification
{
    use Queueable;

    public $token;
    public $email;

    /**
     * Create a new notification instance.
     */
    public function __construct($token, $email)
    {
        $this->token = $token;
        $this->email = $email;
    }

    /**
     * Get the notification's delivery channels.
     *
     * @return array<int, string>
     */
    public function via(object $notifiable): array
    {
        return ['mail'];
    }

    /**
     * Get the mail representation of the notification.
     */
    public function toMail(object $notifiable): MailMessage
    {
        $url = 'http://localhost:3000/password_reset/'.$this->token.'?email='.$this->email;
        return (new MailMessage)
                    ->subject('【パスワード再設定】')
                    ->view('mails.password_reset_mail', ['url' => $url]);
    }

    /**
     * Get the array representation of the notification.
     *
     * @return array<string, mixed>
     */
    public function toArray(object $notifiable): array
    {
        return [
            //
        ];
    }
}
このファイルのtoMailという関数の中で、送信するメールの件名や中身をどのテンプレートにするかなどを指定しています。
$urlという変数にパスワードを実際に更新する画面のURLになります。パスワード更新画面のURLは
http://localhost:3000/password_reset/[パスワード再設定のトークン]?email=[パスワード再設定を申請したユーザーのメールアドレス]
という形式になっていて、この後Next.jsでパスワード更新画面を作るときに、トークンの部分は動的ルーティングのパスになるようにしていきます。
また、ユーザーのメールアドレスをパラメータとしてURLに含めるのは、
- パスワード更新画面でユーザーが自分のメールアドレスを入力する手間をなくため
- パスワード更新画面が開かれたときにトークンとユーザーのメールアドレスがパスワードの再設定を申請したユーザーのものかどうかを検証するため
という2つの理由があります。
ここまでできたら、Userモデルに以下の記述を追記してください。
    public function sendPasswordResetNotification($token)
    {
        $email = $this->email;
        $this->notify(new CustomPasswordReset($token, $email));
    }
ユーザーに対して通知を行うのでUserモデルに記述します。
次は、コントローラーに先ほど作成したパスワード再設定のメールをユーザーに送信する関数を書いていきます。AuthController.phpに以下の関数を追記してください。
// パスワード再設定メールを送信
public function sendPasswordResetEmail(Request $request)
{
    // 送信されたメールアドレスのユーザーを取得
    $user = User::where('email', $request->input('email'))->first();
    if (!$user) {
        return response()->json(['error' => 'Email not found.']);
    }
    // トークンを生成
    $token = Password::broker()->createToken($user);
    // トークンの有効期限を設定
    $now = Carbon::now();
    $expire_at = $now->addHour(1)->toDateTimeString();
    // トークンをDBに保存
    UserToken::create([
        'user_id' => $user->id,
        'token' => $token,
        'expire_at' => $expire_at,
    ]);
    // 実際にメールを送信する処理
    $user->sendPasswordResetNotification($token);
    // レスポンスを返す
    return new JsonResponse([
        'token' => $token,
        'mail_sent' => true,
    ]);
}
ルーティングも書いていきます。routesディレクトリにあるapi.phpに以下の記述を追加してください。
Route::post('/password/reset/request', 'App\Http\Controllers\AuthController@sendPasswordResetEmail')->name('password.reset');
これでLaravelのパスワード再設定メールを送信する処理ができたので、実際に実行してみましょう。
Mailtrapにログインしてください。
※まだMailtrapのアカウントを作成していない場合は、新しくアカウントを作成してください。

ログインしたら、Mailtrapの接続情報を調べて、Laravelの.envファイルにその情報を記載します。
まず、サイドバーにあるEmail TestingのInboxesを選択し、右端にある「Add Inbox」をクリックします。名前を決めて、新しいInboxを作成してください。

作成したInboxeを開いて、Integrationsのところで「Laravel 9+」を選択します。すると、Mailtrapの接続情報が表示されるので、「Copy」を押してこの情報をコピーします。

コピーした情報をLaravelの.envファイルのメールの設定のところに貼り付けます。

これでMailtrapが使えるようになりましたので、Postmanからパスワード再設定メール送信のリクエストを送ってみましょう。
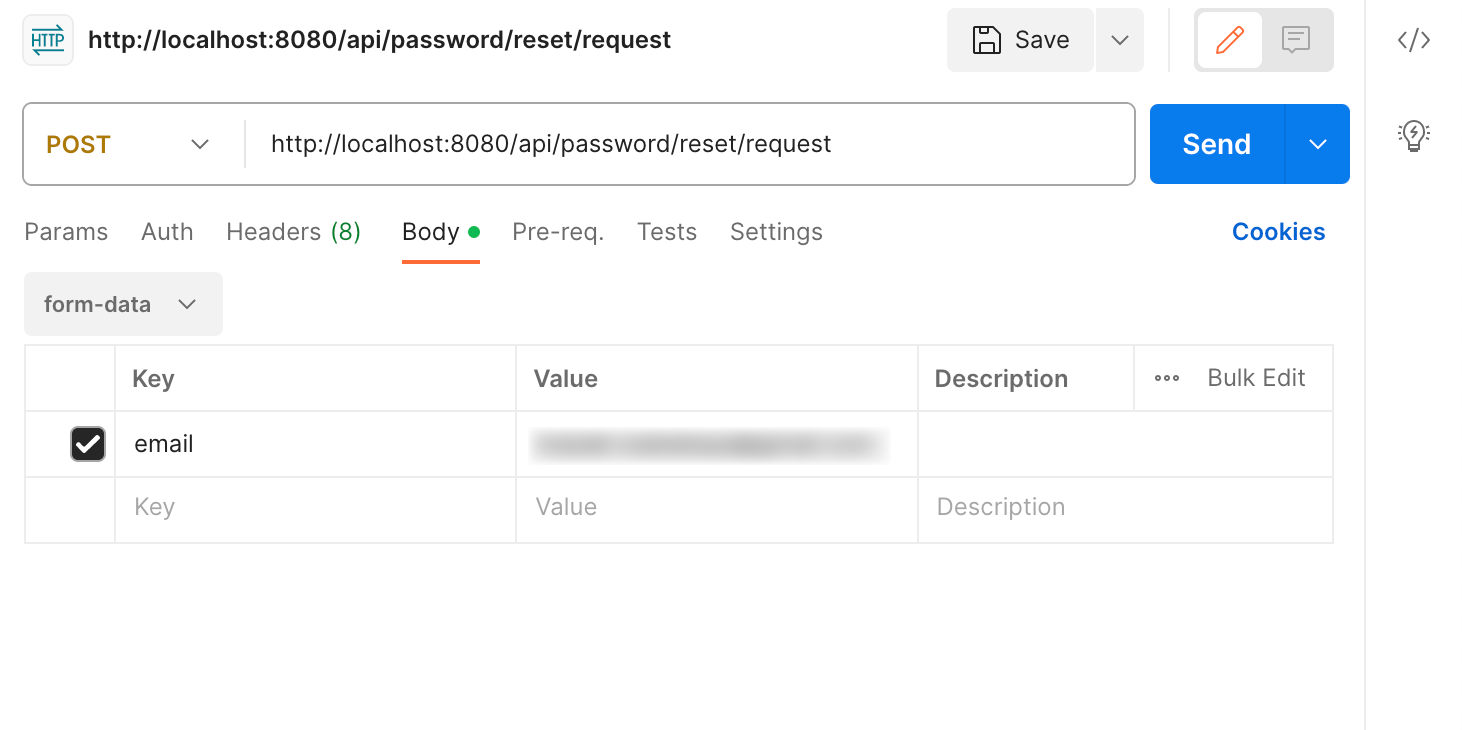
MailtrapのInboxを確認して、実際にパスワード再設定のメールが届いていればOKです。

Next.jsでパスワード再設定メールをリクエストする画面を作成する
次は、Next.jsでユーザーがメールアドレスを入力して、パスワード再設定を申請する画面を作成していきます。
Next.jsのappディレクトリの中に(auth)ディレクトリを作成します。そして、その中にforgot_passwordディレクトリを作成して、その中にpage.tsxを作成します。
このpage.tsxの中身は以下のようにしてください。
"use client";
import React, { useEffect, useState } from 'react';
import axios from 'axios';
import { AxiosError } from 'axios';

// XSRF-TOKENをリクエスト時に送信するための設定
const http = axios.create({
    baseURL: 'http://localhost:8080',
    withCredentials: true,
});


const ForgotPassword = () => {
    const [email, setEmail] = useState('');
    const [mailSent, setMailSent] = useState(false);
    // ローディングスピナーの状態
    const [loading, setLoading] = useState<boolean>(false);
    // エラーメッセージを格納するstate
    const [errorMessage, setErrorMessage] = useState('');


    const postData = async () => {
        // ローディングアニメーションを開始
        setLoading(true);
        // エラーメッセージを初期化
        setErrorMessage('');
        // CSRF保護の初期化
        axios.get('http://localhost:8080/sanctum/csrf-cookie', { withCredentials: true }).then((res: any) => {
            console.log(res);
            // パスワードリセットのメールを送信
            http.post('/api/password/reset/request', {email}).then((res: any) => {
                console.log(res.data.mail_sent);
                setMailSent(res.data.mail_sent);
                // ローディングアニメーションを終了
                setLoading(false);
            }).catch((err: AxiosError)=>{
                // err.response.data.messageがエラーメッセージ
                setErrorMessage(err.response?.data.message);
                // ローディングアニメーションを終了
                setLoading(false);
            });
        });
    }

    const loadingStyle: any = {
        display: loading ? "block" : "none",
        position: "absolute",
        zIndex: "10",
        top: "0",
        left: "0",
        width: "100%",
        height: "100%",
        backgroundColor: "rgba(255,255,255,0.5)",
    }

    return (
        <>
            <div style={loadingStyle} className="loading">
                <div className="h-screen w-screen flex justify-center items-center">
                    <div className="animate-spin h-20 w-20 border-4 border-teal-300 rounded-full border-t-transparent"></div>
                </div>
            </div>
            <div className='h-screen w-screen flex justify-center items-center'>
                {
                    mailSent ? (
                        <div className=''>
                            <p>
                                パスワード再設定メールの送信が完了しました。
                            </p>
                        </div>
                    ) : (
                        <div className='w-1/2'>
                            <input
                                type="text"
                                className='appearance-none border-2 border-teal-300 rounded-full w-full py-4 px-5 text-gray-700 leading-tight focus:outline-none focus:px-8 focus:border-teal-300 my-3 min-w-sm'
                                placeholder='email'
                                onChange={(e) => {
                                    setEmail(e.target.value);
                                }}
                            /><br/>
                            <div className="py-1 px-4">
                                <p className="text-red-500">{errorMessage}</p>
                            </div>
                            <div>
                                <button
                                    className="shadow bg-teal-300 hover:bg-teal-200 focus:shadow-outline focus:outline-none w-full text-white font-bold py-4 px-5 rounded-full my-3 min-w-sm text-xl"
                                    onClick={()=>{
                                        postData();
                                    }}
                                >パスワード再設定メールを送信</button>
                            </div>
                        </div>
                    )
                }
            </div>
        </>
    );
}

export default ForgotPassword;
この画面でユーザーがメールアドレスを入力して、パスワード再設定の申請を行います。
ユーザーがこの画面を開いてメールアドレスを入力して送信ボタンを押すと、LaravelのAPIにリクエストが送られて先ほど作成したパスワード再設定メールの処理が実行されるようになっています。
パスワードの再設定の申請が行われると、mailSentの値がtrueに変わり、画面の表示も「パスワード再設定メールの送信が完了しました。」という表示に切り替わります。
実際に、このページにアクセスし、メールアドレスを入力してパスワード再設定の申請を行うと、先ほどPostmanでリクエストを送ったときと同様に、パスワード再設定のメールが届くはずです。

パスワード再設定のメールを送信する機能はこれで完了です。
Next.jsで実際にパスワードを変更するための画面を作成
ここからは、実際にユーザーのパスワードを更新するための機能を作成していきます。まずは、Next.jsでユーザーがパスワードを更新を行う画面を作成します。
Next.jsのappディレクトリの中にある(auth)ディレクトリの中に、password_resetというディレクトリを新しく作成してください。
そうしたら、password_resetディレクトリの中に[token]というディレクトリを作成し、その中にpage.tsxを作成します。
つまり、
app/(auth)/password_reset/[token]/page.tsx
という感じの構成になります。
この[token]の部分が動的ルーティングになっていて、実際のパスワード再設定画面のURLでは、この部分がLaravel側で発行したパスワード再設定のためのトークンになります。
page.tsxの中身は以下のようにしてください。
"use client";
import React, { useEffect, useState } from 'react';
import axios from 'axios';
import { useRouter } from 'next/navigation';
import { usePathname, useSearchParams } from "next/navigation";
import { AxiosError } from 'axios';

// XSRF-TOKENをリクエスト時に送信するための設定
const http = axios.create({
    baseURL: 'http://localhost:8080',
    withCredentials: true,
});


const ResetPassword = () => {
    const [password, setPassword] = useState('');
    const [password_confirmation, setPasswordConfirmation] = useState('');
    // トークンとメールアドレスの検証結果
    const [isVerified, setIsVerified] = useState(false);
    // トークンとメールアドレスの検証エラーメッセージ
    const [errorMessage, setErrorMessage] = useState('');
    // 動的ルーティングのパスを取得して、そこからトークンを取得する
    const pathname = usePathname();
    const pathnameSegments = pathname.split('/');
    const token = pathnameSegments[pathnameSegments.length - 1];
    // searchParamsでURLのパラーメタからメールアドレスを取得する
    const searchParams = useSearchParams();
    const email = searchParams.get("email");
    // router
    const router = useRouter();
    // ローディングスピナーの状態
    const [loading, setLoading] = useState<boolean>(false);
    // パスワードと確認パスワードのエラーメッセージを格納するstate
    const [passwordErrorMessage, setPasswordErrorMessage] = useState('');
    const [passwordConfirmationErrorMessage, setPasswordConfirmationErrorMessage] = useState('');


    // ページがレンダリングされたらトークンとメールアドレスの検証を実行する
    useEffect(()=>{
        console.log(token);
        console.log(email);
        doVerifyTokenAndEmail();
    },[]);


    // トークンとメールアドレスの検証
    const doVerifyTokenAndEmail = async () => {

    }

    // パスワードのリセット
    const doResetPassword = async () => {

    }

    const loadingStyle: any = {
        display: loading ? "block" : "none",
        position: "absolute",
        zIndex: "10",
        top: "0",
        left: "0",
        width: "100%",
        height: "100%",
        backgroundColor: "rgba(255,255,255,0.5)",
    }

    return (
        <>
            <div style={loadingStyle} className="loading">
                <div className="h-screen w-screen flex justify-center items-center">
                    <div className="animate-spin h-20 w-20 border-4 border-teal-300 rounded-full border-t-transparent"></div>
                </div>
            </div>
            <div>
            <div className='h-screen w-screen flex justify-center items-center'>
                <div className='w-1/2'>
                    <input
                        type="password"
                        className='appearance-none border-2 border-teal-300 rounded-full w-full py-4 px-5 text-gray-700 leading-tight focus:outline-none focus:px-8 focus:border-teal-300 my-3 min-w-sm'
                        placeholder='password'
                        onChange={(e) => {
                            setPassword(e.target.value);
                        }}
                    />
                    <div className="py-1 px-4">
                        <p className="text-red-500">{passwordErrorMessage}</p>
                    </div>
                    <input
                        type="password"
                        className='appearance-none border-2 border-teal-300 rounded-full w-full py-4 px-5 text-gray-700 leading-tight focus:outline-none focus:px-8 focus:border-teal-300 my-3 min-w-sm'
                        placeholder='password confirmation'
                        onChange={(e) => {
                            setPasswordConfirmation(e.target.value);
                        }}
                    />
                    <div className="py-1 px-4">
                        <p className="text-red-500">{passwordConfirmationErrorMessage}</p>
                    </div>
                    <div>
                        <button
                            className="shadow bg-teal-300 hover:bg-teal-200 focus:shadow-outline focus:outline-none w-full text-white font-bold py-4 px-5 rounded-full my-3 min-w-sm text-xl"
                            onClick={()=>{
                                doResetPassword();
                            }}
                        >パスワードを変更</button>
                    </div>
                </div>
            </div>
        </div>
        </>
    );
}

export default ResetPassword;
Laravelにパスワード更新のリクエストを送ったりする処理やトークンが有効かどうかを検証する処理などは、後で追加していきます。

Laravelでトークンとメールアドレスを検証して、その結果によってNext.jsのパスワード変更画面の表示を変える
パスワード更新画面のURLは
http://localhost:3000/password_reset/[パスワード再設定のトークン]?email=[パスワード再設定を申請したユーザーのメールアドレス]
という構成になっています。
今回実装するパスワード更新画面では、
-
トークンとメールアドレスを持つユーザーのIDがuser_tokensテーブルに保存されているものと一致しているか?
-
トークンが有効期限を過ぎていないか?
ということをページを開いたときに検証して、トークンが有効期限を過ぎていたり、パラメータで送られたメールアドレスを持つユーザーのものとして発行されたトークンではなかった場合は、パスワード更新のフォームを表示しないようにしていきます。
まずは、Laravelのコントローラーにトークンとメールアドレスを検証するためのメソッドを作成します。
LaravelのAuthControllerに以下の2つのメソッドを追加してください。
// トークンとメールアドレスの検証を行って、結果を返す関数
private function doVerifyTokenAndEmail($token, $email)
{
    // 送信されたトークンがDBに存在するか確認
    $dbToken = UserToken::where('token', $token)->first();
    if (!$dbToken) {
        return ['success' => false, 'message' => 'The token is invalid.'];
    }
    // 送信されたメールアドレスからユーザーを取得
    $user = User::where('email', $email)->first();
    if (!$user) {
        return ['success' => false, 'message' => 'Email not found.'];
    }
    // 現在の時刻がトークンの有効期限を過ぎていないかを確認
    $now = Carbon::now();
    if ($now->gt($dbToken->expire_at)) {
        return ['success' => false, 'message' => 'The token has expired.'];
    }
    // トークンのユーザーIDとメールアドレスのユーザーIDが一致するか確認
    if ($dbToken->user_id != $user->id) {
        return ['success' => false, 'message' => 'The token is invalid.'];
    }
    // 検証が成功した場合
    return ['success' => true];
}

// パスワード再設定画面でトークンとメールアドレスを検証する処理
public function verifyTokenAndEmail(Request $request)
{
    // トークンとメールアドレスの検証を行う
    $result = $this->doVerifyTokenAndEmail($request->token, $request->email);
    if (!$result['success']) {
        return new JsonResponse(['message' => $result['message']]);
    }
    // 検証が成功した場合
    return new JsonResponse([
        'token' => $request->token,
        'verified' => true,
    ]);
}
doVerifyTokenAndEmailメソッドが実際にトークンの有効期限や、送信されたメールアドレスのユーザーIDとトークンがuser_tokensに保存されているものと一致しているかどうかを検証するメソッドになっています。
そして、このdoVerifyTokenAndEmailメソッドをverifyTokenAndEmailの中で呼び出して、検証結果が正当なものであればverifiedがtrueになっているレスポンスを返すようになっています。
Next.jsからパスワード更新画面のURLの動的ルーティングのパスになっているトークンと、パラメータとして付いているメールアドレスを、LaravelのverifyTokenAndEmailメソッドに送って、トークンとメールアドレスを検証します。
では、次はNext.jsからトークンとメールアドレスをLaravelのverifyTokenAndEmailメソッドに送信する処理を書いていきます。
password_reset/[token]/page.tsxの中身を以下のように変更してください。
"use client";
import React, { useEffect, useState } from 'react';
import axios from 'axios';
import { useRouter } from 'next/navigation';
import { usePathname, useSearchParams } from "next/navigation";
import { AxiosError } from 'axios';

// XSRF-TOKENをリクエスト時に送信するための設定
const http = axios.create({
    baseURL: 'http://localhost:8080',
    withCredentials: true,
});


const ResetPassword = () => {
    const [password, setPassword] = useState('');
    const [password_confirmation, setPasswordConfirmation] = useState('');
    // トークンとメールアドレスの検証結果
    const [isVerified, setIsVerified] = useState(false);
    // トークンとメールアドレスの検証エラーメッセージ
    const [errorMessage, setErrorMessage] = useState('');
    // 動的ルーティングのパスを取得して、そこからトークンを取得する
    const pathname = usePathname();
    const pathnameSegments = pathname.split('/');
    const token = pathnameSegments[pathnameSegments.length - 1];
    // searchParamsでURLのパラーメタからメールアドレスを取得する
    const searchParams = useSearchParams();
    const email = searchParams.get("email");
    // router
    const router = useRouter();
    // ローディングスピナーの状態
    const [loading, setLoading] = useState<boolean>(false);
    // パスワードと確認パスワードのエラーメッセージを格納するstate
    const [passwordErrorMessage, setPasswordErrorMessage] = useState('');
    const [passwordConfirmationErrorMessage, setPasswordConfirmationErrorMessage] = useState('');


    // ページがレンダリングされたらトークンとメールアドレスの検証を実行する
    useEffect(()=>{
        console.log(token);
        console.log(email);
        doVerifyTokenAndEmail();
    },[]);


    // トークンとメールアドレスの検証
    const doVerifyTokenAndEmail = async () => {
        // CSRF保護の初期化
        axios.get('http://localhost:8080/sanctum/csrf-cookie', { withCredentials: true }).then((res: any) => {
            console.log(res);
            // URLに含まれているトークンとメールアドレスが有効かどうかを検証
            http.post('/api/password/reset/verify', {email, token}).then((res: any) => {
                console.log(res.data.verified);
                setIsVerified(res.data.verified);
                if (!res.data.verified) {
                    setErrorMessage(res.data.message);
                }
            });
        });
    }

    // パスワードのリセット
    const doResetPassword = async () => {

    }

    const loadingStyle: any = {
        display: loading ? "block" : "none",
        position: "absolute",
        zIndex: "10",
        top: "0",
        left: "0",
        width: "100%",
        height: "100%",
        backgroundColor: "rgba(255,255,255,0.5)",
    }

    return (
        <>
            <div style={loadingStyle} className="loading">
                <div className="h-screen w-screen flex justify-center items-center">
                    <div className="animate-spin h-20 w-20 border-4 border-teal-300 rounded-full border-t-transparent"></div>
                </div>
            </div>
            <div>
            {
                isVerified ? (
                    <div className='h-screen w-screen flex justify-center items-center'>
                        <div className='w-1/2'>
                            <input
                                type="password"
                                className='appearance-none border-2 border-teal-300 rounded-full w-full py-4 px-5 text-gray-700 leading-tight focus:outline-none focus:px-8 focus:border-teal-300 my-3 min-w-sm'
                                placeholder='password'
                                onChange={(e) => {
                                    setPassword(e.target.value);
                                }}
                            />
                            <div className="py-1 px-4">
                                <p className="text-red-500">{passwordErrorMessage}</p>
                            </div>
                            <input
                                type="password"
                                className='appearance-none border-2 border-teal-300 rounded-full w-full py-4 px-5 text-gray-700 leading-tight focus:outline-none focus:px-8 focus:border-teal-300 my-3 min-w-sm'
                                placeholder='password confirmation'
                                onChange={(e) => {
                                    setPasswordConfirmation(e.target.value);
                                }}
                            />
                            <div className="py-1 px-4">
                                <p className="text-red-500">{passwordConfirmationErrorMessage}</p>
                            </div>
                            <div>
                                <button
                                    className="shadow bg-teal-300 hover:bg-teal-200 focus:shadow-outline focus:outline-none w-full text-white font-bold py-4 px-5 rounded-full my-3 min-w-sm text-xl"
                                    onClick={()=>{
                                        doResetPassword();
                                    }}
                                >パスワードを変更</button>
                            </div>
                        </div>
                    </div>
                ) : (
                    <>{errorMessage}</>
                )
            }
        </div>
        </>
    );
}

export default ResetPassword;
ちなみに、Next.jsでは動的ルーティングのパスやURLのパラメータは以下のように取得しています。
// 動的ルーティングのパスを取得して、そこからトークンを取得する
const pathname = usePathname();
const pathnameSegments = pathname.split('/');
const token = pathnameSegments[pathnameSegments.length - 1];
// searchParamsでURLのパラーメタからメールアドレスを取得する
const searchParams = useSearchParams();
const email = searchParams.get("email");
実際に、パスワード更新画面にアクセスして、URLにあるトークンやメールアドレスをテーブルに保存されていないものに書き換えると、パスワード入力欄が表示されなくなることを確認できると思います。

Laravelで実際にパスワードを変更するための処理を作成する
次は、実際にパスワードを更新するための関数をLaravel側で作成していきます。
AuthControllerに以下のメソッドを追加してください。
// パスワードの変更
public function updatePassword(UpdatePasswordRequest $request)
{
    // トークンとメールアドレスの検証を行う
    $result = $this->doVerifyTokenAndEmail($request->token, $request->email);
    if (!$result['success']) {
        return new JsonResponse(['message' => $result['message']]);
    }
    // 検証が成功した場合はパスワードを変更する
    $user = User::where('email', $request->email)->first();
    $user->password = Hash::make($request->password);
    $user->save();
    // パスワードを変更したらトークンは削除する
    UserToken::where('token', $request->token)->delete();
    // レスポンスを返す
    return new JsonResponse([
        'message' => 'Password updated.'
    ]);
}
このupdatePasswordメソッドが実際にユーザーのパスワードを変更する処理ですね。
最初に、先ほど作成したdoVerifyTokenAndEmailメソッドを呼び出して、パスワードを変更しようとしているユーザーのトークンとメールアドレスを検証して、問題がなければパスワードを変更するという流れになっています。
また、パスワード変更のためのルーティングも作成しておきます。routesディレクトリにあるapi.phpに以下の記述を追加してください。
Route::post('/password/reset', 'App\Http\Controllers\AuthController@updatePassword');
ここまでできたら、次はNext.js側で、updatePasswordメソッドにリクエストを送る処理を書いていきます。
password_reset/[token]ディレクトリにあるpage.tsxのdoResetPassword関数の中身を以下のように変更してください。
    // パスワードのリセット
    const doResetPassword = async () => {
        // エラーメッセージを初期化
        setPasswordErrorMessage('');
        setPasswordConfirmationErrorMessage('');
        // ローディングアニメーションを開始
        setLoading(true);
        // CSRF保護の初期化
        axios.get('http://localhost:8080/sanctum/csrf-cookie', { withCredentials: true }).then((res: any) => {
            console.log(res);
            // パスワードリセット
            http.post('/api/password/reset', {password, password_confirmation, email, token}).then((res: any) => {
                console.log(res);
                // パスワード変更完了画面に遷移
                router.push('/password_reset/complete');
            }).catch((err: AxiosError)=>{
                // ローディングアニメーションを終了
                setLoading(false);
            });
        });
    }
LaravelのAPIにリクエストを送り、パスワード更新の処理が完了したら、パスワード更新完了画面に遷移するという処理になっています。
Next.jsでパスワード更新完了画面を作成する
次はパスワード更新完了画面を作成していきます。これはパスワード更新が実行されたあとに表示される画面ですね。
Next.jsのapp/(auth)/password_resetディレクトリの中に、新しくcompleteディレクトリを作成して、その中にpage.tsxを作成してください。
このpage.tsxの中身は以下のようにしてください。
"use client";
import React, { useEffect, useState } from 'react';
import { useRouter } from 'next/navigation';


const Page = () => {
    const router = useRouter();

    useEffect(()=>{
        setTimeout(()=>{
            router.push('/signin');
        }, 3000);
    },[]);

    return (
        <div className='h-screen w-screen flex justify-center items-center'>
            <p>
                パスワードの再設定が完了しました。
                3秒後にログイン画面にリダイレクトします。
            </p>
        </div>
    );
}

export default Page;
パスワードの再設定が完了すると、自動的にこのページにリダイレクトされます。
そして、このページでは「 パスワードの再設定が完了しました。3秒後にログイン画面にリダイレクトします。」というメッセージを表示して、setTimeout関数を使って画面が表示されてから3秒後にログインページにリダイレクトするようにしています。
これでパスワードを更新するための画面と、パスワードを更新する処理ができました。
では実際に、パスワード再設定のメールを送り、そのメールからパスワード再設定画面にアクセスし、パスワードを変更してみましょう。
パスワード変更後に、新しいパスワードでログインできればOKです。
バリデーションとエラーメッセージの表示機能を作成する
最後に、パスワード再設定メールのリクエスト画面とパスワード更新画面にバリデーション機能をつけていきます。
まずはパスワード再設定メールのリクエスト画面のバリデーションから作成していきますね。
ターミナルでLaravelのコンテナの中に入り、以下のコマンドを実行して、新しいリクエストを作成してください。
php artisan make:request SendPasswordResetEmailRequest
パスワード再設定のメール申請には
- 必須
- メールアドレス形式になっているかどうか
のバリデーションをつけたいので、このリクエストの中身は以下のようにします。
<?php

namespace App\Http\Requests;

use Illuminate\Foundation\Http\FormRequest;

class SendPasswordResetEmailRequest extends FormRequest
{
    /**
     * Determine if the user is authorized to make this request.
     */
    public function authorize(): bool
    {
        return true;
    }

    /**
     * Get the validation rules that apply to the request.
     *
     * @return array<string, \Illuminate\Contracts\Validation\ValidationRule|array|string>
     */
    public function rules(): array
    {
        return [
            // filterとdnsをつけることで、ひらがなやカタカナや漢字が含まれているものと存在しないドメインのメールアドレスは弾かれる
            'email' => 'required|email:filter,dns',
        ];
    }

    public function attributes()
    {
        return [
            'email' => 'メールアドレス',
        ];
    }

    public function messages()
    {
        return [
            'email.required' => ':attributeを入力してください。',
            'email.email' => ':attributeを入力してください。',
        ];
    }
}
パスワード再設定のメール送信の申請が行われたときに、このバリデーションが実行されるLaravelのコントローラーのsendPasswordResetEmailメソッドで、このリクエストファイルを呼び出します。
// パスワード再設定メールを送信
public function sendPasswordResetEmail(SendPasswordResetEmailRequest $request)
{
    // 略
}
続いて、Next.jsのパスワード再設定メールの申請画面で、バリデーションのエラーメッセージが表示されるようにしていきます。
app/(auth)/forgot_passwordディレクトリにあるpage.tsxの中身を以下のように変更してください。
"use client";
import React, { useEffect, useState } from 'react';
import axios from 'axios';
import { AxiosError } from 'axios';

// XSRF-TOKENをリクエスト時に送信するための設定
const http = axios.create({
    baseURL: 'http://localhost:8080',
    withCredentials: true,
});


const ForgotPassword = () => {
    const [email, setEmail] = useState('');
    const [mailSent, setMailSent] = useState(false);
    // ローディングスピナーの状態
    const [loading, setLoading] = useState<boolean>(false);
    // エラーメッセージを格納するstate
    const [errorMessage, setErrorMessage] = useState('');


    const postData = async () => {
        // ローディングアニメーションを開始
        setLoading(true);
        // エラーメッセージを初期化
        setErrorMessage('');
        // CSRF保護の初期化
        axios.get('http://localhost:8080/sanctum/csrf-cookie', { withCredentials: true }).then((res: any) => {
            console.log(res);
            // パスワードリセットのメールを送信
            http.post('/api/password/reset/request', {email}).then((res: any) => {
                console.log(res.data.mail_sent);
                setMailSent(res.data.mail_sent);
                // ローディングアニメーションを終了
                setLoading(false);
            }).catch((err: AxiosError)=>{
                // err.response.data.messageがエラーメッセージ
                setErrorMessage(err.response?.data.message);
                // ローディングアニメーションを終了
                setLoading(false);
            });
        });
    }

    const loadingStyle: any = {
        display: loading ? "block" : "none",
        position: "absolute",
        zIndex: "10",
        top: "0",
        left: "0",
        width: "100%",
        height: "100%",
        backgroundColor: "rgba(255,255,255,0.5)",
    }

    return (
        <>
            <div style={loadingStyle} className="loading">
                <div className="h-screen w-screen flex justify-center items-center">
                    <div className="animate-spin h-20 w-20 border-4 border-teal-300 rounded-full border-t-transparent"></div>
                </div>
            </div>
            <div className='h-screen w-screen flex justify-center items-center'>
                {
                    mailSent ? (
                        <div className=''>
                            <p>
                                パスワード再設定メールの送信が完了しました。
                            </p>
                        </div>
                    ) : (
                        <div className='w-1/2'>
                            <input
                                type="text"
                                className='appearance-none border-2 border-teal-300 rounded-full w-full py-4 px-5 text-gray-700 leading-tight focus:outline-none focus:px-8 focus:border-teal-300 my-3 min-w-sm'
                                placeholder='email'
                                onChange={(e) => {
                                    setEmail(e.target.value);
                                }}
                            /><br/>
                            <div className="py-1 px-4">
                                <p className="text-red-500">{errorMessage}</p>
                            </div>
                            <div>
                                <button
                                    className="shadow bg-teal-300 hover:bg-teal-200 focus:shadow-outline focus:outline-none w-full text-white font-bold py-4 px-5 rounded-full my-3 min-w-sm text-xl"
                                    onClick={()=>{
                                        postData();
                                    }}
                                >パスワード再設定メールを送信</button>
                            </div>
                        </div>
                    )
                }
            </div>
        </>
    );
}

export default ForgotPassword;
先ほどのバリデーションで弾かれた場合には、errorMessageのuseStateにバリデーションのエラーメッセージが格納されて、そのメッセージが画面に表示されるようになっています。

パスワード更新画面のバリデーションについても同様に作成していきます。まずLaravelのリクエストを新しく作成してください。
php artisan make:request UpdatePasswordRequest
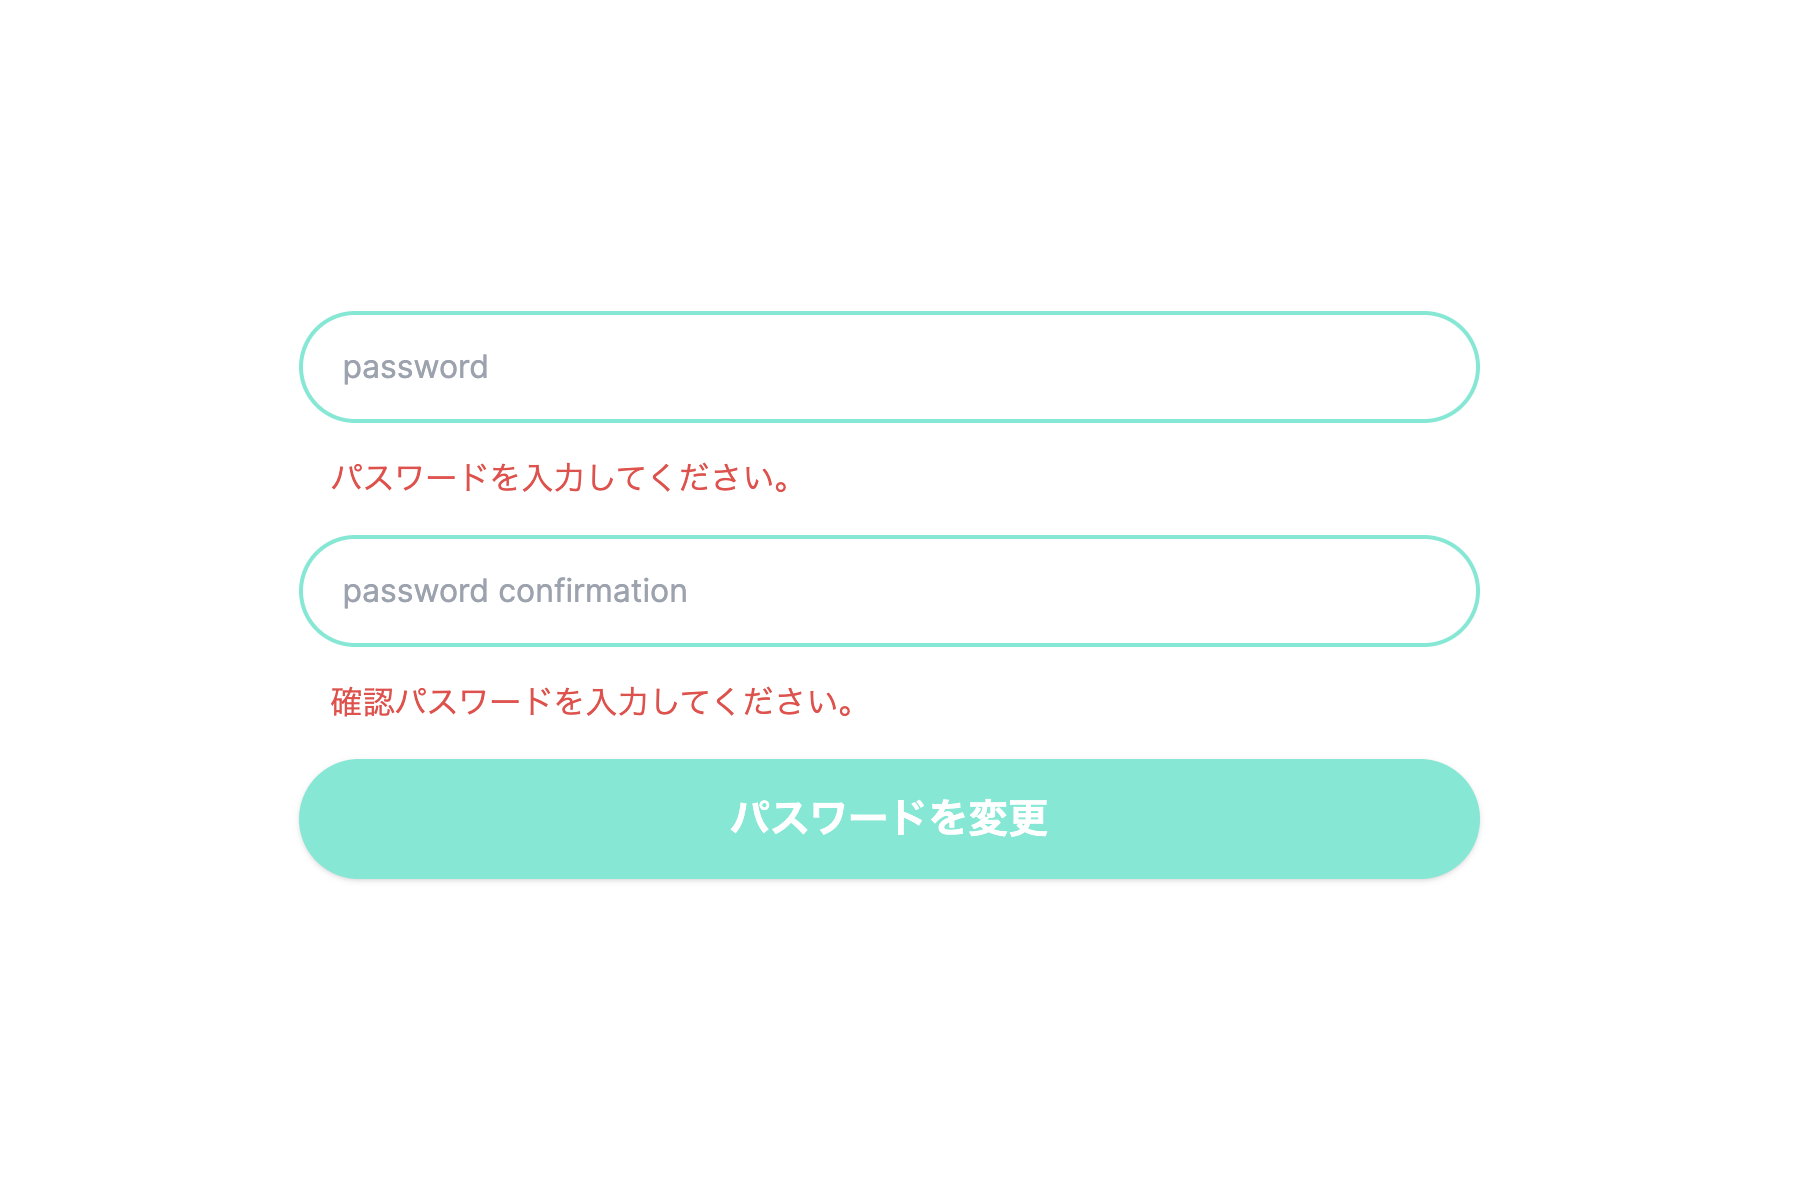
パスワード更新には
- 必須
- 8文字以上
- 20文字以下
- 半角英数字と記号のみ
- 確認パスワードと一致している
というバリデーションをつけていきます。UpdatePasswordRequest.phpの中身を以下のように変更してください。
<?php

namespace App\Http\Requests;

use Illuminate\Foundation\Http\FormRequest;

class UpdatePasswordRequest extends FormRequest
{
    /**
     * Determine if the user is authorized to make this request.
     */
    public function authorize(): bool
    {
        return true;
    }

    /**
     * Get the validation rules that apply to the request.
     *
     * @return array<string, \Illuminate\Contracts\Validation\ValidationRule|array|string>
     */
    public function rules(): array
    {
        return [
            'password' => 'required|min:8|max:20|regex:/^[!-~]+$/',
            'password_confirmation' => 'required|same:password',
        ];
    }

    public function attributes()
    {
        return [
            'password' => 'パスワード',
            'password_confirmation' => '確認パスワード',
        ];
    }

    public function messages()
    {
        return [
            'password.required' => ':attributeを入力してください。',
            'password.min' => ':attributeは8文字以上で入力してください。',
            'password.max' => ':attributeは20文字以内で入力してください。',
            'password.regex' => ':attributeは半角英数字と記号のみで入力してください。',
            'password_confirmation.required' => ':attributeを入力してください。',
            'password_confirmation.same' => 'パスワードと確認パスワードが一致していません。',
        ];
    }
}
このリクエストをLaravelのコントローラーにあるupdatePasswordメソッドで呼び出します。
// パスワードの変更
public function updatePassword(UpdatePasswordRequest $request)
{
    // 略
}
Next.jsのパスワード更新画面の方もバリデーションのエラーメッセージを画面に表示するように変更していきます。
app/(auth)/password_reset/[token]ディレクトリにあるpage.tsxの中身を以下のように変更してください。
"use client";
import React, { useEffect, useState } from 'react';
import axios from 'axios';
import { useRouter } from 'next/navigation';
import { usePathname, useSearchParams } from "next/navigation";
import { AxiosError } from 'axios';

// XSRF-TOKENをリクエスト時に送信するための設定
const http = axios.create({
    baseURL: 'http://localhost:8080',
    withCredentials: true,
});


const ResetPassword = () => {
    const [password, setPassword] = useState('');
    const [password_confirmation, setPasswordConfirmation] = useState('');
    // トークンとメールアドレスの検証結果
    const [isVerified, setIsVerified] = useState(false);
    // トークンとメールアドレスの検証エラーメッセージ
    const [errorMessage, setErrorMessage] = useState('');
    // 動的ルーティングのパスを取得して、そこからトークンを取得する
    const pathname = usePathname();
    const pathnameSegments = pathname.split('/');
    const token = pathnameSegments[pathnameSegments.length - 1];
    // searchParamsでURLのパラーメタからメールアドレスを取得する
    const searchParams = useSearchParams();
    const email = searchParams.get("email");
    // router
    const router = useRouter();
    // ローディングスピナーの状態
    const [loading, setLoading] = useState<boolean>(false);
    // パスワードと確認パスワードのエラーメッセージを格納するstate
    const [passwordErrorMessage, setPasswordErrorMessage] = useState('');
    const [passwordConfirmationErrorMessage, setPasswordConfirmationErrorMessage] = useState('');


    // ページがレンダリングされたらトークンとメールアドレスの検証を実行する
    useEffect(()=>{
        console.log(token);
        console.log(email);
        doVerifyTokenAndEmail();
    },[]);


    // トークンとメールアドレスの検証
    const doVerifyTokenAndEmail = async () => {
        // CSRF保護の初期化
        axios.get('http://localhost:8080/sanctum/csrf-cookie', { withCredentials: true }).then((res: any) => {
            console.log(res);
            // URLに含まれているトークンとメールアドレスが有効かどうかを検証
            http.post('/api/password/reset/verify', {email, token}).then((res: any) => {
                console.log(res.data.verified);
                setIsVerified(res.data.verified);
                if (!res.data.verified) {
                    setErrorMessage(res.data.message);
                }
            });
        });
    }

    // パスワードのリセット
    const doResetPassword = async () => {
        // エラーメッセージを初期化
        setPasswordErrorMessage('');
        setPasswordConfirmationErrorMessage('');
        // ローディングアニメーションを開始
        setLoading(true);
        // CSRF保護の初期化
        axios.get('http://localhost:8080/sanctum/csrf-cookie', { withCredentials: true }).then((res: any) => {
            console.log(res);
            // パスワードリセット
            http.post('/api/password/reset', {password, password_confirmation, email, token}).then((res: any) => {
                console.log(res);
                // パスワード変更完了画面に遷移
                router.push('/password_reset/complete');
            }).catch((err: AxiosError)=>{
                // ローディングアニメーションを終了
                setLoading(false);
                if (err.response?.data.errors) {
                    if (err.response?.data.errors.password) {
                        setPasswordErrorMessage(err.response?.data.errors.password[0]);
                    }
                    if (err.response?.data.errors.password_confirmation) {
                        setPasswordConfirmationErrorMessage(err.response?.data.errors.password_confirmation[0]);
                    }
                }
            });
        });
    }

    const loadingStyle: any = {
        display: loading ? "block" : "none",
        position: "absolute",
        zIndex: "10",
        top: "0",
        left: "0",
        width: "100%",
        height: "100%",
        backgroundColor: "rgba(255,255,255,0.5)",
    }

    return (
        <>
            <div style={loadingStyle} className="loading">
                <div className="h-screen w-screen flex justify-center items-center">
                    <div className="animate-spin h-20 w-20 border-4 border-teal-300 rounded-full border-t-transparent"></div>
                </div>
            </div>
            <div>
            {
                isVerified ? (
                    <div className='h-screen w-screen flex justify-center items-center'>
                        <div className='w-1/2'>
                            <input
                                type="password"
                                className='appearance-none border-2 border-teal-300 rounded-full w-full py-4 px-5 text-gray-700 leading-tight focus:outline-none focus:px-8 focus:border-teal-300 my-3 min-w-sm'
                                placeholder='password'
                                onChange={(e) => {
                                    setPassword(e.target.value);
                                }}
                            />
                            <div className="py-1 px-4">
                                <p className="text-red-500">{passwordErrorMessage}</p>
                            </div>
                            <input
                                type="password"
                                className='appearance-none border-2 border-teal-300 rounded-full w-full py-4 px-5 text-gray-700 leading-tight focus:outline-none focus:px-8 focus:border-teal-300 my-3 min-w-sm'
                                placeholder='password confirmation'
                                onChange={(e) => {
                                    setPasswordConfirmation(e.target.value);
                                }}
                            />
                            <div className="py-1 px-4">
                                <p className="text-red-500">{passwordConfirmationErrorMessage}</p>
                            </div>
                            <div>
                                <button
                                    className="shadow bg-teal-300 hover:bg-teal-200 focus:shadow-outline focus:outline-none w-full text-white font-bold py-4 px-5 rounded-full my-3 min-w-sm text-xl"
                                    onClick={()=>{
                                        doResetPassword();
                                    }}
                                >パスワードを変更</button>
                            </div>
                        </div>
                    </div>
                ) : (
                    <>{errorMessage}</>
                )
            }
        </div>
        </>
    );
}

export default ResetPassword;
これでパスワード更新画面にもバリデーションが実装できているはずです。
ここまでできたらパスワード再設定機能は完成です。
まとめ
パスワード再設定のトークンを保存するテーブルを作成して、パスワード再設定メール送信時に有効期限があるトークンを発行することで、Next.jsとLaravelのWebアプリにパスワード再設定機能を作成することができる。
今回の実装のGitHubのリポジトリはこちらです。
- Next.js
- Laravel