OSX Cocoa で透過なし画像とマスク画像を使って透過画像を作成する方法です。
唯一の方法ではないと思いますが、これしかわかりません。
登場するクラス
NSImage
Cocoaで画像といえばこれ。
NSBitmapImageRep
NSImageの中身。NSImageRepのサブクラス。保持するデータをどのように表示するか知ってる。 兄弟にPDF用とかいろいろ居る。
CGImageRef
あるいみNSImageRepの中身。C言語だぞ。
CGContextRef
画像のキャンバスの人。 NSGraphicsContextの親玉。C言語だぞ。
画像関連クラスの相互変換
その前に画像関連クラス達の相互変換の方法
NSImage → NSBitmapImageRep
NSImage *image;
NSData *tiffData = image.TIFFRepresentation;
NSBitmapImageRep *imageRep = [NSBitmapImageRep imageRepWithData:tiffData];
NSBitmapImageRep → CGImageRef
NSBitmapImageRep *imageRep;
CGImageRef imageRef = imageRep.CGImage;
CGImageRef → NSBitmapImageRep
CGImageRef imageRef;
NSBitmapImageRep *imageRep = [[NSBitmapImageRep alloc] initWithCGImage:imageRef];
NSBitmapImageRep → NSImage
NSBitmapImageRep *imageRep;
NSData *tiffData = imageRep.TIFFRepresentation;
NSImage *image = [[NSImage alloc] initWithData:tiffData];
NSImage → CGImageRef
- NSImage → NSBitmapImageRep → CGImageRef
CGImageRef → NSImage
- CGImageRef → NSBitmapImageRep → NSImage
透過画像の作成
では実際に透過画像を作成します。
- (NSImage *)transparentImage:(NSImage *)image maskImage:(NSImage *)mask
{
    NSBitmapImageRep *maskImageRep = [[NSBitmapImageRep alloc] initWithData:mask.TIFFRepresentation];

    NSSize size = image.size;
    NSRect rect = NSMakeRect(0, 0, size.width, size.height);

    NSImage *transparentImage = [[NSImage alloc] initWithSize:size];
    [transparentImage lockFocus];
    {
        CGContextRef context = [[NSGraphicsContext currentContext] graphicsPort];
        CGContextSaveGState(context);

        CGContextClipToMask(context, NSRectToCGRect(rect), maskImageRep.CGImage);

        [image drawAtPoint:NSZeroPoint
                  fromRect:rect
                 operation:NSCompositeCopy
                  fraction:1.0];

        CGContextRestoreGState(context);
    }
    [transparentImage unlockFocus];

    return transparentImage;
}
CGContextClipToMask()を使いカレントコンテクストにマスクを設定し、画像を描画しています。
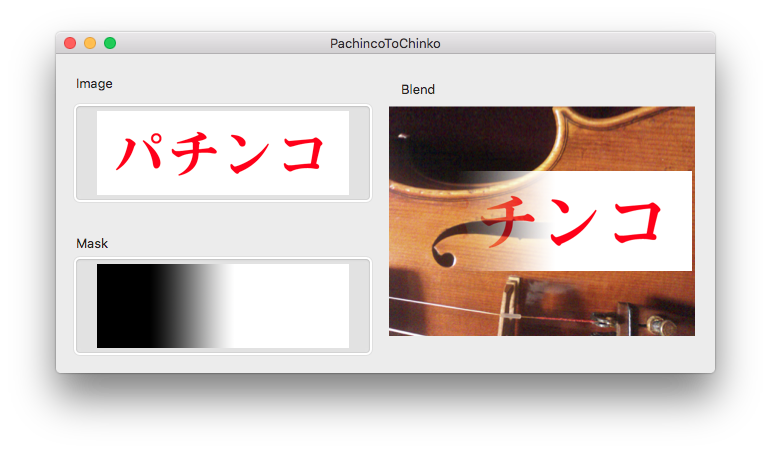
実際にこのコードを使った使ったサンプルがこちらです。
応用例
NSTextFieldのサブクラスとしてスーパークラスであるNSTextFieldの描画前にカレントコンテキストにマスクを設定することでフェードアウトするテキストフィールドを造ることが可能です。
@interface HMFadeOutTextField : NSTextField
@end

@implementation HMFadeOutTextField

- (CGImageRef)maskImageWith:(CGFloat)middle1 middle2:(CGFloat)middle2
{
    NSRect rect = self.bounds;
    CGColorSpaceRef colorspace = CGColorSpaceCreateDeviceGray();
    CGContextRef maskContext =
    CGBitmapContextCreate(
                          NULL,
                          rect.size.width,
                          rect.size.height,
                          8,
                          rect.size.width,
                          colorspace,
                          0);
    CGColorSpaceRelease(colorspace);

    // Switch to the context for drawing
    NSGraphicsContext *maskGraphicsContext =
    [NSGraphicsContext graphicsContextWithGraphicsPort:maskContext
                                               flipped:NO];
    [NSGraphicsContext saveGraphicsState];
    [NSGraphicsContext setCurrentContext:maskGraphicsContext];

    // Draw the text right-way-up (non-flipped context)

    NSGradient *gradient = [[NSGradient alloc] initWithColorsAndLocations:
                            [NSColor whiteColor], 0.0,
                            [NSColor whiteColor], middle1,
                            [NSColor blackColor], middle2,
                            [NSColor blackColor], 1.0,
                            nil];

    [gradient drawInRect:rect angle:0.0];
    // Switch back to the window's context
    [NSGraphicsContext restoreGraphicsState];

    // Create an image mask from what we've drawn so far
    CGImageRef maskImage = CGBitmapContextCreateImage(maskContext);

    CFRelease(maskContext);

    return (CGImageRef)CFAutorelease(maskImage);
}

- (CGImageRef)maskImage
{
    if(_maskImage) return _maskImage;

    _maskImage = [self maskImageWith:0.75 middle2:0.85];
    CFRetain(_maskImage);

    return _maskImage;
}

- (void)drawRect:(NSRect)dirtyRect
{
    CGContextRef context = [[NSGraphicsContext currentContext] graphicsPort];
    CGContextSaveGState(context);
    CGContextClipToMask(context, NSRectToCGRect(self.bounds), self.maskImage);

    [super drawRect:dirtyRect];

    CGContextRestoreGState(context);
}
@end
こんな感じになります。
