はじめに
デザインの都合上ボタンとか、LinearLayoutを角丸にしたかった時に調べた時のメモ。
実装
基本的にはbackgroundを指定する際に、別ファイルで角丸を定義したものを読みこめばうまく行きます。
ボタンの比較
まずはボタンで比較してみます。
比較対象は通常のボタン、角丸(5dp)のボタン、角丸(10dp)のボタンです。
    <RelativeLayout
        android:layout_width="match_parent"
        android:layout_height="wrap_content"
        android:layout_marginTop="10dp">

        <!--通常のボタン-->
        <Button
            android:id="@+id/buttonNormal"
            android:layout_width="wrap_content"
            android:layout_height="wrap_content"
            android:layout_alignParentLeft="true"
            android:background="@color/button_material_light"
            android:text="普通" />

        <!--角丸5dpのボタン-->
        <Button
            android:id="@+id/buttonRoundedCorners5dp"
            android:layout_width="wrap_content"
            android:layout_height="wrap_content"
            android:layout_centerInParent="true"
            android:background="@drawable/shape_rouded_corners_5dp"
            android:text="角丸(5dp)" />

        <!--角丸10dp-->
        <Button
            android:id="@+id/buttonRoundedCorners10dp"
            android:layout_width="wrap_content"
            android:layout_height="wrap_content"
            android:layout_alignParentRight="true"
            android:background="@drawable/shape_rouded_corners_10dp"
            android:text="角丸(10dp)" />
    </RelativeLayout>
通常のボタン
これは特に弄っていないので説明は割愛します。
角丸(5dp)のボタン
radiusを指定して角丸の度合いを調整します。まずは5dpから
<?xml version="1.0" encoding="utf-8"?>
<selector xmlns:android="http://schemas.android.com/apk/res/android">
    <item>
        <shape android:shape="rectangle">
            <corners
                android:topRightRadius="5dp"
                android:bottomRightRadius="5dp"
                android:bottomLeftRadius="5dp"
                android:topLeftRadius="5dp"
                />
            <solid
                android:color="@color/button_material_light"
                />
        </shape>
    </item>
</selector>
角丸(10dp)のボタン
Radiusの指定を大きくすると更に強い角丸になります。
<?xml version="1.0" encoding="utf-8"?>
<selector xmlns:android="http://schemas.android.com/apk/res/android">
    <item>
        <shape android:shape="rectangle">
            <corners
                android:topRightRadius="10dp"
                android:bottomRightRadius="10dp"
                android:bottomLeftRadius="10dp"
                android:topLeftRadius="10dp"
                />
            <solid
                android:color="@color/button_material_light"
                />
        </shape>
    </item>
</selector>
比較画像
ボタンの補足
ボタン押下時に色を変えたい場合は、定義したファイルに書き加えることで実現可能です。
ただし、その場合にはstate_pressed毎に角丸の指定もしてあげないと押した瞬間に角ばったボタンに変わりますので気をつけて下さい。
<?xml version="1.0" encoding="utf-8"?>
<selector xmlns:android="http://schemas.android.com/apk/res/android">
    <!--ボタン通常時のレイアウト-->
    <item state_pressed="false">
        <shape android:shape="rectangle">
            <corners
                android:topRightRadius="5dp"
                android:bottomRightRadius="5dp"
                android:bottomLeftRadius="5dp"
                android:topLeftRadius="5dp"
                />
            <solid
                android:color="@color/button_material_light"
                />
        </shape>
    </item>
    <!--ボタン押下時のレイアウト-->
    <item state_pressed="true">
        <shape android:shape="rectangle">
            <corners
                android:topRightRadius="5dp"
                android:bottomRightRadius="5dp"
                android:bottomLeftRadius="5dp"
                android:topLeftRadius="5dp"
                />
            <solid
                android:color="#000000"
                />
        </shape>
    </item>
</selector>
LinearLayoutの比較
次にLinearLayoutを比較していきます。
ボタンと違い中にViewを持つため、場合によっては少々勝手が違ってきます。
<!--LinearLayout全体に適用-->
        <LinearLayout
            android:layout_width="wrap_content"
            android:layout_height="wrap_content"
            android:layout_alignParentLeft="true"
            android:background="@drawable/shape_rouded_corners_5dp"
            android:orientation="vertical">

            <TextView
                android:layout_width="wrap_content"
                android:layout_height="wrap_content"
                android:text="hoge" />

            <TextView
                android:layout_width="wrap_content"
                android:layout_height="wrap_content"
                android:text="fuga" />

            <TextView
                android:layout_width="wrap_content"
                android:layout_height="wrap_content"
                android:text="foo" />

            <TextView
                android:layout_width="wrap_content"
                android:layout_height="wrap_content"
                android:text="bar" />
        </LinearLayout>

        <!--LinearLayout全体に適用したうえで要素一つだけ別の色を指定-->
        <LinearLayout
            android:layout_width="wrap_content"
            android:layout_height="wrap_content"
            android:layout_centerInParent="true"
            android:background="@drawable/shape_rouded_corners_5dp"
            android:orientation="vertical">

            <!--個別の背景を色で指定-->
            <TextView
                android:layout_width="wrap_content"
                android:layout_height="wrap_content"
                android:background="@color/accent_material_light"
                android:text="hoge" />

            <TextView
                android:layout_width="wrap_content"
                android:layout_height="wrap_content"
                android:text="fuga" />

            <TextView
                android:layout_width="wrap_content"
                android:layout_height="wrap_content"
                android:text="foo" />

            <TextView
                android:layout_width="wrap_content"
                android:layout_height="wrap_content"
                android:text="bar" />
        </LinearLayout>

        <!--LinearLayout全体に適用したうえで要素一つだけ別の背景を指定-->
        <LinearLayout
            android:layout_width="wrap_content"
            android:layout_height="wrap_content"
            android:layout_alignParentRight="true"
            android:background="@drawable/shape_rouded_corners_5dp"
            android:orientation="vertical">

            <!--個別の背景を定義ファイルで指定-->
            <TextView
                android:layout_width="wrap_content"
                android:layout_height="wrap_content"
                android:background="@drawable/shape_rouded_corners_top_5dp"
                android:text="hoge" />

            <TextView
                android:layout_width="wrap_content"
                android:layout_height="wrap_content"
                android:text="fuga" />

            <TextView
                android:layout_width="wrap_content"
                android:layout_height="wrap_content"
                android:text="foo" />

            <TextView
                android:layout_width="wrap_content"
                android:layout_height="wrap_content"
                android:text="bar" />
        </LinearLayout>
    </RelativeLayout>
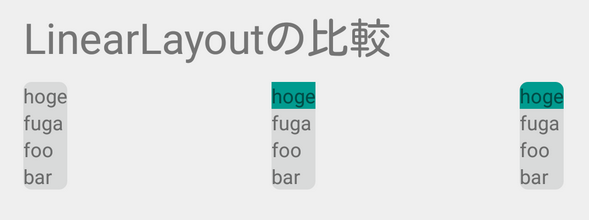
LinearLayout全体に適用
これはボタンで使用したxmlファイルをそのまま流用しても大丈夫です。
どの角もちゃんと丸くなります。
LinearLayout全体に適用したうえで要素一つだけ別の色を指定
これは一見うまくいきそうですが、色を指定したせいで左上と右上の角丸の指定が無効になり
左下右下だけ角丸という歪な形になってしまいます。
LinearLayout全体に適用したうえで要素一つだけ別の背景を指定
ひとつ前で色を指定していた箇所を、xmlで個別に定義して指定すればうまくいきます。
<?xml version="1.0" encoding="utf-8"?>
<selector xmlns:android="http://schemas.android.com/apk/res/android">
    <item>
        <shape android:shape="rectangle">
            <corners
                android:topRightRadius="5dp"
                android:topLeftRadius="5dp"
                />
            <solid
                android:color="@color/accent_material_light"
                />
        </shape>
    </item>
</selector>
比較画像
おわりに
こんな面倒なことしなくてもxmlに指定しただけで上手いこと角丸になってくれないかしらと思いました。
今回のソースは下記です。
https://github.com/masaibar/RoundedCornersSample

