TL;DR / 結論から先に言うと
- 音声ファイル(wavファイル)から、Google Assistantにリクエストして、実行されたインテントを確認するテスト用ライブラリを作った
- 以下で「google-assistant-test-from-wavefile」 として公開した
- https://github.com/masachaco/google-assistant-test-from-wavefile
- テストも不十分で仮実装レベルなので実運用向きではない。α版未満。
- セットアップが大変
- できればどのEntityにマッチしたとかは、今後できるようにしていきたい
何ができるの
あなたにかわって、Google Assistantにテストライブラリが録音したあなたの音声で話しかけます。
話しかけた音声が、ちゃんと想定のインテントに落ちているかテストできます。
定期的に実行して、Google Assistantが発話に対する認識がかわってしまっていることがないか確認できます。
すでにあるものと、やりたかったこと
「actions-on-google-testing-nodejs」 という公式のGoogle Assistant End to Endテストライブラリがすでに存在しています。
これは、以下のように、PC内で Google Assistantを実際に実行して、その結果を確認するというものです。
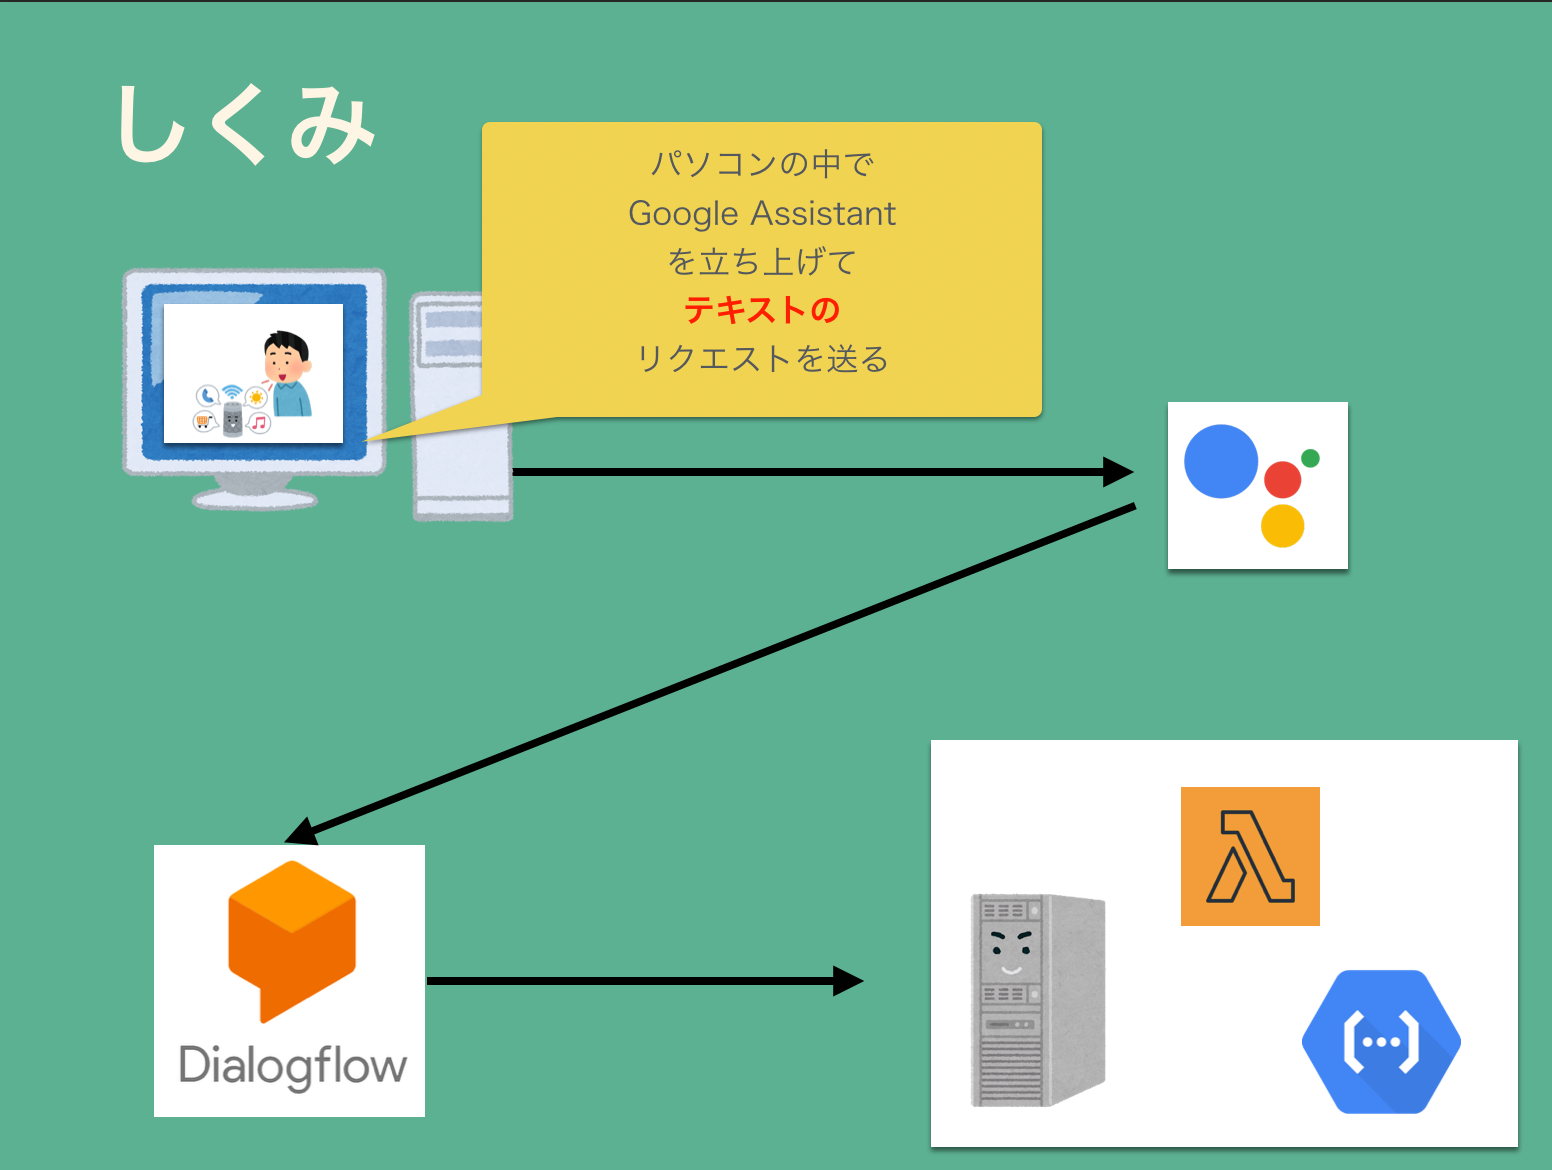
ですが、音声でのリクエストと、テストは現在サポートされていません。
そのため、以下の確認はできません。
- 音声でリクエストして、 今現在実際に Google Assistantに発話がどのように認識されているのか
- 音声でリクエストした結果、Dialogflowのどのインテントに落ちているのか
実際にテストするとなると、Assistantに話しかけるしかなく、テスト・確認に手間がかかっていました。

そこで、 actions-on-google-testing-nodejs と同じ仕組みで、wavファイルを指定して音声によるテストができるライブラリを作ってみました。
これで、「実行時点でGoogle Assistantはどういう風に認識するのか」その結果、「実行時点でDialogflowがどのIntentに落とし込むのか」を確認できるはずです。

ということで
wavファイルから、Google Assistantへリクエストして、どのインテントに落ちたか確認できる
google-assistant-test-from-wavefile(仮)
https://github.com/masachaco/google-assistant-test-from-wavefile
を作成しました。
※以下のプロジェクトを元に作成しました
googlesamples/assistant-sdk-nodejs
https://github.com/googlesamples/assistant-sdk-nodejs
ライブラリのセットアップ手順
ライブラリをセットアップするために3つの認証情報を入手する必要があります。
- テスト対象の、Google Assistantの APIへの認証情報
- テスト対象の、Dialogflowの APIへの認証情報
- テストでPC上で立ち上げるGoogle Assistant(Device) の認証情報
その後、テストでPC上で立ち上げるGoogle Assistant(Device) の認証情報に、
Assistantを使用するユーザ(Googleアカウント)を指定して紐付けます。
このライブラリを使う前に
だいぶセットアップの手順が煩雑なため、まずはこのライブラリの作成のために、
参考にしたプロジェクトである「actions-on-google-testing-nodejs」を先に使用して、使用イメージを掴むことをお勧めします。
よういちろうさん が作成してくださったブログに詳しい使い方がとてもわかりやすく記載されています。
Googleアシスタント向けアプリのEnd to Endテストライブラリの使い方
https://www.eisbahn.jp/yoichiro/2018/07/actions_on_google_testing_ja.html
(以下のセットアップ方法も上記の記事を参考に作成させていただきました。 ![]() )
)
ライブラリのインストールとセットアップ
Assistant アプリのプロジェクト配下に移動します
cd ~/Projects/your_assistnat_project
以下を実行します。
npm install --save-dev https://github.com/masachaco/google-assistant-test-from-wavefile
credentialsディレクトリを作成します。
コミットしないように .gitignore に追加します。
その他バージョン管理システムを使用している場合は適宜除外して、 credentials ディレクトリ以下は絶対にコミットしないようにしてください。
mkdir  ~/Projects/your_assistnat_project/credentials/
echo "\ncredentials/" >> ~/Projects/your_assistnat_project/credentials/.gitignore
テスト用Assistantデバイスの作成
Actions on Googleにアクセス。 「GO TO ACTIONS CONSOLE」を選択します。

新規プロジェクトを作成します。特に指定がなければ、ロケールは日本・日本語にするのを忘れないようにします。

いろいろ選択肢が出てきますが、「Device Registration」を選択します。


Register Modelを選択して、仮想スピーカーを登録します

登録するデバイス名や、作成企業、作成デバイスは適当に選びます
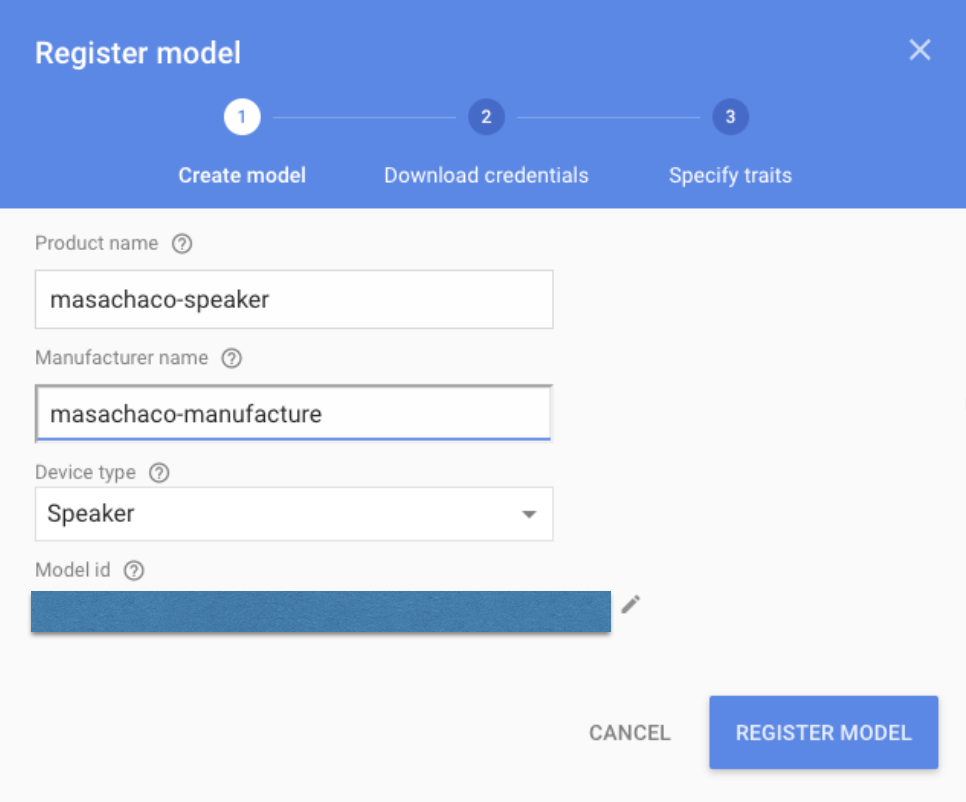
Download OAuth 2.0 credential を選択してダウンロードします。

ダウンロードしたCredentialファイルは、先ほどAssistantアプリ のディレクトリ配下に device-credential.json として配置します。
credentials ディレクトリ以下のファイルは .gitignore に追加して、絶対にコミットしないようにしてください。
mv ~/Downloads/(DownloadしたCredentialのJSON).json ~/Projects/your_assistnat_project/credentials/device-credentials.json
Google Assistant APIの有効化
Google Assistantデバイスは、デフォルトではAPIへのアクセスが有効化されていません。
そのため、SDKからアクセスしようとしてもエラーになります。
以下のURLにアクセスして、Google Assistant APIを有効化してください。
https://console.cloud.google.com/apis/library/embeddedassistant.googleapis.com?q=Assistant
その際、GCP上部に表示されているプロジェクトに、先ほど作成したAssistant デバイスが選択されていることを確認してください。
選択されていない場合は、、先ほど作成したAssistant デバイスを選択し直して、再度上記のURLにアクセスしてください。
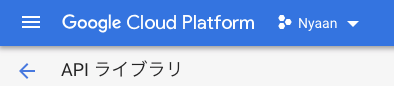
Google Assistant APIを有効にするボタンを押下して、有効にします。
テスト用Assistantデバイスとで使用するGoogleアカウントの認証ファイルの作成
以下のコマンドを実行して、Assistantに使用するGoogleアカウントを、先ほど作成したDeviceを紐付けます。
コマンドを実行すると、認証用のURLが表示されるので、ブラウザでアクセスします。
node ~/Projects/your_assistnat_project/node_modules/actions-on-google-testing/generate-credentials.js ~/Projects/your_assistnat_project/credentials/device-credentials.json
Assistantに使用するGoogleアカウントでログインします。
その後、Google Assistantが、使用するGoogleアカウントへのアクセスを求めてくるので、許可します。
最後に、認証用のコードが表示されるので、クリップボードにコピーします。
先ほどコマンドを実行したコンソールが、 Authorization code の入力を求めているので、さきほどクリップボードにコピーした内容を貼り付け、Enterを押します。
先ほどコマンドを実行したディレクトリに test-credentials.json が作成されます。
credentials ディレクトリ配下に移動します。
これも、gitなどに絶対コミットしないように .gitignore で除外するようにしてください。
mv ~/Projects/your_assistnat_project/test-credentials.json ~/Projects/your_assistnat_project/credentials/test-credentials.json
以上で、テスト用Assistantデバイスの作成と認証情報の設定は完了です。
お疲れ様でした。
Dialogflow APIへの認証情報の作成
まだ認証情報を作成する必要があります。
テストライブラリでは、音声によって、想定したインテントが呼ばれているかインテント名を指定して確認します。
ですが、Assistant SDKは、デバッグモードでも、実行したインテントの「ID」しか返してくれません。
そのため、インテント名と、インテントIDを紐づけるために、Dialogflow APIへアクセスします。
そのための認証情報を作成します。
まずは、Google Assistant APIと同様に、以下のURLにアクセスしてDialogflow APIを有効にします。
今度、GCPのプロジェクトに、 テスト対象のDialogflowが選択されていなければならないことに注意してください。
選択されていない場合は、テスト対象のActions アプリ / Dialogflowのプロジェクトを選択し直して、上記のURLに再度アクセスします。
その後、APIを有効にします。
その後、以下の手順にそってサービスアカウントを作成、認証キーのJSONファイルをダウンロードします。
https://cloud.google.com/docs/authentication/getting-started
ダウンロードしたJSONファイルは、 Assistantアプリ プロジェクトの credentials ディレクトリ配下に dialogflow-credential.json として配置します。
これも、gitなどにコミットされないように .gitignore などで必ず除外されるようにしてください。
mv ~/Downloads/(ダウンロードしたJSON).json ~/Projects/your_assistnat_project/credentials/dialogflow-credential.json
大変、大変お疲れ様でした。
これで認証情報が全て揃いました。
テストで使用する音声ファイルの準備
リクエストに使用するwavファイルは以下の形式である必要があります。
- WAV (Microsoft) 16bit PCM符号あり
- モノラル
- サンプリングレート 16000Hz
Audacity などで、上記形式の音声ファイルは作成できます。11
テストの作成
jest を使用した場合のテスト例を以下に示します。
/** テストするGoogle Assistaに統合されている、DialogflowのProject ID */
process.env.DIALOGFLOW_PROJECT_ID = '** Set your testing dialogflow project id. **';

/**
 * Dialogflow API にアクセスするための credential JSONのパス
 * @see https://github.com/googleapis/nodejs-dialogflow
 */
process.env.DIALOGFLOW_CREDENTIAL = './credentials/dialogflow-credential.json';

/**
 * Assistant Deviceとして登録されたデバイスの Credential JSONのパス
 */
process.env.DEVICE_CREDENTIAL = './credentials/test-credentials.json';

/**
 * リクエストに使用するwavファイルが保存されているパス
 */
process.env.WAVE_FILES_PATH = './waves/';

const GoogleAssistant = require('google-assistant-test-from-wavefile');
const assistant = new GoogleAssistant();

// テストに時間がかかるのでタイムアウトの時間を延長
jest.setTimeout(30000);

/** Google Assistantとの接続をセットアップ */
beforeAll(async () => {
    await assistant.setUp();
});

/** 「終了」を発話して、何らかのアシスタントアプリに入っているステータスの場合は抜け出す */
beforeEach(async () => {
    await assistant.initConversation();
});

/** 「終了」を発話して、アシスタントアプリに入っているステータスから抜け出す */
afterAll(async () => {
    await assistant.shutdownConversation();
});

test('Default Welcome Intentが呼ばれることをテストする', async () => {
    // ./wave/call_action.wav の音声でGoogle Assistantにリクエストすると、Default Welcome Intent が呼ばれることをテスト
    expect(await assistant.callIntentByAudio("call_action.wav")).toBe('Default Welcome Intent');

    // ./test-wave-files/hello.wav の音声でGoogle Assistantにリクエストすると、HelloIntent が呼ばれることをテスト
    expect(await assistant.callIntentByAudio("hello.wav")).toBe('HelloIntent');
});
テストファイルの解説
Google AssistantプロジェクトIDの指定
process.env.DIALOGFLOW_PROJECT_ID
テスト対象のGoogle Assistant AppのIDを環境変数に指定します。
もちろんこの行を削除して、テスト実行前に指定しても問題ありません。
Dialogflowの マークを押して、設定画面から確認することができます。

Dialogflow APIへアクセスするためのCredential JSONファイルの指定
process.env.DIALOGFLOW_CREDENTIAL = './credentials/dialogflow-credential.json';
先ほどダウンロードした dialogflow-credential.json のパスを指定します。
nodejsプロジェクトのディレクトリ直下から見た形で指定します。
テストで使用するwavを格納したディレクトリの指定
process.env.WAVE_FILES_PATH = './waves/';
テストで使用するwavファイルが保存されているディレクトいのパスを指定します。
nodejsプロジェクトのディレクトリ直下から見た形で指定します。
先述したとおり、リクエストに使用するwavファイルは以下の形式である必要があります。
- WAV (Microsoft) 16bit PCM符号あり
- モノラル
- サンプリングレート 16000Hz
Google Assistant APIへアクセスするためのCredential JSONファイルの指定
process.env.DEVICE_CREDENTIAL = './credentials/test-credentials.json';
先ほどダウンロードした test-credentials.json のパスを指定します。
nodejsプロジェクトのディレクトリ直下から見た形で指定します。
ライブラリのインポート
ライブラリをインポートし、インスタンスを作成します。
const GoogleAssistant = require('google-assistant-test-from-wavefile');
const assistant = new GoogleAssistant();
テストのセットアップ
テスト実行時の一番最初にDialogflowから、インテント一覧を取得します。
/** Google Assistantとの接続をセットアップ */
beforeAll(async () => {
    await assistant.setUp();
});
会話の初期化
「終了」と発話して、何かしらのアプリに入っている場合は、テストの都度終了します。
beforeEach(async () => {
    await assistant.initConversation();
});
引数にstringの配列を指定することで会話を初期化するための、発話を指定することができます。
配列の先頭から順番にテキストでAssistantへリクエストされます。
beforeEach(async () => {
    await assistant.initConversation(['それじゃ','バイバイ']);
});
会話の終了
「終了」と発話して、会話をテストの都度終了します。
afterAll(async () => {
    await assistant.shutdownConversation();
});
引数にstringの配列を指定することで会話を初期化するための、発話を指定することができます。
配列の先頭から順番にテキストでAssistantへリクエストされます。
beforeEach(async () => {
    await assistant.shutdownConversation(['それじゃ','バイバイ']);
});
テストの実行
test('Default Welcome Intentが呼ばれることをテストする', async () => {
    // ./wave/call_action.wav の音声でGoogle Assistantにリクエストすると、Default Welcome Intent が呼ばれることをテスト
    expect(await assistant.callIntentByAudio("call_action.wav")).toBe('Default Welcome Intent');

    // ./test-wave-files/hello.wav の音声でGoogle Assistantにリクエストすると、HelloIntent が呼ばれることをテスト
    expect(await assistant.callIntentByAudio("hello.wav")).toBe('HelloIntent');
});
assistant.callIntentByAudio('wavファイル名') を指定することで、Google Assistantにリクエストを送ります。
非同期で実行されるので、必要に応じて await などしてください。
assistant.callIntentByAudio はwavファイルの音声によって実行されたインテント名を返します。
実行してみる
実行してみる
% npm test ./test/index.test.js

> assist-wave-test@1.0.0 test /Users/xxxx/your-assistant-app
> jest "./test/index.test.js"

(node:8102) DeprecationWarning: grpc.load: Use the @grpc/proto-loader module with grpc.loadPackageDefinition instead
  console.log node_modules/google-assistant-test-from-wavefile/google-assistant-grpc/googleassistant.js:152
    query:終了

  console.log node_modules/google-assistant-test-from-wavefile/google-assistant-grpc/googleassistant.js:215
    User say: 終了

  console.log node_modules/google-assistant-test-from-wavefile/google-assistant-grpc/googleassistant.js:216
    Assistant say: わかりました

  console.log node_modules/google-assistant-test-from-wavefile/google-assistant-grpc/googleassistant.js:152
    query: call_action.wav

  console.log node_modules/google-assistant-test-from-wavefile/google-assistant-grpc/googleassistant.js:125
    Loading wave file... : call_action.wav

  console.log node_modules/google-assistant-test-from-wavefile/google-assistant-grpc/googleassistant.js:210
    User say: ○○○○○(アプリ名) につないで

  console.log node_modules/google-assistant-test-from-wavefile/google-assistant-grpc/googleassistant.js:211
    Assistant say: わかりました。○○○○○(アプリ名)のテストバージョンです。
    こんにちは、○○○○○(アプリ名)です

  console.log node_modules/google-assistant-test-from-wavefile/google-assistant-grpc/googleassistant.js:152
    query:hello.wav

  console.log node_modules/google-assistant-test-from-wavefile/google-assistant-grpc/googleassistant.js:125
    Loading wave file... : hello.wav

  console.log node_modules/google-assistant-test-from-wavefile/google-assistant-grpc/googleassistant.js:210
    User say: こんにちは

  console.log node_modules/google-assistant-test-from-wavefile/google-assistant-grpc/googleassistant.js:211
    Assistant say: はい、こんにちは

  console.log node_modules/google-assistant-test-from-wavefile/google-assistant-grpc/googleassistant.js:152
    query:終了

 PASS  test/index.test.js (24.826s)
  ✓ アプリに接続してあいさつできること (17438ms)

Test Suites: 1 passed, 1 total
Tests:       1 passed, 1 total
Snapshots:   0 total
Time:        27.603s
Ran all test suites matching /.\/test\/index.test.js/i.
  console.log node_modules/google-assistant-test-from-wavefile/google-assistant-grpc/googleassistant.js:215
    User say: 終了

  console.log node_modules/google-assistant-test-from-wavefile/google-assistant-grpc/googleassistant.js:216
    Assistant say: undefined
おまけ
一応、コードをいじると以下も取得できます。
- Assistantのレスポンステキスト
- Google Assistantによって、テキストに変換されたリクエスト
- マッチしたインテントのID
    { text: 'はい、○○○○のテストバージョンです。\nこんにちは。',
      query: '○○○○ につないで',
      matchedIntentId: 'xxxx-xxxx-xxxx-xxxx' }
まとめ
無事、音声でリクエストしてGoogle Assistantのテストをすることができました。
AIの認識は毎回かわるので、テストというよりも、一定の音声に対してGoogle AssistantとDialogflowがどんな認識をするのか、といった監視に近いのかもしれません。
とりあえず、実行できることを優先したので、今後は、コードを整理して綺麗に、使いやすくして、実用できるものにしていこうと思います。
new GoogleAssistant() で、毎回認証しているのでもう少し効率化できそうですね。
しばらくしたら、 Actions SDKを使用して、 node.jsで音声によるリクエストをするための詳細を記事にしてみようと思います。