モチベーション
アプリを作る時の為に、SwiftUIで出来ること、出来ないことを知っておくことで正しい選択が出来ると考え、
StackOverflowを読んでいるが、その中でUIKitで当たり前のようにやっていたことが
SwiftUIだと実現が困難またはやり方が不明なことが多いことに気づいた。(今年発表の技術だから予想はついていたが手を動かして確認したかった)
今回はテキスト入力として ほとんどのアプリで活用される代表的なUIパーツの一つの TextField に焦点を当てて自分の得た知識を記事にまとめることにする。
TextField = UITextFieldである
アプリ開発者または、チュートリアルなどの学習サイトを一通り学習したことのある人なら、少なくとも一度はUIKitのUITextFieldを扱ったことがあるだろう。
UITextFieldを使う中でよく実現したいこととしては以下のものがあると思う。
ひとつずつ、SwiftUIでどのようにして実現するか解説していくことにする。
- 一定文字数以上は入力できないようにする制御
- 文字の必須チェック(「登録ボタン」の非活性化)
- クリアボタン追加
- キーボードが表示したときにUITextFieldが隠れないようにする ← 本記事では取り扱いません。
- TextFiledの背景色、テキスト色のカスタマイズ
SwiftUIで機能を実現していく
一定文字数以上は入力できないようにする制御
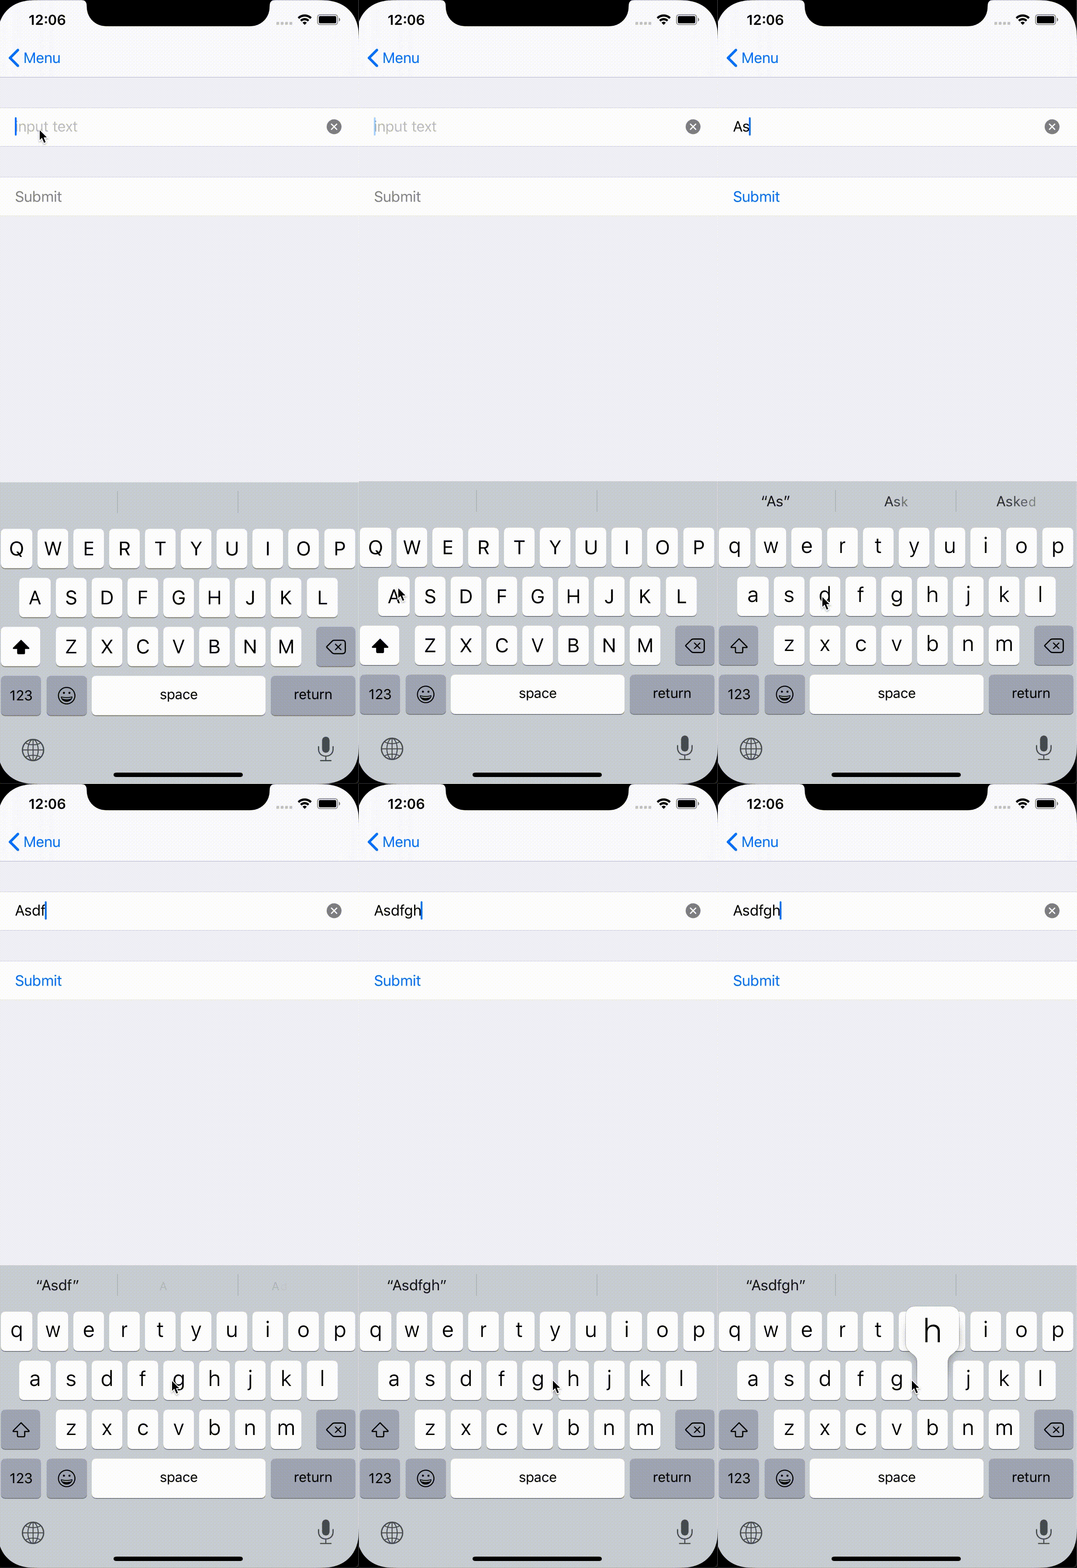
上限文字数に到達したら一定時間で入力した文字が消えるというものである。これは、How to use Combine on a SwiftUI View の記事を読んで着想を得て作ったものである。
キーボード入力が出来ないというものではない点に注意されたし。← これをSwiftUIで実現出来る方法は現時点で見つけられていない。
ソースコードは以下の通りだ。
struct ContentView: View {
    @ObservedObject private var restrictInput = RestrictInput(5)
    var body: some View {
        Form {
            TextField("input text", text: $restrictInput.text)
        }
    }

// https://stackoverflow.com/questions/57922766/how-to-use-combine-on-a-swiftui-view
class RestrictInput: ObservableObject {
    @Published var text = ""
    private var canc: AnyCancellable!
    init (_ maxLength: Int) {
        canc = $text
            .debounce(for: 0.5, scheduler: DispatchQueue.main)
            .map { String($0.prefix(maxLength)) }
            .assign(to: \.text, on: self)
    }
    deinit {
        canc.cancel()
    }
}
Combine frameworkの ObservableObject を活用して、 0.5秒後に入力したテキスト文字の指定文字数以上をカットしている。
ほとんどのTextFieldのチュートリアルでは @Stateに対して 2way bind しているが、ここでは、
TextField("input text", text: $restrictInput.text) の第2引数が ObservableObjectに対して $を使って 2way bindしている事が特徴だ。
debounce(for: 0, scheduler: DispatchQueue.main) としたらそもそも指定文字数以上最初から入力できないようにできるのではないかと実験してみたが、テキスト入力自体ができなくなる。これは実際に実験してもらいたい。
文字未入力時は、「登録ボタン」の非活性化

struct ContentView: View {
    @ObservedObject private var restrictInput = RestrictInput(5)
    // 追加
    var isEnabled: Bool {
        restrictInput.text.count > 0
    }
    Form {
     ...
       Section {
          Button(action: submit) { Text("Submit").disabled(!self.isEnabled) }
       }
    }

    func submit() -> Void {
        guard self.isEnabled else {
            return
        }
        print("click submit button")
    }
}
上記のアニメーションを見てもらってわかるとおり、ButtonをDisabledにしてもハイライトしてしまうので、
disable時はボタンをテキストとして表示するようにするほうが良さそうだ。
処理がスマートではないものの、UXを考えると必然と以下のようになると思われる。
 Section {
     if self.isEnabled {
         Button(action: submit) { Text("Submit") }
     } else {
         Text("Submit").foregroundColor(.gray)
     }
 }
クリアボタン追加
SwiftUI: Add ClearButton to TextField に書かれている解決策である。

struct RestlictInputView: View {
    @ObservedObject private var restrictInput = RestrictInput(5)
    @State var showClearButton = true
    private var isEnabled: Bool {
        restrictInput.text.count > 0
    }
    var body: some View {
        Form {
            Section {
                TextField("input text", text: $restrictInput.text, onEditingChanged: { editing in
                    self.showClearButton = editing
                }, onCommit: {
                    self.showClearButton = false
                })
                    .modifier( ClearButton(text: $restrictInput.text, visible: $showClearButton))
            }
            Section {
                // highlight problem when button is disabled.
                if self.isEnabled {
                    Button(action: submit) { Text("Submit") }
                } else {
                    Text("Submit").foregroundColor(.gray)
                }
            }

        }
     }
}

struct ClearButton: ViewModifier {
    @Binding var text: String
    @Binding var visible: Bool
    public func body(content: Content) -> some View {
        HStack {
            content
            Image(systemName: "multiply.circle.fill")
                .foregroundColor(.secondary)
                .opacity(visible ? 1 : 0)
                .onTapGesture {
                    self.text = ""
                }
            // ButtonのActionでも機能としては実現できるが、クリアボタン以外の部分もハイライトされてしまう。
//            Button(action: {
//                self.text = ""
//            }) {
//                Image(systemName: "multiply.circle.fill")
//                    .foregroundColor(.secondary)
//                    .opacity(visible ? 1 : 0)
//            }
        }
    }
}
TextFiledの背景色、テキスト色のカスタマイズ
背景色の変更およびplaceholderの変更は結論としてSwiftUIでは、出来ません。 ←解決方法をご存知でしたら教えて下さい。
テキスト色は foregroundColor を使い変更できます。
TextField("input text", text: $restrictInput.text)
.foregroundColor(.yellow)
以下のように、ViewModifierを使いカスタマイズを試みましたが、結果は以下の画像のとおりです。
var body: some View {
    Form {
        ...
        Section {
            TextField("custom stype", text: $text)
                .modifier(CustomStyle())
        }
    }
}

private struct CustomStyle: ViewModifier {
    public func body(content: Content) -> some View {
        return content
            .padding()
            .foregroundColor(.green)
            .background(Color.yellow)
    }
}

考察
SwiftUIはApple公式のチュートリアルで Interfacing with UIKit を用意しているところから、現時点では未完成な技術であると捉えると良さそうだ。
SwiftUIで出来ないところは、UIKitをラップして処理は任せる作りにするのは、2019年、2020年では現実的なんだろうと思う。
ただし、AppleはiPadOSを作り上げ(現時点ではiOSの拡張版)、やWatchOS、MacOSもSwiftUIで簡単に開発出来ることを目標にしており、将来的にはUIkitを全くつかわないPure SwiftUIのアプリ開発が出来る時代が来るだろうと推測できる。
私達エンジニアは、将来のPure SwiftUI 時代が到来した際に、以下にコードの修正を少なくするかにフォーカスして、カスタムパーツをSwiftUIに似せたIFで作成しておくことが現時点で出来る良い解決策ではないかと考えている。
そしてより最良の解決策は、デザイン面でSwiftUIを独自カスタマイズしたものにしない、Appleの好みの形にしていくことだ。
