はじめに
こんにちはmasa-asaです。今回はクラウドプラットフォームの一つであるGoogle Cloudで、Cloud Runを用いるための簡単なアーキテクチャを実現する方法について述べたいと思います。本記事の概要は以下です。
- Cloud Runを作成する
- Load Balancer作成し、Cloud Runと連携する
- Cloud Armorによりファイアウォールルールを作成してアクセス制限をする
- リソースはIaCで構築。terraformを用いる
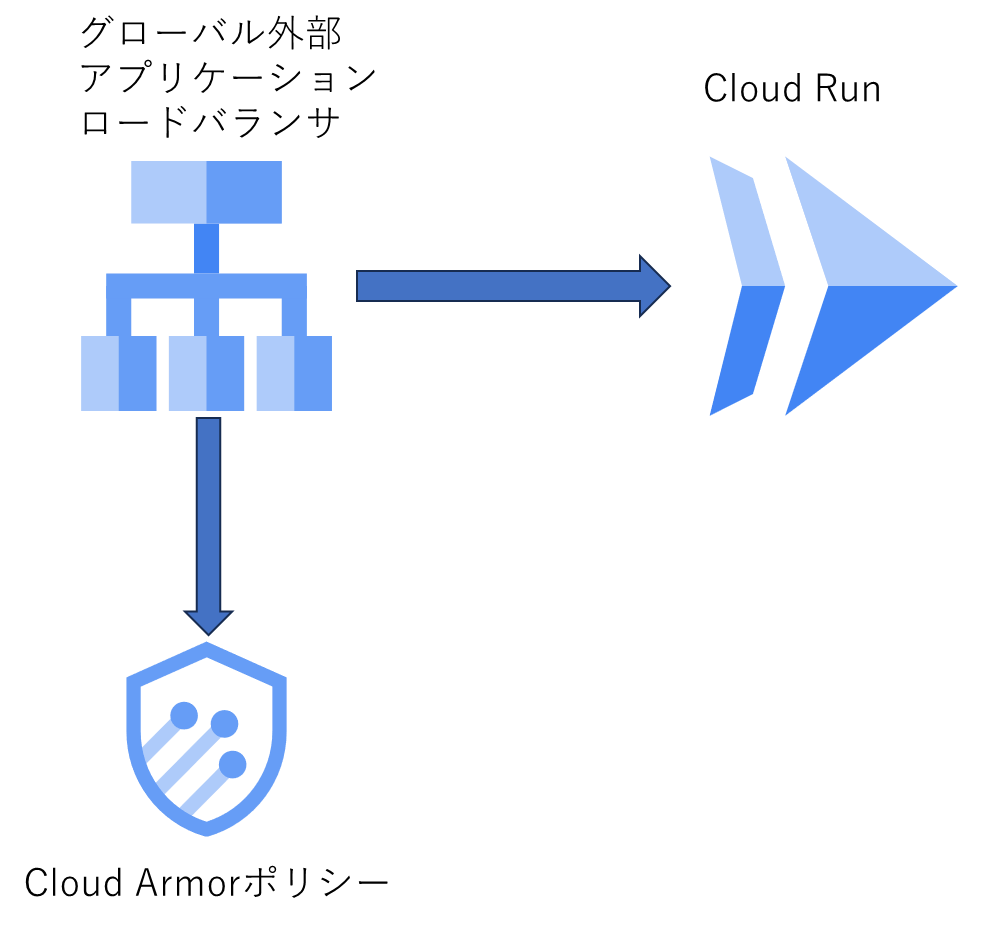
ざっくりとした構成は以下の図のようになります。
また、本記事では参考リンクが多くなりますので、末尾の参考資料ではなく、各リソースの説明の最後にリンクを参考として記載します。ご了承お願いいたします。
terraformとは
HashiCorpが開発するIaCを実現するためのツールです。
大手のクラウドサービスに対応しており、AWS,Azure,Google Cloudのいずれにおいてもリソース管理を行うことができます。基本的なコマンドの簡単な説明は以下です。
- terraformの初期化:
terraform init - terraformの実行による差分の確認:
terraform plan - terraformの実行:
terraform apply - terraformで作成したリソースの破棄
terraform destroy
Cloud Runを作成する
terraformで以下のように作成します。
imageにCloud Runにデプロイするイメージを指定します。今回はGoogleが用意しているサンプルのイメージを用います。また、認証が不要になるようなiamの設定を入れ込んでいます。
resource "google_cloud_run_v2_service" "default" {
    name     = "crun-sandbox-asa"
    location = "asia-northeast1"
    deletion_protection = false
    ingress = "INGRESS_TRAFFIC_ALL"

    template {
        max_instance_request_concurrency = 20
        scaling {
        max_instance_count = 1
        }
        containers {
        image = "us-docker.pkg.dev/cloudrun/container/hello"
        resources {
            limits = {
              cpu = "1"
              memory = "512Mi"
                }
            }
        }
    }
}


data "google_iam_policy" "noauth" {
  binding {
    role = "roles/run.invoker"
    members = [
      "allUsers",
    ]
  }
}

resource "google_cloud_run_service_iam_policy" "noauth" {
  location    = google_cloud_run_v2_service.default.location
  project     = google_cloud_run_v2_service.default.project
  service     = google_cloud_run_v2_service.default.name

  policy_data = data.google_iam_policy.noauth.policy_data
}

output "clrun_sandbox_asa_name" {
  value = google_cloud_run_v2_service.default.name
}
ロードバランサを作成する
本記事のキモになる部分です。Google Cloud のコンソールでは、ロードバランサは専用のGUIで数ステップに分けて作成していきます。ところが、terraformでは、VPCやCloud Runのようにロードバランサ自体のリソースは存在しません。
下図はGoogle Cloud のドキュメントから抜粋したグローバルアプリケーションロードバランサの構成です。terraformでロードバランサを実現するには、これらの構成を再現するように記述する必要があります。
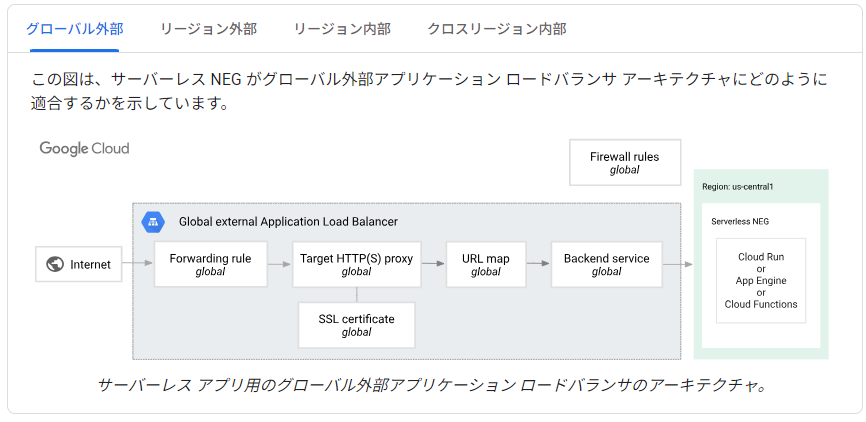
列挙すると以下のようなリソースを作成する必要があります。
- Serverless NEG
- Cloud Armor Policy
- Backend Service
- URL Map
- SSL 証明書の設定
- SSL Policy
- Target Proxy
- Compute Address
- Forwarding Rule
次から上で列挙したリソースを作成していきます。
Serverless NEGの作成
Sereverless NEGの作成です。Cloud Runを指定するので、変数としてCloud Runの名前を指定しています。
## Sereverless NEG。接続するCloud Runのサービスを指定する。
resource "google_compute_region_network_endpoint_group" "cloudrun_neg" {
  name                  = "neg-sandbox-asa"
  network_endpoint_type = "SERVERLESS"
  region                = "asia-northeast1"
  cloud_run {
    service = var.cloud_run_service_name
  }
}


output "serverless_neg_self_link" {
  value = google_compute_region_network_endpoint_group.cloudrun_neg.self_link

}
Cloud Armorの作成
以下の例のように、Coud Armorのポリシーとポリシーに含まれるルールを作成します。
必要に応じて、google_compute_security_policy_ruleでルールを作成し、actionで許可・拒否を決めていきます。
# Cloud Armorの設定
resource "google_compute_security_policy" "region-sec-policy-basic" {
  name        = "my-sec-policy-basic"
  description = "basic region security policy"
  type        = "CLOUD_ARMOR"
  provider    = google-beta
}

resource "google_compute_security_policy_rule" "rule_default" {
  security_policy = google_compute_security_policy.region-sec-policy-basic.name
  priority        = 2147483646
  action          = "deny(403)"
  description     = "default deny"
  provider    = google-beta

  match {
    versioned_expr= "SRC_IPS_V1"
    config {
      src_ip_ranges = ["*"]
    }
  }
}

resource "google_compute_security_policy_rule" "rule_one" {
  security_policy = google_compute_security_policy.region-sec-policy-basic.name
  priority        = 100
  action          = "allow"
  description     = "in company proxy 1"
  provider    = google-beta

  match {
    versioned_expr= "SRC_IPS_V1"
    config {
      src_ip_ranges = ["xxx.xxx.xxx.xxx/xx"]
    }
  }
}

output "cloud_armor_self_link" {
  value = google_compute_security_policy.region-sec-policy-basic.self_link
}
Backend Serviceの作成
Backend Serviceの作成を行います。ここで、先ほど作成したSereverless NEGとCloud Armor Policyを利用します。
具体的には、security_policyには、Cloud Armorの作成で作ったセキュリティポリシーを指定します。
また、backendのgroupに作成したSereverless NEGを指定します。
# バックエンドサービスの作成

resource "google_compute_backend_service" "backend_service_sandbox_asa" {
  description           = "Cloud Runに対するバックエンドサービス"
  load_balancing_scheme = "EXTERNAL_MANAGED" # リージョン外部アプリケーションロードバランサの場合 https://cloud.google.com/load-balancing/docs/backend-service?hl=ja
  name                  = "bes-sandbox-asa"
  provider = google-beta
  port_name             = "http"
  protocol              = "HTTPS"
  session_affinity      = "NONE"
  security_policy       = var.cloud_armor_self_link
  timeout_sec           = 30
  backend {
    group               = var.serverless_neg_self_link
    capacity_scaler     = 1.0
    balancing_mode      = "UTILIZATION"
  }

  log_config {
    enable      = true
    sample_rate = 1.0
  }
}


output "backend_service_id" {
  value = google_compute_backend_service.backend_service_sandbox_asa.id

}
URL Mapの作成
URL Mapの作成を行います。今回URL Mapは2種類作成します。それぞれ、httpsの受信を扱うものと、httpの通信をhttpsにリダイレクトするためのものです。
URL Mapが紐づくデフォルトサービスに、上で作成したBackend Serviceのidを指定しています。直下の例がhttpsの場合のコードです。
# URL Map https
resource "google_compute_url_map" "url_map_sandbox_https_asa" {
  name            = "url-map-https-sandbox-asa"
  default_service = var.backend_service_id
}

output "https_url_map_id" {
  value = google_compute_url_map.url_map_sandbox_https_asa.id
}
下の例ががhttpをhttpsにリダイレクトするためのURL Mapです。
https_redirectをtrueにすることで、リダイレクトできます。strip_queryをtrueにすると、元のURLにあったクエリがリダイレクト時に削除されます。ここではfalse(デフォルト値)に設定しています。
# URL Map http→httpsリダイレクト用
resource "google_compute_url_map" "url_map_sandbox_asa" {
  default_url_redirect {
    https_redirect         = true
    redirect_response_code = "MOVED_PERMANENTLY_DEFAULT"
    strip_query            = false
  }

  name    = "url-map-http-sandbox-asa"
}

output "http_url_map_id" {
  value = google_compute_url_map.url_map_sandbox_asa.id
}
SSL証明書をロードバランサに適用する設定
後で作成するhttps用のTarget Proxyに用いるためのSSL証明書の設定を作成します。
certificatetとprivate_keyにそれぞれPEM形式の証明書とPEM形式の秘密鍵を指定します。
今回は実用のシステムではないので、オレオレ証明書のファイルを指定しています。PEM形式の証明書・秘密鍵をべた書きすることも可能ですが、実際の利用ではSecret Managerに保存した証明書・秘密鍵を用いることになるかと思います。
# httpsのフォワーディングルールに適応するためのssl証明書 secret managerから取得する
resource "google_compute_ssl_certificate" "ssl_cert_sandbox_asa" {
  certificate = file("./modules/load-balancer/ssl-certificate/oreore_cert/server.crt")
  description = "sandbox-asa"
  name_prefix = "sandbox-ssl"
  private_key = file("./modules/load-balancer/ssl-certificate/oreore_cert/server.key")

  lifecycle {
    create_before_destroy = true
  }
}

output "ssl_cert_sandbox_asa_id" {
  value = google_compute_ssl_certificate.ssl_cert_sandbox_asa.id
}
SSL Policyの作成
後で作成するhttps用のTarget Proxyに用いるためにSSL Policyを作成します。
profileはGoogleが事前定義したものに加えてカスタムしたものも使用可能で、要件の厳しさに応じて設定可能です。
resource "google_compute_ssl_policy" "ssl_policy_sandbox_asa" {
  name            = "ssl-policy-sandbox-asa"
  profile         = "MODERN"
  min_tls_version = "TLS_1_2"
}

output "ssl_policy_self_link" {
  value = google_compute_ssl_policy.ssl_policy_sandbox_asa.self_link
}
Target Proxyの作成
Target Proxyの作成でもhttpとhttpsの場合の2種類を作ります。Target Proxyはhttpとhttpsの場合でリソース名が異なっていることに注意が必要です。
url_mapには、上で作成したURL Mapのidを指定しています。
# httpの場合
resource "google_compute_target_http_proxy" "default" {
  name             = "target-proxy-http"
  url_map          = var.http_url_map_id
}

output "http_target_proxy_id" {
  value = google_compute_target_http_proxy.default.id

}
httpsの場合、 SSL通信を行うための証明書の設定とSSL Policyの設定が必要です。それぞれ、前述の内容で作成したリソースを指定しています。
# httpsの場合
resource "google_compute_target_https_proxy" "default" {
  name             = "target-proxy-https"
  url_map          = var.https_url_map_id
  ssl_certificates = [var.ssl_id]
  ssl_policy       = var.ssl_policy_self_link
}

output "https_target_proxy_id" {
  value = google_compute_target_https_proxy.default.id
}
グローバルIPアドレス(Compute Address)の作成
ロードバランサに設定するグローバルIPアドレスの作成(取得)を行います。以下で、静的なグローバルIPアドレスを1つ取得します。addressを指定していないので、IPアドレスの値はGoogle Cloudが持つアドレスから自動で割り当てられたものになります。
resource "google_compute_global_address" "lb_ip" {
  address_type = "EXTERNAL"
  description  = "LBに付与する静的IP"
  name         = "lb-static-ip-sandbox-asa"
}

output "lb_ip_id" {
  value = google_compute_global_address.lb_ip.id
}
Forwarding Ruleの作成
Forwarding Ruleもhttpとhttpsの場合の2種類を作成します。http通信とhttps通信のためにそれぞれポート80と443を指定しています。
また、Forwarding Rule作成の際にIPアドレスの指定と、Target Proxyの設定をしています。
これらは前の内容で取得したipアドレスと作成したTarget Proxyです。
network_tierに関しては、グローバル外部ALBの場合はPREMIUMにする必要があります。
# フォワーディングルール(LBのフロントエンドhttp)
resource "google_compute_global_forwarding_rule" "http_forwarfing" {
  name                  = "test-http-forwarding-rule"
  provider              = google-beta
  ip_protocol           = "TCP"
  load_balancing_scheme = "EXTERNAL_MANAGED"
  port_range            = "80-80"
  target                = var.http_target_proxy_id
  ip_address            = var.lb_ip_id
  network_tier          = "PREMIUM"
}
# フォワーディングルール(LBのフロントエンドhttps)
resource "google_compute_global_forwarding_rule" "https_forwarfing" {
  name                  = "test-https-forwarding-rule"
  provider              = google-beta
  ip_protocol           = "TCP"
  load_balancing_scheme = "EXTERNAL_MANAGED"
  port_range            = "443-443"
  target                = var.https_target_proxy_id
  ip_address            = var.lb_ip_id
  network_tier          = "PREMIUM"
}
作成したリソースにアクセスしてみる
terraform init,terraform plan,terraform applyコマンドを実行し、リソースを作成しました
。直下の図は作成されたCloud Runです。
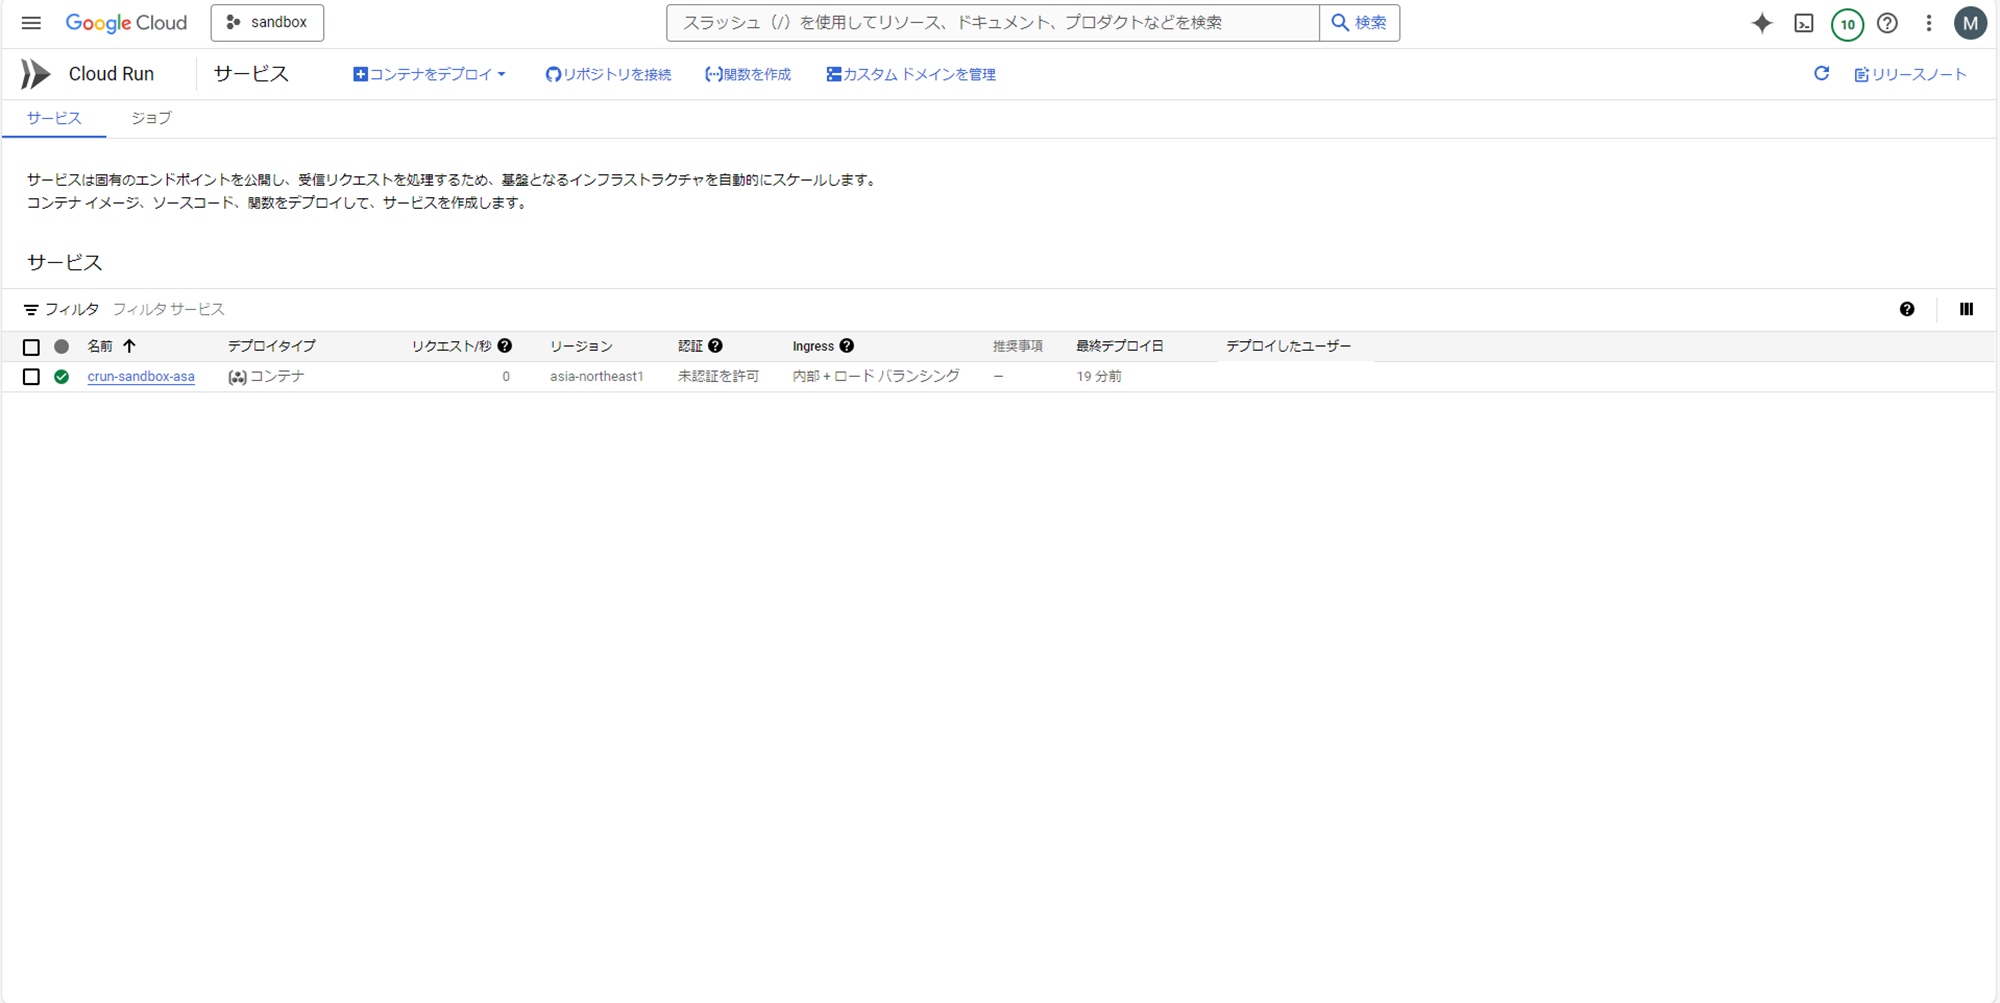
Cloud RunのURLに直接アクセスすると、エラーになります。ロードバランサを経由しないアクセスを遮断していることがわかります。

下の図はURL Mapです。httpsとhttp→httpsリダイレクト用の2つがあることがわかります。

httpsのURL Mapの詳細でIPアドレスが確認できます。このIPアドレスはterraformで作成(取得)したものです。
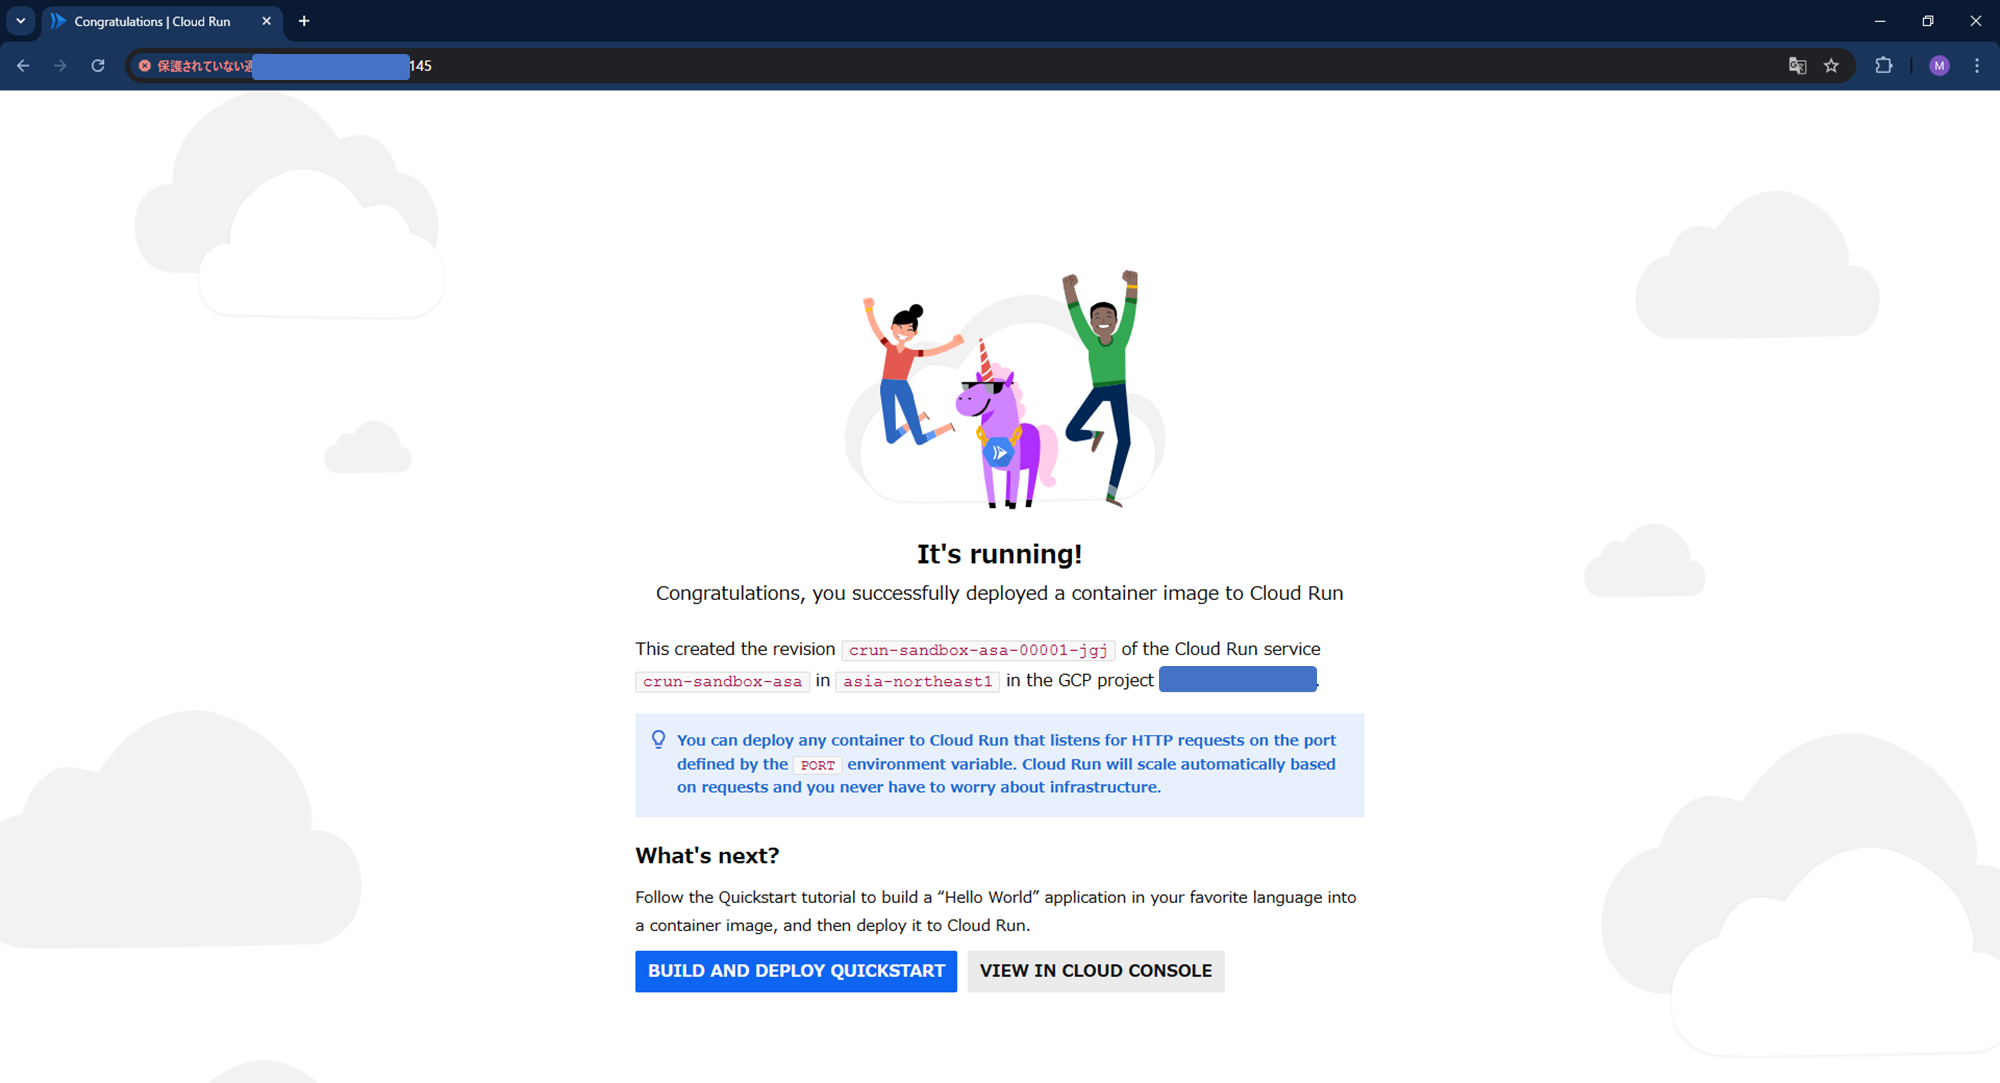
IPアドレスをに対してアクセスを行ってみます。

オレオレ証明書を用いているため、警告が表示されますが、アクセスできたことがわかります。
補講
Providerやバージョンの設定
provider.tfなどで利用するproviderやterraformのバージョンを明示することができます。
例では、バージョン 1.6.0 以上の 1.x.x バージョンを使用することを指定しています。
poviderでは、googleを指定し、projrctには対象のGoogle Cloudのプロジェクトidを指定します。
これは必ずしもprovider.tfに記述する必要はなく、main.tfなどに記述することもできます。
terraform {
  required_version = "~>1.6.0"
}

# providerとなるgoogle cloudプロジェクトを指定
provider "google" {
  project = "xxxxxxxxxxxx"
  region  = "asia-northeast1"
}
VPCの作成
今回は必要ありませんが、VPCを作成するためのterraformを以下に紹介します。リージョン範囲のロードバランサを作成する場合には、VPCが必要になります。
# VPC Network
resource "google_compute_network" "vpc_network" {
  name                    = "vpc-sandbox-asa"
  auto_create_subnetworks = false
  mtu                     = 1460
  routing_mode            = "GLOBAL"
}

output "vpc_network_id" {
  value = google_compute_network.vpc_network.id
}
作成に成功すると、以下の画面のようにVPCができます。

Subnetの作成
リージョン範囲ロードバランサの場合はプロキシ専用サブネットが必要です。このためにVPCも必要になるというわけです。作成例は以下のようになります。
purposeをREGIONAL_MANAGED_PROXYに設定しています。
# 外部ALBのためのEnvoyプロキシ専用サブネット
resource "google_compute_subnetwork" "proxy_only" {
  name          = "proxy-only-subnet"
  ip_cidr_range = "10.148.0.0/23"
  network       = var.vpc_network_id
  purpose       = "REGIONAL_MANAGED_PROXY"
  region        = "asia-northeast1"
  role          = "ACTIVE"
  description   = "Subnet for the external ALB Envoy proxy"
}

output "subnetwork" {
  value = google_compute_subnetwork.proxy_only
}
注意事項
cloud runの作成時に、認証が不要な設定をしていますが、'run.services.setIamPolicy'権限がない場合は403エラーになります。
terraformの例で変数を用いていますが、変数の扱い方についてはここでは記述していません。
変数の扱いについては以下のようなサイトが参考になりました。
まとめ
今回の内容をまとめると以下になります。
- Cloud Runを作成する
- Load Balancer作成し、Cloud Runと連携する
- Cloud Armorによりファイアウォールルールを作成してアクセス制限をする
- リソースはIaCで構築。terraformを用いる
重要な点は、terraformでGoogle Cloudのロードバランサを作成する場合は、複数のリソースを組み合わせて作成し、最終的にロードバランサとして動作する、という点です!
以上になります。お読みいただきありがとうございました!