はじめに
こんにちは、masa-asaです。本記事ではAI Searchについて記事にしたいと思います。目標はストレージアカウントに格納したpdfをデータソースにして、AI Searchのインデックスを作成し、そこでチャンクされたデータとベクトル化されたデータを検索できることとします。
作成するリソースは次の通りです。
- Azure OpenAI
- text-embedding-3-small(組み込みモデル)
- Azure AI Search
- Storage Account
また、インデックスを利用できるまでの流れで、AI Searchでの操作は次の通りです。
- インデックスの作成(フィールドの作成)
- データソースの作成
- スキルセットの作成
- インデクサーの作成(実行)
AI Searchの作成
terraformのフォルダ構成は以下になります
└──iac_azure/
  ├──  modules
  │  └── ai_search/
  │    ├── main.tf
  │     └── variables.tf
  │  └── resource_group/
  │    ├── main.tf
  ├── main.tf
  └── provider.tf
- AI Searchの作成
# iac_azure/modules/ai_search/main.tf
resource "azurerm_search_service" "srch" {
  name                = "srch-asa-poc"
  resource_group_name = var.rg_name
  location            = var.rg_location
  sku                 = "basic"
  identity {
    type = "SystemAssigned"
  }
}

resource "azurerm_role_assignment" "example" {
  scope                = var.rg_id
  role_definition_name = "Cognitive Services OpenAI Contributor"
  principal_id         = azurerm_search_service.srch.identity[0].principal_id

  depends_on = [
    azurerm_search_service.srch
    ]
}
# iac_azure/modules/ai_search/variables.tf
variable "rg_name" {
    description = "The name of the resource group"
    type        = string
}

variable "rg_location" {
    description = "The location of the resource group"
    type        = string
}

variable "rg_id" {
    description = "The id of the resource group"
    type        = string
}
- 実行するモジュールを読み込むterraformを作成
# iac_azure/main.tf
module "rg" {
    source = "./modules/resource_group"
}

module "srch" {
    source = "./modules/ai_search"
    rg_name = module.rg.rg_name
    rg_location = module.rg.rg_location
    rg_id = module.rg.rg_id
}
- providerなどの設定
# iac_azure/provider.tf
terraform {
    required_providers {
    azurerm = {
        source  = "hashicorp/azurerm"
        version = "=4.16.0"
        }
    }
    required_version = "~>1.10.0"
}

provider "azurerm" {
    resource_provider_registrations = "none"
    subscription_id = "<YOUR_SUBSCRIPTION_ID>"
    features {}
}
providerでazurermのv4以降を利用する際にはsubscription_idの指定が必要になるようです。また、terraformを実行するユーザー、サービスプリンシパル、またはアイデンティティにAzure Resource Providersを登録する権限がない場合にresource_provider_registrations = "none"が必要です。
上記のterraformを実行していきます。
terraform planコマンドを実行すると以下のような結果になりました。
リソースグループについてはすでに作成していたため、AI Searchの作成のみが行われることになり1つリソースが作成されるということが読み取れます。
Terraform used the selected providers to generate the following execution plan. Resource actions are indicated with the following symbols:
  + create

Terraform will perform the following actions:

  # module.srch.azurerm_search_service.srch will be created
  + resource "azurerm_search_service" "srch" {
      + id                            = (known after apply)
      + location                      = "japaneast"
      + name                          = "srch-asa-poc"
      + partition_count               = (known after apply)
      + primary_key                   = (known after apply)
      + public_network_access_enabled = true
      + query_keys                    = (known after apply)
      + replica_count                 = (known after apply)
      + resource_group_name           = "rg-asato-poc"
      + secondary_key                 = (known after apply)
      + sku                           = "basic"
    }

Plan: 1 to add, 0 to change, 0 to destroy.

────────────────────────────────────────────────────────────────────────────────────────────────────────────────────────────────────────────────────────────────────────────────────────────────────────────────────────────────────────────────────

Note: You didn't use the -out option to save this plan, so Terraform can't guarantee to take exactly these actions if you run "terraform apply" now.
terraform applyを実行した結果が以下です。
作成に成功し、リソースが1つ追加されました。
~~~~~~~~~~~~~~~~~~~~~~~~~~~~~~~~~~~~~~~~中略~~~~~~~~~~~~~~~~~~~~~~~~~~~~~~~~~~~~~~~~
Terraform used the selected providers to generate the following execution plan. Resource actions are indicated with the following symbols:
  + create

Terraform will perform the following actions:

  # module.srch.azurerm_search_service.srch will be created
  + resource "azurerm_search_service" "srch" {
      + id                            = (known after apply)
      + location                      = "japaneast"
      + name                          = "srch-asa-poc"
      + partition_count               = (known after apply)
      + primary_key                   = (known after apply)
      + public_network_access_enabled = true
      + query_keys                    = (known after apply)
      + replica_count                 = (known after apply)
      + resource_group_name           = "rg-asato-poc"
      + secondary_key                 = (known after apply)
      + sku                           = "basic"
    }

Plan: 1 to add, 0 to change, 0 to destroy.

Do you want to perform these actions?
  Terraform will perform the actions described above.
  Only 'yes' will be accepted to approve.

  Enter a value: yes

module.srch.azurerm_search_service.srch: Creating...
module.srch.azurerm_search_service.srch: Creation complete after 7s [id=/subscriptions/541a4a83-08ec-4f92-9f60-51b4efef8893/resourceGroups/rg-asato-poc/providers/Microsoft.Search/searchServices/srch-asa-poc]

Apply complete! Resources: 1 added, 0 changed, 0 destroyed.
Azure Portalの画面をみるとAI Searchが作成されていることがわかります。

Azure OpenAIの作成、埋め込みモデルのデプロイ
Azure AI Searchでデータソースをベクトル化するために必要となる埋め込みモデルの準備をします。
埋め込みモデルをデプロイするために、Azure OpenAIリソースを作成し、モデルのデプロイをします。
└──iac_azure/
  ├──  modules
  │  └── ai_search/
  │    ├── main.tf
  │     └── variables.tf
  │  └── resource_group/
  │    ├── main.tf
  │  └── oai/
  │    ├── main.tf
  │    └── variables.tf
  ├── main.tf
  └── provider.tf
- Azure OpenAIのリソース作成とモデルのデプロイ
# iac_azure/modules/oai/main.tf
resource "azurerm_cognitive_account" "oai" {
    name                = "oai-asa-poc"
    location            = var.rg_location
    resource_group_name = var.rg_name
    kind                = "OpenAI"

    sku_name = "S0"
    custom_subdomain_name = "oai-asa-poc"
    tags = {
        Acceptance = "poc"
    }
}


resource "azurerm_cognitive_deployment" "text_embedding_3_small" {
    name                 = "text-embedding-3-small"
    cognitive_account_id = azurerm_cognitive_account.oai.id
    model {
        format  = "OpenAI"
        name    = "text-embedding-3-small"
        version = "1"
    }

    sku {
        name = "Standard"
        capacity = 300
    }
}
# iac_azure/modules/oai/variable.tf
variable "rg_name" {
    description = "The name of the resource group"
    type        = string
}

variable "rg_location" {
    description = "The location of the resource group"
    type        = string
}
- 実行するモジュールを読み込むterraformを更新
# iac_azure/main.tf
module "rg" {
    source = "./modules/resource_group"
}

module "srch" {
    source = "./modules/ai_search"
    rg_name = module.rg.rg_name
    rg_location = module.rg.rg_location
    rg_id = module.rg.rg_id
}

module "oai" {
    source = "./modules/oai"
    rg_name = module.rg.rg_name
    rg_location = module.rg.rg_location

}
Azure OpenAIがデプロイできました。AI Foundryを開きデプロイを確認してみます。
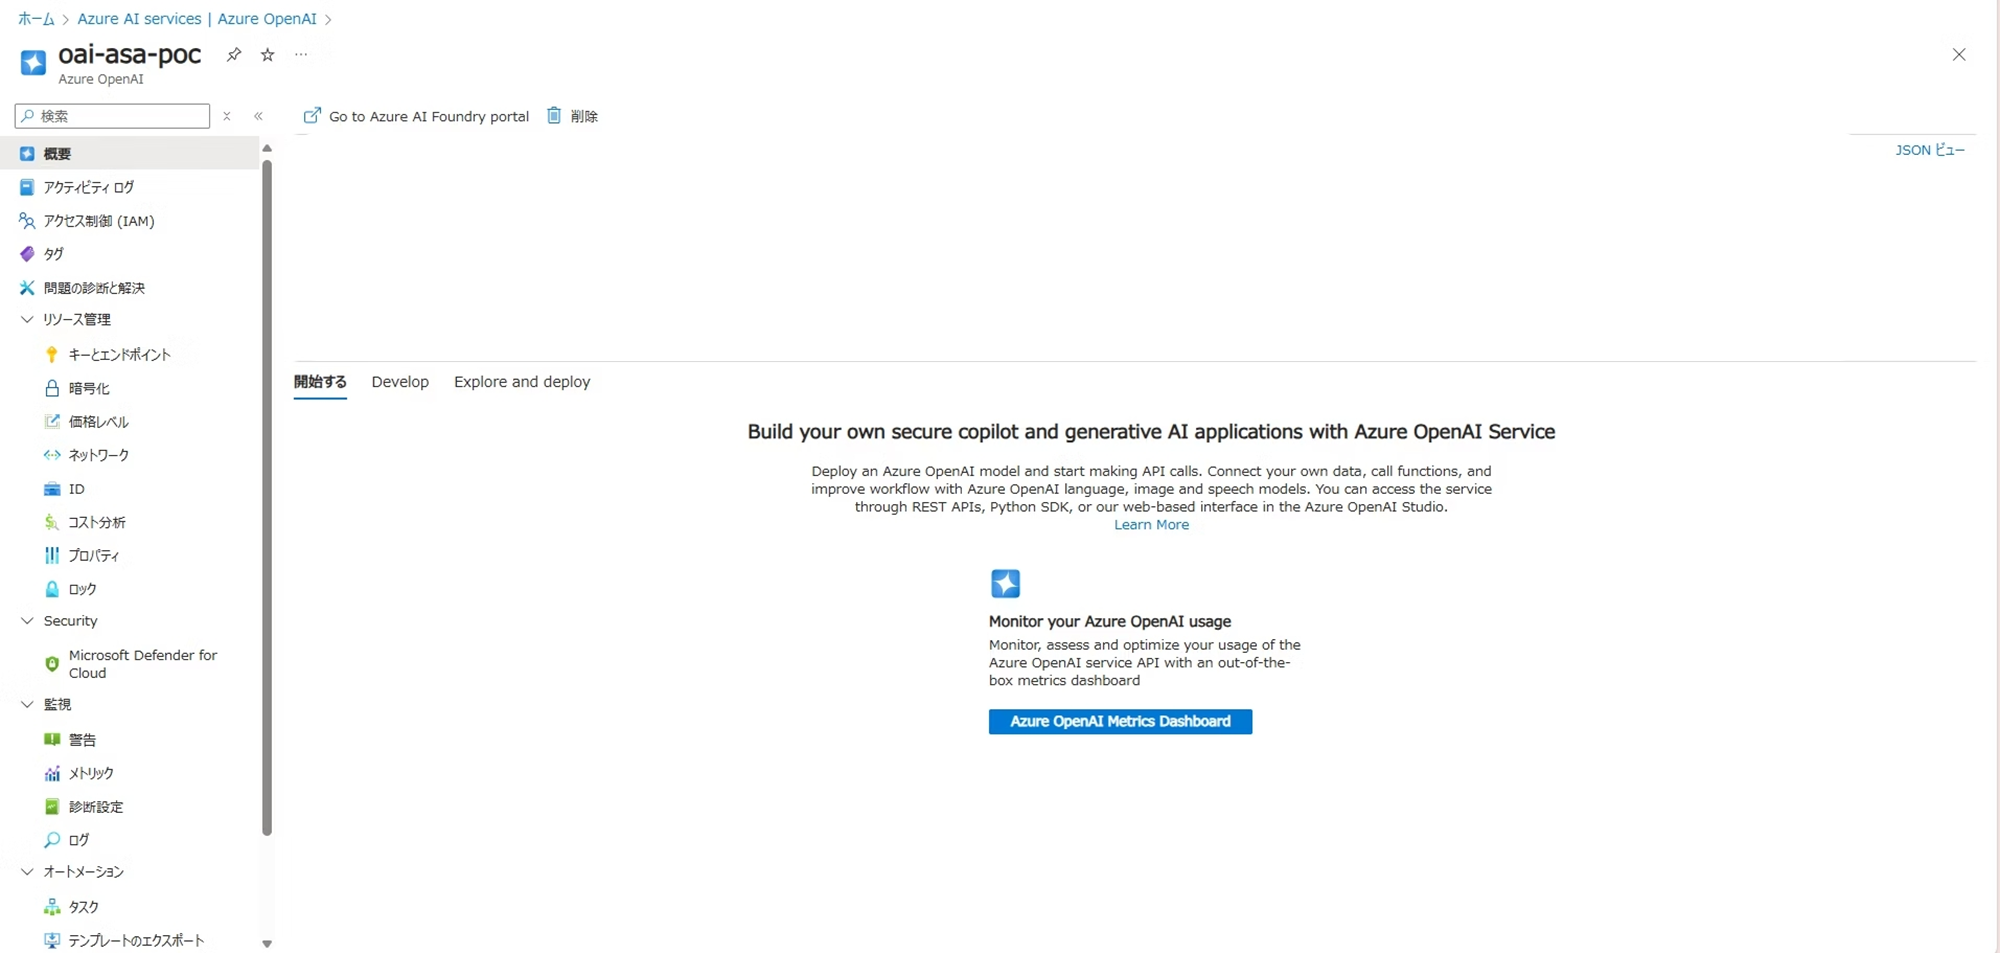
埋め込みモデル(text-embedding-3-small)もデプロイできていることがわかります。

ストレージアカウントの作成~ファイルのアップロード
AI Searchのデータソースで用いるためストレージアカウントを作成します。このストレージアカウントにデータソースとなるPDFをアップロードします。
terraformのディレクトリ構成を以下のように更新します。
└──iac_azure/
  ├──  modules
  │  └── ai_search/
  │    ├── main.tf
  │     └── variables.tf
  │  └── resource_group/
  │    ├── main.tf
  │  └── oai/
  │    ├── main.tf
  │    └── variables.tf
  │  └── storage_account/
  │    ├── main.tf
  │    └── variables.tf
  ├── main.tf
  └── provider.tf
- ストレージアカウントとコンテナの作成
# iac_azure/modules/storage_account/main.tf
resource "azurerm_storage_account" "st_srch" {
  name                     = "stasapoc"
  resource_group_name      = var.rg_name
  location                 = var.rg_location
  account_tier             = "Standard"
  account_replication_type = "GRS"

  tags = {
    environment = "poc"
  }
}


resource "azurerm_storage_container" "st_container_srch" {
  name                  = "srchcontainer"
  storage_account_id =  azurerm_storage_account.st_srch.id
  container_access_type = "private"
}
# iac_azure/modules/storage_account/variables.tf
variable "rg_name" {
    description = "The name of the resource group"
    type        = string
}

variable "rg_location" {
    description = "The location of the resource group"
    type        = string
}
- モジュールを読み込み、実行する部分を更新
module "rg" {
    source = "./modules/resource_group"
}

module "srch" {
    source = "./modules/ai_search"
    rg_name = module.rg.rg_name
    rg_location = module.rg.rg_location
    rg_id = module.rg.rg_id
}

module "st" {
    source = "./modules/storage_account"
    rg_name = module.rg.rg_name
    rg_location = module.rg.rg_location
}

module "oai" {
    source = "./modules/oai"
    rg_name = module.rg.rg_name
    rg_location = module.rg.rg_location

}
terraform init,terraform plan,terraform applyを実行し、リソースを作成した結果が以下になります。ストレージアカウントが作成できました!

コンテナも作成されています。

AzureのRAGチュートリアルで公開されているPDFデータをお借りして、図のように「pdfs」フォルダ下にファイルを含めコンテナにアップロードしました。

インデックスを作成する
Azure PortalからAI Searchに移動し、図のように「インデックスの追加」を選択することで作成画面に遷移できます。

インデックス作成画面ではフィールドの追加を行っていきます。フィールドに対して属性の構成を指定します。
属性の意味について、公式ドキュメントから要約した表が以下です。
| 属性 | 概要 |
|---|---|
| 取得可能 | インデックスの検索結果にこのフィールドを含むことができるかどうか |
| フィルター可能 | このフィールドがフィルターできるかどうか。$filterクエリでフィールドを参照できるようにするか |
| 並べ替え可能 | 検索結果をこのフィールドに基づいてソートできるようにすることを許すかどうか |
| Facetable | "ファセット可能"か、つまり検索結果をカテゴリごとに集計して表示するといったことをこのフィールドに許可するかという設定 |
| 検索可能 | フィールドの内容を全文検索やベクトル検索の対象にするかどうか。チャンキングの対象になる |
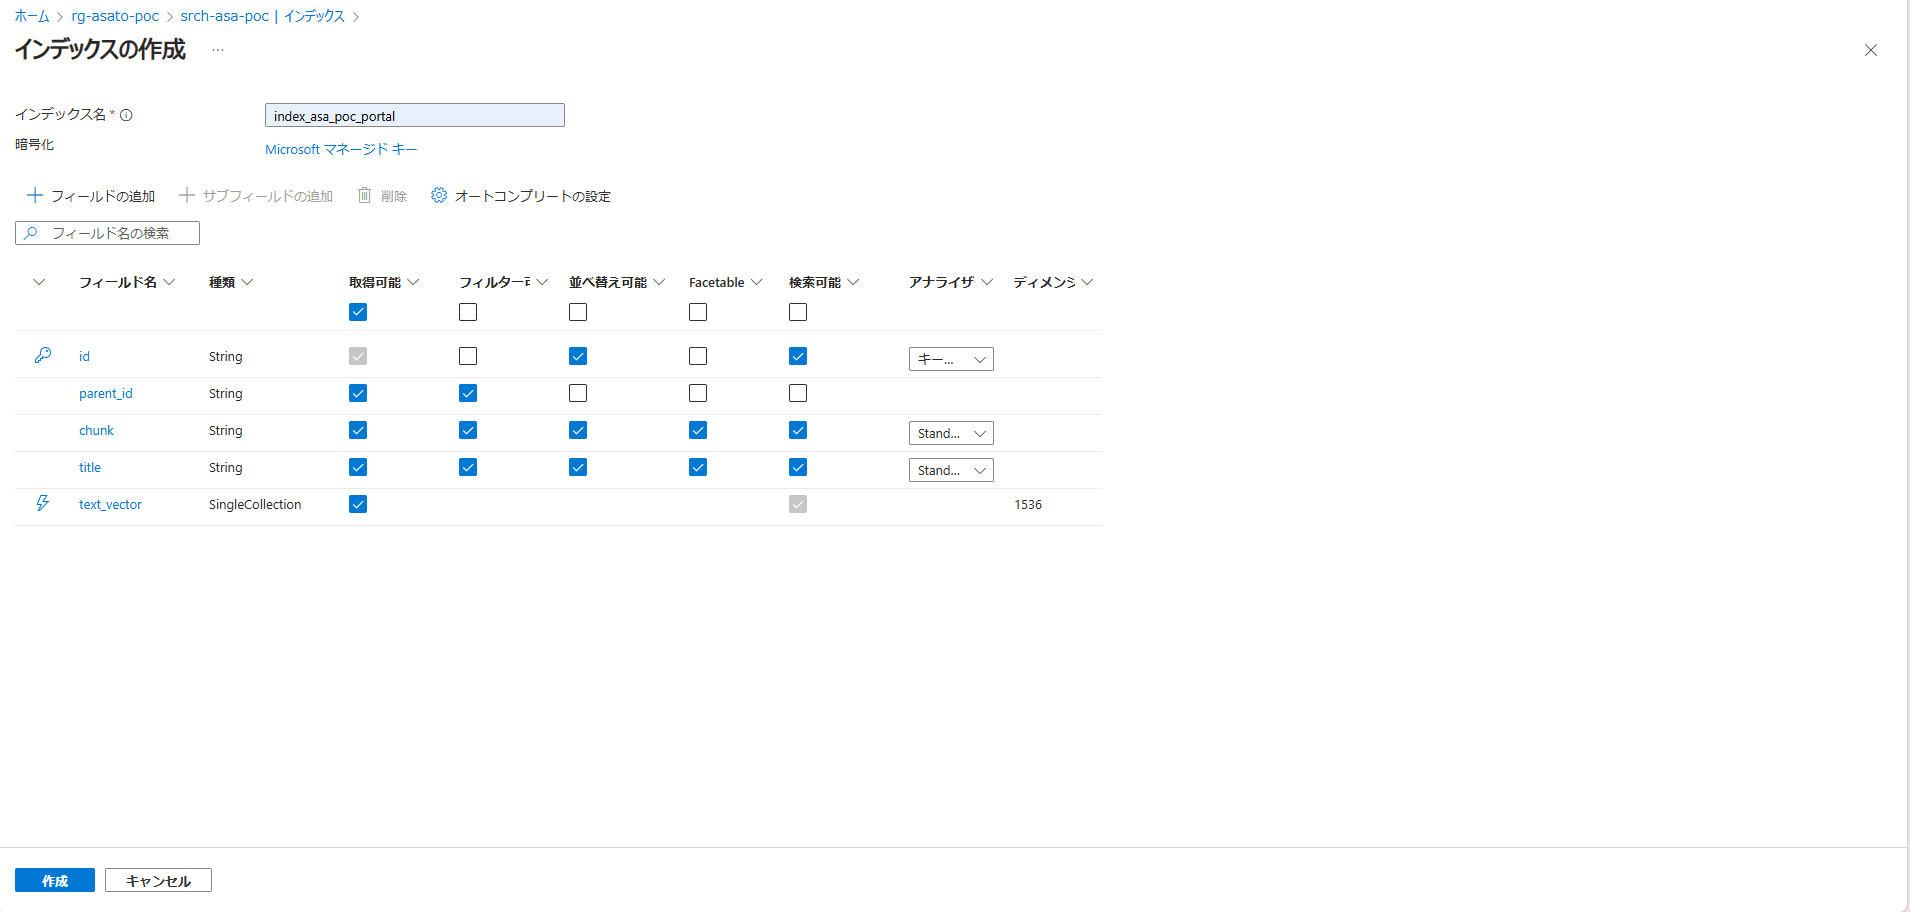
図がインデックスの作成画面です。インデックス名を入力し、「フィールドの追加」を押すとフィールドを1つ新規追加できます。フィールド追加時の設定ではデータの種類(型)や検索可能であるかといったフィールド属性の設定が可能です。
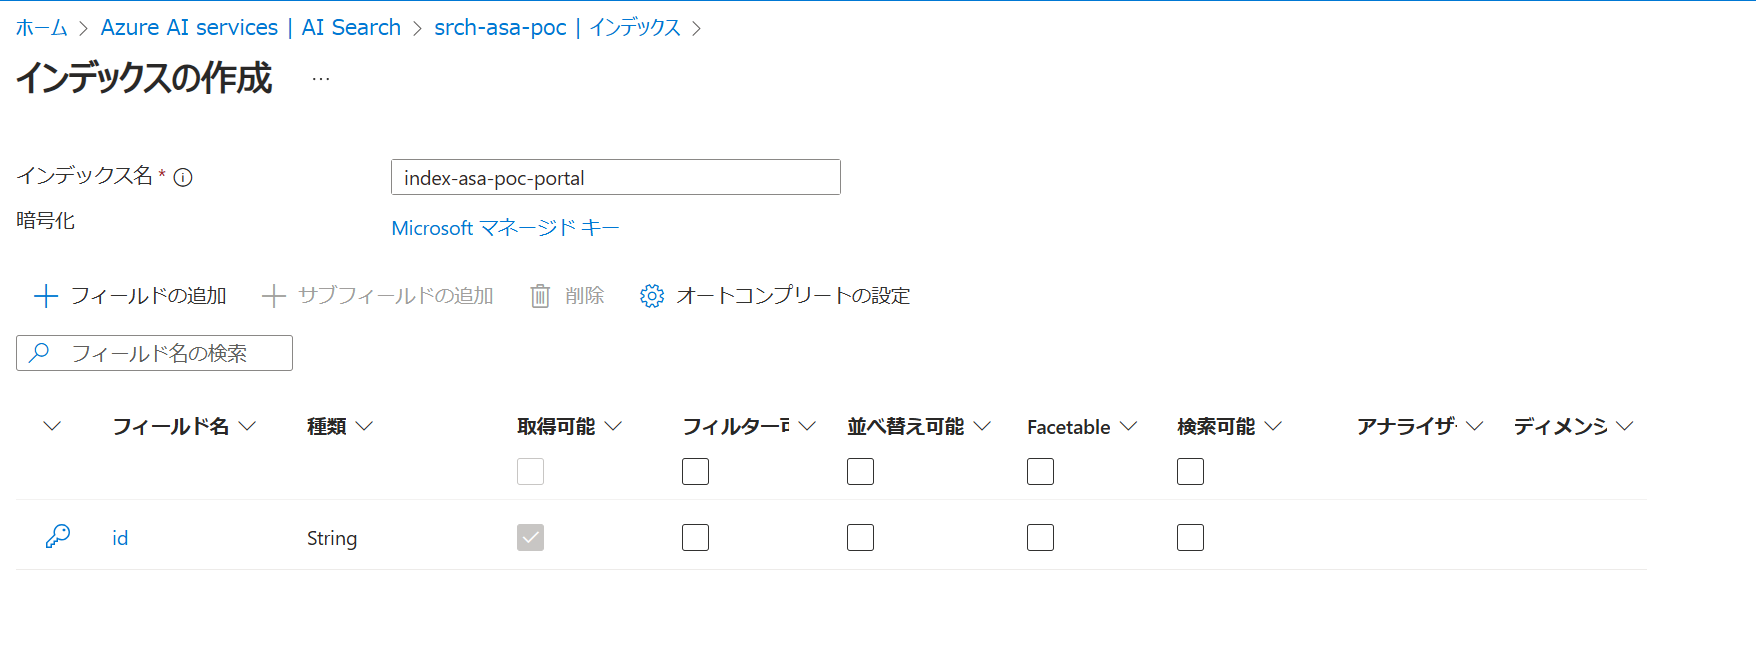

今回は、図のようなフィールド定義でインデックスを作成します。

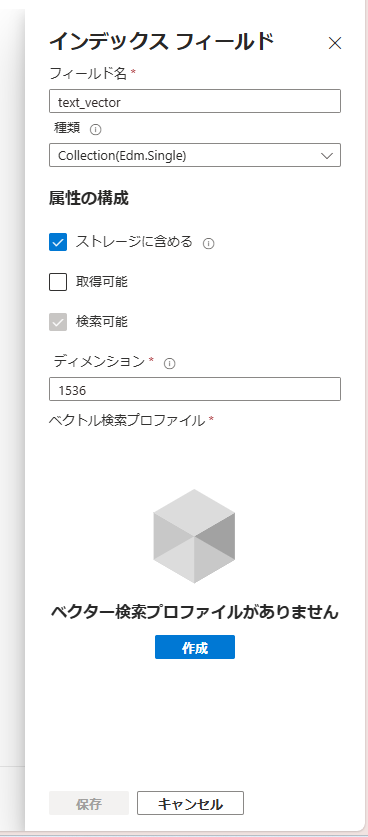
ベクトルデータのフィールド「text_vector」作成の設定について、ベクトルの次元数を1536に設定します。この次元数は、今回使う埋め込みモデルで扱える次元数がこの値のためです。
次に、「ベクター検索プロファイルがありません」となっているので、「作成」を押してプロファイルを作成していきます。
プロファイル作成では、「アルゴリズム構成」の設定とベクトル化の設定をそれぞれ作成する必要があります。
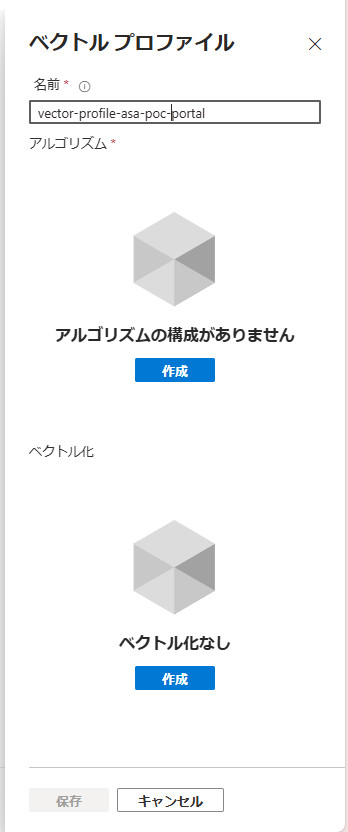
アルゴリズムの構成を以下のように設定します。アルゴリズム名以外はデフォルト値です。
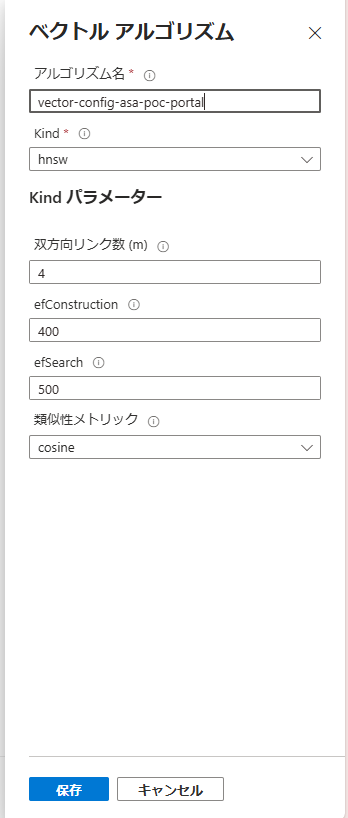
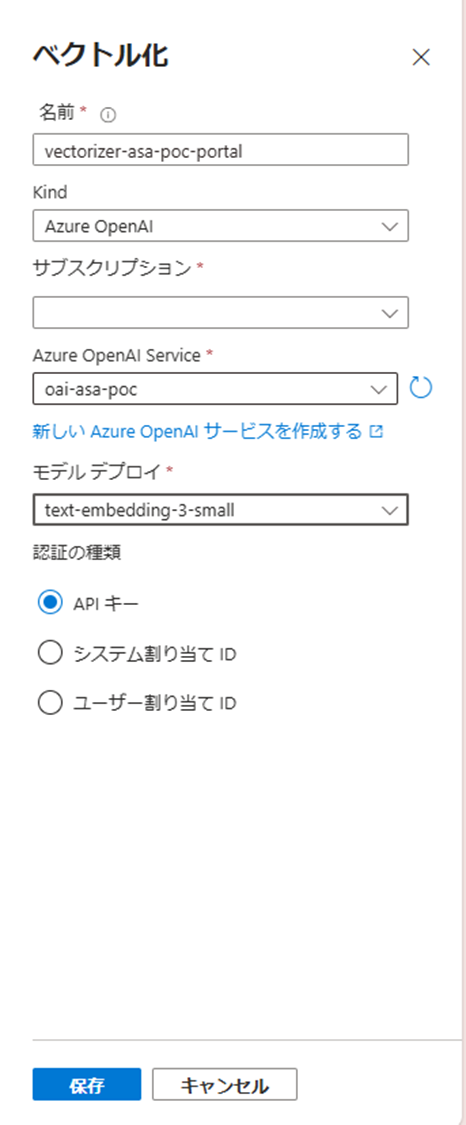
ベクトル化の設定を作成します。作成したAzure OpenAIとデプロイしたモデルを指定します。
※アルゴリズムの構成作成した時点で、ベクトル化の設定の下に「圧縮の設定」が追加されますが、こちらの設定は作成しなくても問題ありません。
各種の設定が完了し、フィールドの追加に過不足がないことを確認し、保存します。
インデックスの作成ができました!

データソースの追加
データソースの作成を行います。Azure PortalのAI Search画面から、以下のように遷移して設定画面を開きます。

以下のように作成したストレージアカウント、blobコンテナーを指定して作成をします。

作成できました!データソースが追加されていることがわかります。

スキルセットを作成する
スキルセットとはデータソースとなるドキュメントに対して、チャンクの処理などをはじめとして内容の分析や変換を行うための処理を定義できる機能です。ここではドキュメントのチャンク化と、チャンク化したデータのベクトル化を行い、先ほど作成したインデックスのフィールドにそれぞれのデータをマッピングしていく処理を行います。
今回作成したスキルセットは以下です。次でこのスキルセットで何をしているのか見ていきます。
{
  "@odata.etag": "\"0x8DD40FE515DA842\"",
  "name": "skillset-asa-poc",
  "description": "Skillset to chunk documents and generate embeddings",
  "skills": [
    {
      "@odata.type": "#Microsoft.Skills.Text.SplitSkill",
      "name": "#1",
      "description": "Split skill to chunk documents",
      "context": "/document",
      "defaultLanguageCode": "en",
      "textSplitMode": "pages",
      "maximumPageLength": 500,
      "pageOverlapLength": 100,
      "maximumPagesToTake": 0,
      "unit": "characters",
      "inputs": [
        {
          "name": "text",
          "source": "/document/content",
          "inputs": []
        }
      ],
      "outputs": [
        {
          "name": "textItems",
          "targetName": "pages"
        }
      ]
    },
    {
      "@odata.type": "#Microsoft.Skills.Text.AzureOpenAIEmbeddingSkill",
      "name": "#2",
      "description": "embedding",
      "context": "/document/pages/*",
      "resourceUri": "https://oai-asa-poc.openai.azure.com",
      "deploymentId": "text-embedding-3-small",
      "dimensions": 1536,
      "modelName": "text-embedding-3-small",
      "inputs": [
        {
          "name": "text",
          "source": "/document/pages/*",
          "inputs": []
        }
      ],
      "outputs": [
        {
          "name": "embedding",
          "targetName": "text_vector"
        }
      ]
    }
  ],
  "cognitiveServices": {
    "@odata.type": "#Microsoft.Azure.Search.DefaultCognitiveServices"
  },
  "indexProjections": {
    "selectors": [
      {
        "targetIndexName": "index_asa_poc_portal",
        "parentKeyFieldName": "parent_id",
        "sourceContext": "/document/pages/*",
        "mappings": [
          {
            "name": "text_vector",
            "source": "/document/pages/*/text_vector",
            "inputs": []
          },
          {
            "name": "chunk",
            "source": "/document/pages/*",
            "inputs": []
          },
          {
            "name": "file_name",
            "source": "/document/metadata_storage_name",
            "inputs": []
          }
        ]
      }
    ],
    "parameters": {
      "projectionMode": "skipIndexingParentDocuments"
    }
  }
}
skillsに関連する要素について確認します
-
skills: この要素がスキルを記述する部分です。配列形式になっており、各スキルをこの要素下に記述します -
@odata.type: 利用したいスキルを指定する部分です。Azureが用意した組み込みスキルやカスタムスキル、ユーティリティが指定できます。今回はskillsで2つのスキルを用いています。#Microsoft.Skills.Text.SplitSkillはテキストをチャンクに分割するスキルで、#Microsoft.Skills.Text.AzureOpenAIEmbeddingSkillはデータのエンベディングを行うためのスキルです。cognitiveServicesの設定にある#Microsoft.Azure.Search.DefaultCognitiveServicesは、テキストの分割などスキルセットの処理の中で利用されることがあるCognitive Services(AI Services)を指定するものです。ここで指定されているサービスは自分で作成したリソース ではなく、Azureが内部で管理するCognitive Servicesを示しています。そのため、ユーザーがAzure Portal上で確認できるものではありません。(2025年3月27追記) -
context: スキルセットが処理するドキュメント(データソースのデータ)の操作を実行するレベルを決定する部分です。形式が決まっており、/documentがルートでドキュメント全体、/document/contentだとJSON BLOB の "content" プロパティ、つまりドキュメントの内容そのものです。今回データソースでBLOBコンテナーを指定しており、そこに入っているデータ(pdf)の内容を意味しています。/document/pages/*は、チャンク化されたドキュメントの各要素です。ワイルドカードですべてを指定しています -
name: skills内の各スキルのnameは実行するスキル順に#1,#2というように書きます
ここからは、#Microsoft.Skills.Text.SplitSkillに着目して要素を見ていきます
-
textSplitMode:pagesかsentencesを指定します。sentencesだと短く分割されてしまうことが多く、pagesにすることが多いようです -
maximumPageLength: 1つのpageに含まれる文字数の最大数です。最大この大きさでチャンクに分割する、というイメージが近いかもしれません。最小値は300、最大値は50000です -
pageOverlapLength: チャンク分割する際に、前のpageをどれだけ含むか、つまり何文字分前のpageと重複させるかを指定します。ある程度の重複は、RAGの際に精度を高める効果があります -
maximumPagesToTake:処理されるpageの上限を設定します。例えば、maximumPageLengthが1000でmaximumPagesToTakeが1のとき、各ドキュメントの最初の1000文字を処理します。2にすると、各ドキュメントの最初の1000文字と次の1000文字というようになります -
inputs:name: textの部分でチャンク分割するテキストを指定します。"source": /document/content"になっていることから、データソースのコンテンツの内容(ここではpdfの内容)をチャンク化するように指定していることがわかります -
outputs: 出力(チャンク化された結果)をどこに出すかです。textItemsは出力の規定名で、分割された文字列(チャンク)の配列として出力されます。"targetName": "pages"としてしておりこのスキルのcontextが/documentに指定されているため、出力は'/document/pages/*'のようになります!
次にスキル#Microsoft.Skills.Text.AzureOpenAIEmbeddingSkillについて確認します
-
resourceUri: モデルプロバイダー、つまりAzure OpenAIのURIです。作成したAzure OpenAIリソースの「キーとエンドポイント」画面から確認できる「~openai.azure.com/」のURIです -
deploymentId: Azure OpenAIでデプロイした埋め込みモデルの名前です。2025年1月現在text-embedding-ada-002、text-embedding-3-large、text-embedding-3-smallの埋め込みモデルがあります -
dimensions埋め込みの次元数です。今回用いる埋め込みモデルtext-embedding-3-smallの最大次元数は1536のため、そのように指定しています -
modelName: 基本的にdeploymentIdと同じになります。サポートされている値はtext-embedding-ada-002、text-embedding-3-large、text-embedding-3-smallの3つです -
inputs:name: textの部分でベクトル化する部分を指定しています。先のスキルでチャンク化したものをベクトル化したいので、"source": "/document/pages/*"と指定しています -
output:"name": "embedding"が入力をベクトル化結果の出力です。"targetName": "text_vector"このように指定し、contextが"context": "/document/pages/*"であるため、出力は/document/pages/*/text_vectorのようになります
最後に、indexProjectionsについて見ていきます
-
parentKeyFieldName: 親ドキュメントのキーを提供するフィールド名です。ここではインデックス作成の際に作ったparent_idフィールドを指定しています。データソースをBLOBストレージにしている場合、各BLOBのURLがIDになるようです -
mappingsインデックスのフィールドに対してどのデータを適用していくのかというマッピングを定義する部分です。例えば"name": "text_vector"フィールドに対して、/document/pages/*/text_vectorとマッピングしています。また、BLOBデータはmetadata_storage_nameというメタデータを持ち、"name": "file_name"フィールドに対し、/document/metadata_storage_nameと指定することでファイル名マッピングしています。このようにしてフィールドとドキュメントの対応する構成要素をマッピングします
インデクサーの作成
Azure PortalのAI Search画面でインデクサーに遷移し、作成を行っていきます。
以下の図がインデクサーの作成画面です。
インデクサーの名前、インデクサーが参照するインデックス、データソース、スキルセットの指定を行います。
データソースが更新されるユースケースなどでは、スケジュールを設定して定期的にインデクサーの実行をすることができます。今回は一度だけの設定にしていますが、その場合でもAzure Portalのインデクサー画面から手動で実行することができます。

実行を押すとインデクサーが実行され、成功するとインデックスが更新されます。

Azure PortalのGUIからインデクサーを作成した場合、インデクサーの定義Jsonは以下のように自動作成されます。対象のインデックス、データソース、スキルセットが指定されていることがわかります。
{
  "@odata.context": "https://srch-asa-poc.search.windows.net/$metadata#indexers/$entity",
  "@odata.etag": "\"0x8DD41B8AD818648\"",
  "name": "indexer-asa-poc",
  "description": null,
  "dataSourceName": "azureblob-datasource-asa-poc",
  "skillsetName": "skillset-asa-poc",
  "targetIndexName": "index_asa_poc_portal",
  "disabled": null,
  "schedule": null,
  "parameters": null,
  "fieldMappings": [],
  "outputFieldMappings": [],
  "cache": null,
  "encryptionKey": null
}
検索してみる
Azure PortalのAI Search画面でインデックスを選択すると検索エクスプローラーが利用できます。
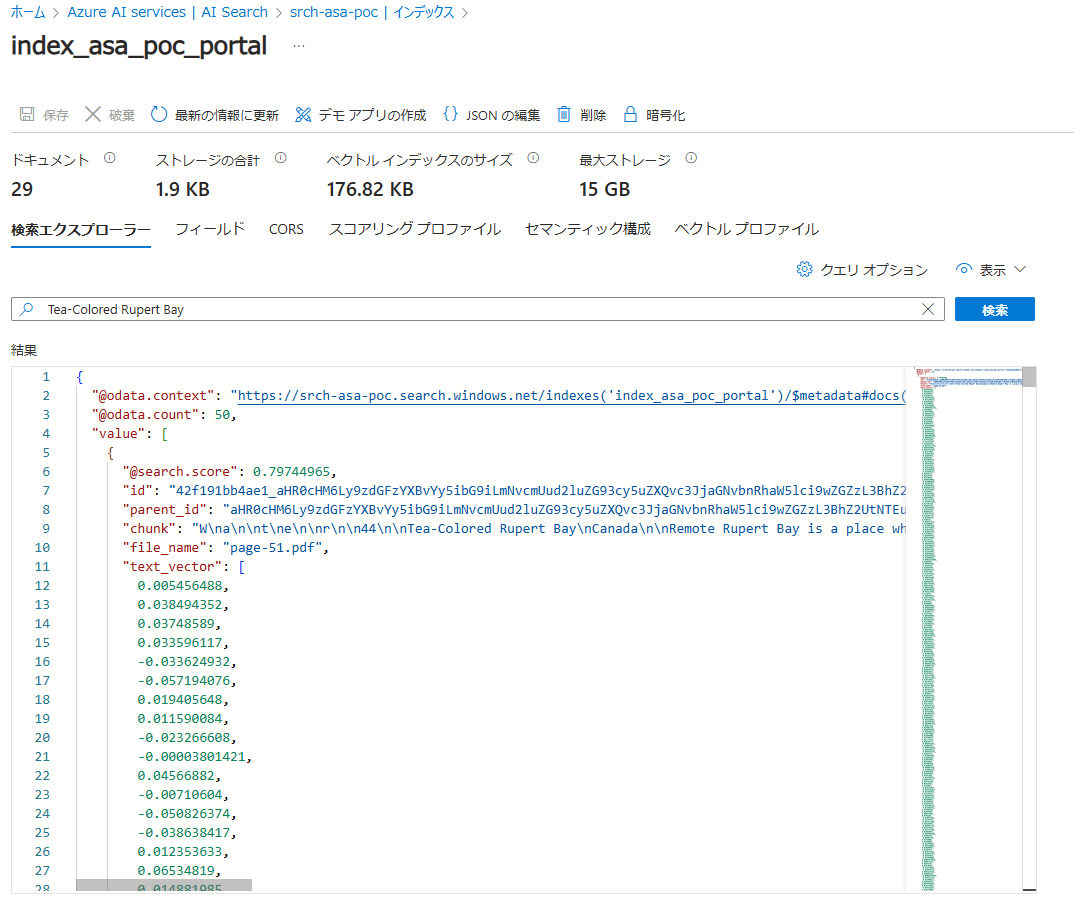
試しに「Tea-Colored Rupert Bay」と検索してみました。検索結果がウィンドウに表示されます。value要素の中が配列になっており、検索結果のscoreが高い順にソートされて表示されていることがわかります。
scoreが一番高い結果のchunkを見ると、「~~~Tea-Colored Rupert Bay\nCanada\n\nRemote Rupert Bay is a place~~~」2番目のchunkは「forests and wetlands of northern Quebec, the rivers that flow into Rupert Bay carry~~~」となっています。
これらのデータのfile_name「page-51.pdf」を実際に開いた図を下に示します。検索ワード「Tea-Colored Rupert Bay」はこのファイルの見出しでした。この文言で検索した際に、scoreの上位2件にヒットするチャンクは、見出しから続く文章になっており、類似性の高いデータが上位になっていることがわかります。高精度で検索できていそうです!


また、こちらの図はtext_vectorフィールドを表示した検索結果です。次元数が1536であるため見切れていますが、各チャンクの内容がベクトル化されていることがわかります。このようにベクトルフィールドを持つインデックスはRAGに活用することが可能です。
まとめ
今回はリソースの作成~インデックスで検索ができるまでの流れを実践しました。
難しいポイントとしてはスキルセットの作成の部分かと思います。スキルについては今回紹介したもの以外にもOCRのためのスキルなど、用途に応じた様々なスキルが提供されています。
また、特に理解が難しい部分に/document/contentのような構造情報の部分でした。スキルセットの処理でデータソース内のファイルが分析され、構造化情報に変換されるのですがどのような構造になっているのかがわからずどのように指定すべきなのか理解が難しかったですが、理解を深めて様々なユースケースに対応できることを目指そうと思います。
最後に今回行ったことについておさらいでまとめます。
リソースの準備
- Azure OpenAIリソースと埋め込みモデル(text-embedding-3-small)のデプロイ
- Storage Accountのデプロイ、BLOBにデータをアップロード
- Azure AI Searchのデプロイ
Azure AI Searchで行ったこと
- インデックスの作成(フィールドの作成)この時点ではインデックスの中身は空
- データソースの作成
- スキルセットの作成
- インデクサーの作成(実行)インデクサーを実行することでインデックスのフィールドにデータが入る
長くなってしまい。わかりにくい部分も多かったと思いますが、お読みくださりありがとうございました!
参考文献
おまけ
リソースグループを作成するterraform
今回作成したAzureリソースのterraformディレクトリ構成は以下でした。この中のリソースグループ作成の部分について、ここで添付しておきます。
└──iac_azure/
  ├──  modules
  │  └── ai_search/
  │    ├── main.tf
  │     └── variables.tf
  │  └── resource_group/
  │    ├── main.tf
  │  └── oai/
  │    ├── main.tf
  │    └── variables.tf
  │  └── storage_account/
  │    ├── main.tf
  │    └── variables.tf
  ├── main.tf
  └── provider.tf
リソースグループ作成部分のterraformリソースのコードです。
# iac_azure/modules/resource_group/main.tf
resource "azurerm_resource_group" "rg" {
 name     = "rg-asa-poc"
 location = "Japan East"
}

output "rg_name" {
 value = azurerm_resource_group.rg.name
}

output "rg_location" {
 value = azurerm_resource_group.rg.location
}

output "rg_id" {
 value = azurerm_resource_group.rg.id
}