はじめに
PlayFramwork1.2でBootstrap3.xを使う方法のメモ。
Play用に特別なことをしているわけではありませんが一応メモ。
Bootstrapをダウンロードして解凍する
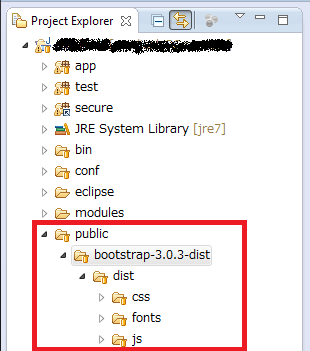
PlayプロジェクトのPublic配下に配置する
テンプレート(view)でBootstrapを読み込む
Bootstrap公式のサンプルを参考に、テンプレートでBootstrapを読み込みます。
main.html
<!DOCTYPE html>

<html>
    <head>
        <title>#{get 'title' /}</title>
        <meta charset="${_response_encoding}" name="viewport" content="width=device-width, initial-scale=1.0" name="ROBOTS" content="NOINDEX,NOFOLLOW">
        <!-- Bootstrap -->
        <link href="@{'public/bootstrap-3.0.3-dist/dist/css/bootstrap.min.css'}" rel="stylesheet">
        <!-- jQuery (necessary for Bootstrap's JavaScript plugins) -->
        <script src="@{'public/javascripts/jquery-1.10.2.min.js'}"></script>
        <!-- Include all compiled plugins (below), or include individual files as needed -->
        <script src="@{'public/bootstrap-3.0.3-dist/dist/js/bootstrap.min.js'}"></script>
        <script src="@{'public/javascripts/bootbox.min.js'}"></script>
        <!-- HTML5 Shim and Respond.js IE8 support of HTML5 elements and media queries -->
        <!-- WARNING: Respond.js doesn't work if you view the page via file:// -->
        <!--[if lt IE 9]>
          <script src="https://oss.maxcdn.com/libs/html5shiv/3.7.0/html5shiv.js"></script>
          <script src="https://oss.maxcdn.com/libs/respond.js/1.3.0/respond.min.js"></script>
        <![endif]-->
        #{get 'moreStyles' /}
        <link rel="shortcut icon" type="image/png" href="@{'public/images/favicon.png'}">
        #{get 'moreScripts' /}

    </head>
おまけ
bootstrapのカスタマイズは↓のやり方でやっています。
lessがわからない人のBootstrap簡単カスタマイズ方法 - Qiita