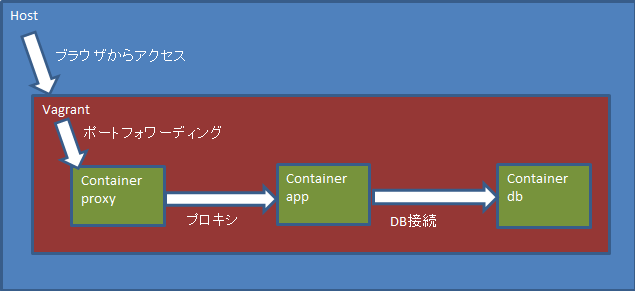
VagrantとDocker(とDocker Compose)を使って開発環境を一発で立ち上げられるようすることを目標とした連載(予定)、第一回です。
環境
以下の環境を前提としています。
- ホスト:Windows10(コマンドはCygwinを使用)
- Vagrant:1.9.2(インストールは割愛)
- ゲストOS:ubuntu:trusty
今回はVagrantにDockerを入れるまでを書いていきます。
ゲストOSが起動するまでの流れ
- Vagrant boxを追加する(ダウンロードも可)
- Vagrantfileを作成する
- ゲストOSを起動する
Vagrant boxを追加する
Vagrant boxに対してinitを行うことで、Vagrantfileのひな型が作成されます。
vagrant box add ubuntu/trusty64
実は公式で配布しているボックスなら、いきなりinitしてもVagranfileが作成されます。
Vagrantfileを作成する
適当な空のディレクトリを作成し、そこで以下のコマンドを実行しましょう。
vagrant init ubuntu/trusty64
Vagrantfileのひな型が作成されるので、これをいじっていきます。
Dockerをインストールする
dockerを起動時にインストールしたり、dockerのコマンドを起動してくれる仕組みがVagrantには用意されています。
Vagrant.configure("2") do |config|
  config.vm.provision "docker"
end
今回はDocker Composeを使うので、Dockerでは何もしませんが、以下のように記述することでコマンドも実行してくれます。
Vagrant.configure("2") do |config|
  config.vm.provision "docker" do |d|
    d.build_image "/vagrant",
      args: "-t test-image"
    d.run "test-image",
      args: "-v /vagrant/volume:/volume:rw -p 80:80 --name first-container",
      daemonize: true
end
詳細な説明は割愛しますが、これはVagrantの起動後に、ゲストOS上で以下のコマンドを実行することと同じです。
docker build -t test-image /vagrant
docker run -d -v /vagrant/volume:/volume:rw -p 80:80 --name first-container test-image
Docker Composeをインストールする(vagrant up時にコマンドを実行する)
プロビジョニングで、特定のコマンドを"VM作成時"と"VM起動の度"に実行させることができます。
Vagrantfileと同じディレクトリにprovision.shというファイルを作成し、Vagrantfileに以下のように追記します。
#!/usr/bin/env bash

sudo apt-get update
sudo apt-get install -y bash-completion
sudo apt-get install -y lxc-docker

sudo -i
COMPOSE_VERSION=1.12.0-rc1
curl -L https://github.com/docker/compose/releases/download/$COMPOSE_VERSION/docker-compose-`uname -s`-`uname -m` > /usr/local/bin/docker-compose
chmod +x /usr/local/bin/docker-compose
curl -L https://raw.githubusercontent.com/docker/compose/$COMPOSE_VERSION/contrib/completion/bash/docker-compose > /etc/bash_completion.d/docker-compose
Vagrant.configure("2") do |config|
  config.vm.provision :shell, :path => "provision.sh"
  config.vm.provision :shell, run: "always", inline: "cd /vagrant/docker && docker-compose up -d --build"
end
pathで指定したファイルを。inlineでその後に記述する文字列を実行してくれます。
※この段階ではdocker-compose.ymlを作成していないので、失敗に終わります。
おおまかなVagrantの設定は今回はここまでとし、後は必要に応じて追記していきます。
ゲストOSを起動する
Vagrantfileがあるディレクトリで、vagrant upを打ちます。
初回はダウンロードで時間が多めにかかります。
これだけで開発環境が揃うところがゴールなので、以下は補足となります。
ゲストOSに入って作業する
vagrant sshと打つと、sshで入れます。
抜けるときはCtrl+d
dockerのインストールができているか確認するため、
docker --helpや、docker-compose --helpと打ってみましょう。
ゲストOSを止める/立ち上げる
停止:vagrant suspend
起動(停止から):vagrant resume
シャットダウン:vagrant halt
起動(suspendからでもOK):vagrant up
ゲストOSを破棄:vagrant destroy
はまりどころ
Guest Addtionsのバージョン違いで起動できなくなる
唐突にやってきます。ホストマシンで
vagrant plugin install vagrant-vbguest
で解決。
追記
Vagrantのpluginに、vagrant-docker-composeなるものがあるらしいです。
試してないけど、それを使ってVagrantfile内でプロビジョニングした方が簡単そうです。
次回、Docker編に続く。
