iphoneを利用していればよく使う以下のアクションシートの簡単な実装の備忘録です。
いちいち一から実装する事はなく、swift側が便利なツールを用意してくれています。
利用するコード
・actionSheet()
・actionSheetのモディファイアであるActionsheet()
・BUtton()
・dufault()
・cancel()
・destrcutive()
全体コード
//
// ContentView.swift
// Shared
//
//
import SwiftUI
struct ContentView: View {
@State var isSheet: Bool = false
var body: some View {
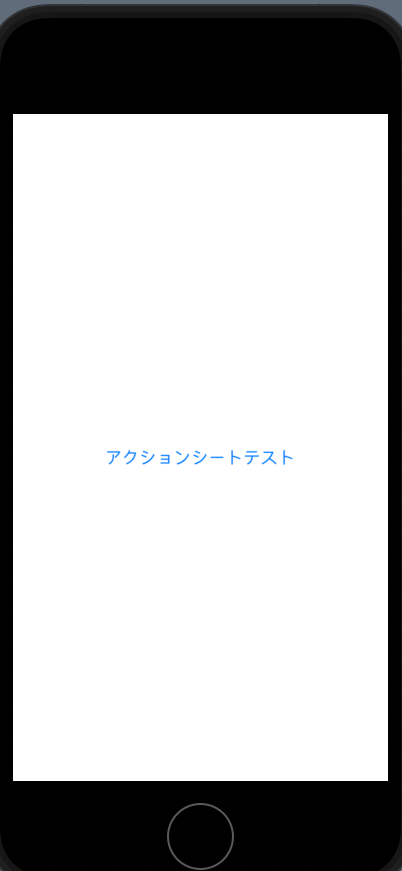
Button(action: {
isSheet = true
}) {
Text("アクションシートテスト")
}.actionSheet(isPresented: $isSheet) {
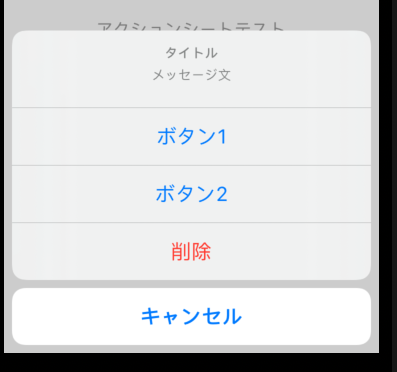
ActionSheet(title: Text("タイトル"),
message: Text("メッセージ文"),
buttons: [
.default(Text("ボタン1"), action: {}),
.default(Text("ボタン2"), action: {}),
.destructive(Text("削除"), action:{}),
.cancel(Text("キャンセル"), action: {})
])
}
}
}
struct ContentView_Previews: PreviewProvider {
static var previews: some View {
ContentView()
}
}
Buttonでアクション設定をする。
ライブラリパネルのButtonを使い、アクションとテキストを設定します。
 Button(action: {
            isSheet = true
        }) {
            Text("アクションシートテスト")
クリック可能なボタンができます。
ボタンをクリックするとisSheetにtrueが代入されます。
Textには"アクションシートテキスト"を設定します。
アクションシートを表示するコードを追加する。
actionSheetモディファイアを利用し、引数にユーザーが定義した変数であるisSheetを設定します。Buttonのaction実行時にisSheetがtrueなので、ActionSheetが実行されアクションシートが表示されます。
titleにはタイトル、messageにはメッセージを設定します。
buttons:に必要なボタンを設定すれば完了です。
ボタンに応じて処理を行いたければaction:{}の中に記載すれば良いです。
.actionSheet(isPresented: $isSheet) {
            ActionSheet(title: Text("タイトル"),
            message: Text("メッセージ文"),
            buttons: [
                .default(Text("ボタン1"), action: {}),
                .default(Text("ボタン2"), action: {}),
                .destructive(Text("削除"), action:{}),
                .cancel(Text("キャンセル"), action: {})
            ])
        }

buttons:で設定したいボタンの種類を簡単に設定することができます。
.defaultであれば通常の青いボタン、destructive
であれば赤いボタン cancelであれば独立したキャンセルボタンが設定されます。
buttons: [
                .default(Text("ボタン1"), action: {}),
                .default(Text("ボタン2"), action: {}),
                .destructive(Text("削除"), action:{}),
                .cancel(Text("キャンセル"), action: {})
            ])
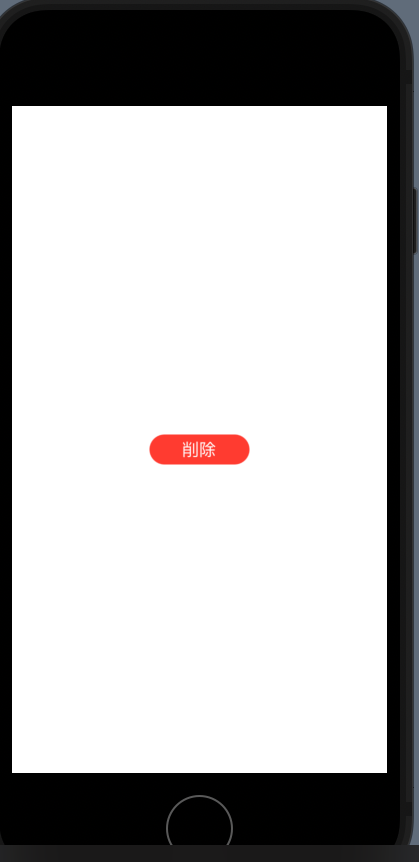
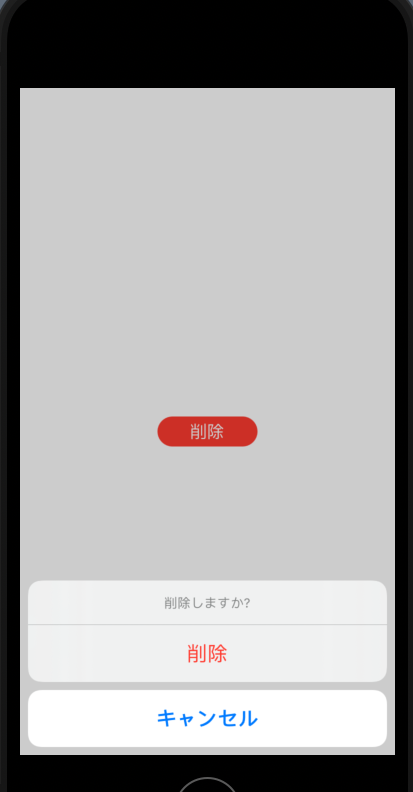
おまけ削除を確認するアクションシート
※デリート処理は書きませんので自身の制作したいもによって書き換えます。
//
//  ContentView.swift
//  Shared
//
//
//

import SwiftUI

struct ContentView: View {
    @State var isSheet: Bool = false
    var body: some View {
        Button(action: {
            isSheet = true
        }){
            Text("削除")
                .foregroundColor(.white)
                //カプセル型のボタン
                .background(Capsule()
                .foregroundColor(.red)
                .frame(width: 100,height: 30))
        }.actionSheet(isPresented: $isSheet){
            ActionSheet(title: Text("削除しますか?"),
                        buttons:[
                            .destructive(Text("削除"), action:{
                                deleteProcess()
                            }),
                            .cancel(Text("キャンセル"),action:{})
                        ]
            )
        }
    }
}
func deleteProcess(){
    print("削除しました。")
}
struct ContentView_Previews: PreviewProvider {
    static var previews: some View {
        ContentView()
    }
}
以上です。