こんにちは、ギャル電のまおです★
IoTLT Advent Calendar 2017の 20日目を担当です!イェイ卍
今年もふと思えばすっかり年末になってしまいましたね〜!
年末といえば、パリピにとってイベントが絶えなくて忙しいです。
ということで、年末のパーリーに向けてギャル電のLEDの光らせ方にバリエーションを増やそうと思います!
心拍センサからの値でNeoPixelを光らす
心拍センサーから得られた値と連動してNeopixelを光らせる方法について紹介していまぁす!
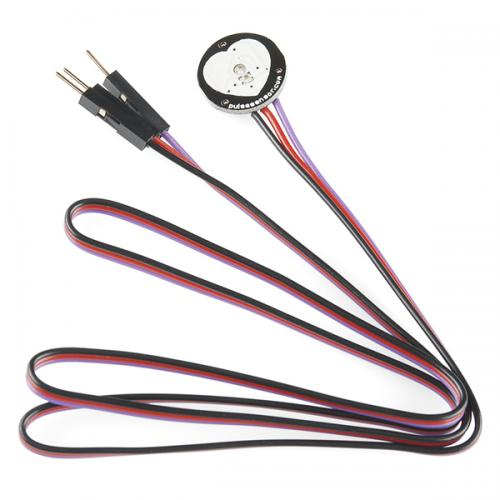
今回使うセンサは耳たぶや指先にセンサをつけて5V,GND,Data pinをArduinoにつないで、心拍計測プログラムを書きこめば簡単に心拍データが取れる可愛い心拍センサです❤︎

準備するもの
心拍センサ
Arduino UNO
NeoPixel
ジャンプワイヤー
ブレッドボード
心拍センサのテスト
まずは、心拍センサのテストをしてみした。
https://pulsesensor.com/pages/code-and-guide
このサイトを参考に、まずは
https://github.com/WorldFamousElectronics/PulseSensorPlayground
からPulseSensorPlaygroundのライブラリのZipをダウンロードしてArduinoのライブラリにインクルードしました。
次に、ファイル>スケッチの例>PulseSensorPlayground>GettingStartedProject を開いて、そのプログラムをArduinoに書き込みます。
書き込みが終了したら、ツール>シリアルプロッタ を選択するとウィンドウズが出てきて、心拍センサで心拍を計り始めると、心電図らしきグラフがウィンドウズに表示されます。
心拍センサと連動させてNeoPixelを光らす
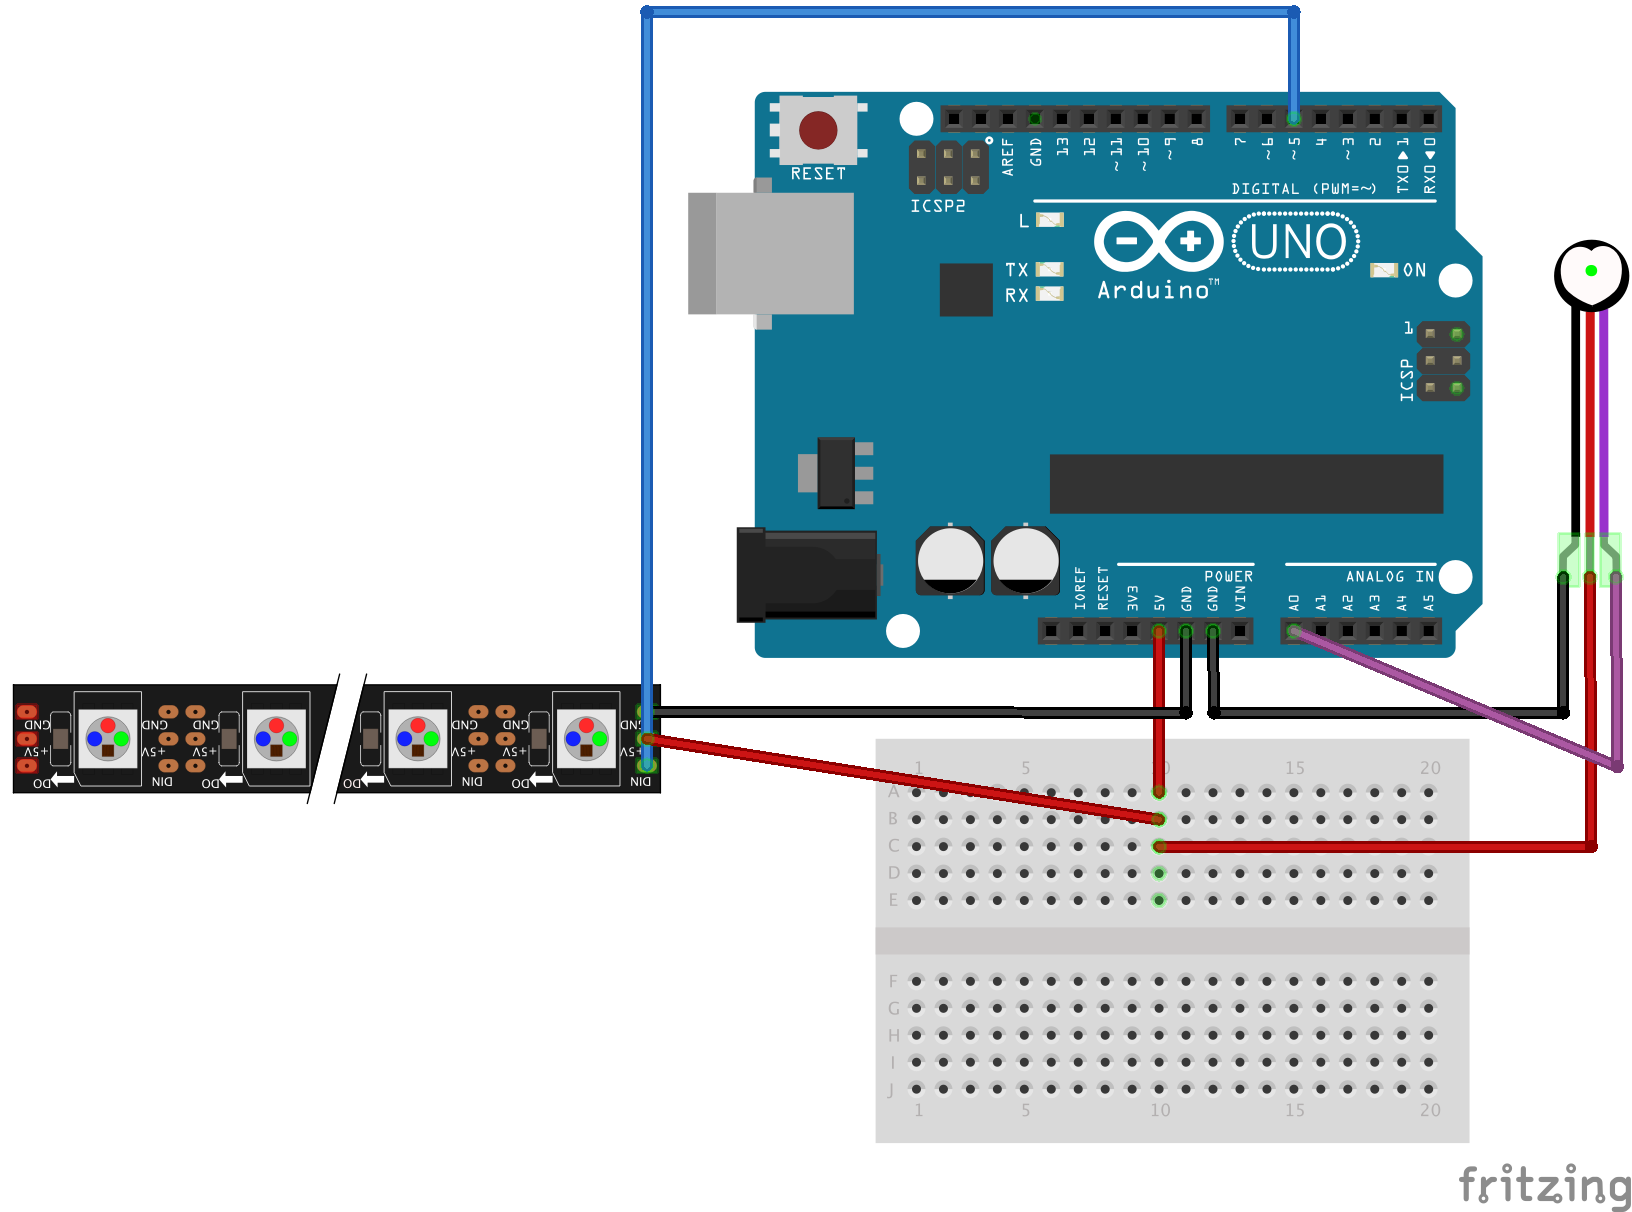
回路作成
プログラム
まずは以下のこのプログラムを拡張子inoで保存してください。(保存するのみでArduinoでは実行しなくて大丈夫です)
# include <Adafruit_NeoPixel.h>    // Library containing

// Behavior setting variables
int pulsePin = 0;                 // Pulse Sensor purple wire connected to analog pin 0
int blinkPin = 13;                // Digital pin to blink led at each beat
int fadePin  = 5;                 // pin to do fancy neopixel effects at each beat
int fadeRate = 0;                 // used to fade LED on with PWM on fadePin

// these variables are volatile because they are used during the interrupt service routine
volatile int BPM;                   // used to hold the pulse rate
volatile int Signal;                // holds the incoming raw data
volatile int IBI = 600;             // holds the time between beats, the Inter-Beat Interval
volatile boolean Pulse = false;     // true when pulse wave is high, false when it's low
volatile boolean QS = false;        // becomes true when Arduoino finds a beat.

// Set up use of NeoPixels
const int NUMPIXELS = 4;           // Put the number of NeoPixels you are using here
const int BRIGHTNESS = 60;          // Set brightness of NeoPixels here
Adafruit_NeoPixel strip = Adafruit_NeoPixel(NUMPIXELS, fadePin, NEO_GRB + NEO_KHZ800);

void setup(){
  pinMode(blinkPin,OUTPUT);         // pin that will blink to your heartbeat!
//  Serial.begin(115200);           // Serial output data for debugging or external use
  strip.begin();
  strip.setBrightness(BRIGHTNESS);
  for (int x=0; x < NUMPIXELS; x++) {  // Initialize all pixels to 'off'
     strip.setPixelColor(x, strip.Color(0, 0,0));
  }
  strip.show();                     // Ensure the pixels are off
  delay(1000);                      // Wait a second
  interruptSetup();                 // sets up to read Pulse Sensor signal every 2mS
}

void loop(){
//  sendDataSerial('S', Signal);      // send Processing the raw Pulse Sensor data
  if (QS == true){                    // Quantified Self flag is true when arduino finds a heartbeat
     fadeRate = 255;                  // Set 'fadeRate' Variable to 255 to fade LED with pulse
//     sendDataSerial('B',BPM);       // send heart rate with a 'B' prefix
//     sendDataSerial('Q',IBI);       // send time between beats with a 'Q' prefix
     QS = false;                      // reset the Quantified Self flag for next time
  }
  ledFadeToBeat();                    // Routine that fades color intensity to the beat
  delay(20);                          //  take a break
}

void ledFadeToBeat() {
    fadeRate -= 15;                         // Set LED fade value
    fadeRate = constrain(fadeRate,0,255);   // Keep LED fade value from going into negative numbers
    setStrip(fadeRate);                     // Write the value to the NeoPixels
//    sendDataSerial('R',fadeRate);
}

void sendDataSerial(char symbol, int data ) {
//    Serial.print(symbol);                // symbol prefix tells Processing what type of data is coming
//    Serial.println(data);                // the data to send culminating in a carriage return
}

void setStrip(int r) {     // Set the strip to one color intensity (red)
   int g = 0;              // Green is set to zero (for non-red colors, change this)
   int b = 100;              // Blue is set to zero (for non-red colors, change this)
   for (int x=0; x < NUMPIXELS; x++) {
      strip.setPixelColor(x, strip.Color(r, g, b));
   }
   strip.show();

}
保存したらArduinoを立ち上げて、心拍とNeoPixelを連動させて光らせる以下のプログラムをコピペして、上のプログラムと同じファイルディレクトリに保存してください。
# include <Adafruit_NeoPixel.h>    // Library containing

// Behavior setting variables
int pulsePin = 0;                 // Pulse Sensor purple wire connected to analog pin 0
int blinkPin = 13;                // Digital pin to blink led at each beat
int fadePin  = 5;                 // pin to do fancy neopixel effects at each beat
int fadeRate = 0;                 // used to fade LED on with PWM on fadePin

// these variables are volatile because they are used during the interrupt service routine
volatile int BPM;                   // used to hold the pulse rate
volatile int Signal;                // holds the incoming raw data
volatile int IBI = 600;             // holds the time between beats, the Inter-Beat Interval
volatile boolean Pulse = false;     // true when pulse wave is high, false when it's low
volatile boolean QS = false;        // becomes true when Arduoino finds a beat.

// Set up use of NeoPixels
const int NUMPIXELS = 4;           // Put the number of NeoPixels you are using here
const int BRIGHTNESS = 60;          // Set brightness of NeoPixels here
Adafruit_NeoPixel strip = Adafruit_NeoPixel(NUMPIXELS, fadePin, NEO_GRB + NEO_KHZ800);

void setup(){
  pinMode(blinkPin,OUTPUT);         // pin that will blink to your heartbeat!
//  Serial.begin(115200);           // Serial output data for debugging or external use
  strip.begin();
  strip.setBrightness(BRIGHTNESS);
  for (int x=0; x < NUMPIXELS; x++) {  // Initialize all pixels to 'off'
     strip.setPixelColor(x, strip.Color(0, 0,0));
  }
  strip.show();                     // Ensure the pixels are off
  delay(1000);                      // Wait a second
  interruptSetup();                 // sets up to read Pulse Sensor signal every 2mS
}

void loop(){
//  sendDataSerial('S', Signal);      // send Processing the raw Pulse Sensor data
  if (QS == true){                    // Quantified Self flag is true when arduino finds a heartbeat
     fadeRate = 255;                  // Set 'fadeRate' Variable to 255 to fade LED with pulse
//     sendDataSerial('B',BPM);       // send heart rate with a 'B' prefix
//     sendDataSerial('Q',IBI);       // send time between beats with a 'Q' prefix
     QS = false;                      // reset the Quantified Self flag for next time
  }
  ledFadeToBeat();                    // Routine that fades color intensity to the beat
  delay(20);                          //  take a break
}

void ledFadeToBeat() {
    fadeRate -= 15;                         // Set LED fade value
    fadeRate = constrain(fadeRate,0,255);   // Keep LED fade value from going into negative numbers
    setStrip(fadeRate);                     // Write the value to the NeoPixels
//    sendDataSerial('R',fadeRate);
}

void sendDataSerial(char symbol, int data ) {
//    Serial.print(symbol);                // symbol prefix tells Processing what type of data is coming
//    Serial.println(data);                // the data to send culminating in a carriage return
}

void setStrip(int r) {     // Set the strip to one color intensity (red)
   int g = 0;              // Green is set to zero (for non-red colors, change this)
   int b = 100;              // Blue is set to zero (for non-red colors, change this)
   for (int x=0; x < NUMPIXELS; x++) {
      strip.setPixelColor(x, strip.Color(r, g, b));
   }
   strip.show();
}
コンパイルしてみて通らない場合もう一度一番最初のプログラムが2番目のプログラムと同じディレクトリにあるか確認してみてください。
書き込みが終了したら、準備完了です!
光らせてみた
ざっと光らせてみたらこんか感じです:))色がピンクで盛れてる心拍になりました❤︎
心拍センサー https://t.co/46fhiEW2Xj
— mao★ (@galmao777) December 20, 2017
みなさんもぜひ心拍光らせて年末はパリピしちゃおう!イェイ!

