農業とか警備とか画像認識出来る情報収集ドローンに
興味ある人誰かいませんかね〜?
個人での継続は寂しいものです。
前回に続いてシミュレーター内のドローンをウェブとGUIのインターフェースから操作出来るようにしました。
参考にしたのはこちらの方
AR drone 2.0 Simulator ウィキページ
環境は前回と変わらず
Ubuntu 14.04
※ROSのcatkin_wsは~/catkin_wsに設定しています。
~/catkin_ws/srcディレクトリ上で
roslibjsパッケージをインストール
$ git clone https://github.com/RobotWebTools/roslibjs
参考ページに従ってこの時点でwebsocketを実行するとrosauth
が入っていないというエラーになりました。
~/catkin_ws/srcにrosauthを入れた上で
buildします。
$ git clone https://github.com/GT-RAIL/rosauth.git
$ catkin_make
drone.htmlの名前で下記のhtmlファイルを
下記ディレクトリに保存
▼保存先
~/catkin_ws/src/roslibjs/examples
▼ファイル内容
 <!DOCTYPE html>
 <html>
 <head>
 <meta charset="utf-8" />
 <script src="http://cdn.robotwebtools.org/EventEmitter2/current/eventemitter2.min.js"></script>
 <script src="../build/roslib.js"></script>

 <script>
  // Connecting to ROS
  // -----------------
  var ros = new ROSLIB.Ros();

  // If there is an error on the backend, an 'error' emit will be emitted.
  ros.on('error', function(error) {
    document.getElementById('connecting').style.display = 'none';
    document.getElementById('connected').style.display = 'none';
    document.getElementById('closed').style.display = 'none';
    document.getElementById('error').style.display = 'inline';
    console.log(error);
  });

  // Find out exactly when we made a connection.
  ros.on('connection', function() {
    console.log('Connection made!');
    document.getElementById('connecting').style.display = 'none';
    document.getElementById('error').style.display = 'none';
    document.getElementById('closed').style.display = 'none';
    document.getElementById('connected').style.display = 'inline';
  });

  ros.on('close', function() {
    console.log('Connection closed.');
    document.getElementById('connecting').style.display = 'none';
    document.getElementById('connected').style.display = 'none';
    document.getElementById('closed').style.display = 'inline';
  });

  // Create a connection to the rosbridge WebSocket server.
  ros.connect('ws://localhost:9090');

 // Write your code here, to publish or subscribe in topics

 function Takeoff() {
 // First, we create a Topic object with details of the topic's name and message type.
  var takeoff = new ROSLIB.Topic({
    ros : ros,
    name : 'ardrone/takeoff',
    messageType : 'std_msgs/Empty'
  });

  // Then we create the payload to be published. The object we pass in to ros.Message matches the
  // fields defined in the geometry_msgs/Twist.msg definition.
  var msg = new ROSLIB.Message('');

  // And finally, publish.
  takeoff.publish(msg);
 }

 function Land() {
 // First, we create a Topic object with details of the topic's name and message type.
  var land = new ROSLIB.Topic({
    ros : ros,
    name : 'ardrone/land',
    messageType : 'std_msgs/Empty'
  });

  // Then we create the payload to be published. The object we pass in to ros.Message matches the
  // fields defined in the geometry_msgs/Twist.msg definition.
  var msg = new ROSLIB.Message('');

  // And finally, publish.
  land.publish(msg);
 }

 function GoTo(){
 var TheForm;
 TheForm = document.movingForm;

  var coordinate = new ROSLIB.Topic({
    ros : ros,
    name : 'tum_ardrone/com',
    messageType : 'std_msgs/String'
  });

  // Then we create the payload to be published. The object we pass in to ros.Message matches the
  // fields defined in the geometry_msgs/Twist.msg definition.
  var msg = new ROSLIB.Message({data : "c goto 20 20 5 2"});
  // And finally, publish.
  coordinate.publish(msg);
 }
 </script>
 </head>

 <body>
   <h1>Drone Application</h1>
 <input type="button" value= "Takeoff" onclick="Takeoff()" style="width:150px"/>
 <br>
 <input type="button" value= "Land" onclick="Land()" style="width:150px"/>
 <form name=movingForm>
	<input type="text" name= "coordinate" style="width:142px"/>
	<br>
	<input type="button" value= "Go to" onclick="GoTo()" style="width:150px"/>
 <form/>
 <br>
  <div id="statusIndicator">
    <p id="connecting">
      Connecting to rosbridge...
    </p>
    <p id="connected" style="color:#00D600; display:none">
      Connected
    </p>
    <p id="error" style="color:#FF0000; display:none">
      Error in the backend!
    </p>
    <p id="closed" style="display:none">
      Connection closed.
    </p>
  </div>
 </body>
 </html>
ターミナルからウェブソケットを起動します。
$ roslaunch rosbridge_server rosbridge_websocket.launch
成功するとポート9090でサーバーがスタートしたメッセージ表示が確認出来ます。
[INFO] [WallTime: 1455515889.569402] Rosbridge WebSocket server started on port 9090
前回準備したAR drone 2.0のシミュレーション環境を起動して下さい。
$roslaunch cvg_sim_gazebo ardrone_testworld.launch
さて、これでdrone.htmlをブラウザで開くと
Connected!という表示でウェブソケットにクライアントが接続されて
Takeoff, Land, Go toのボタンが使えるようになっている筈です。
私が試験した所、TakeoffとLandで離陸、着陸はボタンで確認出来ましたがGo Toでの行き先の指定の仕方がいまいち分かりませんでした。
そこで別のGUIコントローラーも試します。
~/catkin_ws/srcへパッケージをインストールします。
$git clone http://www.ros.org/wiki/tum_ardrone
tum_ardrone配下の
tum_ardrone.launchを使って実行しました。
$ cd ~/catkin_ws/src/tum_ardrone/launch
$ roslaunch tum_ardrone tum_ardrone.launch
こんな感じでGUIのコントローラー、ドローンカメラ映像、飛行座標のトラッキング情報のウィンドウが開く筈です。
試しにGUIのControl Sourceを Keyboardに指定して動かしてみましょう。
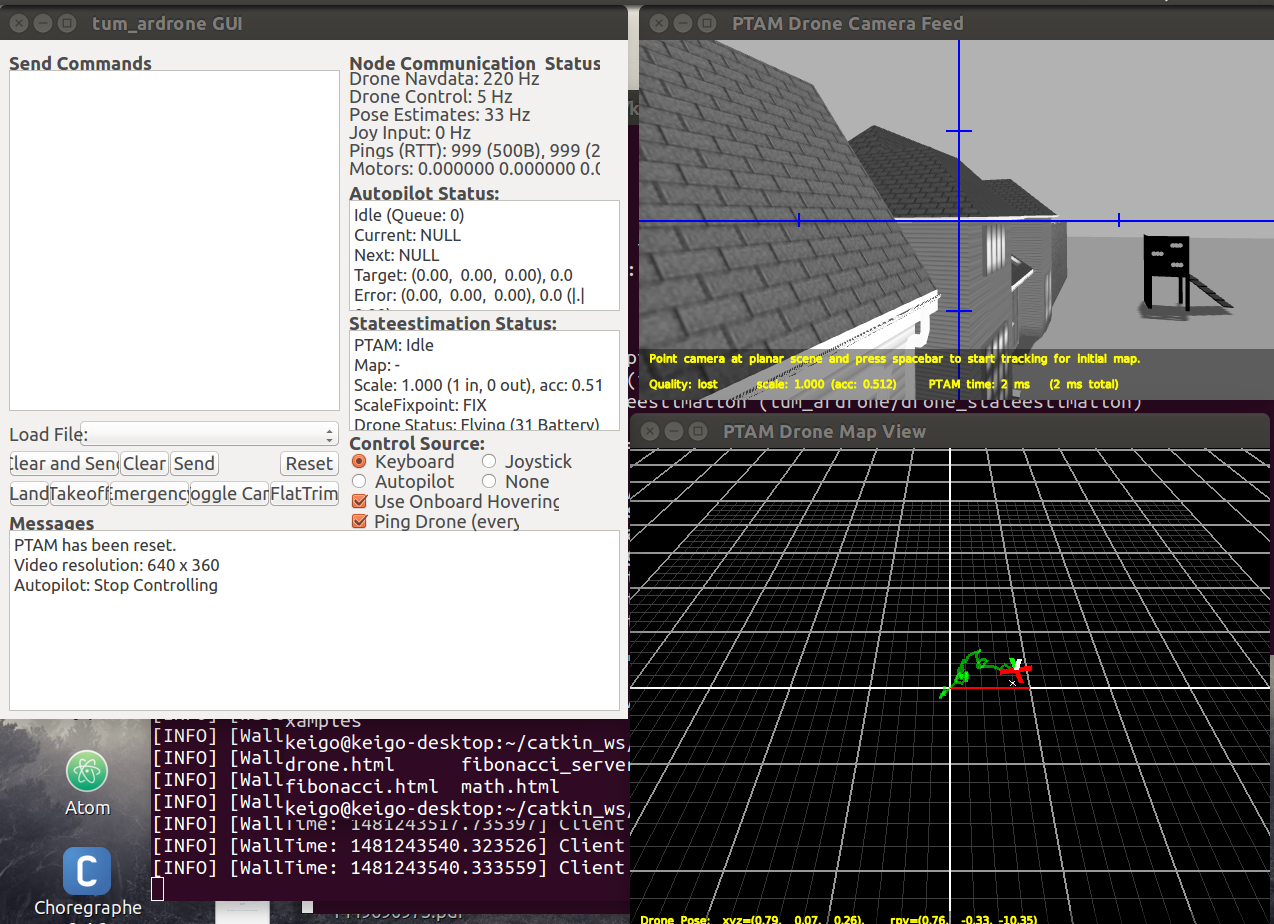
i:前進
k:後退
l:右旋回
j:左旋回
s:離陸
d:着陸
動きました!
次回は録画した動画から認識にかけて
人間、害獣、害虫、作物など必要情報を認識出来るように出来たらいいなぁ
darknetというフレームワークはすごくお手軽でありつつ
高性能な機能を実現出来て便利です。
darknet
実際に収集した3Dデータで作った仮想空間で
自動害虫除去のシミュレーションしたいです。
下記のページとか良さそう
[No.3-3:環境をつくろう ! (Digital Elevation Models 編)]
(http://cir-kit.github.io/blog/2015/02/03/gazebo-digital-elevation-models/)