はじめに
react-nativeの勉強をはじめました。
今回はreact-navigationで画面遷移を作成します。
本ページで記載するテストコードはiOS-Simulatorでのみ確認しています。
環境
macOS: Catalina 10.15.4
XCode: Ver11.4.1
react-native-cli: 2.0.1
react-native: 0.62.2
@react-navigation/native: 5.1.7
準備
react-navitaionをインストール
npm install @react-navigation/native
依存ライブラリをインストール
npm install react-native-reanimated react-native-gesture-handler react-native-screens react-native-safe-area-context @react-native-community/masked-view
iosのためpodを更新
npx pod-install ios
やりたいこと
簡単な画面遷移をするサンプルを作成します。
今後の拡張を考えて、前画面から遷移後の画面に値の受け渡しも行います。
ソース
ソースはなるべくシンプルに記載しているつもりです。(冗長な記載などありましたらご教示いただけると幸いです)
app.js
Main(MainScreen)とDetail(DetailScreen)の2つの画面を持つアプリケーションを用意します。
初期画面はMainとして、Stack.ScreenにMain/Detailを登録します。
import React, {Component} from 'react';
import {createStackNavigator} from '@react-navigation/stack';
import {NavigationContainer } from '@react-navigation/native';
import MainScreen from './MainScreen';
import DetailScreen from './DetailScreen';

type Props = {};
const Stack = createStackNavigator();

export default class App extends Component<Props>{
  render(){
    return (
      <NavigationContainer>
        <Stack.Navigator
         initialRouteName="Main"
        >
          <Stack.Screen
            name="Main"
            component={MainScreen}
          />
          <Stack.Screen
            name="Detail"
            component={DetailScreen}
          />
        </Stack.Navigator>
      </NavigationContainer>
    );
  }
}
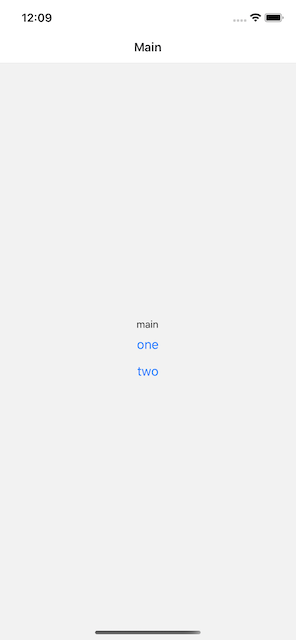
Main画面
Mainの画面には、mainというtextと画面遷移のためのボタンを2つ用意します。
one,twoのそれぞれのボタンは押下時にfromMain:'one',fromMain:'two'を渡しています。
import React, {Component} from 'react';
import {Button, Text, View} from 'react-native';

export default class MainScreen extends Component{
    constructor(props){
        super(props)
    }

    render(){
        return(
            <View style={{flex: 1, alignItems: 'center', justifyContent: 'center'}}>
                <Text>main</Text>
                <Button title="one"  onPress={() => {this.props.navigation.navigate('Detail', {fromMain: 'one'})}} />
                <Button title="two"  onPress={() => {this.props.navigation.navigate('Detail', {fromMain: 'two'})}} />
            </View>
        )
    }
}
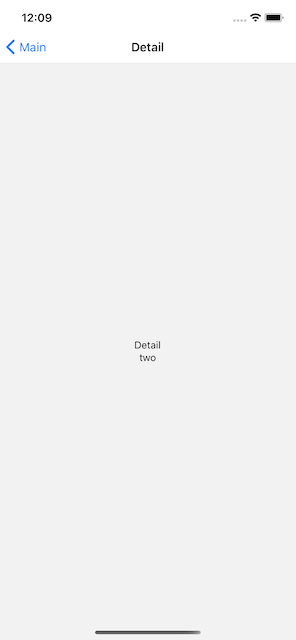
Detail画面
コンストラクタでMain画面で送ったfromMainの情報を受け取り、stateに保存します。
5系では、props.route.paramsでアクセスします。props.navigation.state.paramsではないことに注意です。
受け取ったfromMain画面を表示しています。
import React, {Component} from 'react';
import {Text, View} from 'react-native';

export default class DetailScreen extends Component{
    constructor(props){
        super(props)

        let {fromMain} = props.route.params
        this.state = {
            fromMain,
        }
    }
    render(){
        return(
            <View style={{flex: 1, alignItems: 'center', justifyContent: 'center'}}>
                <Text>Detail</Text>
                <Text>{this.state.fromMain}</Text>
            </View>
        )
    }
}
結果