Template Syntax
この章では、AngularのTemplate Syntaxについて話します。
コードとデモ環境は、Template Syntax Live Code / download example を確認ください。
HTML in templates
全てのHTMLのsyntaxはtemplate syntaxの中で有効です。ただし、<script>タグに関しては、セキュリティ上の理由から使用を禁止しています。詳しくは、Securityを確認ください。
次のセクションからAngularのデータバインディングを通してどのようにDOMの値を取得し、挿入するか見ていきます。
Interpolation (インターポレーション)
<h3>
  {{title}}
  <img src="{{heroImageUrl}}" style="height:30px">
</h3>
クラスのプロパティを出力するのに、{{ }} を使用することができます。上記の例だと、Angularは、titleとheroImageUrlを解釈し、stringへとconvertします。
また、componentクラスに定義されているメソッドも呼び出すことができます。
<!-- "The sum of 1 + 1 is not 4" -->
<p>The sum of 1 + 1 is not {{1 + 1 + getVal()}}</p>
Angularは、{{}}で囲われた全ての値を解釈して、最終的には element または、directiveのプロパティに紐付けします。interpolation(インターポレーション)は、特殊なsyntaxで、property bindingへと変換しています。
Template expressions
Template内で式を書くことによって値を出力することができます。 interporalation(インターポレーション)では、{{ 1 + 1 }}のようにかけます。 JavaScriptで使用できる式はほどんどカバーしていますが、以下のものについては使用ができません。
- assignments (
=,+=,-=, ...) new- chaining expressions with
;or, - increment and decrement operators (
++and--)
Expression context
expression contextとは、一般的にcomponentのインスタンスを指します。次の例では、{{title}}とisUnchanged は、AppComponent のプロパティを意味します。
{{title}}
<span [hidden]="isUnchanged">changed</span>
template input variable(let hero)や、template reference variable(#heroInput)もexpressionのうちに含まれます。
<div *ngFor="let hero of heroes">{{hero.name}}</div>
<input #heroInput> {{heroInput.value}}
componentが、heroプロパティを持っていて、*ngForでもhero変数をテンプレート内で定義している場合は名前衝突がおきますが、この場合のheroは、*ngForが定義したテンプレート変数であることに注意してください。
また、template expressionはグローバルなnamespaceを参照することはできません。windowや、document、console.logなどをtemplate内では使うことはできません。
Expression guidelines
template expressionでは次のガイドラインに従ってください。
No visible side effects
template expressionはターゲットのプロパティ以外のアプリケーションの状態を変更してはいけません。
このルールは、Angularのunidirectional data flow(単一方向のフローのポリシーに従っています。
Quick execution
Angularは、change detection cycleが走った後にtemplate expressionを実行します。expressionはすぐにデータが変更したらすぐに実行される必要があります。
Simplicity
複雑なtemplate expressionを書くことはできますが、これは避けるべきです。
複雑なビジネスロジックなどはcomponentに書いて、template内に書くべきではありません。
Idempotence
idempotence(冪等性)とは、ある操作を1回行っても複数回行っても結果が同じことです。
idempotenceの考え方は理想的であり、Angularのchange detectionのパフォーマンスを向上させます。
Template statements
template statementはcomponentやdirectiveから検知されたイベントに反応します。 event bindingで、template statementsについて見ることができます。(click)="deleteHero()がtemplate statementの部分です。
<button (click)="deleteHero()">Delete hero</button>
template statementにはside effectがあります。イベントに反応することは、Angularのunidirectional data flow(単一方向のフローのポリシーに反しています。イベントループ中に、いつでも、どこでも変更がされてしまうのです。
template expressionのように、template statementはJavaScriptのstatementを使用することができます。
ただ、以下のものたちは使用をすることができません。
new- increment and decrement operators,
++and-- - operator assignment, such as
+=and-= - the bitwise operators
|and& - the template expression operators
Statement context
statement contextは基本的にcomponentのインスタンスを表します。 `(click)="deleteHero()"の delete Heroがcomponentのメソッドになります。
<button (click)="deleteHero()">Delete hero</button>
statement contextはtemplateのcontextを参照することもできます。例えば、$eventオブジェクトや、let heroなどはevent handlingのメソッドの引数として渡すことができます。
<button (click)="onSave($event)">Save</button>
<button *ngFor="let hero of heroes" (click)="deleteHero(hero)">{{hero.name}}</button>
<form #heroForm (ngSubmit)="onSubmit(heroForm)"> ... </form>
template contextの名前は、component contextの名前より優先されます。上のコードのdeleteHero(hero)のheroは、templateのinput変数であり、componentのheroプロパティを指すわけではありません。
Statement guidelines
expressions同様に、複雑なtemplate contextを書くのは避けましょう。シンプルなメソッドを呼び出すか、変数プロパティを使うのが一般的です。
Binding syntax: An overview
以下は、Angularが提供しているData bindingのsyntaxです。

Binding targets
data bindingのターゲットはDOM上のelement、componentやdirectiveなどが該当します。以下がそのサマリーです。
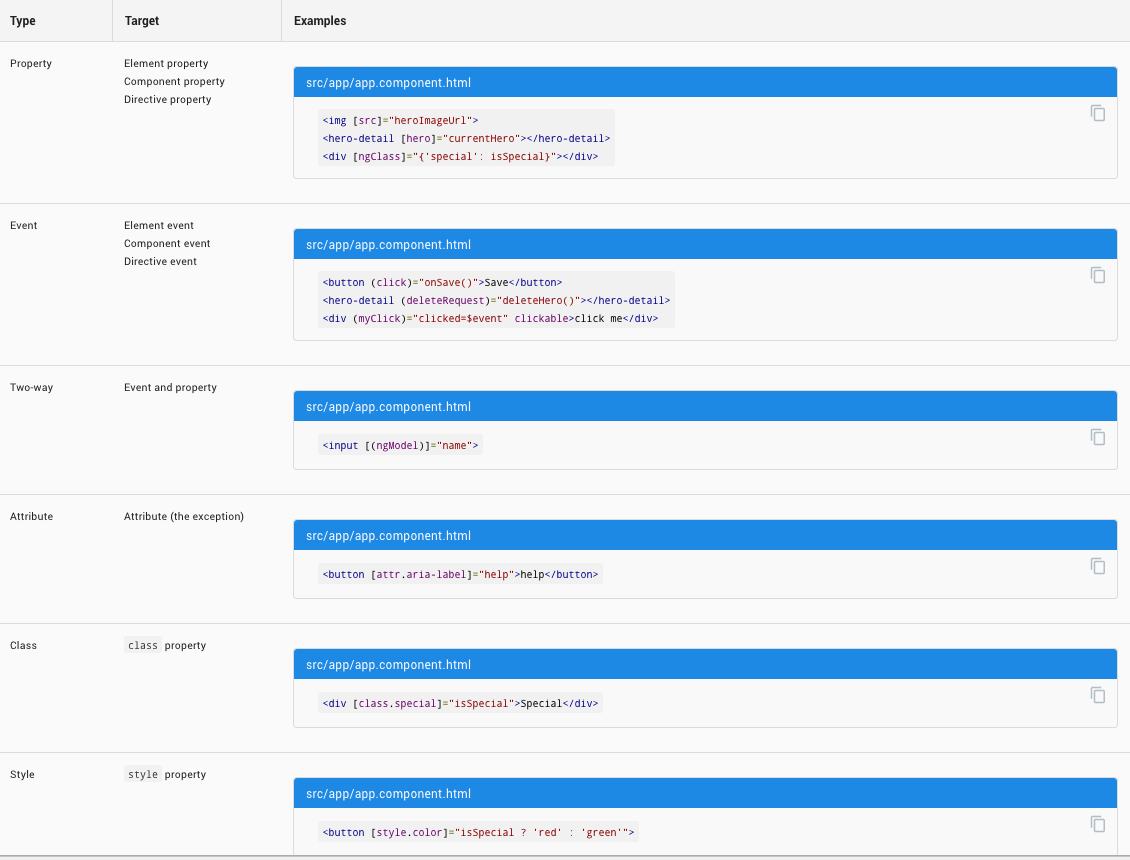
Property binding ( [property] )
property bindingはcomponentのプロパティの値をtemplate expressionのプロパティへセットすることができます。次の例は、srcプロパティとcomponentのheroImageUrlプロパティをbindingしています。
<img [src]="heroImageUrl">
以下は、isUnchangedによって、ボタンにdisabledをかけます。
<button [disabled]="isUnchanged">Cancel is disabled</button>
ディレクティブへのプロパティへ値をセットする例。
<div [ngClass]="classes">[ngClass] binding to the classes property</div>
次は、custom componentに対して、モデルのプロパティをセットしています。(これは、親componentから子componentへ渡す仕組みです。)
<hero-detail [hero]="currentHero"></hero-detail>
One-way in
property bindingは単一方向でデータのフローが流れることから one-way data bindingだと言われています。
ですので、bindしているelement側からcomponentのプロパティへ値を変更することはありません。componentからelementへsetだけ、することができるのです。
Binding target
つぎの例は、srcプロパティをtargetにしてbindingしています。
<img [src]="heroImageUrl">
別の方法で、bind-をprefixにつけることができます。
<img bind-src="heroImageUrl">
element property以外にAngularはdirectiveのプロパティを検知します。
<div [ngClass]="classes">[ngClass] binding to the classes property</div>
もし、directiveのプロパティ名とマッチしなかった場合は、unknown directiveエラーをAngularは出します。
Remember the brackets
[]があることによって、Angularはそれが、template expressionとして解釈します。もし、[]をつかわないと、Angularはそれをstringとして解釈します。
<!-- ERROR: HeroDetailComponent.hero expects a
     Hero object, not the string "currentHero" -->
  <hero-detail hero="currentHero"></hero-detail>
One-time string initialization
次の場合は、[]を使わない方法をおすすめします。
- targetのpropertyがstringとして値を受け取る
- 固定値としてtemplateに使う
- 変化がない初期値として使用
<hero-detail prefix="You are my" [hero]="currentHero"></hero-detail>
Property binding or interpolation?
property bindingとinterpolationは同じ挙動をします。
<p><img src="{{heroImageUrl}}"> is the <i>interpolated</i> image.</p>
<p><img [src]="heroImageUrl"> is the <i>property bound</i> image.</p>

<p><span>"{{title}}" is the <i>interpolated</i> title.</span></p>
<p>"<span [innerHTML]="title"></span>" is the <i>property bound</i> title.</p>
interpolationは、property bindingをする方法のうちのひとつです。
データをレンダリングするという意味では、この両者に違いはありません。可読性やチームのルールに基づいて、コーディングスタイルを決めてください。
ただ、element propertyに対して、non-stringな値を入れるときは、property bindingを使用してください。
Attribute, class, and style bindings
Attribute binding
attribute bindingを使って、直接attributeにデータをセットできます。
このガイドでは、element propertyに値をセットするのは、property bindingをすることを進めてきました。では、attribute bindingとはなんでしょうか。
bindするelement propertyがない場合は、attribute bindingを使用してください。
もし、以下のようにcolspanに対して値を入れようとすると、
<tr><td colspan="{{1 + 1}}">Three-Four</td></tr>
Angularはエラーを出します。
Template parse errors:
Can't bind to 'colspan' since it isn't a known native property
interpolationはプロパティに値をセットはできますが、attributesに対して値をセットできるわけではありません。
もし、attributesに値をセットしたい場合は、attributes bindingを使用する必要があります。
attributes bindingをするときは、attr.というprefixをつかって、そのあとに、attributes名を記入します。
[attr.colspan]に値をいれます。
<table border=1>
  <!--  expression calculates colspan=2 -->
  <tr><td [attr.colspan]="1 + 1">One-Two</td></tr>

  <!-- ERROR: There is no `colspan` property to set!
    <tr><td colspan="{{1 + 1}}">Three-Four</td></tr>
  -->

  <tr><td>Five</td><td>Six</td></tr>
</table>
Class binding
class bindingを使うことによって、classを入れたり、削除することができます。
class bindingのsyntaxはclass.に続いて、class名を書きます。[class.class-name]
<!-- standard class attribute setting  -->
<div class="bad curly special">Bad curly special</div>
つぎのような形でも書くことができます。
<!-- reset/override all class names with a binding  -->
<div class="bad curly special"
     [class]="badCurly">Bad curly</div>
class名をtrue or falseによって出し分けて書くこともできます。
<!-- toggle the "special" class on/off with a property -->
<div [class.special]="isSpecial">The class binding is special</div>

<!-- binding to `class.special` trumps the class attribute -->
<div class="special"
     [class.special]="!isSpecial">This one is not so special</div>
ただ、このようなtoggleでclassを出し分けたかったら、NgClass directiveを使用することをおすすめします。
Style binding
style bindingも同様に、[style.]に続いて、[style.style-property]と書くことができます。
<button [style.color]="isSpecial ? 'red': 'green'">Red</button>
<button [style.background-color]="canSave ? 'cyan': 'grey'" >Save</button>
unitをつけたいときは、次のように書くことができます。
<button [style.font-size.em]="isSpecial ? 3 : 1" >Big</button>
<button [style.font-size.%]="!isSpecial ? 150 : 50" >Small</button>
styleをつける方法は、これでも問題はありませんが、一般的にはNgStyle directiveを使用することをおすすめします。
style propertyをつける際は、dash-care、もしくは、
fontSizeのようにcamelCaseでかけます。
Event binding ( (event) )
ユーザーからアクションがあったときに、データをelementからcomponentへ送る方法は、event bindingを使用することができます。
<button (click)="onSave()">Save</button>
Target event
次の例は、ボタンにclickイベントを紐付けています。
<button (click)="onSave()">Save</button>
on-をつけて、書くこともできます。
<button on-click="onSave()">On Save</button>
customのイベントととして使用することもできます。
<!-- `myClick` is an event on the custom `ClickDirective` -->
<div (myClick)="clickMessage=$event" clickable>click with myClick</div>
myClickディレクティブはaliasing input/output propertiesで詳しく説明されています。
$event and event handling statements
Angularはevent handlerをtargetのイベントに対してセットすることができます。
もし、eventがnativeのDOM element eventである場合は、$eventオブジェクトを渡すことができます。
<input [value]="currentHero.name"
       (input)="currentHero.name=$event.target.value" >
Custom events with EventEmitter
EventEmitterを使用することによって、customのeventを作ることができます。
template: `
<div>
  <img src="{{heroImageUrl}}">
  <span [style.text-decoration]="lineThrough">
    {{prefix}} {{hero?.name}}
  </span>
  <button (click)="delete()">Delete</button>
</div>`
// This component make a request but it can't actually delete a hero.
deleteRequest = new EventEmitter<Hero>();

delete() {
  this.deleteRequest.emit(this.hero);
}
ユーザーがdeleteをクリックしたときに、delete()が実行され、this.deleteRequest.emit(this.hero);で、Heroクラスにイベントをemitします。
<hero-detail (deleteRequest)="deleteHero($event)" [hero]="currentHero"></hero-detail>
受け取り側は、deleteRequestをlistenして、イベントを検知したタイミングで、deleteHero($event)を実行します。
Two-way binding ( [(...)] )
ユーザーが変更を加えたときに、データを更新して、viewに表示させたいケースはよくあります。
Angularは、これをtwo-way data bindingという仕組みで解決することができます。two-way data bindingのsyntaxは、[(x)]になります。
import { Component, EventEmitter, Input, Output } from '@angular/core';

@Component({
  selector: 'my-sizer',
  template: `
  <div>
    <button (click)="dec()" title="smaller">-</button>
    <button (click)="inc()" title="bigger">+</button>
    <label [style.font-size.px]="size">FontSize: {{size}}px</label>
  </div>`
})
export class SizerComponent {
  @Input()  size: number | string;
  @Output() sizeChange = new EventEmitter<number>();

  dec() { this.resize(-1); }
  inc() { this.resize(+1); }

  resize(delta: number) {
    this.size = Math.min(40, Math.max(8, +this.size + delta));
    this.sizeChange.emit(this.size);
  }
}
sizeの初期値は、property bindingのinput値になります。ボタンをクリックすることによって、sizeを増加したり、減少させます。sizeに変更があったタイミングで、sizeChangeが、変更をemitします。
sizeChangeのemitを受け取る側は、[(size)]と書くとtwo-way bindingができます。
<my-sizer [(size)]="fontSizePx"></my-sizer>
<div [style.font-size.px]="fontSizePx">Resizable Text</div>
$eventを使用すると、sizeChangeイベントで渡ってきた値を取得することができます。
<my-sizer [size]="fontSizePx" (sizeChange)="fontSizePx=$event"></my-sizer>
このようにAngularでは、簡単にtwo-way bindingを実装することができます。<input>や<select>要素で使用すると、とても便利ですが、その場合はAngularもNgModelを使用することをおすすめします。
Built-in directives
Angularはたくさんのbuilt-in directivesを持っています。それらは、複雑なタスクをこなすのにとても便利な存在になります。
それらのdirectivesたちは、attribute directives と、structural directivesに分けることができます。
Built-in attribute directives
attribute directivesはHTML要素の属性や、プロパティを変更します。詳細は、Attribute Directivesを確認ください。以下は、代表的なattribute directivesです。
-
NgClass- cssのクラスを追加したり、削除します -
NgStyle- HTMLのスタイルを追加したり、削除します -
NgModel- form要素のデータをtwo-way bindingするのに使用します
NgClass
NgClassは、true/falseによってclassを追加したり、削除することができます。
currentClasses: {};
setCurrentClasses() {
  // CSS classes: added/removed per current state of component properties
  this.currentClasses =  {
    'saveable': this.canSave,
    'modified': !this.isUnchanged,
    'special':  this.isSpecial
  };
}
以下は、currentClassesをngClassにbindingさせて、classを出し分けしています。
<div [ngClass]="currentClasses">This div is initially saveable, unchanged, and special</div>
NgStyle
componentにcurrentStylesというプロパティを用意して、なかでセットしたいスタイルをkeyにしてオブジェクトをつくります。スタイルは、valueのtrue/falseによって出し分けされます。
currentStyles: {};
setCurrentStyles() {
  // CSS styles: set per current state of component properties
  this.currentStyles = {
    'font-style':  this.canSave      ? 'italic' : 'normal',
    'font-weight': !this.isUnchanged ? 'bold'   : 'normal',
    'font-size':   this.isSpecial    ? '24px'   : '12px'
  };
}
<div [ngStyle]="currentStyles">
  This div is initially italic, normal weight, and extra large (24px).
</div>
NgModel - Two-way binding to form elements with
NgModelを使うと、簡単にtwo-way data bindingを仕組みをつくることができます。
<input [(ngModel)]="currentHero.name">
ngModelを使う際には、必ずFormsModuleをimportしてください。Formの詳細は、Formsを確認ください。
import { NgModule } from '@angular/core';
import { BrowserModule }  from '@angular/platform-browser';
import { FormsModule } from '@angular/forms'; // <--- JavaScript import from Angular

/* Other imports */

@NgModule({
  imports: [
    BrowserModule,
    FormsModule  // <--- import into the NgModule
  ],
  /* Other module metadata */
})
export class AppModule { }
ngModelを使わなくて、<input>とvalueをつかって同じ仕組みをつくることができます。
<input [value]="currentHero.name"
       (input)="currentHero.name=$event.target.value" >
ただ、これは見た感じあまり効率良くありません。ngModeldirectiveは、このinputとoutputの面倒な処理を内部で実装しているので、私たちがinputとvalueを書かなくてもtwo-way bindingを実現することができます。
<input
  [ngModel]="currentHero.name"
  (ngModelChange)="currentHero.name=$event">
もし、入力されたデータをuppercaseに変えたいなら次のように書き換えることができます。
<input
  [ngModel]="currentHero.name"
  (ngModelChange)="setUppercaseName($event)">

Built-in structural directives
structural directiveはHTMLのlayoutを変更するときに使われます。structural directiveの詳細は、Structural Directivesを確認ください。
このセクションでは代表的なstructural directivesを紹介します。
- NgIf - 条件に基づいてDOMを追加したり、削除します
- NgFor - リストのアイテムを繰り返し出力します
- NgSwitch - 与えられた条件のもと、別のviewを出力します
NgIf
NgIfを使って、DOMの要素を追加したり、削除することができます。
<hero-detail *ngIf="isActive"></hero-detail>
(*)をngIfの前につけることを忘れないでください。
isActiveがtrueのときは、HeroDetailComponentをDOM上に追加します。もし、falseのときは、HeroDetailComponentとそれに紐づく、サブクラスをDOM上から削除します。
スタイルをあてることによって、同じような動きを実現することができます。
<!-- isSpecial is true -->
<div [class.hidden]="!isSpecial">Show with class</div>
<div [class.hidden]="isSpecial">Hide with class</div>

<!-- HeroDetail is in the DOM but hidden -->
<hero-detail [class.hidden]="isSpecial"></hero-detail>

<div [style.display]="isSpecial ? 'block' : 'none'">Show with style</div>
<div [style.display]="isSpecial ? 'none'  : 'block'">Hide with style</div>
しかし、要素をhideさせているだけだとDOM常には存在しているので、なにか変更があったときにAngularは引き続き検知して処理を実行してしまいます。これは、パフォーマンス的にあまりよくはありません。
show/hideする場合は、ピンポイントで要素に適用するのに向いているので、component全体に使用する場合はNgIfを使用することをおすすめします。
NgFor
NgForは要素をリピートして出力することができます。
<div *ngFor="let hero of heroes">{{hero.name}}</div>
componentをリピートすることもできます。
<hero-detail *ngFor="let hero of heroes" [hero]="hero"></hero-detail>
heroの前にあるletキーワードは、template変数をつくるために使われます。componentのheros配列を受け取り、それをloopし、heroをtemplateの変数として使用します。
<div *ngFor="let hero of heroes">{{hero.name}}</div>
<hero-detail *ngFor="let hero of heroes" [hero]="hero"></hero-detail>
*ngFor with index
indexプロパティは、配列の0から始まるiterationを返してくれます。
<div *ngFor="let hero of heroes; let i=index">{{i + 1}} - {{hero.name}}</div>
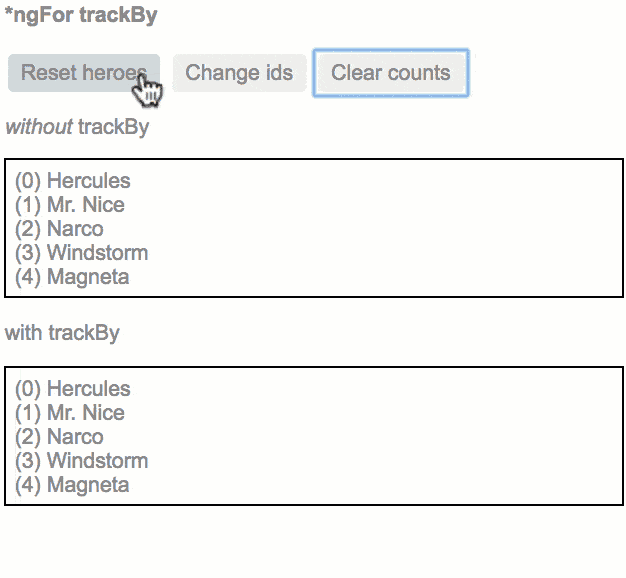
*ngFor with trackBy
NgForは出力する内容によってパフォーマンスに影響をうけることがあります。
もしサーバーから毎回データを取得し、新しいオブジェクトを受け取っていた場合、Angularは新しい参照を受け取ったと検知して、同じ内容のオブジェクトであったとしてもあらたにDOMを生成してしまいます。
これを避けるためにtrackByを使用することができます。trackByでユニークなidを指定することで、Angularに同じオブジェクトであることを教えることができます。
trackByHeroes(index: number, hero: Hero): number { return hero.id; }
<div *ngFor="let hero of heroes; trackBy: trackByHeroes">
  ({{hero.id}}) {{hero.name}}
</div>
次の例は、trackByを使用した時、使用していない時の例です。
-
trackByなしだと、常にDOMの変換がされます。 -
trackByありだと、idが変わった時だけDOMの変換がされます。
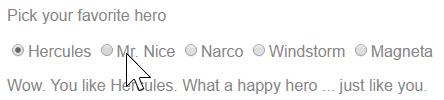
The NgSwitch directives
NgSwitchは、JavaScriptのswitch statementに似ています。与えられた条件のもと、viewを出し分けします。
<div [ngSwitch]="currentHero.emotion">
  <happy-hero    *ngSwitchCase="'happy'"    [hero]="currentHero"></happy-hero>
  <sad-hero      *ngSwitchCase="'sad'"      [hero]="currentHero"></sad-hero>
  <confused-hero *ngSwitchCase="'confused'" [hero]="currentHero"></confused-hero>
  <unknown-hero  *ngSwitchDefault           [hero]="currentHero"></unknown-hero>
</div>
Template reference variables ( #var )
template referenceは、template内のDOM要素を参照するために使用されます。また、componentやdirectiveにも同様に使用されます。
#を使って、参照変数を定義できます。#phoneは、<input>上にphone変数を定義しています。
<input #phone placeholder="phone number">
template内だったら定義した変数をどこでも参照可能です。<input>のphoneは、<button>上で使うこともできます。
<input #phone placeholder="phone number">

<!-- lots of other elements -->

<!-- phone refers to the input element; pass its `value` to an event handler -->
<button (click)="callPhone(phone.value)">Call</button>
How a reference variable gets its value
ほとんどのケースで、参照変数は要素に対してセットしますが、directiveをセットして振る舞いや値を変えたりすることができます。それが、NgFormを使ってできます。
次の例は、基本的なFormsの使い方です。
<form (ngSubmit)="onSubmit(heroForm)" #heroForm="ngForm">
  <div class="form-group">
    <label for="name">Name
      <input class="form-control" name="name" required [(ngModel)]="hero.name">
    </label>
  </div>
  <button type="submit" [disabled]="!heroForm.form.valid">Submit</button>
</form>
<div [hidden]="!heroForm.form.valid">
  {{submitMessage}}
</div>
template内で、heroForm変数が使われていますが、この中には一体なにが入っているのでしょうか。
heroFormは、AngularのdireciveであるNgFormを受け取っています。NgFormは、fromの値をコントロールするために使用されます。
native elementである<form>は、formプロパティをもっていませんが、NgFormは持っています。heroForm.form.validのように、formの妥当性をチェックすることができます。
Template reference variable warning notes
参照変数である#phoneは、template変数であるlet phoneとは異なるので注意してください。この違いの説明は、Structural Directivesをご確認ください。
#の別の書き方として、ref-を使用することができます。
<input ref-fax placeholder="fax number">
<button (click)="callFax(fax.value)">Fax</button>
Input and output properties ( @Input and @Output )
今まで、template expressionとtemplate statementを用いてcomponentのプロパティをbindingする方法を見てきました。
この章では、bindingのtarget(binding文の左側)の説明を詳しくしたいと思います。
binding targetとbinding sourceの違いは、binding targetが式(=)の左側で、binding sourceが式の右側になります。
次のsnippetは、iconUrlとonSaveがAppComponentのメンバーで、イコール(=)の右側に記述されています。
<img [src]="iconUrl"/>
<button (click)="onSave()">Save</button>
これらは、componentのinputsとoutputsではなく、binding sourcesになります。targetは、左側の<img>と<button>要素になります。
次の例を見てみましょう。
<hero-detail [hero]="currentHero" (deleteRequest)="deleteHero($event)">
</hero-detail>
HeroDetailComponent.heroとHeroDetailComponent.deleteRequestが、イコール(=)の左側にいるのがわかります。
HeroDetailComponent.heroが[]の中に書いてあるので、property bindingのtargetになり、HeroDetailComponent.deleteRequestが()の中に書いてあるので、event bindingのtargetになります。
Declaring input and output properties
このtargetプロパティは、inputsとoutputsで定義されなければなりません。
HeroDetailComponentでは、次のように書きます。
@Input()  hero: Hero;
@Output() deleteRequest = new EventEmitter<Hero>();
他の方法で、
inputsとoutputsをdirectiveのメタデータの中に書くこともできます。
@Component({
  inputs: ['hero'],
  outputs: ['deleteRequest'],
})
Input or output?
Inputはたいていデータを受け取り、Outputはイベントをemitするのに使われます。 EventEmitterが主に使用します。

Aliasing input/output properties
InputとOutputデコレータで使用するプロパティ名はaliasを使用することができます。
もしcomponent内でclicksというイベント名で使用するけど、templateでmyClickという名前で使いたい場合は、以下のように書くことができます。
@Output('myClick') clicks = new EventEmitter<string>(); // @Output(alias) propertyName = ...
directiveのメタデータの中で
:を使って書くこともできます。
@Directive({
  outputs: ['clicks:myClick']  // propertyName:alias
})
Template expression operators
template expressionはネイティブのJavaScriptのsyntaxを使用することができますが、Angularではいくつかのsyntaxは
特別な意味を持ちます。
The pipe operator ( | )
|は、Angular pipesです。pipe operatorと呼ばれ、値を整形して出力するために使います。
<div>Title through uppercase pipe: {{title | uppercase}}</div>
また、複数のpipeを使うこともできます。
<!-- Pipe chaining: convert title to uppercase, then to lowercase -->
<div>
  Title through a pipe chain:
  {{title | uppercase | lowercase}}
</div>
<!-- pipe with configuration argument => "February 25, 1970" -->
<div>Birthdate: {{currentHero?.birthdate | date:'longDate'}}</div>
<div>{{currentHero | json}}</div>
The safe navigation operator ( ?. ) and null property paths
Angularのsafe navigation operator(?.)は、nullやundefinedを制御するのにとても便利なoperatorです。
以下では、currentHeroがnullのときにエラーを防いでくれます。
The current hero's name is {{currentHero?.name}}
通常は、nullの状態でプロパティを読み込もうとすると、JavaScriptはreference errorを起こします。
TypeError: Cannot read property 'name' of null in [null].
オブジェクトのプロパティがnullのときは、エラーをthrowするのが理想的ですが、APIからデータが入ってくるまで
nullの状態が続くというケースもあります。データがくるまでは、blankで表示して、エラーを出さないで、データを受け取ってからviewを表示する。
このアプローチは、ngIfを使って実現できます。
<!--No hero, div not displayed, no error -->
<div *ngIf="nullHero">The null hero's name is {{nullHero.name}}</div>
The null hero's name is {{nullHero && nullHero.name}}
このやり方は、正しいやり方ですが、あまり効率よくありません。?.を使えば、もっと簡単に実装することができます。
<!-- No hero, no problem! -->
The null hero's name is {{nullHero?.name}}
The non-null assertion operator ( ! )
Typescript 2.0では、--strictNullChecksフラグをつかうことでnullのチェックをすることができます。このmodeでは、もし変数がnullやundefinedで検知されると、typescriptがエラーを投げるようになっています。また、nullになる可能性がある変数(型が定義されず)に対してもtypescriptはエラーを出します。
必要なタイミングで、このエラーを回避したい場合は、non-null assertion operator (!)を使用することができます。
<!--No hero, no text -->
<div *ngIf="hero">
  The hero's name is {{hero!.name}}
</div>
safe navigation operatorと違って、non-null assertion operatorはnullを回避するのでなく、Typescriptに特定のプロパティがnullのチェックをしなくてもいいよと教えるだけになります。