はじめに
現実逃避のために、自分の遊びの環境をsakura vpsに作ることにしたがsakuraでは環境が保存できないらしいので、代案手段として、Dockerでやってみようと思い立ちました。
やりたいこと
Docker上に、Nginxのサーバーを立ててSSL化する。
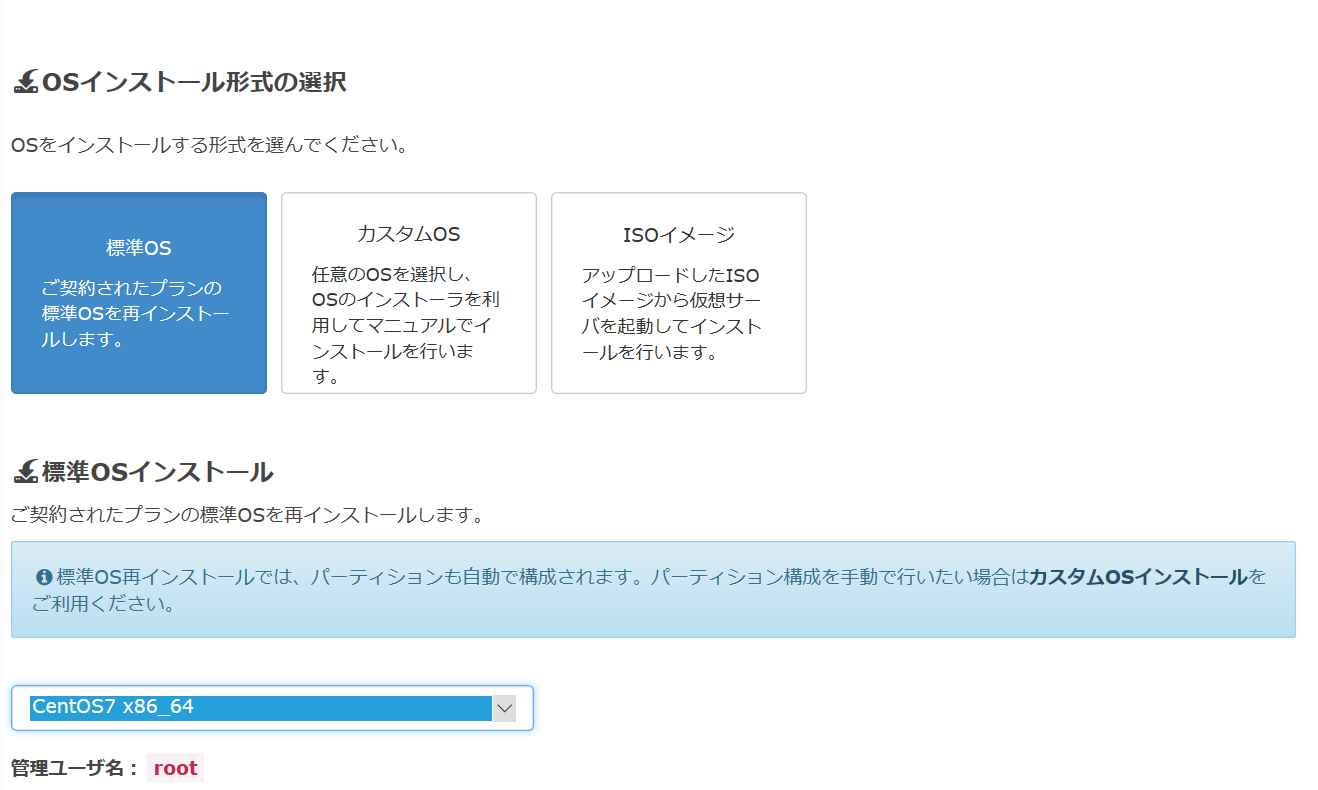
いつもの更地化。
- OSを再インストールして、更地にします。(CentOS7)
Dockerのインストール
個人利用なので、無償版のDocker-ceを入れます。
- コンソールからログイン用のユーザを作って。
- 忘れちゃいけない。yumを更新。
$sudo yum update
- 必要なパッケージをインストールします。
$sudo yum install -y yum-utils device-mapper-persistent-data lvm2
- Docker CEをインストールするため、yumのリポジトリを追加します。
$sudo yum-config-manager --add-repo https://download.docker.com/linux/centos/docker-ce.repo
- Dockerインストール
最新バージョン入れます。
$sudo yum install docker-ce
インストール完了。
Dockerを起動します。
$ sudo systemctl start docker
Nginxを入れて起動してみる。
Nginxイメージを使ってコンテナを起動します、外部からはポート:8080でアクセスするようにして起動。
$ sudo docker container run -itd --name nginx-container -p 8080:80 nginx
ブラウザからURLを指定して、起動を確認。
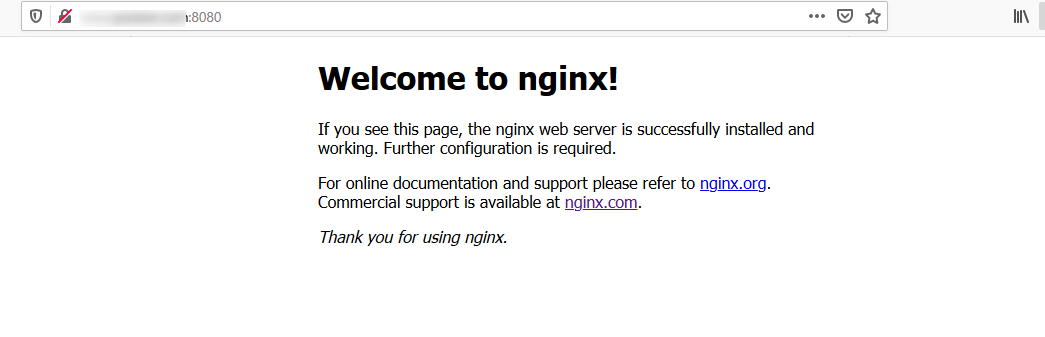
Dockerから状態をみるとNginxが起動してることが確認が取れました。
$ sudo docker ps -a
CONTAINER ID        IMAGE               COMMAND                  CREATED             STATUS              PORTS                  NAMES
7a5f699f72db        nginx               "nginx -g 'daemon of…"   6 hours ago         Up 6 hours          0.0.0.0:8080->80/tcp   nginx-container
DockerのNginxを停止する。
$ docker stop  7a5f699f72db
7a5f699f72db
$ docker ps -a
CONTAINER ID        IMAGE               COMMAND                  CREATED             STATUS                     PORTS               NAMES
7a5f699f72db        nginx               "nginx -g 'daemon of…"   6 hours ago         Exited (0) 2 seconds ago                       nginx-container
STATUSがExitedで停止してます。ブラウザから見ても停止していました。
ここでは、[CONTAINER ID]を指定しましたが、[NAMES]を指定してしても停止できます。
Dockerからnginxのコンテナを削除する。
$ docker rm 7a5f699f72db
7a5f699f72db
$ docker ps -a
CONTAINER ID        IMAGE               COMMAND             CREATED             STATUS              PORTS               NAMES
停止と同様に、ここでは[CONTAINER ID]を指定しましたが、[NAMES]を指定してしても削除できます。
DockerからNginxのイメージを削除する。
現在のイメージを確認します。
$ docker images
REPOSITORY          TAG                 IMAGE ID            CREATED             SIZE
nginx               latest              231d40e811cd        3 days ago          126MB
Nginxのイメージが存在しているので、削除します。
$ docker rmi 231d40e811cd
Untagged: nginx:latest
Untagged: nginx@sha256:50cf965a6e08ec5784009d0fccb380fc479826b6e0e65684d9879170a9df8566
Deleted: sha256:231d40e811cd970168fb0c4770f2161aa30b9ba6fe8e68527504df69643aa145
Deleted: sha256:dc8adf8fa0fc82a56c32efac9d0da5f84153888317c88ab55123d9e71777bc62
Deleted: sha256:77fcff986d3b13762e4777046b9210a109fda20cb261bd3bbe5d7161d4e73c8e
Deleted: sha256:831c5620387fb9efec59fc82a42b948546c6be601e3ab34a87108ecf852aa15f

$ docker images
REPOSITORY          TAG                 IMAGE ID            CREATED             SIZE
イメージが削除されました。
ここでは[IMAGE ID]を指定しましたが、[REPOSITORY]を指定してしても削除できます。
綺麗になりました。めっちゃ便利です。
なんで今まで使ってなかったのか悔やまれます。
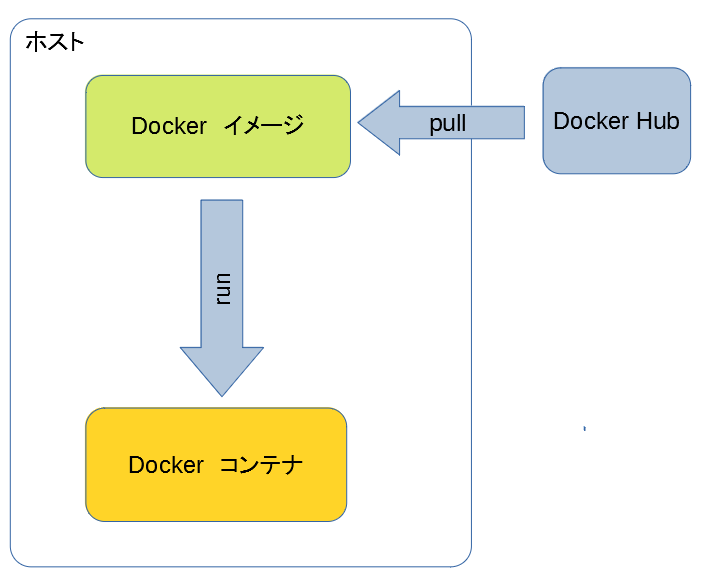
Dockerの構造
Dockerの構造として、イメージとコンテナという概念があり、イメージが概念で、コンテナが実態のようです。
クラスとインスタンスの関係と同様のようです。
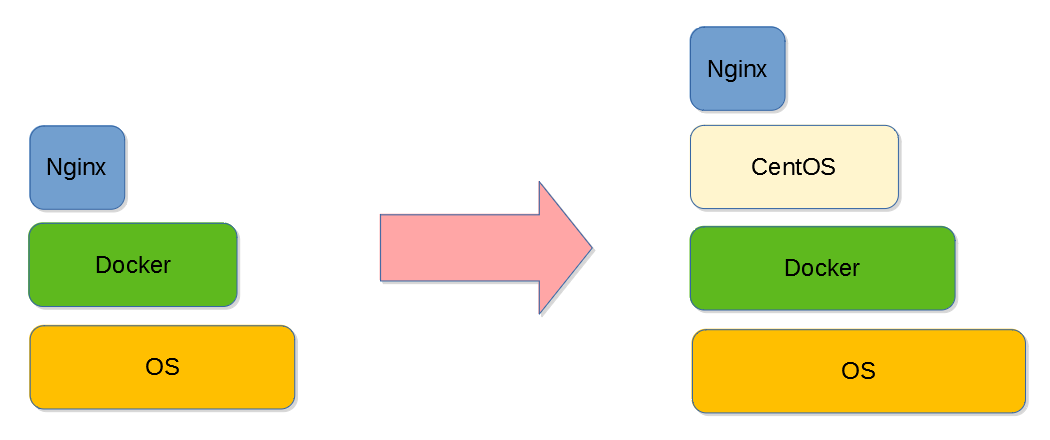
NginxをHTTPS化したなと思って、Docker Hubを見てたら、Certbotはあったのですが、連携の仕方がわからず、なんかいい方法が無いものかと思って調べていたら、Docker HubにCentOSのイメージもあることに気が付きました。つまり、今までDockerの上にNginxやなんやらかんやらの載せて管理するのかなと思っていましたが、Dockerの上にOS載せて、その上でNginxを載せられる?もしそうならもっと楽に構築できるじゃないかと思い立ちました。
CentOSを起動する
イメージを取得する。
$ sudo docker pull centos:centos7
centos7: Pulling from library/centos
ab5ef0e58194: Pull complete
Digest: sha256:4a701376d03f6b39b8c2a8f4a8e499441b0d567f9ab9d58e4991de4472fb813c
Status: Downloaded newer image for centos:centos7
docker.io/library/centos:centos7
$sudo docker images
REPOSITORY          TAG                 IMAGE ID            CREATED             SIZE
centos              centos7             5e35e350aded        2 weeks ago         203MB
イメージを起動して、ログインする。(exitするとDockerのCentOSから脱出できます。)
$ sudo docker run -it -d --name centos7 5e35e350aded
docker ps -a
CONTAINER ID        IMAGE               COMMAND                  CREATED             STATUS              PORTS                  NAMES
9927906158a2        centos              "/bin/bash"              10 seconds ago      Up 9 seconds                               centos7
$ sudo docker exec -it centos7 /bin/bash
[root@9927906158a2 /]# ls
bin  etc   lib    lost+found  mnt  proc  run   srv  tmp  var
dev  home  lib64  media       opt  root  sbin  sys  usr
コンテナのCentOSにNginxをインストールする
Docker上のCentOS上のyumを更新します。
Nginxをインストールします。NginxのInstallation instructionsにしたがってインストールします。
$ yum update
$ yum install yum-utils
/etc/yum.repos.d/nginx.repoファイルを作成します。
$ vi /etc/yum.repos.d/nginx.repo
記載内容
[nginx-stable]
name=nginx stable repo
baseurl=http://nginx.org/packages/centos/$releasever/$basearch/
gpgcheck=1
enabled=1
gpgkey=https://nginx.org/keys/nginx_signing.key
module_hotfixes=true

[nginx-mainline]
name=nginx mainline repo
baseurl=http://nginx.org/packages/mainline/centos/$releasever/$basearch/
gpgcheck=1
enabled=0
gpgkey=https://nginx.org/keys/nginx_signing.key
module_hotfixes=true
Nginxのインストールし、起動しようとした処で、D-Busの権限エラーが発生しました。
$ yum-config-manager --enable nginx-mainline
$ yum install nginx
$ systemctl start nginx
Failed to get D-Bus connection: Operation not permitted
調べて見ると、 docker runする際に、--privilegedのオプションと、公開するにあたってポートの公開が必要なようです。
そこで、今のイメージを保存して、上記の2つのオプションをつけて起動し直すことにしました。
手順としては、今のコンテナを停止させてから、イメージを作成します。
$ sudo docker ps -a
CONTAINER ID        IMAGE               COMMAND             CREATED             STATUS              PORTS               NAMES
4073d82ac893        5e35e350aded        "/bin/bash"         9 minutes ago       Up 9 minutes                            centos7
$ sudo docker stop 4073d82ac893
$ sudo docker ps -a
CONTAINER ID        IMAGE               COMMAND             CREATED             STATUS                        PORTS               NAMES
4073d82ac893        5e35e350aded        "/bin/bash"         13 minutes ago      Exited (137) 12 seconds ago                       centos7
イメージのステータスがExitedになり、止まった状態になったので、イメージを作成します。
docker commit NAMES(または、CONTAINER ID) 作成イメージ名
$ sudo docker commit 4073d82ac893 centos7n
$ sudo docker images
REPOSITORY          TAG                 IMAGE ID            CREATED             SIZE
centos7n            latest              0c30b8b87f37        19 seconds ago      347MB
centos              centos7             5e35e350aded        2 weeks ago         203MB
作成したイメージの先程のオプションつけて起動します。Exitedを起動します。
$ sudo docker run -d --privileged -p 80:80 -p 443:443 centos7n /sbin/init
$ sudo docker ps -a
CONTAINER ID        IMAGE               COMMAND             CREATED             STATUS                        PORTS                  NAMES
550d5d2474b9        centos7n            "/sbin/init"        9 seconds ago       Up 8 seconds                  0.0.0.0:80->80/tcp   stupefied_moser
4073d82ac893        5e35e350aded        "/bin/bash"         23 minutes ago      Exited (137) 10 minutes ago                          centos7
$ sudo docker exec -it stupefied_moser /bin/bash
$ systemctl start nginx
今度は無事起動でき、外部からアクセスできことを確認しました。次にやりたいのはHTTPS化です。
以前、使ったLet's EncryptからSSL証明書を取得してHTTPS化します。
HTTPS化する。
Certbotをインストールします。certbotの手順を見ながらインストールします。
$ yum -y install yum-utils
$ yum-config-manager --enable rhui-REGION-rhel-server-extras rhui-REGION-rhel-server-optional
$ yum install certbot python2-certbot-nginx
Loaded plugins: fastestmirror, ovl
Loading mirror speeds from cached hostfile
 * base: ftp-srv2.kddilabs.jp
 * extras: ftp-srv2.kddilabs.jp
 * updates: ftp-srv2.kddilabs.jp
No package certbot available.
No package python2-certbot-nginx available.
Error: Nothing to do
なんかエラーが出ました。パッケージがないとのこと。
epelを追加して、再度インストールでうまくいきました。
$ yum install epel-release
$ yum install certbot python2-certbot-nginx
証明書を取得します。
管理者のメールアドレスが求められるので入力します。
$ certbot --nginx
Saving debug log to /var/log/letsencrypt/letsencrypt.log
Plugins selected: Authenticator nginx, Installer nginx
Enter email address (used for urgent renewal and security notices) (Enter 'c' to
ライセンスに同意するか聞かれるので、Aを入力します。
Starting new HTTPS connection (1): acme-v02.api.letsencrypt.org

- - - - - - - - - - - - - - - - - - - - - - - - - - - - - - - - - - - - - - - -
Please read the Terms of Service at
https://letsencrypt.org/documents/LE-SA-v1.2-November-15-2017.pdf. You must
agree in order to register with the ACME server at
https://acme-v02.api.letsencrypt.org/directory
- - - - - - - - - - - - - - - - - - - - - - - - - - - - - - - - - - - - - - - -
(A)gree/(C)ancel:
メールアドレスをシェアするとか言ってるので、Nを入力します。
- - - - - - - - - - - - - - - - - - - - - - - - - - - - - - - - - - - - - - - -
Would you be willing to share your email address with the Electronic Frontier
Foundation, a founding partner of the Let's Encrypt project and the non-profit
organization that develops Certbot? We'd like to send you email about our work
encrypting the web, EFF news, campaigns, and ways to support digital freedom.
- - - - - - - - - - - - - - - - - - - - - - - - - - - - - - - - - - - - - - - -
ドメイン名を入力します。(Let's Encryptでドメイン指定する際はwwwをつけた状態にします。)
No names were found in your configuration files. Please enter in your domain
エラーが発生した。
Obtaining a new certificate
Resetting dropped connection: acme-v02.api.letsencrypt.org
Performing the following challenges:
http-01 challenge for ドメイン名
Using default address 80 for authentication.
Waiting for verification...
Challenge failed for domain ドメイン名
http-01 challenge for ドメイン名
Cleaning up challenges
Some challenges have failed.

IMPORTANT NOTES:
 - The following errors were reported by the server:

   Domain: ドメイン名
   Type:   connection
   Detail: Fetching
   http://ドメイン名/.well-known/acme-challenge/dlxpxIAt0fMvR90N0bBWnTTcAvu_XTHSV6jyKOC872M:
   Connection refused

   To fix these errors, please make sure that your domain name was
   entered correctly and the DNS A/AAAA record(s) for that domain
   contain(s) the right IP address. Additionally, please check that
   your computer has a publicly routable IP address and that no
   firewalls are preventing the server from communicating with the
   client. If you're using the webroot plugin, you should also verify
   that you are serving files from the webroot path you provided.
 - Your account credentials have been saved in your Certbot
   configuration directory at /etc/letsencrypt. You should make a
   secure backup of this folder now. This configuration directory will
   also contain certificates and private keys obtained by Certbot so
   making regular backups of this folder is ideal.
[http://ドメイン名/.well-known/acme-challenge/]にアクセスしようとしてるようなので、Nginx設定ファイルの編集して場所を設定します。
以下にアクセスの場所を作ります。
/var/www/acme-challenge
設定ファイルをバックアップを作成し、編集します。
$ cp /etc/nginx/conf.d/default.conf default.conf.org
$ vi /etc/nginx/conf.d/default.conf
[location ^~ /.well-known/acme-challenge/]の振替先を追加
server {
    listen       80;
    server_name  localhost;

    #charset koi8-r;
    #access_log  /var/log/nginx/host.access.log  main;

    location / {
        root   /usr/share/nginx/html;
        index  index.html index.htm;
    }

    # 追加した
    location ^~ /.well-known/acme-challenge/ {
        root /var/www/acme-challenge;
    }

    #error_page  404              /404.html;

    # redirect server error pages to the static page /50x.html
    #
    error_page   500 502 503 504  /50x.html;
    location = /50x.html {
-- INSERT --
Nginxをリスタートします。certbotを再び起動しドメイン名を登録します。
$ systemctl restart nginx
$ certbot --nginx
Saving debug log to /var/log/letsencrypt/letsencrypt.log
Plugins selected: Authenticator nginx, Installer nginx
Starting new HTTPS connection (1): acme-v02.api.letsencrypt.org
No names were found in your configuration files. Please enter in your domain
name(s) (comma and/or space separated)  (Enter 'c' to cancel): ドメイン名
Obtaining a new certificate
Performing the following challenges:
http-01 challenge for ドメイン名
Using default address 80 for authentication.
Waiting for verification...
Cleaning up challenges
Could not automatically find a matching server block for ドメイン名. Set the `server_name` directive to use the Nginx installer.

IMPORTANT NOTES:
 - Unable to install the certificate
 - Congratulations! Your certificate and chain have been saved at:
   /etc/letsencrypt/live/ドメイン名/fullchain.pem
   Your key file has been saved at:
   /etc/letsencrypt/live/ドメイン名/privkey.pem
   Your cert will expire on 2020-02-27. To obtain a new or tweaked
   version of this certificate in the future, simply run certbot again
   with the "certonly" option. To non-interactively renew *all* of
   your certificates, run "certbot renew"
成功したら、再び設定ファイルを編集し、SSL接続の設定を追加します。
listen 443 ssl;
ssl_certificate /etc/letsencrypt/live/ドメイン名/fullchain.pem;
ssl_certificate_key /etc/letsencrypt/live/ドメイン名/privkey.pem;
$ vi /etc/nginx/conf.d/default.conf
server {
    listen       80;
    server_name  localhost;

    # 追加した
    listen 443 ssl;
    ssl_certificate     /etc/letsencrypt/live/ドメイン名/fullchain.pem;
    ssl_certificate_key /etc/letsencrypt/live/ドメイン名/privkey.pem;

    #charset koi8-r;
    #access_log  /var/log/nginx/host.access.log  main;

    location / {
        root   /usr/share/nginx/html;
        index  index.html index.htm;
    }

    location ^~ /.well-known/acme-challenge/ {
        root /var/www/acme-challenge;
    }


    #error_page  404              /404.html;
Nginxを再起動して、HTTPSで接続の確認します。
systemctl restart nginx
無事HTTPSで接続できました。
が、なんか違う…こんなに面倒な設定は、Dockerに任せたいはずだった。
自分がやりたかったことを一回整理
- 環境を破壊したりするので、状態を保存して、適度なタイミングで復帰したい。
- 自家製のコンテンツも環境と同じように切り替えられるようにしたい。
- ログは、コンテンツ扱いにすると消えるので、指定の場所に保存したい。
もう一回構成を含めて検討してきます。