概要
Databricks (Spark) でシリアライズしたデータを Confluent に書き込むと、Confluent のコンソール上で Value 列が文字化けして見えてしまう事象について解説します。これは想定外の動作ではなく、Confluent の Wire Header 仕様が影響して起こる現象です。本記事では、事象の説明・再現方法・対応方法を順を追って紹介します。
なお、ここで紹介する対応方法は動作確認や仕様の理解を目的とした簡易的なものです。実際の運用では Confluent Schema Registry を利用する方法を強くおすすめします。
事象について
Databricks 上でシリアライズしたデータを Confluent に書き込むと、次のように Value 列が文字化けして表示されることがあります。
| key | Value |
|---|---|
| "User_1" | "�����W\fUser_1\u0010Region_1\nOTHER" |
| "User_2" | "�³ۡX\fUser_2\u0010Region_2\nOTHER" |
| "User_3" | "���W\fUser_3\u0010Region_3\fFEMALE" |
しかし、Databricks から同じトピックを読み込んだ場合は想定通りにデータが表示されます。
これは Confluent 側で Wire Header が設定されていないため、Confluent の Web コンソール上で文字化けが起きているだけです。Wire Header を付加して書き込むことで、コンソール上でも文字化けせずに表示できます。
引用元: Formats, Serializers, and Deserializers for Schema Registry on Confluent Cloud | Confluent Documentation
事前準備
1. Confluent で API キーを取得
2. Databricks 上で Confluent への認証情報をセット
# Confluent への接続情報を設定
bootstrap_servers = "pkc-921jm.us-east-2.aws.confluent.cloud:9092"
sasl_username = "NYQNA56RYSHSESZK"
sasl_password = "g0AwC7hwasWL49Vn5MdBWrZeaQBFpv3DH0QcTWj7Ovh/HE1R2dWUssi0VxBc6JqW"
3. 検証用に Databricks のオブジェクトを作成
%sql
CREATE CATALOG IF NOT EXISTS confluent_test;
CREATE SCHEMA IF NOT EXISTS confluent_test.test;
src_table_name = "confluent_test.test.src_table"
checkpoint_volume_name = "confluent_test.test.checkpoint_01"
checkpoint_volume_dir = f"/Volumes/confluent_test/test/checkpoint_01"
spark.sql(f"CREATE TABLE IF NOT EXISTS {src_table_name}")
spark.sql(f"CREATE VOLUME IF NOT EXISTS {checkpoint_volume_name}")
dbutils.fs.rm(checkpoint_volume_dir, True)
4. ソースとなる Databricks のテーブルにデータを書き込み
data = [
    ("User_1", 1507214855421, "Region_1", "OTHER"),
    ("User_2", 1516353515688, "Region_2", "OTHER"),
    ("User_3", 1511384261793, "Region_3", "FEMALE")
]

columns = ["userid", "registertime", "regionid", "gender"]
df = spark.createDataFrame(data, columns)

df.write.format("delta").mode("overwrite").saveAsTable(src_table_name)
文字化け事象の再現方法
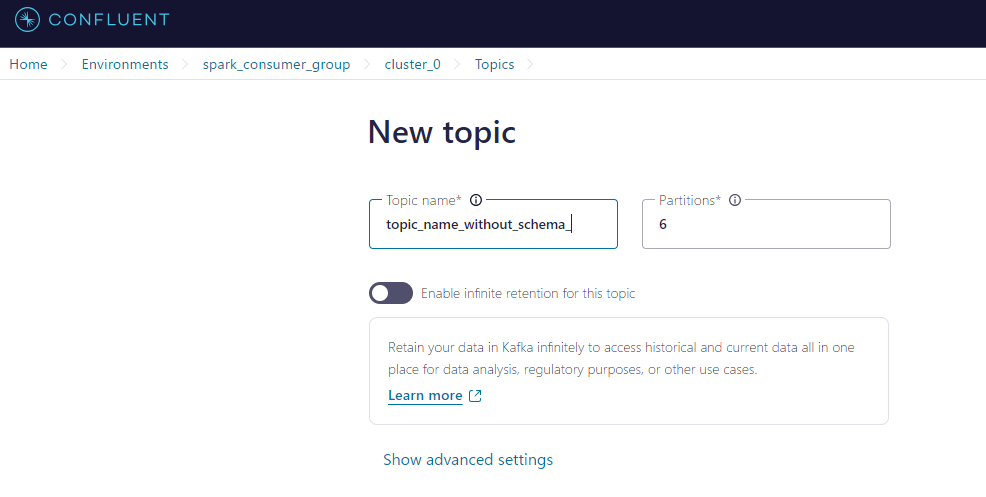
1. Confluent で Topic を作成
2. Databricks 上で Topic とデータスキーマを定義
topic_name_without_schema = "topic_name_without_schema"
schema = """
{
  "connect.name": "ksql.users",
  "fields": [
    {
      "name": "registertime",
      "type": "long"
    },
    {
      "name": "userid",
      "type": "string"
    },
    {
      "name": "regionid",
      "type": "string"
    },
    {
      "name": "gender",
      "type": "string"
    }
  ],
  "name": "users",
  "namespace": "ksql",
  "type": "record"
}
"""
3. Databricks で Confluent に書き込むデータセットを定義
from pyspark.sql.functions import col, struct
from pyspark.sql.avro.functions import to_avro

src_df = spark.readStream.table(src_table_name)

# key 列を設定
src_df = src_df.withColumn("key", col("userid"))

# value 列(Avro形式にシリアライズ)
src_df = src_df.withColumn("value", struct("registertime", "userid", "regionid", "gender"))
src_df = src_df.withColumn("value", to_avro(col("value"), schema))

# key と value だけを出力カラムに
src_df = src_df.select("key", "value")
4. Confluent に書き込み
(
    src_df.writeStream.format("kafka")
    .option("kafka.bootstrap.servers", bootstrap_servers)
    .option("kafka.security.protocol", "SASL_SSL")
    .option(
        "kafka.sasl.jaas.config",
        f'kafkashaded.org.apache.kafka.common.security.plain.PlainLoginModule required username="{sasl_username}" password="{sasl_password}";',
    )
    .option("kafka.sasl.mechanism", "PLAIN")
    .option("topic", topic_name_without_schema)
    .option("checkpointLocation", checkpoint_dir)
    .trigger(availableNow=True)
    .start()
)
5. Confluent 上で文字化けを確認
| key | Value |
|---|---|
| "User_1" | "�����W\fUser_1\u0010Region_1\nOTHER" |
| "User_2" | "�³ۡX\fUser_2\u0010Region_2\nOTHER" |
| "User_3" | "���W\fUser_3\u0010Region_3\fFEMALE" |
6. Databricks 上で Confluent からデータを取得し、文字化けしていないことを確認
from pyspark.sql.functions import col
from pyspark.sql.avro.functions import from_avro

# Confluent から読み込み
df = (
    spark.readStream.format("kafka")
    .option("kafka.bootstrap.servers", bootstrap_servers)
    .option("kafka.security.protocol", "SASL_SSL")
    .option(
        "kafka.sasl.jaas.config",
        f'kafkashaded.org.apache.kafka.common.security.plain.PlainLoginModule required username="{sasl_username}" password="{sasl_password}";',
    )
    .option("kafka.sasl.mechanism", "PLAIN")
    .option("subscribe", topic_name_without_schema)
    .option("startingOffsets", "earliest")
    .load()
)

# Key をデシリアライズ
key_des_df = df.withColumn("key", col("Key").cast("string"))

# Value をデシリアライズ
decoded_df = key_des_df.withColumn(
    "decoded_value",
    from_avro(col("value"), schema)
)

# 展開したカラムを表示
tgt_cols = [
    "key",
    "decoded_value.*",
    "topic",
    "partition",
    "offset",
    "timestamp",
    "timestampType"
]
src_df = decoded_df.select(tgt_cols)
src_df.display()
文字化け事象への対応方法
1. Confluent で Topic をスキーマ指定して作成
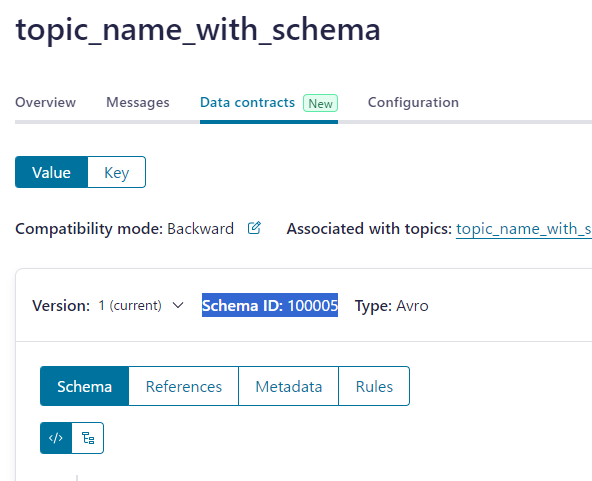
2. Data Contract タブでスキーマを追加
{
  "connect.name": "ksql.users",
  "fields": [
    {
      "name": "registertime",
      "type": "long"
    },
    {
      "name": "userid",
      "type": "string"
    },
    {
      "name": "regionid",
      "type": "string"
    },
    {
      "name": "gender",
      "type": "string"
    }
  ],
  "name": "users",
  "namespace": "ksql",
  "type": "record"
}
3. Confluent 上で Schema ID を取得(例:100005)
4. Databricks 上で Schema ID を変数にセット
schema_id_num = 100005
5. Databricks 上で Topic とスキーマを変数にセット
topic_name_with_schema = "topic_name_with_schema"
schema = """
{
  "connect.name": "ksql.users",
  "fields": [
    {
      "name": "registertime",
      "type": "long"
    },
    {
      "name": "userid",
      "type": "string"
    },
    {
      "name": "regionid",
      "type": "string"
    },
    {
      "name": "gender",
      "type": "string"
    }
  ],
  "name": "users",
  "namespace": "ksql",
  "type": "record"
}
"""
6. Databricks 上で Wire Header を定義
# Confluent Wire Header の定義
magic_byte_num = 0
wire_header = bytes([magic_byte_num])
wire_header += schema_id_num.to_bytes(4, byteorder='big', signed=False)
print(wire_header)
7. Databricks から Confluent に書き込む
checkpoint_dir = checkpoint_volume_dir + "/" + topic_name_with_schema

from pyspark.sql.functions import col, struct, lit, concat
from pyspark.sql.avro.functions import to_avro

src_df = spark.readStream.table(src_table_name)

# key 列
src_df = src_df.withColumn("key", col("userid"))

# Value 列(Avro形式へシリアライズ)
src_df = src_df.withColumn("value", struct("registertime", "userid", "regionid", "gender"))
src_df = src_df.withColumn("value", to_avro(col("value"), schema))

# 先頭に Wire Header (magic-byte と schema-id) を付与
src_df = src_df.withColumn("add_bytes", lit(wire_header))
src_df = src_df.withColumn("value", concat(col("add_bytes"), col("value")))

# key と value のみを選択
src_df = src_df.select("key", "value")

(
    src_df.writeStream.format("kafka")
    .option("kafka.bootstrap.servers", bootstrap_servers)
    .option("kafka.security.protocol", "SASL_SSL")
    .option(
        "kafka.sasl.jaas.config",
        f'kafkashaded.org.apache.kafka.common.security.plain.PlainLoginModule required username="{sasl_username}" password="{sasl_password}";',
    )
    .option("kafka.sasl.mechanism", "PLAIN")
    .option("topic", topic_name_with_schema)
    .option("checkpointLocation", checkpoint_dir)
    .trigger(availableNow=True)
    .start()
)
8. Confluent 上で想定通りデータが書き込まれたことを確認
まとめ
Databricks からシリアライズしたデータを Confluent に書き込んだ際に、Confluent コンソール上で Value が文字化けしてしまうのは、Confluent の Wire Header(magic-byte や schema-id)を付与していないためです。Databricks 側でヘッダーを正しく付与することで、Confluent コンソールでも文字化けをせずに表示できるようになります。
ただし、運用環境では Confluent Schema Registry を利用するのが一般的であり、今回の方法はワイヤーフォーマットの理解を目的としたものです。本番環境ではぜひ Schema Registry を活用し、スキーマ管理を効率化することをおすすめします。


