概要
本記事にて、Great Expectations(GE) によるノートブック型環境(Databricks)でのデータ品質保証方法を共有する。GE がツールの概要を提示した上で、コードとその実行結果を提示する。
実行コードとその出力結果を Github に配置してあり、次のリンクで確認が可能。
Great Expectations とは
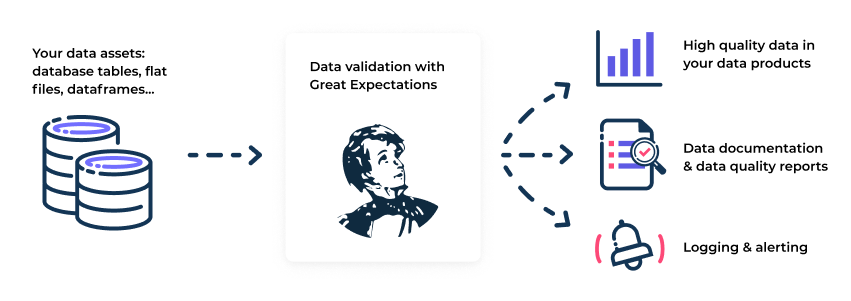
Great Expectations (GE) とは、データに対する検証、ドキュメント化、および、プロファイリングにより、データ品質の保証と改善を支援する OSS の Python ライブラリである。データに対する品質保証条件(GE では Expectations と呼ぶ)に基づき、データソースへの検証を行い、検証結果をドキュメント化することができる。
引用元:Welcome | Great Expectations
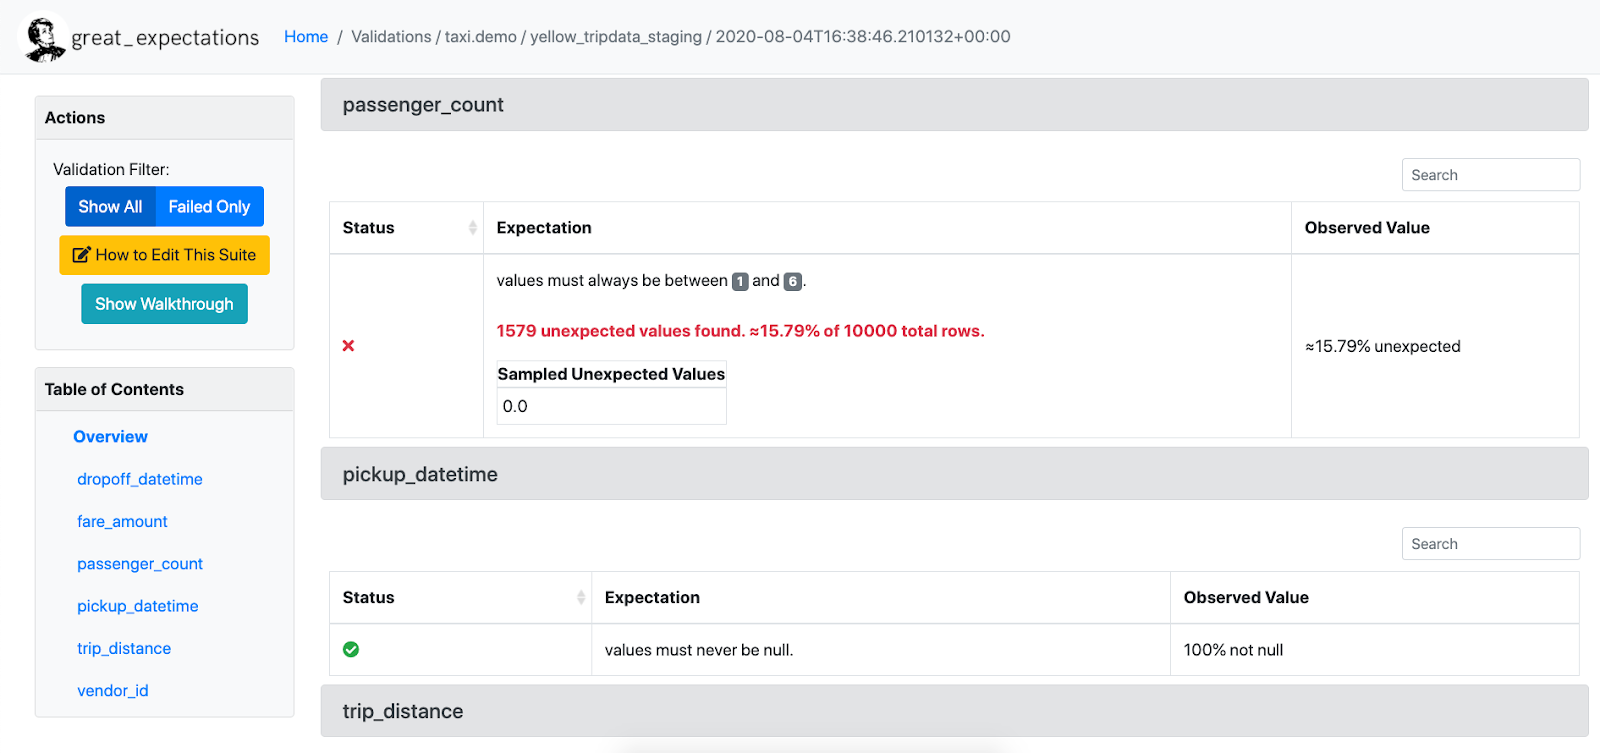
Expectation を、次のように定義する。下記図では、passenger_count というカラムにおける値の最小が1であり、値の最大が6であることを確認している。このような Expectation を複数定義して、データ品質検証を行う。

引用元:Welcome | Great Expectations
生成されるドキュメントは、下記の項目が表示される HTML ファイルであり、静的サイトとしてホストすることができる。検証するごとにその時点でのファイルが生成され、過去にさかのぼって確認することも可能。
引用元:Welcome | Great Expectations
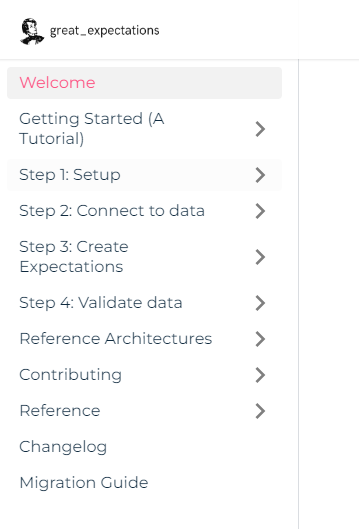
GE を利用する基本的な手順は次のようになっている。ドキュメントの構成も、手順がベースとなっている。
- セットアップ
- データへの接続
- Expectations の作成
- データの検証
下記図が、ドキュメントの構成。
引用元:Welcome | Great Expectations
検証できるデータソースには次のものがある。本記事後述の手順では、Spark Dataframe、および、Pandas Dataframeを利用している。
- データベース(SQLAlchemy 経由)
- Pandas Dataframe
- Spark Dataframe
SQLAlchemy 経由で接続できるデータベースには、次のものが提示されている。
- How to connect to a Athena database
- How to connect to a BigQuery database
- How to connect to an MSSQL database
- How to connect to a MySQL database
- How to connect to a PostgreSQL database
- How to connect to a Redshift database
- How to connect to a Snowflake database
- How to connect to a SQLite database
- How to connect to a Trino database (formerly Presto SQL)
データソースごとに利用できる Expection が異なり、次のリンクが参考になる。
GE を利用する方法として、CLIによる方法とノートブック型環境による方法がある。本記事後述の手順では後者の方法を実施しており、次のドキュメントが参考となる。
- How to instantiate a Data Context without a yml file
- How to quickly explore Expectations in a notebook | Great Expectations
- How to pass an in-memory DataFrame to a Checkpoint | Great Expectations
データ検証後に、ドキュメントを作成するだけでなく、次のような Action を設定可能。
- How to trigger Email as a Validation Action
- How to collect OpenLineage metadata using a Validation Action
- How to trigger Opsgenie notifications as a Validation Action
- How to trigger Slack notifications as a Validation Action
- How to update Data Docs after validating a Checkpoint
GE に関する基本的な情報は、次のリンクに記載されている。
| # | リンク | 概要 |
|---|---|---|
| 1 | Welcome | 概要 |
| 2 | Getting started with Great Expectations | チュートリアル |
| 3 | Glossary of Terms | 用語集 |
| 4 | Customize your deployment Great Expectations | 利用するための考慮事項 |
| 5 | Explore Expectations | Expectation 一覧 |
| 6 | Community Page • Great Expectations | コミュニティ関連 |
| 7 | Case studies from Great Expectations | ケーススタディ |
ノートブック型環境(Databricks)での Great Expectations の実行
1. Greate Exceptions を利用するための事前準備
Great Expectations のインストール
%pip install great_expectations -q

データ(データフレーム)の準備
schema = '''
`VendorID` INT,
`tpep_pickup_datetime` TIMESTAMP,
`tpep_dropoff_datetime` TIMESTAMP,
`passenger_count` INT,
`trip_distance` DOUBLE,
`RatecodeID` INT,
`store_and_fwd_flag` STRING,
`PULocationID` INT,
`DOLocationID` INT,
`payment_type` INT,
`fare_amount` DOUBLE,
`extra` DOUBLE,
`mta_tax` DOUBLE,
`tip_amount` DOUBLE,
`tolls_amount` DOUBLE,
`improvement_surcharge` DOUBLE,
`total_amount` DOUBLE,
`congestion_surcharge` DOUBLE
'''

src_files = [
    "/databricks-datasets/nyctaxi/tripdata/yellow/yellow_tripdata_2019-01.csv.gz",
#     "/databricks-datasets/nyctaxi/tripdata/yellow/yellow_tripdata_2019-02.csv.gz",
]

tgt_df = (
    spark
    .read
    .format("csv")
    .schema(schema)
    .option("header", "true")
    .option("inferSchema", "false")
    .load(src_files)
)

2. 基本的なデータ品質検証の実施
本章では、次の記事を参考にしている。
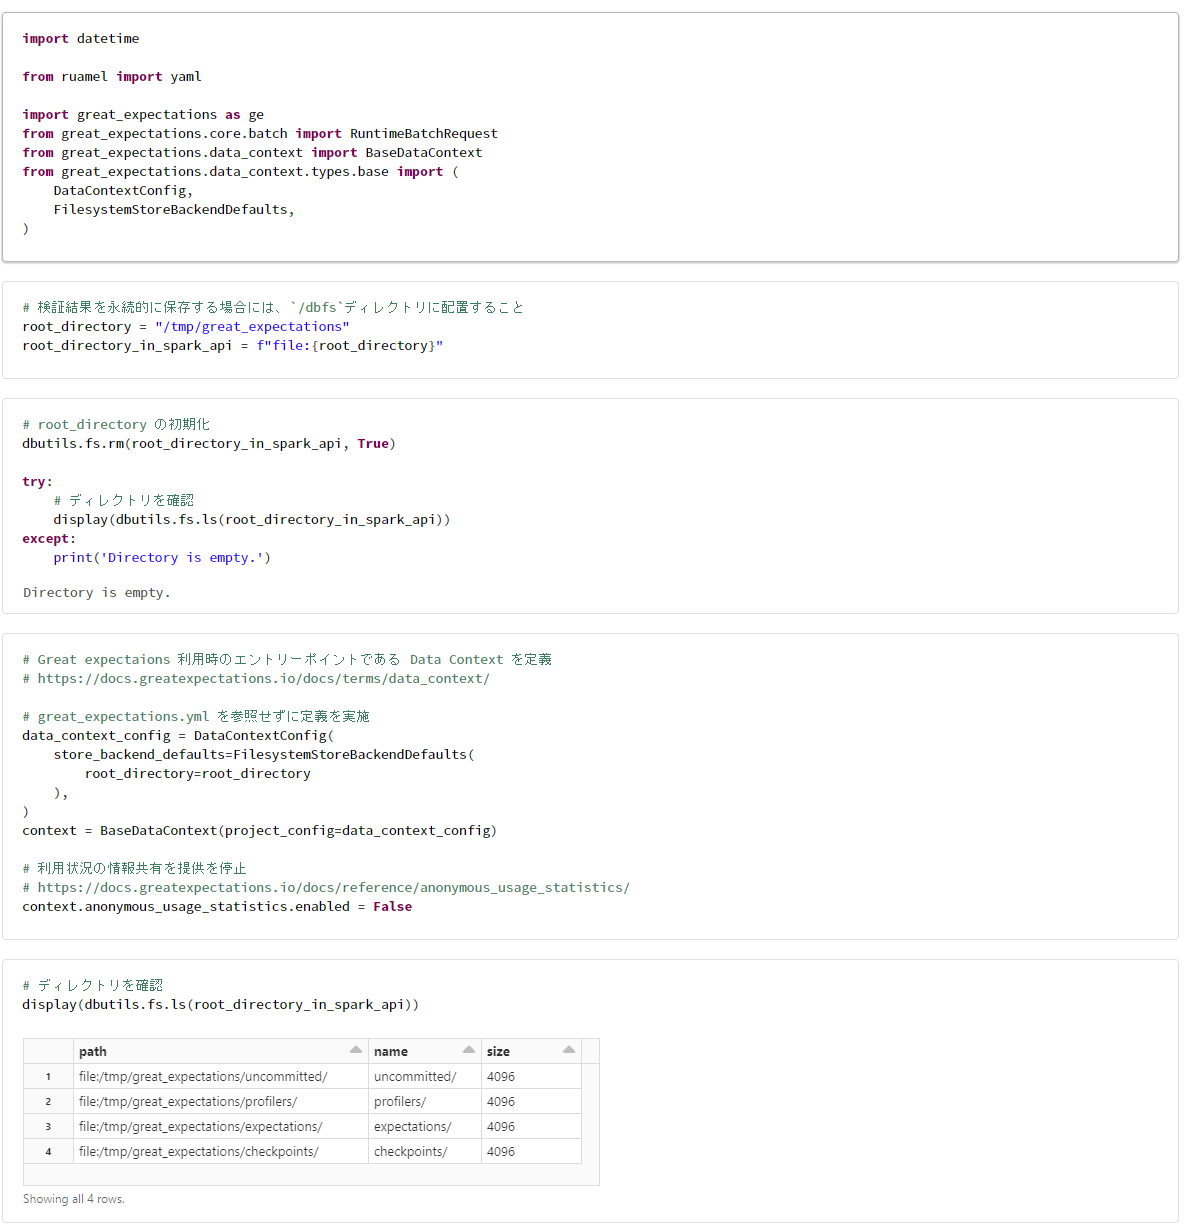
Great Expectations のセットアップ
import datetime

from ruamel import yaml

import great_expectations as ge
from great_expectations.core.batch import RuntimeBatchRequest
from great_expectations.data_context import BaseDataContext
from great_expectations.data_context.types.base import (
    DataContextConfig,
    FilesystemStoreBackendDefaults,
)
# root_directory の初期化
dbutils.fs.rm(root_directory_in_spark_api, True)

try:
    # ディレクトリを確認
    display(dbutils.fs.ls(root_directory_in_spark_api))
except:
    print('Directory is empty.')
# Great expectaions 利用時のエントリーポイントである Data Context を定義
# https://docs.greatexpectations.io/docs/terms/data_context/

# great_expectations.yml を参照せずに定義を実施
data_context_config = DataContextConfig(
    store_backend_defaults=FilesystemStoreBackendDefaults(
        root_directory=root_directory
    ),
)
context = BaseDataContext(project_config=data_context_config)

# 利用状況の情報共有を提供を停止
# https://docs.greatexpectations.io/docs/reference/anonymous_usage_statistics/
context.anonymous_usage_statistics.enabled = False
# ディレクトリを確認
display(dbutils.fs.ls(root_directory_in_spark_api))
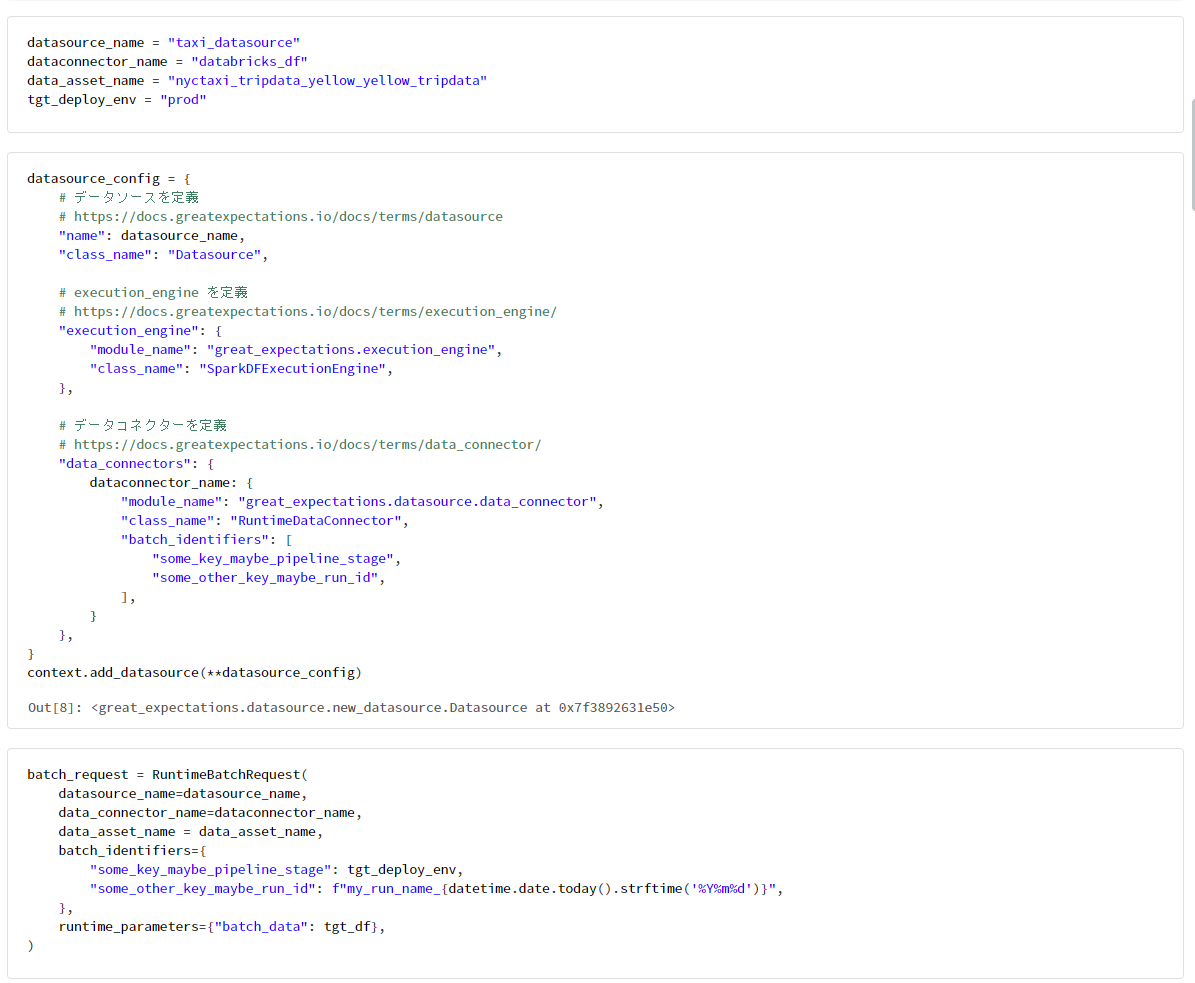
データへの接続
datasource_name = "taxi_datasource"
dataconnector_name = "databricks_df"
data_asset_name = "nyctaxi_tripdata_yellow_yellow_tripdata"
tgt_deploy_env = "prod"
datasource_config = {
    # データソースを定義
    # https://docs.greatexpectations.io/docs/terms/datasource
    "name": datasource_name,
    "class_name": "Datasource",

    # execution_engine を定義
    # https://docs.greatexpectations.io/docs/terms/execution_engine/
    "execution_engine": {
        "module_name": "great_expectations.execution_engine",
        "class_name": "SparkDFExecutionEngine",
    },

    # データコネクターを定義
    # https://docs.greatexpectations.io/docs/terms/data_connector/
    "data_connectors": {
        dataconnector_name: {
            "module_name": "great_expectations.datasource.data_connector",
            "class_name": "RuntimeDataConnector",
            "batch_identifiers": [
                "some_key_maybe_pipeline_stage",
                "some_other_key_maybe_run_id",
            ],
        }
    },
}
context.add_datasource(**datasource_config)
batch_request = RuntimeBatchRequest(
    datasource_name=datasource_name,
    data_connector_name=dataconnector_name,
    data_asset_name = data_asset_name,
    batch_identifiers={
        "some_key_maybe_pipeline_stage": tgt_deploy_env,
        "some_other_key_maybe_run_id": f"my_run_name_{datetime.date.today().strftime('%Y%m%d')}",
    },
    runtime_parameters={"batch_data": tgt_df},
)
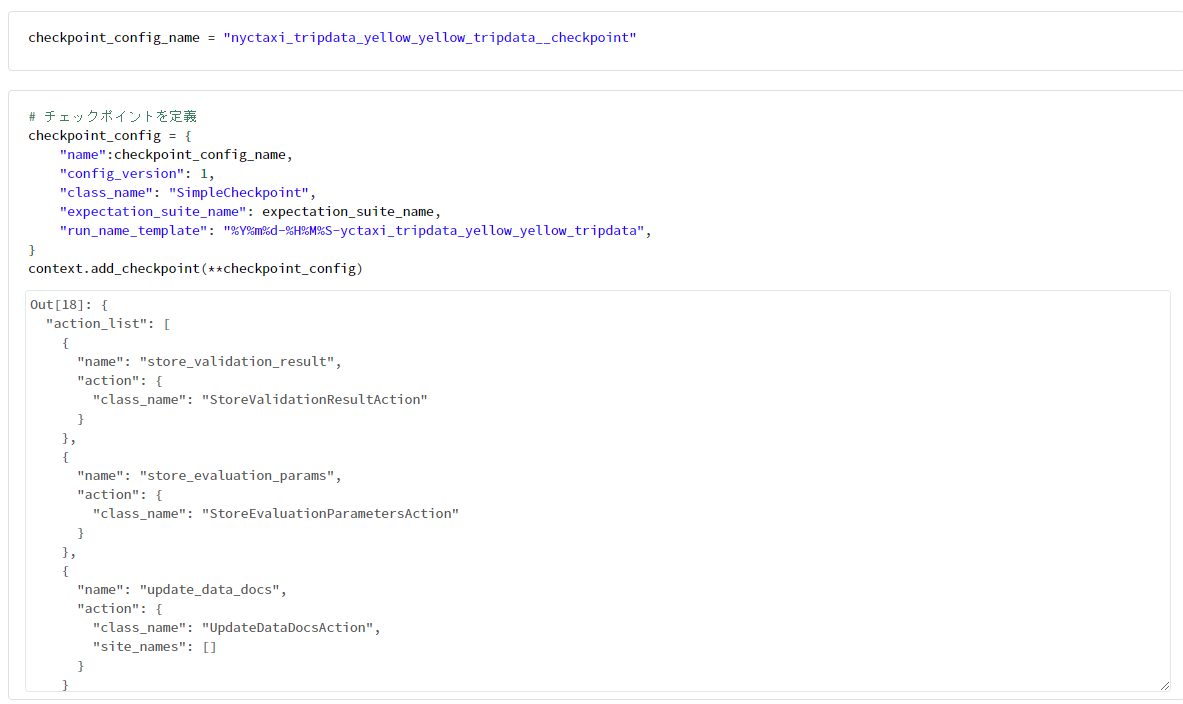
Expectations を作成
checkpoint_config_name = "nyctaxi_tripdata_yellow_yellow_tripdata__checkpoint"
# チェックポイントを定義
checkpoint_config = {
    "name":checkpoint_config_name,
    "config_version": 1,
    "class_name": "SimpleCheckpoint",
    "expectation_suite_name": expectation_suite_name,
    "run_name_template": "%Y%m%d-%H%M%S-yctaxi_tripdata_yellow_yellow_tripdata",
}
context.add_checkpoint(**checkpoint_config)
# checkpoints にファイルが作成されたことを確認
checkpoints_file_path = f'{root_directory_in_spark_api}/checkpoints/{checkpoint_config_name}.yml'
print(dbutils.fs.head(checkpoints_file_path))
checkpoint_result = context.run_checkpoint(
    checkpoint_name=checkpoint_config_name,
    validations=[
        {
            "batch_request": batch_request,
            "expectation_suite_name": expectation_suite_name,
        }
    ],
)
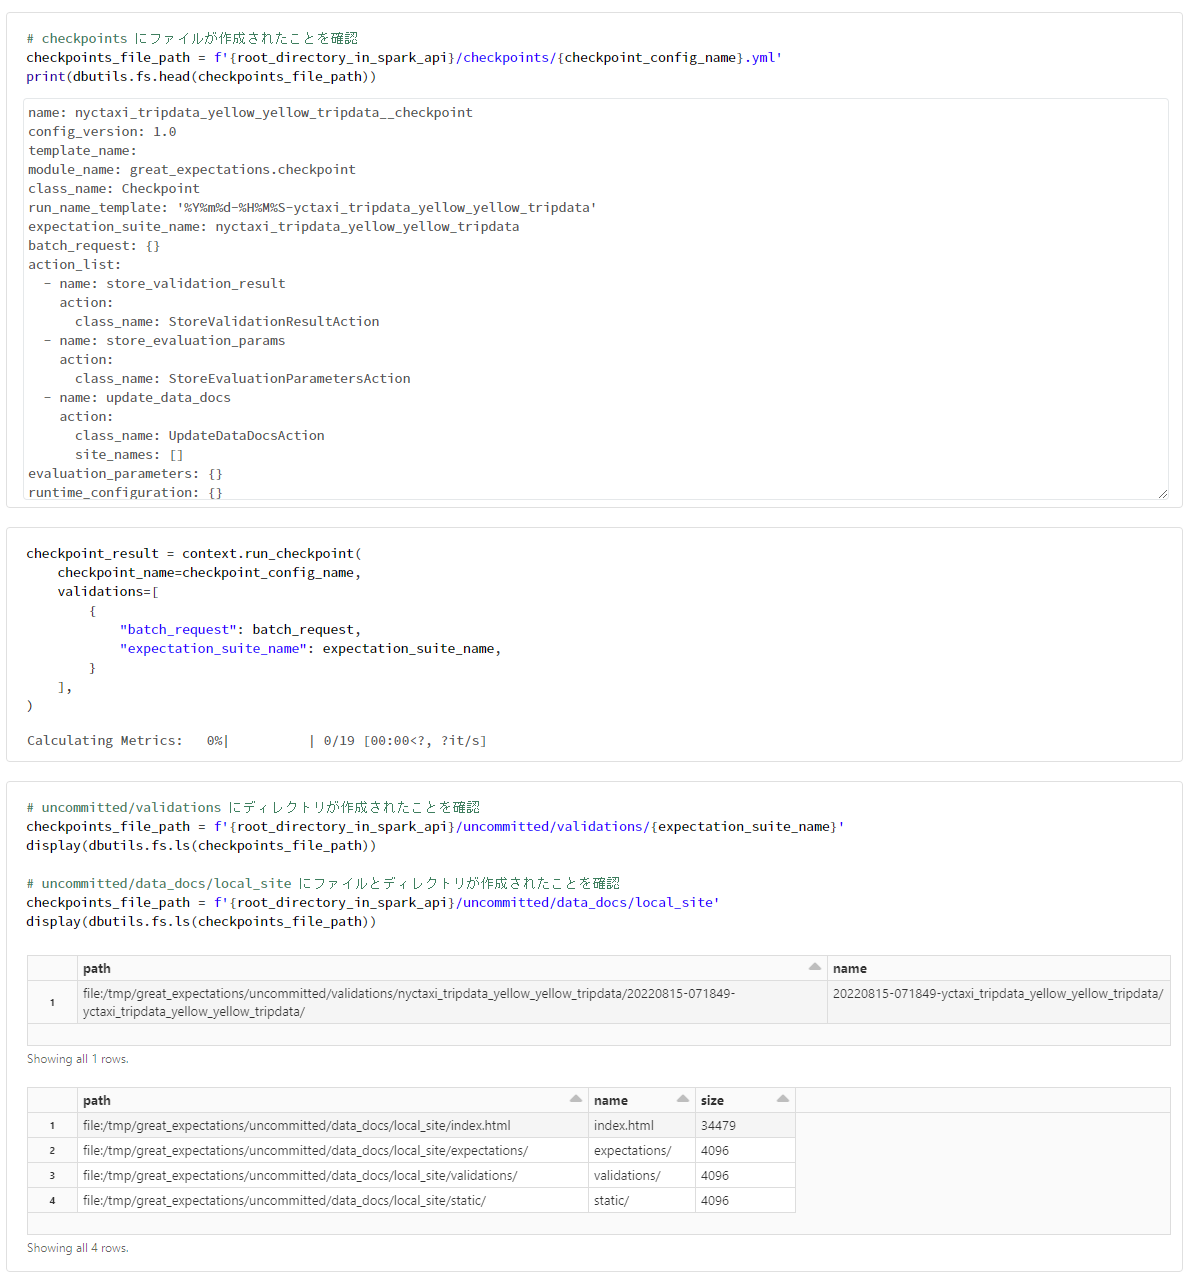
検証結果を確認
# 品質チェック結果を表示
checkpoint_result["success"]
# 品質チェック結果の HTML ファイルを表示
first_validation_result_identifier = (
    checkpoint_result.list_validation_result_identifiers()[0]
)
first_run_result = checkpoint_result.run_results[first_validation_result_identifier]

docs_path = first_run_result['actions_results']['update_data_docs']['local_site']

html = dbutils.fs.head(docs_path,)

displayHTML(html)

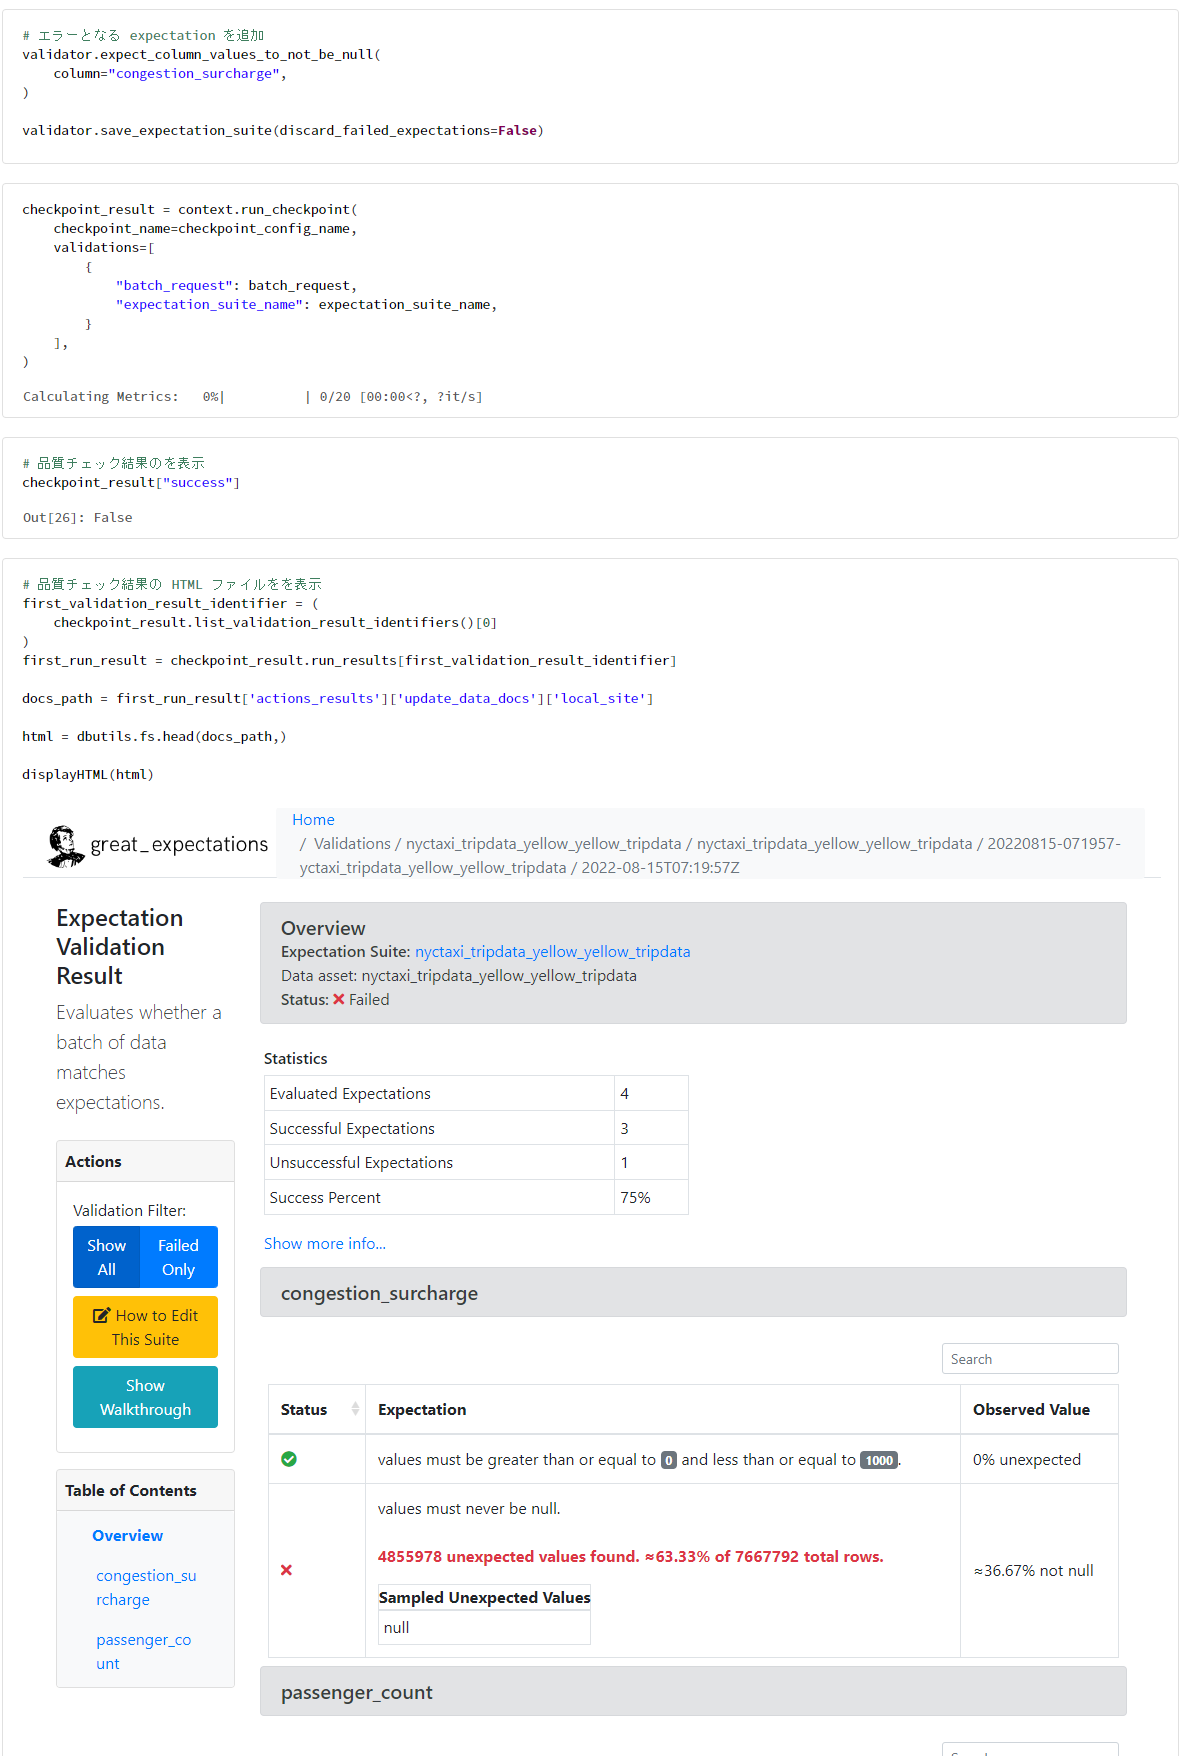
3. 品質エラーがある場合の動作検証
# エラーとなる expectation を追加
validator.expect_column_values_to_not_be_null(
    column="congestion_surcharge",
)

validator.save_expectation_suite(discard_failed_expectations=False)
checkpoint_result = context.run_checkpoint(
    checkpoint_name=checkpoint_config_name,
    validations=[
        {
            "batch_request": batch_request,
            "expectation_suite_name": expectation_suite_name,
        }
    ],
)
# 品質チェック結果のを表示
checkpoint_result["success"]
# 品質チェック結果の HTML ファイルを表示
first_validation_result_identifier = (
    checkpoint_result.list_validation_result_identifiers()[0]
)
first_run_result = checkpoint_result.run_results[first_validation_result_identifier]

docs_path = first_run_result['actions_results']['update_data_docs']['local_site']

html = dbutils.fs.head(docs_path,)

displayHTML(html)
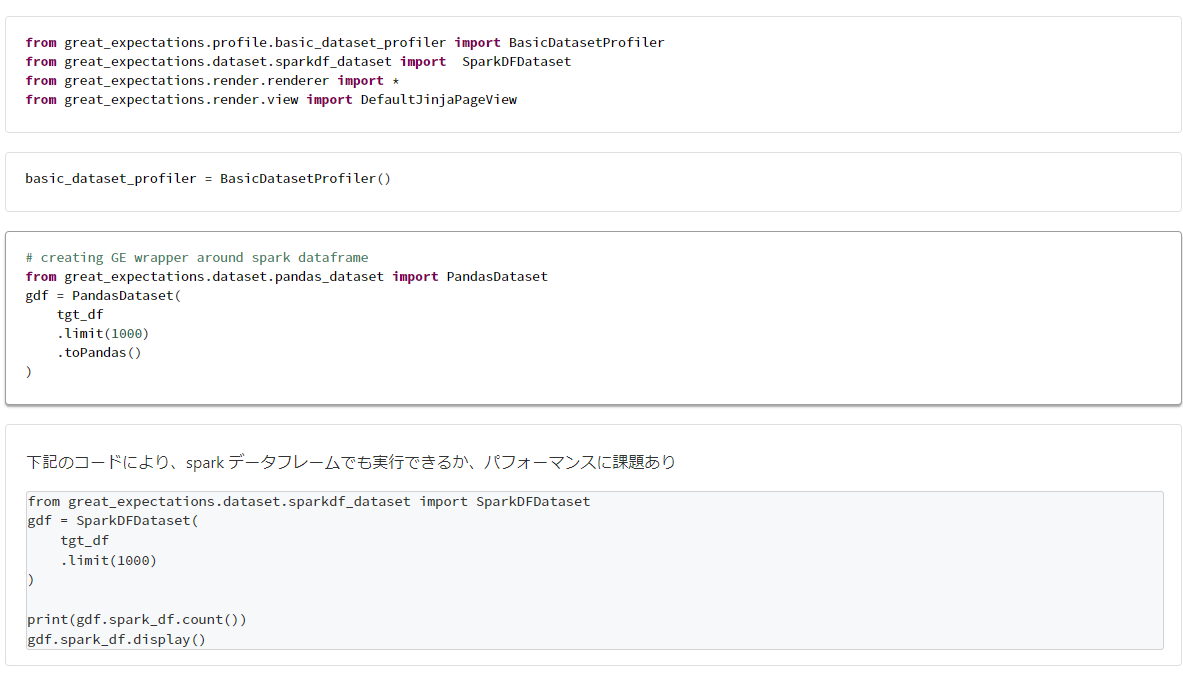
4. データプロファイリング
本章では、次の記事を参考にしている。
from great_expectations.profile.basic_dataset_profiler import BasicDatasetProfiler
from great_expectations.dataset.sparkdf_dataset import  SparkDFDataset
from great_expectations.render.renderer import *
from great_expectations.render.view import DefaultJinjaPageView
basic_dataset_profiler = BasicDatasetProfiler()
from great_expectations.dataset.pandas_dataset import PandasDataset
gdf = PandasDataset(
    tgt_df
    .limit(1000)
    .toPandas()
)
下記のコードにより、spark データフレームでも実行できるか、パフォーマンスに課題あり
from great_expectations.dataset.sparkdf_dataset import SparkDFDataset
gdf = SparkDFDataset(
    tgt_df
    .limit(1000)
)

print(gdf.spark_df.count())
gdf.spark_df.display()
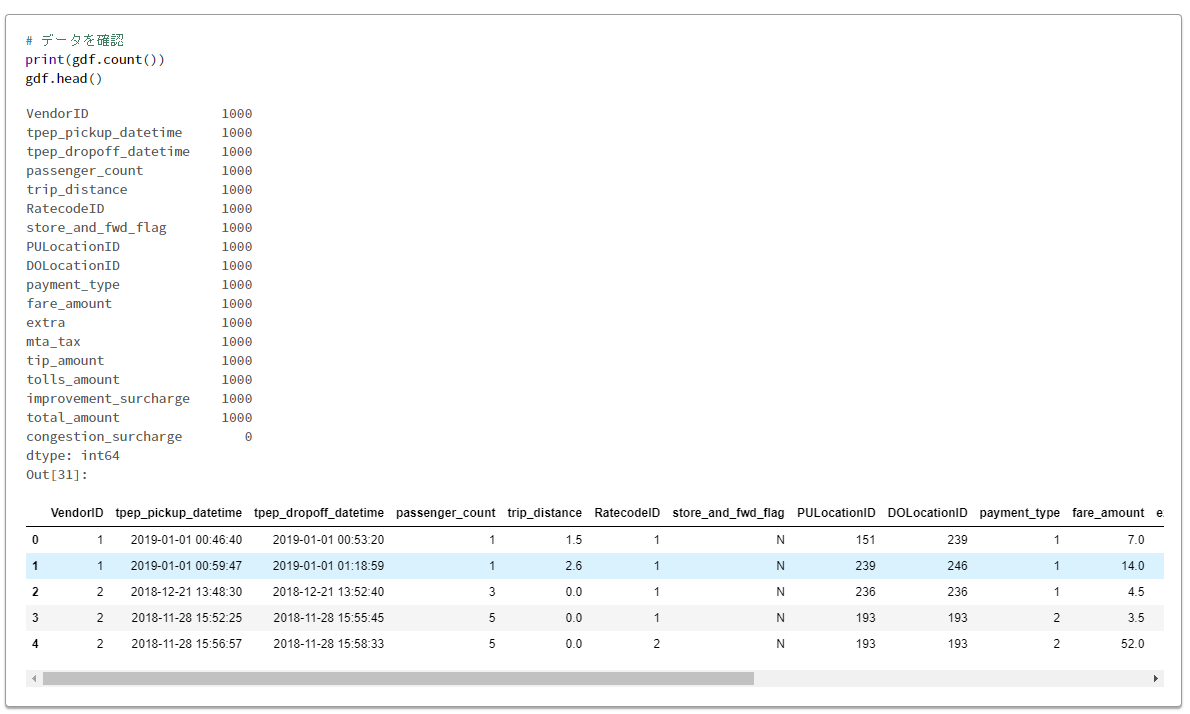
# データを確認
print(gdf.count())
gdf.head()
from great_expectations.profile.basic_dataset_profiler import BasicDatasetProfiler

# データをプロファイリング
expectation_suite, validation_result = gdf.profile(BasicDatasetProfiler)
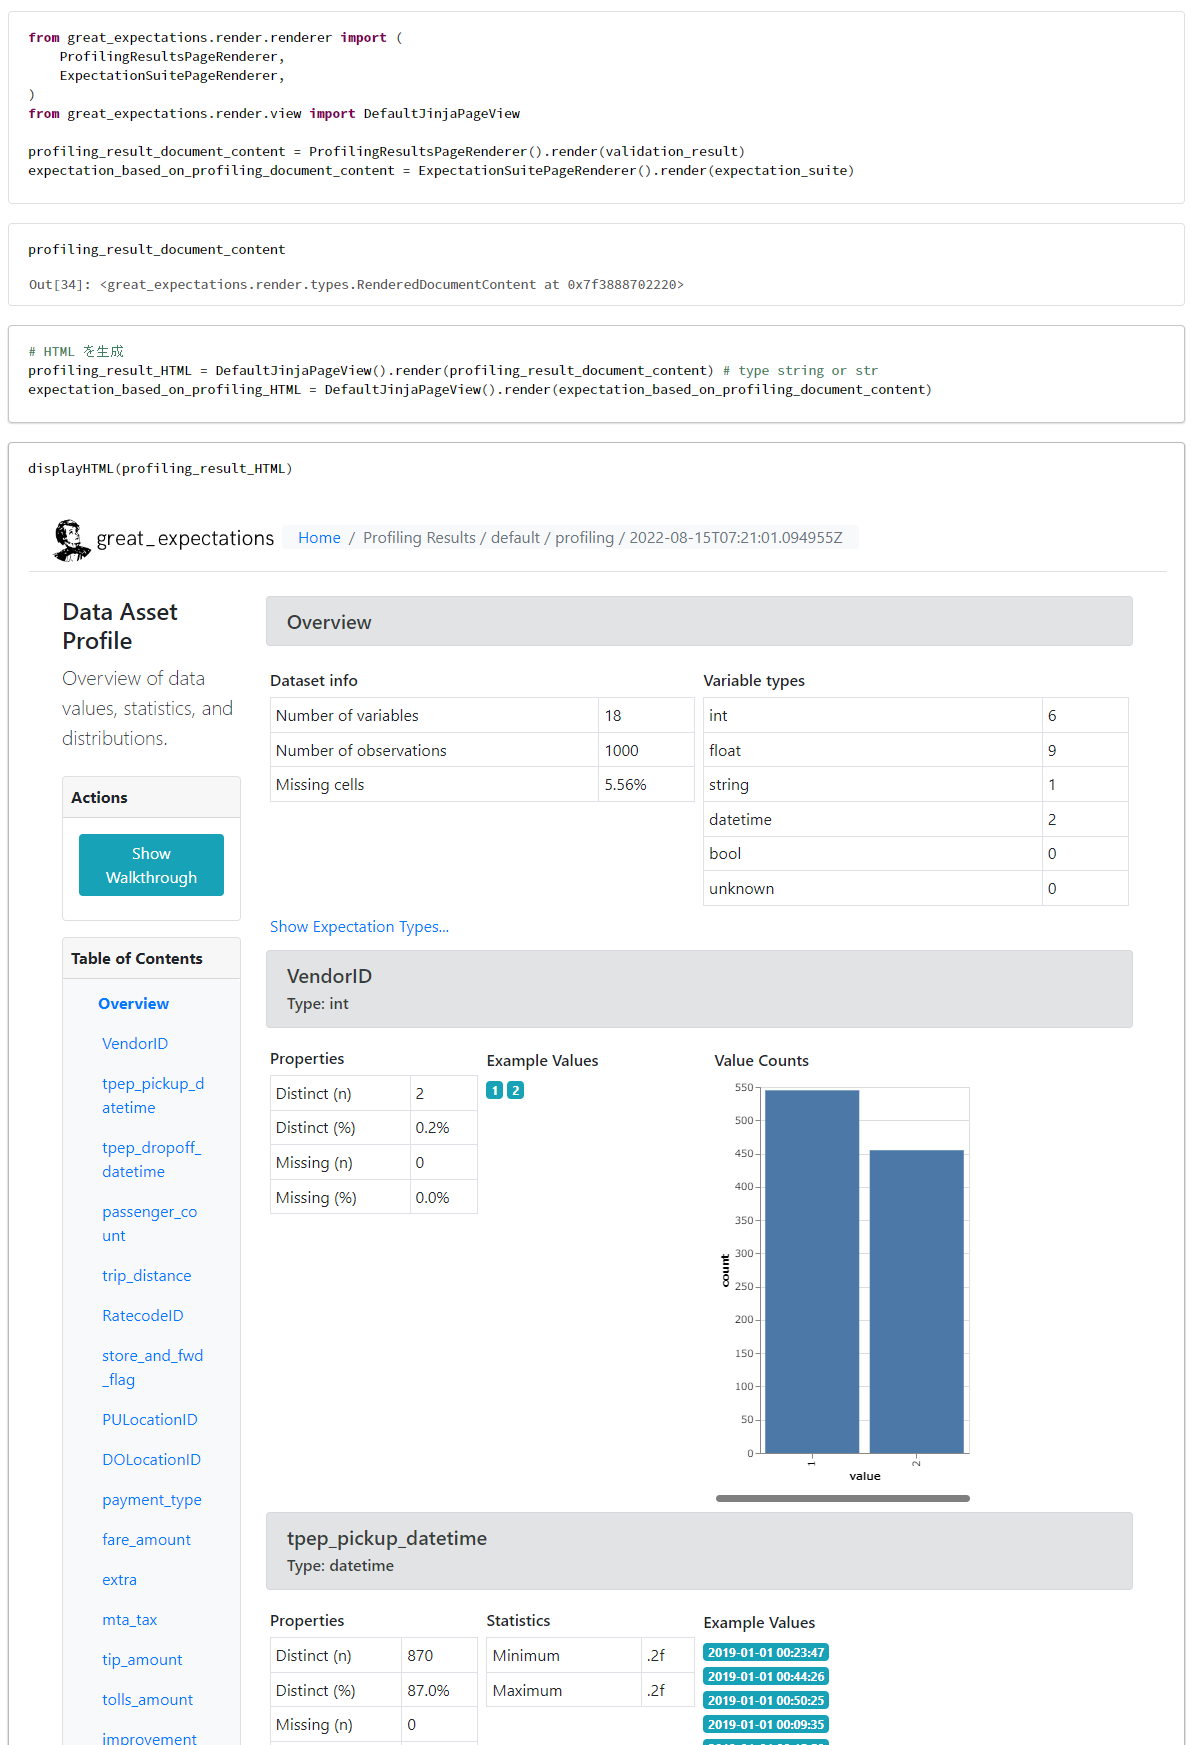
from great_expectations.render.renderer import (
    ProfilingResultsPageRenderer,
    ExpectationSuitePageRenderer,
)
from great_expectations.render.view import DefaultJinjaPageView

profiling_result_document_content = ProfilingResultsPageRenderer().render(validation_result)
expectation_based_on_profiling_document_content = ExpectationSuitePageRenderer().render(expectation_suite)
# HTML を生成
profiling_result_HTML = DefaultJinjaPageView().render(profiling_result_document_content) # type string or str
expectation_based_on_profiling_HTML = DefaultJinjaPageView().render(expectation_based_on_profiling_document_content)

displayHTML(profiling_result_HTML)
5. リソースのクリーンアップ
dbutils.fs.rm(root_directory_in_spark_api, True)
