Web機能に機械学習を実装したくてTensorflow.jsを導入してみた
今回は以前作成したCRUDのwebアプリにAIによる入力画像の識別をImage netを用いた学習済みモデルを使用して実装した。

1.Tensorflow.jsライブラリの追加
まず、resources/views/layouts/app.blade.phpファイルを開いて、タグの前に以下のコードを追加します:
<script src="https://cdn.jsdelivr.net/npm/@tensorflow/tfjs@3.18.0"></script>
2.JavaScriptファイルの作成
public/jsディレクトリにtensorflow-classifier.jsというファイルを新規作成します:
// TensorFlow.js Image Classifier for Laravel application
document.addEventListener('DOMContentLoaded', function() {
    const form = document.getElementById('imageAnalysisForm');
    const resultDiv = document.getElementById('analysisResult');
    const resultContent = document.getElementById('resultContent');

    // Model loading status
    let modelLoaded = false;
    let model;

    // Load the MobileNet model (pre-trained on ImageNet)
    async function loadModel() {
        try {
            // Load the model
            model = await tf.loadLayersModel('https://storage.googleapis.com/tfjs-models/tfjs/mobilenet_v1_0.25_224/model.json');
            modelLoaded = true;
            console.log('MobileNet model loaded successfully');

            // Add a notification that the model is ready
            const modelStatus = document.createElement('div');
            modelStatus.className = 'text-green-600 mb-2';
            modelStatus.textContent = 'AI モデルの準備完了';
            form.insertBefore(modelStatus, form.firstChild);
        } catch (error) {
            console.error('Error loading model:', error);
        }
    }

    // Call model loading when page loads
    loadModel();

    // Process image and make prediction
    async function classifyImage(imgElement) {
        if (!modelLoaded) {
            return { error: 'モデルがまだ読み込まれていません。少々お待ちください。' };
        }

        try {
            // Preprocess the image to match MobileNet's input requirements
            const tfImg = tf.browser.fromPixels(imgElement)
                .resizeNearestNeighbor([224, 224]) // Resize to 224x224
                .toFloat()
                .div(tf.scalar(255.0))
                .expandDims();

            // Make prediction
            const predictions = await model.predict(tfImg).data();

            // Get the top 5 predictions
            const topPredictions = Array.from(predictions)
                .map((prob, index) => ({ probability: prob, className: IMAGENET_CLASSES[index] }))
                .sort((a, b) => b.probability - a.probability)
                .slice(0, 5);

            return {
                success: true,
                predictions: topPredictions
            };
        } catch (error) {
            console.error('Error classifying image:', error);
            return { error: '画像分類エラー: ' + error.message };
        } finally {
            // Clean up tensors
            tf.dispose();
        }
    }

    // Handle form submit
    form.addEventListener('submit', async function(e) {
        e.preventDefault();

        const imageInput = document.getElementById('ai_image');
        if (!imageInput.files || imageInput.files.length === 0) {
            resultContent.innerHTML = '<div class="text-red-600">画像を選択してください。</div>';
            resultDiv.classList.remove('hidden');
            return;
        }

        const file = imageInput.files[0];
        const formData = new FormData(form);
        formData.append('post_id', formData.get('post_id'));

        // Show loading state
        resultContent.innerHTML = '<div>分析中...</div>';
        resultDiv.classList.remove('hidden');

        // First, display the image
        const img = document.createElement('img');
        img.src = URL.createObjectURL(file);
        img.style.maxWidth = '300px';
        img.style.maxHeight = '300px';
        img.style.marginBottom = '10px';

        // When image is loaded, classify it
        img.onload = async function() {
            // Perform the existing image analysis
            try {
                const response = await fetch(form.getAttribute('data-analyze-url') || '{{ route("image.analyze") }}', {
                    method: 'POST',
                    body: formData,
                    headers: {
                        'X-CSRF-TOKEN': document.querySelector('meta[name="csrf-token"]').getAttribute('content')
                    }
                });

                const data = await response.json();

                // Now perform TensorFlow.js classification
                const tfResult = await classifyImage(img);

                // Combine the results
                let htmlContent = '';

                if (data.success) {
                    // Display standard image analysis results
                    let colorDisplay = '';
                    if (data.result.avg_color && data.result.avg_color.hex) {
                        colorDisplay = `
                            <div class="flex items-center mt-2">
                                <div style="background-color: ${data.result.avg_color.hex}; width: 50px; height: 50px; border: 1px solid #ccc;"></div>
                                <div class="ml-2">
                                    <div>色コード: ${data.result.avg_color.hex}</div>
                                    <div>RGB値: R=${data.result.avg_color.r}, G=${data.result.avg_color.g}, B=${data.result.avg_color.b}</div>
                                </div>
                            </div>
                        `;
                    }

                    htmlContent += `
                        <div class="text-green-600">分析完了!</div>
                        <div class="mt-3">
                            <div><strong>画像サイズ:</strong> ${data.result.width} × ${data.result.height} ピクセル</div>
                            <div><strong>優勢な色調:</strong> ${data.result.dominant_tone}</div>
                            ${data.result.brightness ? `<div><strong>明るさ:</strong> ${data.result.brightness.value} (${data.result.brightness.category})</div>` : ''}
                        </div>
                        <div class="mt-3">
                            <strong>平均色:</strong>
                            ${colorDisplay}
                        </div>
                    `;
                }

                // Add TensorFlow.js classification results
                if (tfResult.success) {
                    htmlContent += `
                        <div class="mt-4">
                            <strong>AI画像分類結果:</strong>
                            <ul class="mt-2 list-disc pl-5">
                                ${tfResult.predictions.map(pred =>
                                    `<li>${pred.className}: ${(pred.probability * 100).toFixed(2)}%</li>`
                                ).join('')}
                            </ul>
                        </div>
                    `;
                } else if (tfResult.error) {
                    htmlContent += `<div class="mt-4 text-red-600">AI分類エラー: ${tfResult.error}</div>`;
                }

                // Display the image and results
                resultContent.innerHTML = `
                    <div class="mb-4">
                        <strong>分析した画像:</strong><br>
                        ${img.outerHTML}
                    </div>
                    ${htmlContent}
                `;

                // Save the analysis results if needed
                if (data.success && tfResult.success) {
                    const combinedResult = {
                        standardAnalysis: data.result,
                        aiClassification: tfResult.predictions
                    };

                    saveAnalysisResults(combinedResult);
                }

            } catch (error) {
                resultContent.innerHTML = `
                    <div class="mb-4">
                        <strong>分析した画像:</strong><br>
                        ${img.outerHTML}
                    </div>
                    <div class="text-red-600">エラー: ${error.message}</div>
                `;
            }
        };
    });

    // Save analysis results to the server
    function saveAnalysisResults(combinedResult) {
        fetch('/image/save-analysis', {
            method: 'POST',
            headers: {
                'Content-Type': 'application/json',
                'X-CSRF-TOKEN': document.querySelector('meta[name="csrf-token"]').getAttribute('content')
            },
            body: JSON.stringify({
                post_id: document.querySelector('input[name="post_id"]').value,
                analysis_data: JSON.stringify(combinedResult)
            })
        })
        .then(response => response.json())
        .then(data => {
            if (data.success) {
                console.log('分析結果が保存されました');
            }
        })
        .catch(error => {
            console.error('分析結果の保存中にエラーが発生しました:', error);
        });
    }
});

// This is a simplified version of ImageNet classes
// In a real app, you'd want to include all 1000 classes
const IMAGENET_CLASSES = [
    'テレビ', '冷蔵庫', '本', 'タオル', '車', 'バス', '人', '犬', '猫', '鳥',
    '花', '木', '海', '山', '川', '空', '雲', '食べ物', '果物', '野菜',
    'コンピューター', 'カメラ', '時計', '電話', '椅子', 'テーブル', 'ベッド', 'ソファ', 'キッチン用品', '建物',
    '信号機', '道路', '橋', '船', '飛行機', '電車', '自転車', 'バイク', 'スポーツ用品', '楽器'
    // Normally you'd include all 1000 ImageNet classes here
];
const IMAGENET_CLASSES = []; の部分はImage netのラベルを追加する。この例では40ラベルしか記述されていないが実際には1000ラベル書いた。このラベルはネット上で獲得してほしい。
3.JavaScriptファイルの読み込み
resources/views/layouts/app.blade.phpまたはresources/views/post/show.blade.phpに、以下のコードを追加して作成したJavaScriptファイルを読み込みます:
<script src="{{ asset('js/tensorflow-classifier.js') }}"></script>
4.ImageAnalysisControllerの作成
sail artisan make:controller
ImageAnalysisControllerへの追加
<?php

namespace App\Http\Controllers;

use Illuminate\Http\Request;
use App\Models\Post;

class ImageAnalysisController extends Controller
{
    public function saveAnalysis(Request $request)
    {
        $validated = $request->validate([
            'post_id' => 'required|exists:posts,id',
            'analysis_data' => 'required|json'
        ]);

        $post = Post::findOrFail($validated['post_id']);
        $post->ai_analysis = $validated['analysis_data'];
        $post->save();

        return response()->json(['success' => true]);
    }
    public function analyze(Request $request)
{
    // 基本的な画像分析のロジック
    $validated = $request->validate([
        'image' => 'required|image|mimes:jpeg,png,jpg,gif|max:2048',
        'post_id' => 'required|exists:posts,id'
    ]);

    $image = $request->file('image');
    $imageInfo = getimagesize($image->path());
    $width = $imageInfo[0];
    $height = $imageInfo[1];

    // 画像の分析結果
    $result = [
        'width' => $width,
        'height' => $height,
        'dominant_tone' => $this->getDominantTone($image->path()),
        'avg_color' => $this->getAverageColor($image->path()),
        'brightness' => $this->getBrightness($image->path()),
    ];

    return response()->json([
        'success' => true,
        'result' => $result
    ]);
}

// 主要な色調を取得
private function getDominantTone($imagePath)
{
    // 簡略化した実装
    $img = imagecreatefromstring(file_get_contents($imagePath));
    $w = imagesx($img);
    $h = imagesy($img);

    $rTotal = $gTotal = $bTotal = 0;
    $total = 0;

    for ($x = 0; $x < $w; $x += 10) {
        for ($y = 0; $y < $h; $y += 10) {
            $rgb = imagecolorat($img, $x, $y);
            $r = ($rgb >> 16) & 0xFF;
            $g = ($rgb >> 8) & 0xFF;
            $b = $rgb & 0xFF;

            $rTotal += $r;
            $gTotal += $g;
            $bTotal += $b;
            $total++;
        }
    }

    $rAvg = $rTotal / $total;
    $gAvg = $gTotal / $total;
    $bAvg = $bTotal / $total;

    if ($rAvg > $gAvg && $rAvg > $bAvg) {
        return '赤系';
    } elseif ($gAvg > $rAvg && $gAvg > $bAvg) {
        return '緑系';
    } elseif ($bAvg > $rAvg && $bAvg > $gAvg) {
        return '青系';
    } else {
        return 'モノクロ系';
    }
}

// 平均色を取得
private function getAverageColor($imagePath)
{
    $img = imagecreatefromstring(file_get_contents($imagePath));
    $w = imagesx($img);
    $h = imagesy($img);

    $rTotal = $gTotal = $bTotal = 0;
    $total = 0;

    for ($x = 0; $x < $w; $x += 10) {
        for ($y = 0; $y < $h; $y += 10) {
            $rgb = imagecolorat($img, $x, $y);
            $r = ($rgb >> 16) & 0xFF;
            $g = ($rgb >> 8) & 0xFF;
            $b = $rgb & 0xFF;

            $rTotal += $r;
            $gTotal += $g;
            $bTotal += $b;
            $total++;
        }
    }

    $r = round($rTotal / $total);
    $g = round($gTotal / $total);
    $b = round($bTotal / $total);

    $hex = sprintf("#%02x%02x%02x", $r, $g, $b);

    return [
        'r' => $r,
        'g' => $g,
        'b' => $b,
        'hex' => $hex
    ];
}

// 明るさを取得
private function getBrightness($imagePath)
{
    $img = imagecreatefromstring(file_get_contents($imagePath));
    $w = imagesx($img);
    $h = imagesy($img);

    $brightnessTotal = 0;
    $total = 0;

    for ($x = 0; $x < $w; $x += 10) {
        for ($y = 0; $y < $h; $y += 10) {
            $rgb = imagecolorat($img, $x, $y);
            $r = ($rgb >> 16) & 0xFF;
            $g = ($rgb >> 8) & 0xFF;
            $b = $rgb & 0xFF;

            // 明るさの計算 (0-255)
            $brightness = (0.299 * $r + 0.587 * $g + 0.114 * $b);
            $brightnessTotal += $brightness;
            $total++;
        }
    }

    $avgBrightness = $brightnessTotal / $total;
    $category = '';

    if ($avgBrightness < 64) {
        $category = '暗い';
    } elseif ($avgBrightness < 128) {
        $category = 'やや暗い';
    } elseif ($avgBrightness < 192) {
        $category = 'やや明るい';
    } else {
        $category = '明るい';
    }

    return [
        'value' => round($avgBrightness, 2),
        'category' => $category
    ];
}
}
5.ルートの追加
routes/web.php に以下の行を追加します。
Route::post('/image/save-analysis', [App\Http\Controllers\ImageAnalysisController::class, 'saveAnalysis'])->name('image.save-analysis');
6.データベースへの列追加
sail artisan make:migration add_ai_analysis_to_posts_table --table=posts
を実行して新しくデータベースファイルを作成し
そのMigration Fileに以下のコードを追加する。
<?php

use Illuminate\Database\Migrations\Migration;
use Illuminate\Database\Schema\Blueprint;
use Illuminate\Support\Facades\Schema;

return new class extends Migration
{
    /**
     * Run the migrations.
     */
    public function up(): void
    {
        Schema::table('posts', function (Blueprint $table) {
            $table->json('ai_analysis')->nullable();
        });
    }

    /**
     * Reverse the migrations.
     */
    public function down(): void
    {
        Schema::table('posts', function (Blueprint $table) {
            $table->dropColumn('ai_analysis');
        });
    }
};
作成できたら以下のコードでマイグレーションを実行してください。
sail artisan migrate
7.HTMLの修正
resources/views/post/show.blade.php の画像分析フォームを以下のように修正します。
<div class="max-w-7xl mx-auto px-6 mt-8">
    <h3 class="text-lg font-semibold">画像分析</h3>

    <form id="imageAnalysisForm" class="mt-4" data-analyze-url="{{ route('image.analyze') }}">
        @csrf
        <input type="hidden" name="post_id" value="{{ $post->id }}">

        <div class="w-full flex flex-col">
            <label for="ai_image" class="font-semibold mt-2">分析する画像</label>
            <input id="ai_image" type="file" name="image" class="mt-1">
        </div>

        <button type="submit" class="mt-4 px-4 py-2 bg-blue-500 text-white rounded-md hover:bg-blue-600">
            分析する
        </button>
    </form>

    <div id="analysisResult" class="mt-6 p-4 border rounded-md hidden">
        <h4 class="font-medium text-lg">分析結果</h4>
        <div id="resultContent" class="mt-2"></div>
    </div>
</div>
8.JavaScriptとTensorFlowの読み込み
resources/views/post/show.blade.php の末尾( の直前)に次のコードを追加します:
<script src="https://cdn.jsdelivr.net/npm/@tensorflow/tfjs@3.18.0"></script>
<script src="{{ asset('js/tensorflow-classifier.js') }}"></script>
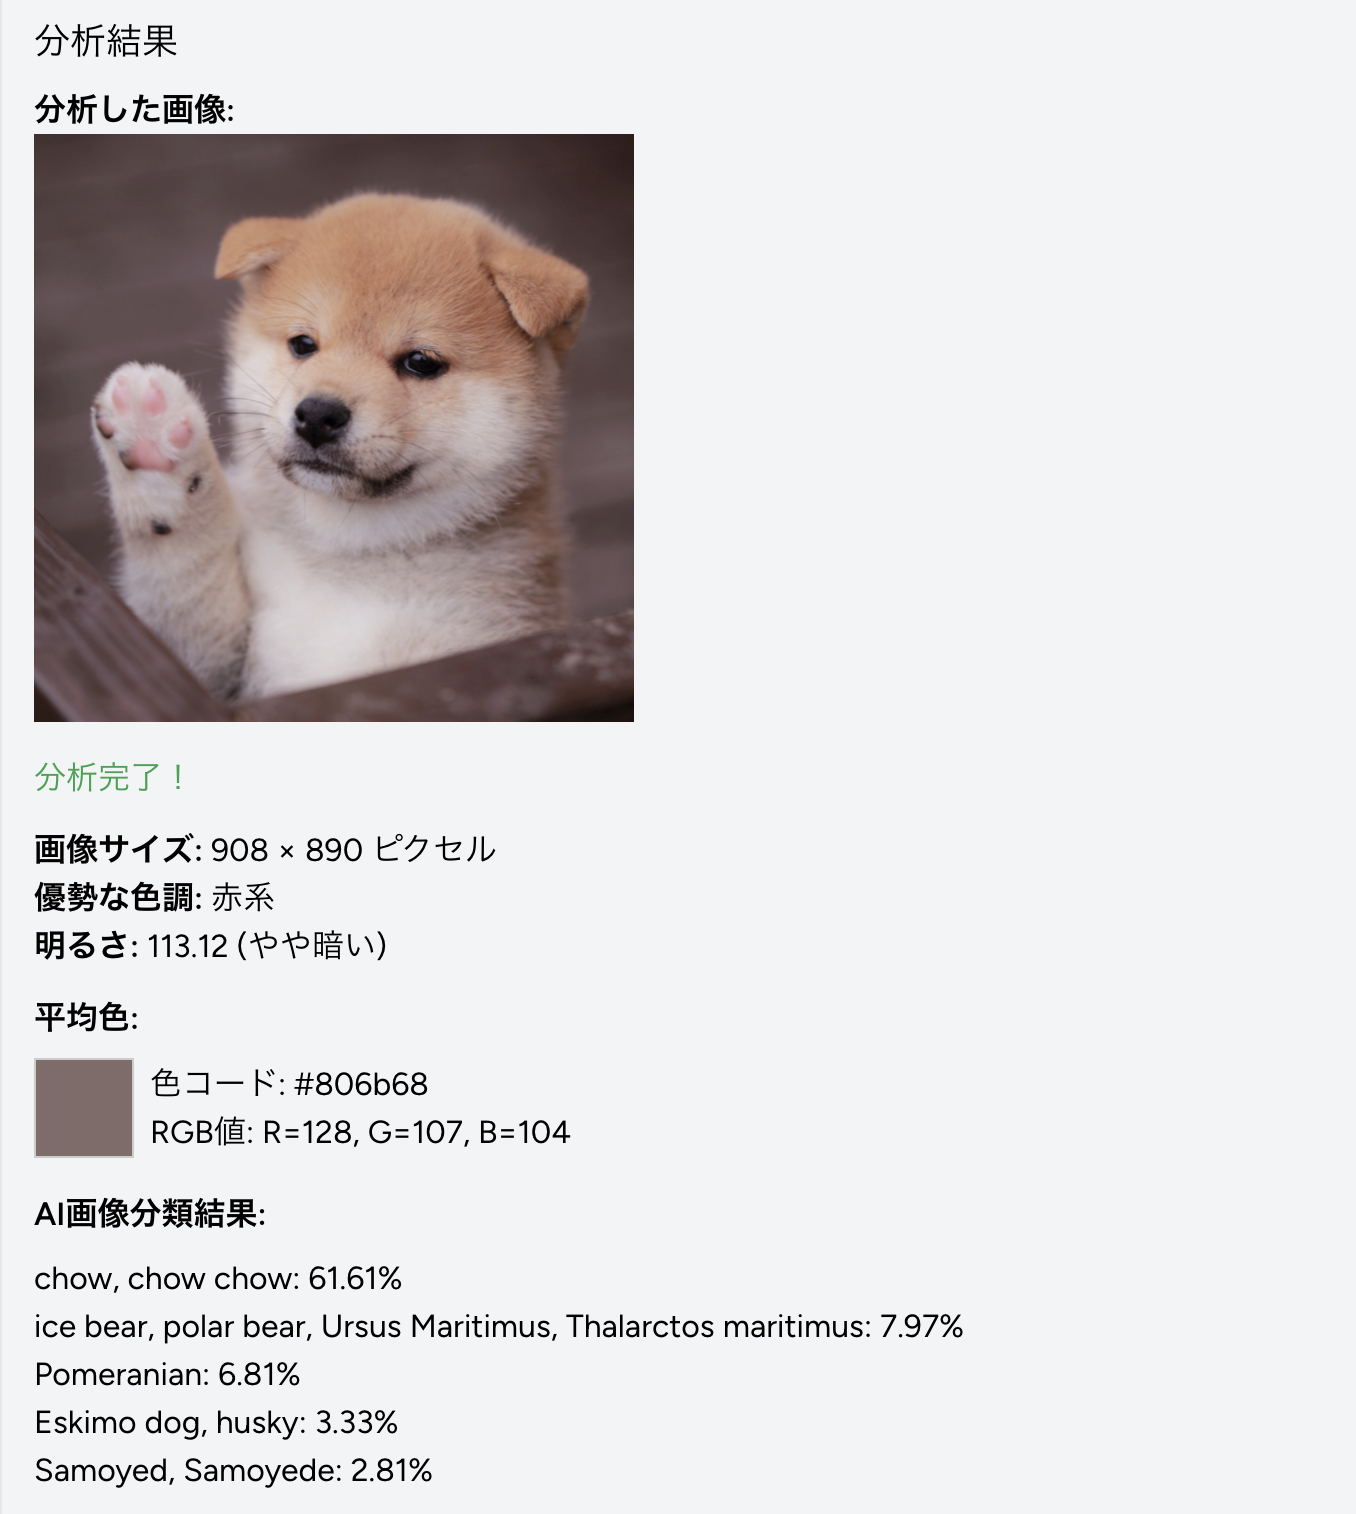
これで、TensorFlow.jsを使った画像分析と分類機能がLaravelアプリケーションに統合されます。アップロードした画像は分析され、その結果がデータベースに保存されます。
また、JavaScriptファイルの設定も確認してください。data-analyze-url 属性が正しく設定されているか確認するために、resources/views/post/show.blade.php の該当部分を以下のように変更することも検討してください:
<form id="imageAnalysisForm" class="mt-4" data-analyze-url="{{ route('image.analyze') }}">
すべての設定が完了したら、Laravelのキャッシュをクリアしてみてください:
./vendor/bin/sail artisan route:clear
./vendor/bin/sail artisan config:clear
./vendor/bin/sail artisan cache:clear

うまく出力されていますね!しかし編集機能と削除機能の部分を間違えて上書きしてしまったので直します汗