このような問い合わせフォームを作成したい。なお、テキストを送信すると私のメールアドレスにこのテキストが送信される仕組みにする。
1. ルートの設定
use App\Http\Controllers\ContactController;
use Illuminate\Support\Facades\Route;

Route::post('/contact', [ContactController::class, 'send'])->name('contact.send');
続いて localhost/contact のビューを作成する。
<!DOCTYPE html>
<html lang="{{ str_replace('_', '-', app()->getLocale()) }}">
    <head>
        <meta charset="utf-8">
        <meta name="viewport" content="width=device-width, initial-scale=1">
        <meta name="csrf-token" content="{{ csrf_token() }}">

        <title>{{ config('app.name', 'Laravel') }}</title>

        <!-- Fonts -->
        <link rel="preconnect" href="https://fonts.bunny.net">
        <link href="https://fonts.bunny.net/css?family=figtree:400,500,600&display=swap" rel="stylesheet" />

        <!-- Scripts -->
        @vite(['resources/css/app.css', 'resources/js/app.js'])
    </head>

    <body class="font-sans antialiased">
        <div class="min-h-screen bg-gray-100 mx-auto">
            @if(isset(Auth::user()->name))
                @include('layouts.navigation')
            @else
                @include('layouts.header-guest')
            @endif

            <header class="bg-white shadow">
                <div class="max-w-7xl mx-auto py-6 px-4 sm:px-6 lg:px-8">
                    <h2 class="font-semibold text-xl text-gray-800 leading-tight">
                        お問い合わせ
                    </h2>
                </div>
            </header>

            <div class="py-12">
                <main class="w-full sm:max-w-2xl mx-auto mt-6 px-6 py-4 bg-white shadow-md overflow-hidden sm:rounded-lg">
                    <div class="flex justify-center my-auto bg-white max-w-max">
                        <div class="text-center space-y-6">
                            <h1 class="text-4xl font-bold mb-6">お問い合わせフォーム</h1>
                            <intro>ご意見、不具合等ございましたら、下記のフォームに入力後に送信をクリックしてください。</intro>


<form action="{{ route('contact.send') }}" method="POST">
    @csrf

    <div class="w-full flex flex-col">
        <textarea name="body" class="w-full py-2 px-3 border border-gray-300 rounded-md" id="body" cols="30" rows="5"></textarea>
    </div>

    <x-primary-button type="submit" class="mt-4">
        送信する
    </x-primary-button>
</form>

                        </div>
                    </div>
                </main>
            </div>
            @include('layouts.footer')
        </div>
    </body>
</html>
route('contact.send')がここでは注目。
submitで問い合わせ内容を送信しているようだ。
これはContactControllerというコントローラーの'send'関数を使用するという意味なので、
続いてコントローラーを見ていく
2. コントローラーの部分
<?php

namespace App\Http\Controllers;

use Illuminate\Http\Request;
use Illuminate\Support\Facades\Mail;
use App\Mail\ContactMail;

class ContactController extends Controller
{
    public function send(Request $request)
    {
        $request->validate([
            'body' => 'required|string|max:5000',
        ]);

        // メール送信
        Mail::to('example@example.com')->send(new ContactMail($request->body));

        return redirect()->back()->with('success', 'お問い合わせ内容を送信しました。');
    }
}
ここで注目すべきは
// メール送信
Mail::to('example@example.com')->send(new ContactMail($request->body));
の部分だ
さて具体的な話をする前に、:: と -> をおさらいします。
3. phpの基礎確認
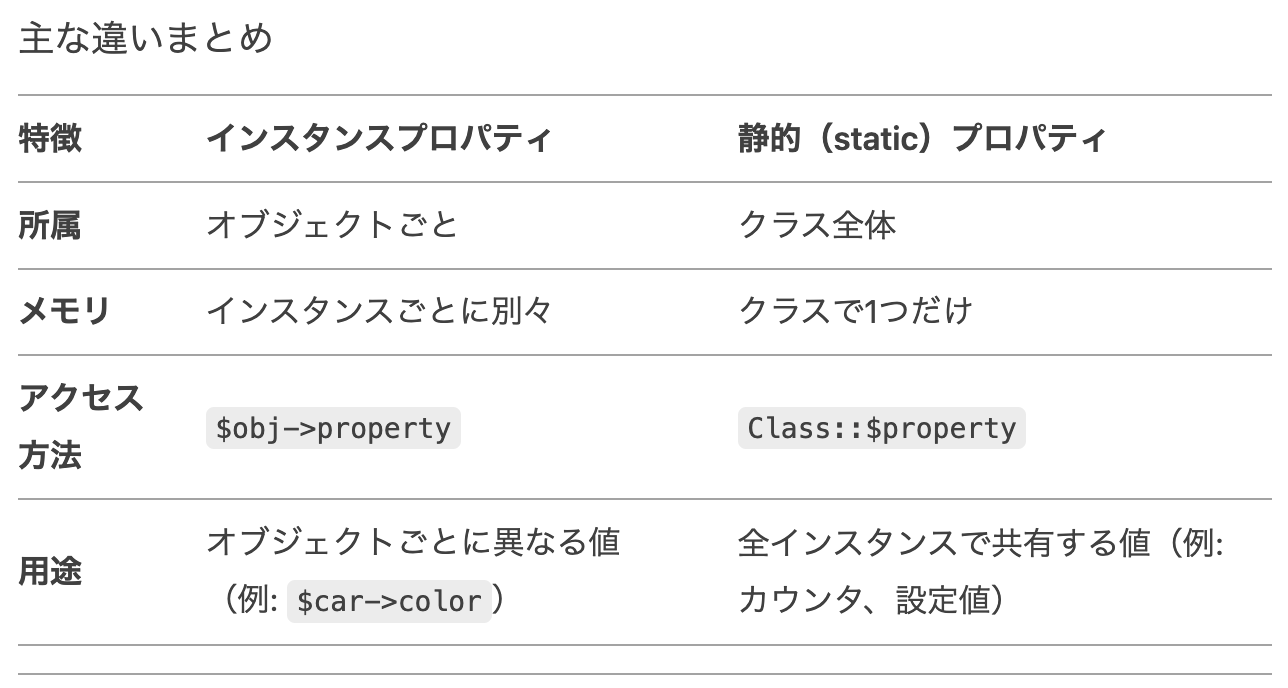
phpにおいて -> はオブジェクト演算子(アロー演算子)と呼ばれ、オブジェクトのプロパティやメソッドにアクセスするために使用されます。
オブジェクトのプロパティとは、以下のようにクラスで定義されたインスタンスのことである。
class Car {
    public $color; // インスタンスプロパティ(オブジェクトごとに異なる値を持つ)

    public function __construct($color) {
        $this->color = $color;
    }
}

$car1 = new Car("red");   // インスタンス1(赤い車)
$car2 = new Car("blue");  // インスタンス2(青い車)

echo $car1->color; // "red"(car1のcolorプロパティ)
echo $car2->color; // "blue"(car2のcolorプロパティ)
一方で :: は静的なプロパティに使用します。静的なプロパティとは例えば以下のように
class Car {
    public static $count = 0; // 静的プロパティ(クラス全体で共有)

    public function __construct() {
        self::$count++; // インスタンス生成ごとにカウントアップ
    }
}

new Car(); // 1台目
new Car(); // 2台目
echo Car::$count; // 2(全インスタンスで共有される)
$count は個々のオブジェクトではなく、クラス自体に属するため、Car::$count でアクセスします。
さて先ほどのコードはチェーン記法で書かれています。本来は
$mailer = Mail::to('example@example.com');
$mailer->send(new ContactMail('本文'));
と同じ意味です。
さて本題に戻る。
Mail::to('example@example.com')のMail は Laravel の ファサード(Facade) で、メール送信機能を提供します。
::to() は静的なメソッドで、送信先のメールアドレスを指定します。
ここでは example@example.com に送信しています。
->send(new ContactMail($request->body))
->send() は、実際にメールを送信するメソッドです。
new ContactMail($request->body) は、メールの内容を定義したMailableクラス(ContactMail)をインスタンス化しています。
$request->body は、ユーザーがフォームなどで入力した本文データを渡しています。
ContactMail は Mailable クラスを継承して作成され、メールの件名・本文・ビュー(HTMLテンプレート) などを定義します
4. app/Mail/ContactMail.php
<?php

namespace App\Mail;

use Illuminate\Bus\Queueable;
use Illuminate\Contracts\Queue\ShouldQueue;
use Illuminate\Mail\Mailable;
use Illuminate\Queue\SerializesModels;


// Mailable クラスを継承した子クラスで上書きする
class ContactMail extends Mailable
{
    use Queueable, SerializesModels;

    public $body;

    public function __construct($body)
    {
        $this->body = $body;
    }

    public function build()
    {
        return $this->subject('お問い合わせが届きました')
                    ->view('emails.contact')
                    ->with(['body' => $this->body]);
    }
}
Mailable クラスを継承
Laravel が提供するメール送信の基底クラスです。
Queueable, SerializesModels
Queueable: メールをキュー(非同期処理)で送信できるようにする。
SerializesModels: メールにモデル(DB のデータ)を含む場合、シリアライズ(データ変換)をサポート。
ここら辺は正直わからん。。。
またresources/views/emails/contact.blade.phpにメールのフォームを作る
<!DOCTYPE html>
<html lang="ja">
<head>
    <meta charset="UTF-8">
    <title>お問い合わせ内容</title>
</head>
<body>
    <p>以下のお問い合わせが届きました:</p>
    <p>{{ $body }}</p>
</body>
</html>
5. その他設定
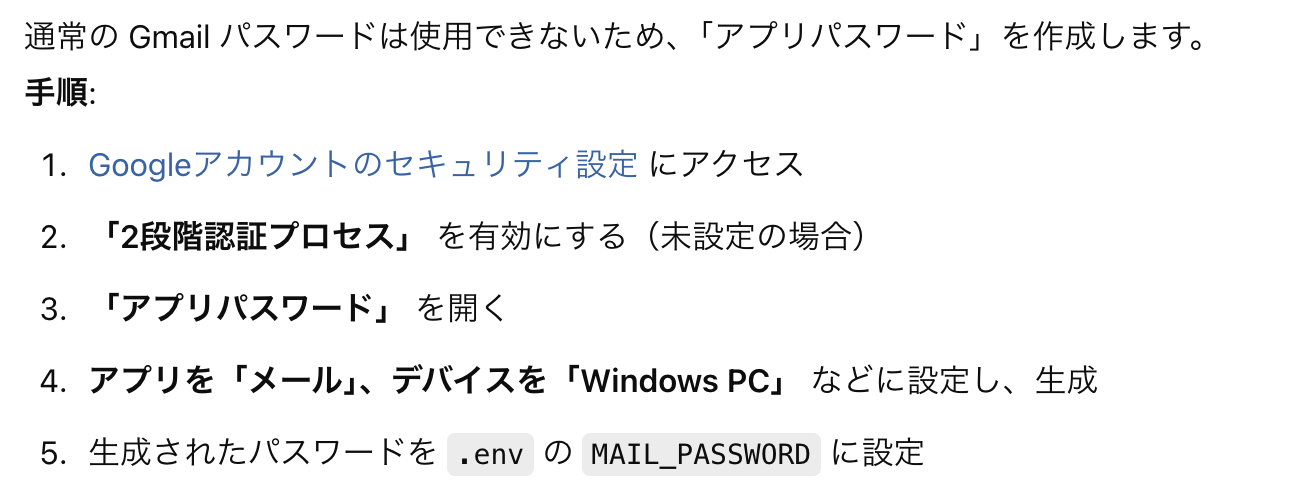
さてさらに.envも変更が必要だ
MAIL_MAILER=smtp
MAIL_HOST=smtp.gmail.com
MAIL_PORT=587
MAIL_USERNAME=your-email@gmail.com
MAIL_PASSWORD=生成したアプリパスワード
MAIL_ENCRYPTION=tls
MAIL_FROM_ADDRESS=your-email@gmail.com
MAIL_FROM_NAME="お問い合わせシステム"
続いて以下の設定もする