はじめに
Flutterスマホアプリに標準で備わっている左上にある戻るボタン。
今回は、その「戻るボタンを押した際に値を渡す方法」について説明します。
戻るボタンで遷移元画面に値を渡す方法
- 【遷移先画面】onWillPopに値を渡す処理を追加
- 【遷移元画面】非同期処理にする
順に説明します。
【遷移先画面】onWillPopに値を渡す処理を追加
return WillPopScope(
      onWillPop: () {
        // 第2引数に渡す値を設定
        Navigator.pop(context, '戻ります');
        return Future.value(false);
       },
     );
Navigator.pop()の第2引数に渡す値を設定します。
return Future.value(false);も必須。
こちらの引数をtrueにすると、遷移元の画面までpopされてしまうので、falseにしてください。
【遷移元画面】非同期処理にする
RaisedButton(
  child: Text('Go to Edit Page'),
  onPressed: () async {
    var result = await Navigator.push(
      context,
      MaterialPageRoute(
        builder: (context) => EditPage(),
      ),
    );
    print(result);
  },
),
onPressedにasyncをつけ、Navigator.pushにawaitをつけて非同期処理にするのがポイント。
resultで値を受け取っています。
サンプルコード例
それでは紹介した方法を使って、値を渡してみましょう。
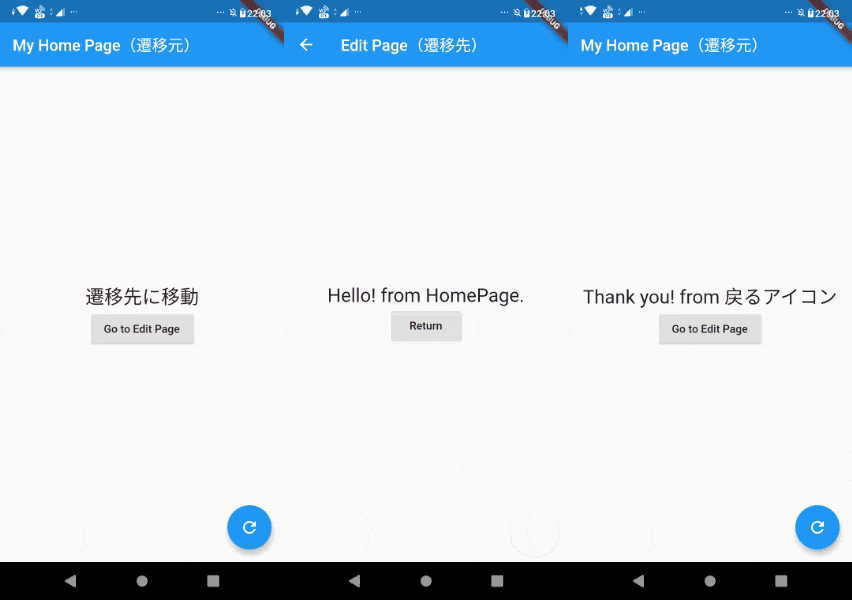
実践的な内容にするため、「遷移元に値を戻して、画面に反映する」ところまでやってみます。
遷移元ページはStatefulWidgetで実装してみました。
StatefulWidgetとは、状態(データ)に変更があった際に画面を再描画できるWidgetのこと。
▼の使い方についてはこちらをどうぞ。
import 'package:flutter/material.dart';
import 'package:flutter/rendering.dart';

void main() {
  runApp(
    MaterialApp(
      home: MyHomePage(),
    ),
  );
}

// 遷移元
class MyHomePage extends StatefulWidget {
  @override
  _MyHomePageState createState() => _MyHomePageState();
}

class _MyHomePageState extends State<MyHomePage> {
  String _result;

  @override
  void initState() {
    super.initState();
    _result = "遷移先に移動";
  }

  @override
  Widget build(BuildContext context) {
    return Scaffold(
      appBar: AppBar(
        title: Text('My Home Page(遷移元)'),
      ),
      body: Center(
        child: Column(
          mainAxisAlignment: MainAxisAlignment.center,
          children: [
            Text(
              _result,
              style: Theme.of(context).textTheme.headline5,
            ),
            RaisedButton(
              child: Text('Go to Edit Page'),
              onPressed: () async {
                var result = await Navigator.push(
                  context,
                  MaterialPageRoute(
                    builder: (context) =>
                        // 引数に遷移元から遷移先へ渡す値を設定
                        EditPage(receive: 'Hello! from HomePage.'),
                  ),
                );
                print(result);
                setState(() {
                  _result = result;
                });
              },
            ),
          ],
        ),
      ),
      floatingActionButton: FloatingActionButton(
        onPressed: () {
          setState(() {
            _result = "遷移先に移動";
          });
        },
        tooltip: 'Increment',
        child: Icon(
          Icons.refresh,
        ),
      ),
    );
  }
}

// 遷移先
class EditPage extends StatelessWidget {
  final receive;
  const EditPage({Key key, this.receive}) : super(key: key);

  @override
  Widget build(BuildContext context) {
    return WillPopScope(
      onWillPop: () {
        // 第2引数に渡す値を設定
        Navigator.pop(context, 'Thank you! from 戻るアイコン');
        return Future.value(false);
      },
      child: Scaffold(
        appBar: AppBar(
          title: Text('Edit Page(遷移先)'),
        ),
        body: Center(
          child: Column(
            mainAxisAlignment: MainAxisAlignment.center,
            children: [
              Text(
                receive,
                style: Theme.of(context).textTheme.headline5,
              ),
              RaisedButton(
                child: Text('Return'),
                onPressed: () =>
                    Navigator.of(context).pop('Thank you! from 戻るボタン'),
              ),
            ],
          ),
        ),
      ),
    );
  }
}
受け取った値をresultに格納して、setState()内で自分の_resultに設定して更新しています。
応用:Providerで実現してみる
StatefulWidgetではなく、Providerを使って値の更新をしてみましょう。
最近ではStatefulWidgetよりProviderで更新を行う方法が推奨されていますので、こちらのほうがより実践的かと思います。
▼こちらの記事にまとめました!
【Flutter】Providerを使って複数画面で再描画を行う【初心者向け】
