マンダラチャートとは
某二刀流メジャーリーガーが高校時代、目標を達成するために作成していたことで有名ですが、添付画像のように9×9マスで、以下のように構成されています。
- 中央のマス:メインの目標やテーマを記入する
- 周囲の8つのマス:中央の目標に対するサブゴールや要素を記入する
- 更に外側の8つの区画:各サブゴールなどについて、さらに詳細な要素やアクションを記入する
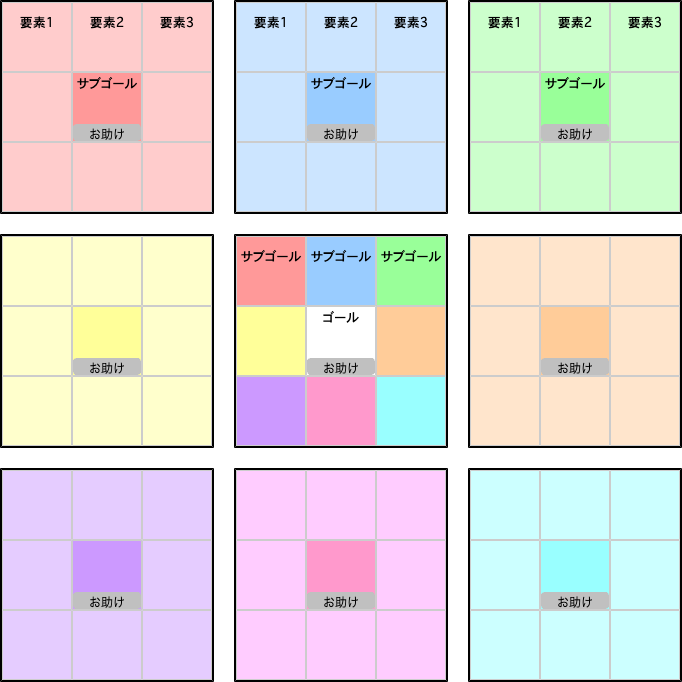
意外と埋まらない、、、
マンダラチャートを作成したことがある人はわかるかもしれませんが、意外と関連する内容が浮かばず、マスが埋まらなかったりします。
そこで、お助けボタンを各区画の中央マスに配置し、そのボタンを押すと、関連する単語リストが下に表示されるようにしました。

機能
- 中央グリッドと周りのグリッドで同じ色のマスは自動的に同じ文字が入る
- お助けボタンを押すと、関連する言葉のリストが表示される
- 「画像を保存」のボタンを押すと、マンダラチャートの画像を保存する
フォルダ構造
フォルダ構造は以下の通りです。
my-mandalart-app/
│
├── public/
│   ├── index.html
│
├── src/
│   ├── App.js
│   ├── App.css
│   ├── index.js
│   ├── styles.css
│
├── .gitignore
├── package.json
└── README.md
実装
index.html
マンダラチャート作成シートを表示するための基本的なテンプレートです。スタイルは外部のCSSファイル(styles.css)に、インタラクティブな機能は外部のJavaScriptファイル(index.js)により提供されます。
index.html
<!DOCTYPE html>
<html lang="ja">
<head>
    <meta charset="UTF-8">
    <meta name="viewport" content="width=device-width, initial-scale=1.0">
    <title>マンダラチャート作成シート</title>
    <link rel="stylesheet" href="./styles.css">
</head>
<body>
    <div id="app"></div>
    <script src="./index.js"></script>
</body>
</html>
App.js
インポート
スタイルシートやライブラリなどをインポート
App.js
import React, { useState } from "react";
import html2canvas from "html2canvas";
import "./styles.css";
import { OpenAI } from "openai";
OpenAI APIとの連携
OpenAI APIと連携し、関連する単語を取得
今回API KEYを直接入力していますが、本来であれば、バックエンドで実装した方が良いです。
App.js
const apiKey = "your open ai api key"; // ここにOpenAI APIキーを入力

const openai = new OpenAI({ apiKey, dangerouslyAllowBrowser: true });

const fetchRelatedWords = async (topic) => {
  try {
    const completion = await openai.chat.completions.create({
      model: "gpt-4o",
      messages: [
        {
          role: "user",
          content: `"${topic}"に関連する単語を15個カンマ区切りで教えて:`,
        },
      ],
    });
    return completion.choices[0].message.content
      .trim()
      .split(",")
      .map((word) => word.trim());
  } catch (error) {
    console.error("Error fetching related words:", error);
    throw new Error("関連する言葉を取得できませんでした");
  }
};
セルコンポーネント
テキストエリアと必要に応じて「お助けボタン」を表示するコンポーネント。
App.js
const Cell = ({ value, onChange, colorClass, onHelp }) => (
  <div className={`cell ${colorClass}`}>
    <textarea
      value={value}
      onChange={(e) => onChange(e.target.value)}
      className={colorClass}
    />
    {onHelp && (
      <button onClick={onHelp} className="help-button">
        お助け
      </button>
    )}
  </div>
);
3x3グリッドコンポーネント
3x3のグリッドを表示するコンポーネントです。
App.js
const Grid3x3 = ({
  baseIndex,
  cells,
  handleChange,
  gridClass,
  isCenterGrid,
  handleHelpClick,
}) => {
  const centerIndices = isCenterGrid ? [0, 1, 2, 9, 10, 11, 18, 19, 20] : [];
  return (
    <div className={`grid3x3 ${gridClass}`}>
      {Array.from({ length: 3 }).map((_, rowIndex) =>
        Array.from({ length: 3 }).map((_, colIndex) => {
          const index = baseIndex + rowIndex * 9 + colIndex;
          const isCenterCell = rowIndex === 1 && colIndex === 1;
          let colorClass = `${gridClass}-other`;

          if (isCenterGrid && centerIndices.includes(index - baseIndex)) {
            const correspondingIndex =
              baseIndex + (rowIndex - 1) * 3 + (colIndex - 1);
            colorClass = `${gridClass}-other-${centerIndices.indexOf(
              index - baseIndex
            )}`;
          } else if (isCenterCell) {
            colorClass = `${gridClass}-center`;
          }

          return (
            <Cell
              key={index}
              value={cells[index]}
              onChange={(newValue) => handleChange(index, newValue)}
              colorClass={colorClass}
              onHelp={isCenterCell ? () => handleHelpClick(index) : null}
            />
          );
        })
      )}
    </div>
  );
};
メインアプリケーション
- メインコンポーネント
マンダラチャート全体の状態を管理する - 関数 handleChange
中央グリッドと対応するグリッドの値も連動して変更されます - 関数 handleHelpClick
「お助けボタン」がクリックされたときに関連する単語を取得し、状態に設定します - handleSave
マンダラチャートを画像として保存する
App.js
const App = () => {
  const initialCells = Array(81).fill("");
  const [cells, setCells] = useState(initialCells);
  const [relatedWords, setRelatedWords] = useState([]);

  const handleChange = (index, newValue) => {
    const newCells = [...cells];
    newCells[index] = newValue;

    const centerIndices = [30, 31, 32, 39, 41, 48, 49, 50];
    const correspondingIndices = [10, 13, 16, 37, 43, 64, 67, 70];

    if (centerIndices.includes(index)) {
      const groupIndex = centerIndices.indexOf(index);
      const correspondingIndex = correspondingIndices[groupIndex];
      newCells[correspondingIndex] = newValue;
    } else if (correspondingIndices.includes(index)) {
      const groupIndex = correspondingIndices.indexOf(index);
      const centerIndex = centerIndices[groupIndex];
      newCells[centerIndex] = newValue;
    }

    setCells(newCells);
  };

  const handleHelpClick = async (index) => {
    const topic = cells[index];
    if (!topic) return alert("先に中央のマスにテーマを入力してください");

    try {
      const words = await fetchRelatedWords(topic);
      setRelatedWords(words);
    } catch (error) {
      alert("関連する言葉を取得する際にエラーが発生しました");
    }
  };

  const gridClasses = [
    "color-red",
    "color-blue",
    "color-green",
    "color-yellow",
    "color-white", // 中央グリッド
    "color-orange",
    "color-purple",
    "color-pink",
    "color-turquoise",
  ];

  const handleSave = () => {
    html2canvas(document.querySelector(".grid-container")).then((canvas) => {
      const link = document.createElement("a");
      link.download = "mandalart.png";
      link.href = canvas.toDataURL();
      link.click();
    });
  };

  return (
    <div className="app-container">
      <h1 className="title">マンダラチャート作成シート</h1>
      <div className="content-container">
        <div className="grid-container">
          {Array.from({ length: 3 }).map((_, rowIndex) =>
            Array.from({ length: 3 }).map((_, colIndex) => {
              const baseIndex = rowIndex * 27 + colIndex * 3;
              const classIndex = rowIndex * 3 + colIndex;
              const isCenterGrid = classIndex === 4;
              return (
                <Grid3x3
                  key={baseIndex}
                  baseIndex={baseIndex}
                  cells={cells}
                  handleChange={handleChange}
                  gridClass={gridClasses[classIndex]}
                  isCenterGrid={isCenterGrid}
                  handleHelpClick={handleHelpClick}
                />
              );
            })
          )}
        </div>
        <div className="help-section">
          <h2>お助けリスト</h2>
          <ul>
            {relatedWords.map((word, index) => (
              <li key={index}>{word}</li>
            ))}
          </ul>
        </div>
      </div>
      <button className="save-button" onClick={handleSave}>
        画像を保存
      </button>
    </div>
  );
};

export default App;
App.css
マンダラチャート作成シートのスタイルを定義し、各セルを均等に配置し、特定の列や行、外枠のボーダーを太くして視覚的に区切りを明確にするためのものです。
App.cssのコード
全体のスタイル設定
App.css
body {
  font-family: Arial, sans-serif;
  display: flex;
  flex-direction: column;
  justify-content: center;
  align-items: center;
  height: 100vh;
  margin: 0;
  background-color: #f0f0f0;
}
グリッドのスタイル
App.css
.grid {
  display: grid;
  grid-template-columns: repeat(9, 70px);
  grid-template-rows: repeat(9, 70px);
  gap: 0;
}
セルのスタイル
App.css
.cell {
  width: 70px;
  height: 70px;
  display: flex;
  justify-content: center;
  align-items: center;
  background-color: white;
  position: relative;
  border: 1px solid #ccc;
}
セルのコンテンツのスタイル
App.css
.cell-content {
  display: flex;
  align-items: center;
  justify-content: center;
  width: 100%;
  height: 100%;
}
線を太くするスタイル
App.css
.grid > :nth-child(3n+1) {
  border-left: 2px solid black;
}

.grid > :nth-child(3n) {
  border-right: 2px solid black;
}

.grid > :nth-child(1):nth-child(9),
.grid > :nth-child(10):nth-child(18),
.grid > :nth-child(19):nth-child(27) {
  border-bottom: 2px solid black;
}

.grid > :nth-child(28):nth-child(36),
.grid > :nth-child(37):nth-child(45),
.grid > :nth-child(46):nth-child(54) {
  border-bottom: 2px solid black;
}

.grid > :nth-child(55):nth-child(63),
.grid > :nth-child(64):nth-child(72),
.grid > :nth-child(73):nth-child(81) {
  border-bottom: 2px solid black;
}

.grid > :nth-child(-n+9) {
  border-top: 2px solid black;
}

.grid > :nth-child(n+1):nth-child(9n+1) {
  border-left: 2px solid black;
}

.grid > :nth-child(9n) {
  border-right: 2px solid black;
}

.grid > :nth-last-child(-n+9) {
  border-bottom: 2px solid black;
}
index.js
Reactをブラウザにレンダリングするための基本的な設定を行っています。
index.js
import React from "react";
import { createRoot } from "react-dom/client";
import App from "./App";

const container = document.getElementById("app");
const root = createRoot(container);
root.render(<App />);
styles.css
マンダラチャート作成シートのスタイルを定義しています。
styles.cssのコード
アプリケーション全体のスタイル
styles.css
.app-container {
    text-align: center;
}

.title {
    margin-bottom: 10px;
}
コンテンツとグリッドのスタイル
styles.css
.content-container {
    display: flex;
    flex-direction: column;
    align-items: center;
    width: 100%;
}

.grid-container {
    display: grid;
    grid-template-columns: repeat(3, auto);
    grid-template-rows: repeat(3, auto);
    gap: 20px;
    margin-bottom: 15px;
}

.grid3x3 {
    display: grid;
    grid-template-columns: repeat(3, 70px);
    grid-template-rows: repeat(3, 70px);
    gap: 0;
    border: 2px solid black;
}
セルのスタイル
styles.css
.cell {
    width: 68px;
    height: 68px;
    display: flex;
    flex-direction: column;
    justify-content: center;
    align-items: center;
    position: relative;
    border: 1px solid #ccc;
}

textarea {
    text-align: center;
    width: 100%;
    height: 75%;
    border: none;
    font-size: 1em;
    resize: none;
    overflow: hidden;
    display: flex;
    align-items: center;
    justify-content: center;
    padding: 0;
    box-sizing: border-box;
}
ヘルプボタンのスタイル
styles.css
.help-button {
    width: 100%;
    height: 25%;
    font-size: 12px;
    background-color: #C0C0C0;
    color: black;
    border: none;
    border-radius: 3px;
    cursor: pointer;
    display: flex;
    align-items: center;
    justify-content: center;
}

.help-button:hover {
    background-color: #0056b3;
}
ヘルプセクションのスタイル
styles.css
.help-section {
    width: calc( 585px + 4 * 20px + 4px);
    text-align: center;
    border: 2px solid black;
    padding: 5px;
    border-radius: 5px;
}

.help-section h2 {
    margin: 0;
    padding: 3px;
}

.help-section ul {
    list-style-type: none;
    padding: 0;
}

.help-section li {
    background-color: #e0e0e0;
    padding: 5px;
    border-radius: 3px;
    display: inline-block;
}
セルの色クラス
styles.css
/* 対応するセルの色クラスを定義 */
.color-red-center,
.color-white-other-0 {
    background-color: #ff9999;
}

.color-red-other {
    background-color: #ffcccc;
}

.color-blue-center,
.color-white-other-1 {
    background-color: #99ccff;
}

.color-blue-other {
    background-color: #cce5ff;
}

.color-green-center,
.color-white-other-2 {
    background-color: #99ff99;
}

.color-green-other {
    background-color: #ccffcc;
}

.color-yellow-center,
.color-white-other-3 {
    background-color: #ffff99;
}

.color-yellow-other {
    background-color: #ffffcc;
}

.color-orange-center,
.color-white-other-5 {
    background-color: #ffcc99;
}

.color-orange-other {
    background-color: #ffe5cc;
}

.color-purple-center,
.color-white-other-6 {
    background-color: #cc99ff;
}

.color-purple-other {
    background-color: #e5ccff;
}

.color-pink-center,
.color-white-other-7 {
    background-color: #ff99cc;
}

.color-pink-other {
    background-color: #ffccff;
}

.color-turquoise-center,
.color-white-other-8 {
    background-color: #99ffff;
}

.color-turquoise-other {
    background-color: #ccffff;
}
保存ボタンのスタイル
styles.css
.save-button {
    margin-top: 15px;
    padding: 8px 30px;
    font-size: 18px;
    background-color: #C0C0C0;
    color: black;
    border: none;
    border-radius: 5px;
    cursor: pointer;
}

.save-button:hover {
    background-color: #0056b3;
}
まとめ
今回、私は初めてJavaScriptで実装しました。
正直わからない部分も多かったので、ChatGPTをふんだんに使用しました。
初心者でも3日間で実装できたので、初めて触る言語で実装するときは、ChatGPTを用いても良いのではないかと思いました。