本記事は、赤帽エンジニア Advent Calendar 2019 の16日目です。
はじめに
本記事では、OpenShift 上で GitOps が実現できることを紹介するため、ArgoCD を使って簡単な GitOps を実践してみます。
GitOps とは
GitOps とは、Git を宣言的なインフラとアプリケーションの "Single Source of Truth" として、Kubernetes クラスタを構成管理するためのプラクティスです。
アプリケーションのソースコードを Git で管理するのと同様に、Pull Request などのアプリケーション開発で一般的に利用されているプラクティスを、Kubernetes のマニフェストの管理にも適用することができます。
CNCF (Cloud Native Computing Foundation) の Sandbox プロジェクトとしてホストされている Flux の開発を推進している Weaveworks 社は、GitOps の基本原則として以下の4つを紹介しています。
- システム全体が宣言的に記述されていること (The entire system described declaratively)
- 標準的な状態が Git でバージョン管理されていること (The canonical desired system state versioned in Git)
- 承認された変更をシステムに自動的に適用できること (Approved changes can be automatically applied to the system)
- 正確性の担保と変更を通知できること (Software agents to ensure correctness and alert on divergence)
ArgoCD とは
ArgoCD は、Kubernetes のマニフェストの構成管理に利用され、Continuous Delivery (継続的デリバリー) に特化したツールです。前述の Flux との違いとしては、Flux が1つのプロセスで1つの Git リポジトリを管理するのに対し、ArgoCD では1つのプロセスで複数の Git リポジトリを管理することができます。
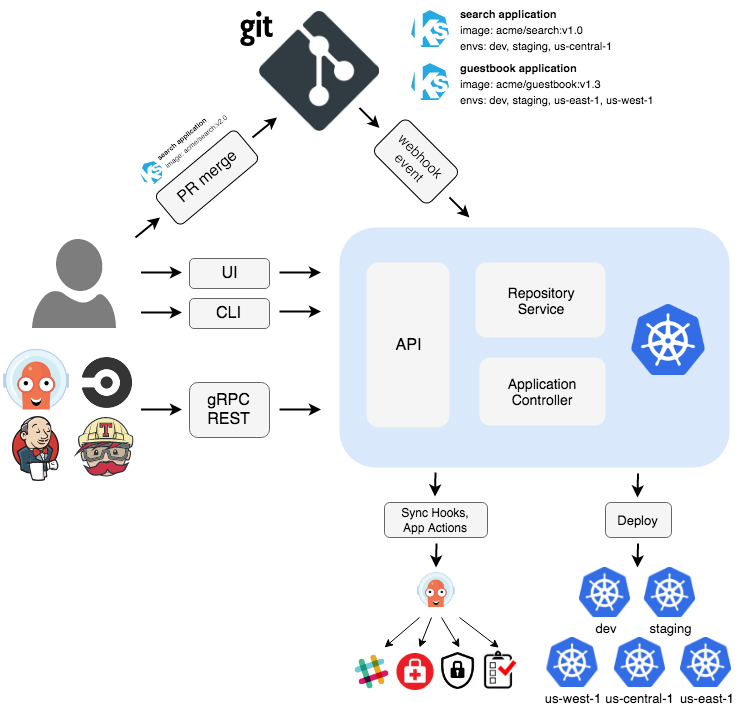
ArgoCD のアーキテクチャ図は以下の通りです。
また、2019/11/14 に Flux の開発を推進している Weaveworks 社と ArgoCD の開発を推進している Intuit 社がパートナーシップを結んだことが発表されました。これにより、ArgoCD プロジェクトと Flux CD プロジェクトが統合された、GitOps Engine プロジェクトが開始されています。
Introducing Argo Flux - A Weaveworks-Intuit-AWS Collaboration
https://www.weave.works/blog/argo-flux-join-forces
OpenShift 上で ArgoCD を動かしてみた
ここからは ArgoCD を使って簡単な GitOps を実践してみます。
ArgoCD インストール
ArgoCD インストール
まずは OpenShift 上に ArgoCD を以下のコマンドを実行してインストールします。
$ oc create namespace argocd
namespace/argocd created

$ oc -n argocd apply -f https://raw.githubusercontent.com/argoproj/argo-cd/v1.2.2/manifests/install.yaml
customresourcedefinition.apiextensions.k8s.io/applications.argoproj.io created
customresourcedefinition.apiextensions.k8s.io/appprojects.argoproj.io created
serviceaccount/argocd-application-controller created
serviceaccount/argocd-dex-server created
serviceaccount/argocd-server created
role.rbac.authorization.k8s.io/argocd-application-controller created
role.rbac.authorization.k8s.io/argocd-dex-server created
role.rbac.authorization.k8s.io/argocd-server created
clusterrole.rbac.authorization.k8s.io/argocd-application-controller created
clusterrole.rbac.authorization.k8s.io/argocd-server created
rolebinding.rbac.authorization.k8s.io/argocd-application-controller created
rolebinding.rbac.authorization.k8s.io/argocd-dex-server created
rolebinding.rbac.authorization.k8s.io/argocd-server created
clusterrolebinding.rbac.authorization.k8s.io/argocd-application-controller created
clusterrolebinding.rbac.authorization.k8s.io/argocd-server created
configmap/argocd-cm created
configmap/argocd-rbac-cm created
configmap/argocd-ssh-known-hosts-cm created
configmap/argocd-tls-certs-cm created
secret/argocd-secret created
service/argocd-dex-server created
service/argocd-metrics created
service/argocd-redis created
service/argocd-repo-server created
service/argocd-server-metrics created
service/argocd-server created
deployment.apps/argocd-application-controller created
deployment.apps/argocd-dex-server created
deployment.apps/argocd-redis created
deployment.apps/argocd-repo-server created
deployment.apps/argocd-server created
ArgoCD のインストールが完了すると、以下のような Pod が起動されます。
$ oc get po
NAME                                             READY   STATUS    RESTARTS   AGE
argocd-application-controller-7b96cb74dd-82dpf   1/1     Running   0          4m51s
argocd-dex-server-58f5b5b44f-nzn6p               1/1     Running   0          4m51s
argocd-redis-868b8cb57f-vw6vj                    1/1     Running   0          4m51s
argocd-repo-server-5bf79d67f4-c5zgx              1/1     Running   0          4m50s
argocd-server-68df77dbb6-vfj4q                   1/1     Running   0          4m50s
Route 作成
次に Web コンソールや CLI ツールからの接続に利用するため Route を作成します。
本記事の環境では自己証明書を利用しているため、以下のコマンドのように argocd-server の Deployment にパッチを適用してから、argocd-server の Service を元に Route を作成します。
$ PATCH='{"spec":{"template":{"spec":{"$setElementOrder/containers":[{"name":"argocd-server"}],"containers":[{"command":["argocd-server","--insecure","--staticassets","/shared/app"],"name":"argocd-server"}]}}}}'
$ oc -n argocd patch deployment argocd-server -p $PATCH
deployment.extensions/argocd-server patched

$ oc -n argocd create route edge argocd-server --service=argocd-server --port=http --insecure-policy=Redirect
route.route.openshift.io/argocd-server created
ArgoCD CLI ツールのインストール
Web コンソールからも操作することができますが、本記事では ArgoCD CLI ツールを使って GitOps の実践を行います。
以下のコマンドを実行して ArgoCD CLI ツールをインストールします。
$ sudo curl -L https://github.com/argoproj/argo-cd/releases/download/v1.2.2/argocd-linux-amd64 -o /usr/local/bin/argocd
$ sudo chmod +x /usr/local/bin/argocd
ArgoCD Server への CLI ツールからのログイン
ArgoCD CLI ツールを使って、ArgoCD Server へログインするコマンドは以下の通りです。
$ ARGOCD_SERVER_PASSWORD=$(oc -n argocd get pod -l "app.kubernetes.io/name=argocd-server" -o jsonpath='{.items[*].metadata.name}')
$ ARGOCD_ROUTE=$(oc -n argocd get route argocd-server -o jsonpath='{.spec.host}')

$ argocd --insecure --grpc-web login ${ARGOCD_ROUTE}:443 --username admin --password ${ARGOCD_SERVER_PASSWORD}
'admin' logged in successfully
Context 'argocd-server-argocd.apps.cluster-9f3a.sandbox1743.opentlc.com:443' updated
また、ArgoCD のインストールを行うとデフォルトで Admin ユーザのパスワードが設定されますが、以下のようなコマンドを実行することで Admin パスワードの変更を行うことができます。
$ argocd --insecure --grpc-web --server ${ARGOCD_ROUTE}:443 account update-password --current-password ${ARGOCD_SERVER_PASSWORD} --new-password (新しいパスワード)
Web コンソールへの接続確認
本記事では ArgoCD CLI ツールを使って GitOps の実践を行いますが、Web コンソールから操作を行うこともできます。以下のコマンドを実行して取得した URL をブラウザから開くことで、ArgoCD の Web コンソールに接続することができます。
$ oc -n argocd get route argocd-server -o jsonpath='{.spec.host}'
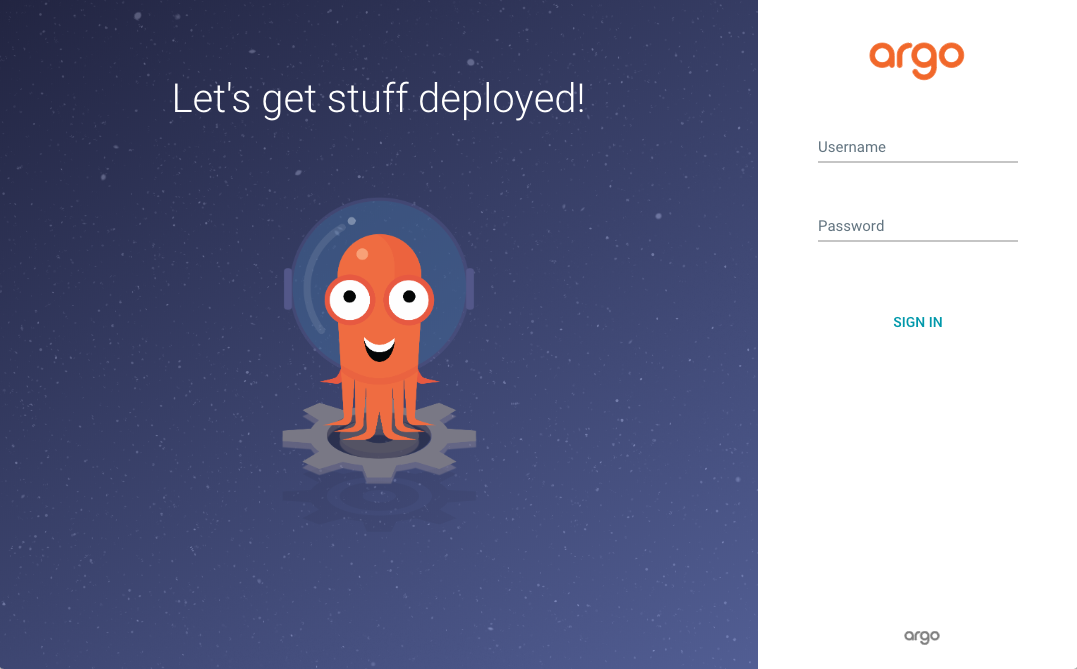
Web コンソール画面は以下の通りです。
簡単な GitOps の実践
OpenShift クラスタの確認
上記の通り ArgoCD をインストールした場合、自動的に OpenShift クラスタが ArgoCD に追加されます。以下のコマンドを実行することで、自動的に追加された OpenShift クラスタを確認することができます。
$ argocd cluster list
SERVER                          NAME  STATUS      MESSAGE
https://kubernetes.default.svc        Successful
Git リポジトリの追加
マニフェストを格納する Git リポジトリを ArgoCD Server に以下のコマンドを実行して追加します。
$ argocd repo add https://github.com/mamoru1112/gitops-on-openshift.git
repository 'https://github.com/mamoru1112/gitops-on-openshift.git' added
追加された Git リポジトリは以下のコマンドで確認することができます。
$ argocd repo list
REPO                                                   INSECURE  LFS    USER  STATUS      MESSAGE
https://github.com/mamoru1112/gitops-on-openshift.git  false     false  -     Successful
アプリケーション追加
同期を行う OpenShift クラスタと Git リポジトリの追加ができたので、次に以下のコマンドを実行してアプリケーションの追加を行います。
$ argocd app create --project default --name reverse-words-app \
    --repo http://github.com/mamoru1112/gitops-on-openshift.git \
    --path simple-app/reversewords_app/ \
    --dest-server https://kubernetes.default.svc \
    --dest-namespace reverse-words \
    --revision master --sync-policy automated
application 'reverse-words-app' created
また、上記のコマンドのそれぞれのオプションの説明は以下の通りです。ここで、プロジェクト・アプリケーションという用語が使用されていますが、OpenShift のプロジェクト・アプリケーションを指しているのではなく、ArgoCD のプロジェクト・アプリケーションを指しています。
-
--project: ArgoCD アプリケーションが所属する ArgoCD プロジェクト -
--name: ArgoCD アプリケーション名 -
--repo: Git リポジトリ -
--path: Git リポジトリ内のマニフェストが格納されたディレクトリのパス -
--dest-server: OpenShift クラスタ -
--dest-namespace: ArgoCD アプリケーションをデプロイする先の OpenShift プロジェクト -
--revision: Gitリポジトリのブランチ -
--sync-policy: Git リポジトリとの同期のポリシー
以下のコマンドによりアプリケーションが追加されたことを確認できます。Git リポジトリと OpenShift クラスタが正常に同期されると STATUS 欄に "Synced" が表示されます。
$ argocd app list
NAME               CLUSTER                         NAMESPACE      PROJECT  STATUS  HEALTH   SYNCPOLICY  CONDITIONS  REPO                                                  PATH                          TARGET
reverse-words-app  https://kubernetes.default.svc  reverse-words  default  Synced  Healthy  Auto        <none>      http://github.com/mamoru1112/gitops-on-openshift.git  simple-app/reversewords_app/  master
アプリケーションの詳細情報は以下のコマンドで確認できます。
$ argocd app get reverse-words-app
Name:               reverse-words-app
Project:            default
Server:             https://kubernetes.default.svc
Namespace:          reverse-words
URL:                https://argocd-server-argocd.apps.cluster-GUID.sandboxXXXX.opentlc.com/applications/reverse-words-app
Repo:               http://github.com/mamoru1112/gitops-on-openshift.git
Target:             master
Path:               simple-app/reversewords_app/
Sync Policy:        Automated
Sync Status:        Synced to master (36306dc)
Health Status:      Healthy

GROUP  KIND        NAMESPACE      NAME           STATUS   HEALTH   HOOK  MESSAGE
       Namespace   reverse-words  reverse-words  Running  Synced         namespace/reverse-words unchanged
       Service     reverse-words  reverse-words  Synced   Healthy        service/reverse-words unchanged
apps   Deployment  reverse-words  reverse-words  Synced   Healthy        deployment.apps/reverse-words unchanged
       Namespace                  reverse-words  Synced   Unknown
デプロイされたアプリケーションの確認
ArgoCD により Git リポジトリに格納されたマニフェストが OpenShift クラスタ上にデプロイされたことを確認します。
本記事で紹介した Git リポジトリには、Deployment・Service・Namespace のマニフェストファイルが格納されており、デプロイされたアプリケーションでは POST された文字列の順序を逆転した文字列が返されるエンドポイントを提供しています。
$ oc get namespace reverse-words
NAME            STATUS   AGE
reverse-words   Active   2m29s

$ oc get deployment -n reverse-words
NAME            READY   UP-TO-DATE   AVAILABLE   AGE
reverse-words   1/1     1            1           2m47s

$ oc get svc -n reverse-words
NAME            TYPE        CLUSTER-IP      EXTERNAL-IP   PORT(S)    AGE
reverse-words   ClusterIP   172.30.244.93   <none>        8080/TCP   3m9s

$ oc expose svc reverse-words -n reverse-words
route.route.openshift.io/reverse-words exposed

$ curl -X POST http://$(oc -n reverse-words get route reverse-words -o jsonpath='{.spec.host}') -d '{"word":"PALC"}'
{"reverse_word":"CLAP"}
削除したリソースが Git リポジトリから復旧されることの確認
GitOps の実践のため、以下のコマンドにより Deployment を削除します。
$ oc delete deployment reverse-words -n reverse-words
deployment.extensions "reverse-words" deleted
リソースが削除された後、以下のコマンドによりアプリケーションの状態を確認すると、STATUS 欄に "OutOfSync" に変わっていることが確認できます。
$ argocd app list
NAME               CLUSTER                         NAMESPACE      PROJECT  STATUS     HEALTH   SYNCPOLICY  CONDITIONS  REPO                                                  PATH                          TARGET
reverse-words-app  https://kubernetes.default.svc  reverse-words  default  OutOfSync  Missing  Auto        <none>      http://github.com/mamoru1112/gitops-on-openshift.git  simple-app/reversewords_app/  master
次に、Git リポジトリに格納されたマニフェストファイルを "Single Source of Truth" として、以下のコマンドにより同期させ OpenShift クラスタの状態を復旧させます。
$ argocd app sync reverse-words-app
TIMESTAMP                  GROUP                     KIND   NAMESPACE                     NAME    STATUS    HEALTH        HOOK  MESSAGE
2019-12-13T01:31:21+00:00                       Namespace                        reverse-words    Synced   Unknown
2019-12-13T01:31:21+00:00                         Service  reverse-words         reverse-words    Synced   Healthy
2019-12-13T01:31:21+00:00   apps               Deployment  reverse-words         reverse-words  OutOfSync  Missing
2019-12-13T01:31:21+00:00  route.openshift.io       Route  reverse-words         reverse-words  OutOfSync  Unknown

Name:               reverse-words-app
Project:            default
Server:             https://kubernetes.default.svc
Namespace:          reverse-words
URL:                https://argocd-server-argocd.apps.cluster-GUID.sandboxXXXX.opentlc.com/applications/reverse-words-app
Repo:               http://github.com/mamoru1112/gitops-on-openshift.git
Target:             master
Path:               simple-app/reversewords_app/
Sync Policy:        Automated
Sync Status:        OutOfSync from master (36306dc)
Health Status:      Progressing

Operation:          Sync
Sync Revision:      36306dc264cea403e33b756de6faf95f605fee5d
Phase:              Succeeded
Start:              2019-12-13 01:31:20 +0000 UTC
Finished:           2019-12-13 01:31:25 +0000 UTC
Duration:           5s
Message:            successfully synced (all tasks run)

GROUP               KIND        NAMESPACE      NAME           STATUS     HEALTH       HOOK  MESSAGE
route.openshift.io  Route       reverse-words  reverse-words  OutOfSync  Unknown            ignored (requires pruning)
                    Namespace   reverse-words  reverse-words  Running    Synced             namespace/reverse-words unchanged
                    Service     reverse-words  reverse-words  Synced     Healthy            service/reverse-words unchanged
apps                Deployment  reverse-words  reverse-words  Synced     Progressing        deployment.apps/reverse-words created
                    Namespace                  reverse-words  Synced     Unknown
FATA[0007] 1 resources require pruning
上記のコマンドの実行結果では、Route を手動で作成したため FATAL メッセージが出力されてしまっていますが、Deployment リソースの HEALTH が "Progressing" になっており、Git リポジトリと OpenShift クラスタが同期されていることが分かります。
Git リポジトリと OpenShift クラスタの同期が完了すると、以下のコマンドによりデプロイされたアプリケーションが復旧したことを確認できます。
$ curl -X POST http://$(oc -n reverse-words get route reverse-words -o jsonpath='{.spec.host}') -d '{"word":"PALC"}'
{"reverse_word":"CLAP"}
Web コンソールから登録されたアプリケーションを確認
ここまでは ArgoCD CLI ツールを使って、Git リポジトリと OpenShift クラスタが同期されることを確認してきましたが、同様の手順を Web コンソールから実行することもできます。全く同じ手順を Web コンソールを使って実行しても面白くないので、上記のコマンド例により追加したアプリケーションが Web コンソール上でどのように表示されるかのみ紹介したいと思います。
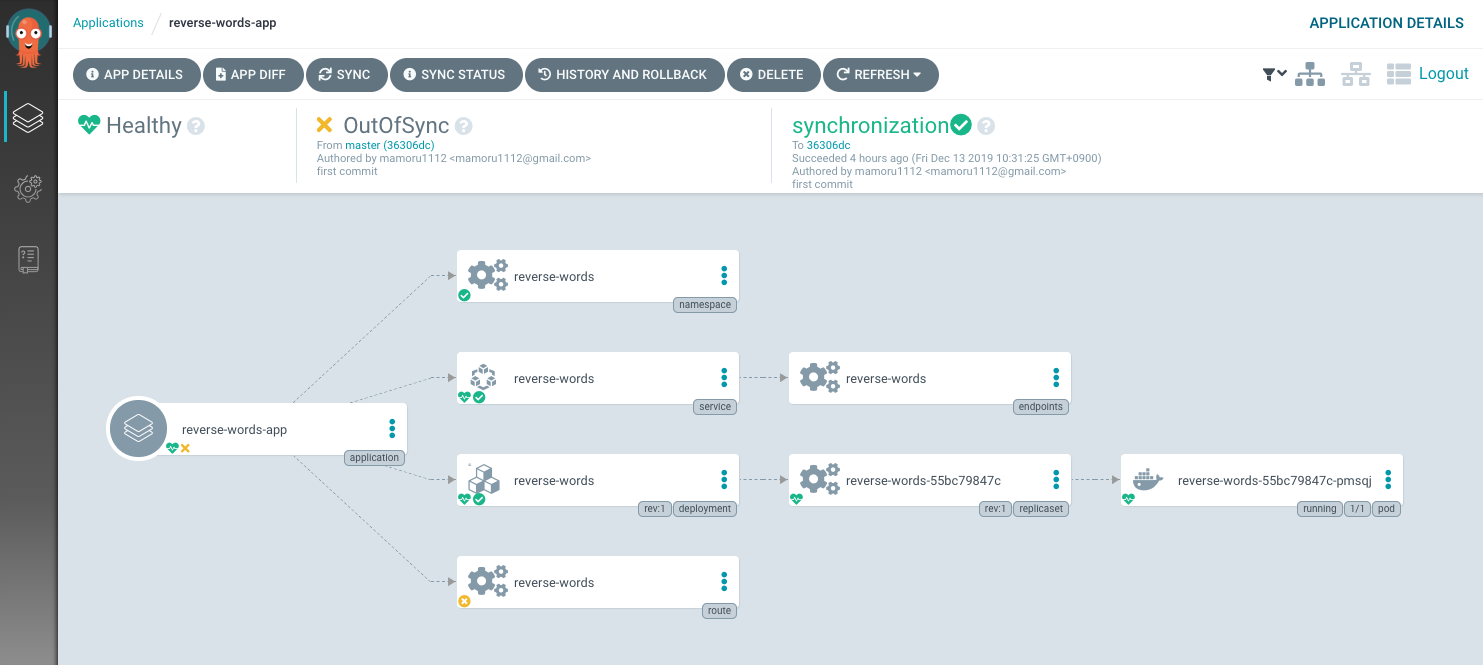
Web コンソールでは、以下の画面キャプチャのように Git リポジトリに管理されているマニフェストファイルとリソースの関係や、Git リポジトリと OpenShift クラスタの同期状況などを確認することができます。
また、画面上部に表示されている "APP DETAILS" や "APP DIFF" ボタンを押下することにより、アプリケーションの詳細情報の確認や Git リポジトリとの差異を確認することもできます。
さいごに
本記事では、OpenShift でも GitOps を実現できることを紹介するため、ArgoCD を使って非常に簡単な GitOps の実践を試してみました。
Web コンソールからの操作の紹介や ArgoCD の機能説明などを本記事では十分にできていませんので、OpenShift 上で実際に GitOps を実践したい方は、以下の ArgoCD のドキュメントを読んで色々と試してもらえると嬉しいです。


