はじめに
前回の「(5)AWS Cognitoでログイン」では、Cognitoを使ってログイン処理を作成しました。今回は、ユーザーがパスワードを忘れてしまった場合の対処法として一般的な「パスワードを忘れた方はこちら」の処理を作っていきたいと思います。ようするにユーザー自身でのパスワードをリセットする機能になります。
「パスワードを忘れた方はこちら」の処理の流れ
1.ユーザーIDとして登録したメールアドレスを入力してもらいます
2.入力されたメールアドレスにパスワードリセット用のコードを送信します。
3.ユーザーは受信したコードと新しいパスワードを入力します。
前回からの変更点
前回のコードからの変更点を順に説明します。
MaterialAppのroutesにパスワード忘れた方こちら画面用の定義を追加
__'/ForgotPassword'__という名前で定義を追加しました。
      routes: <String, WidgetBuilder>{
        '/': (_) => new MyHomePage(),
        '/TopPage': (_) => new TopPage(),
        '/RegisterUser': (_) => new RegisterUserPage(),
        '/ConfirmRegistration': (_) => new ConfirmRegistration(null),
        '/ForgotPassword': (_) => new ForgotPassword(),
      },
ログイン画面の変更
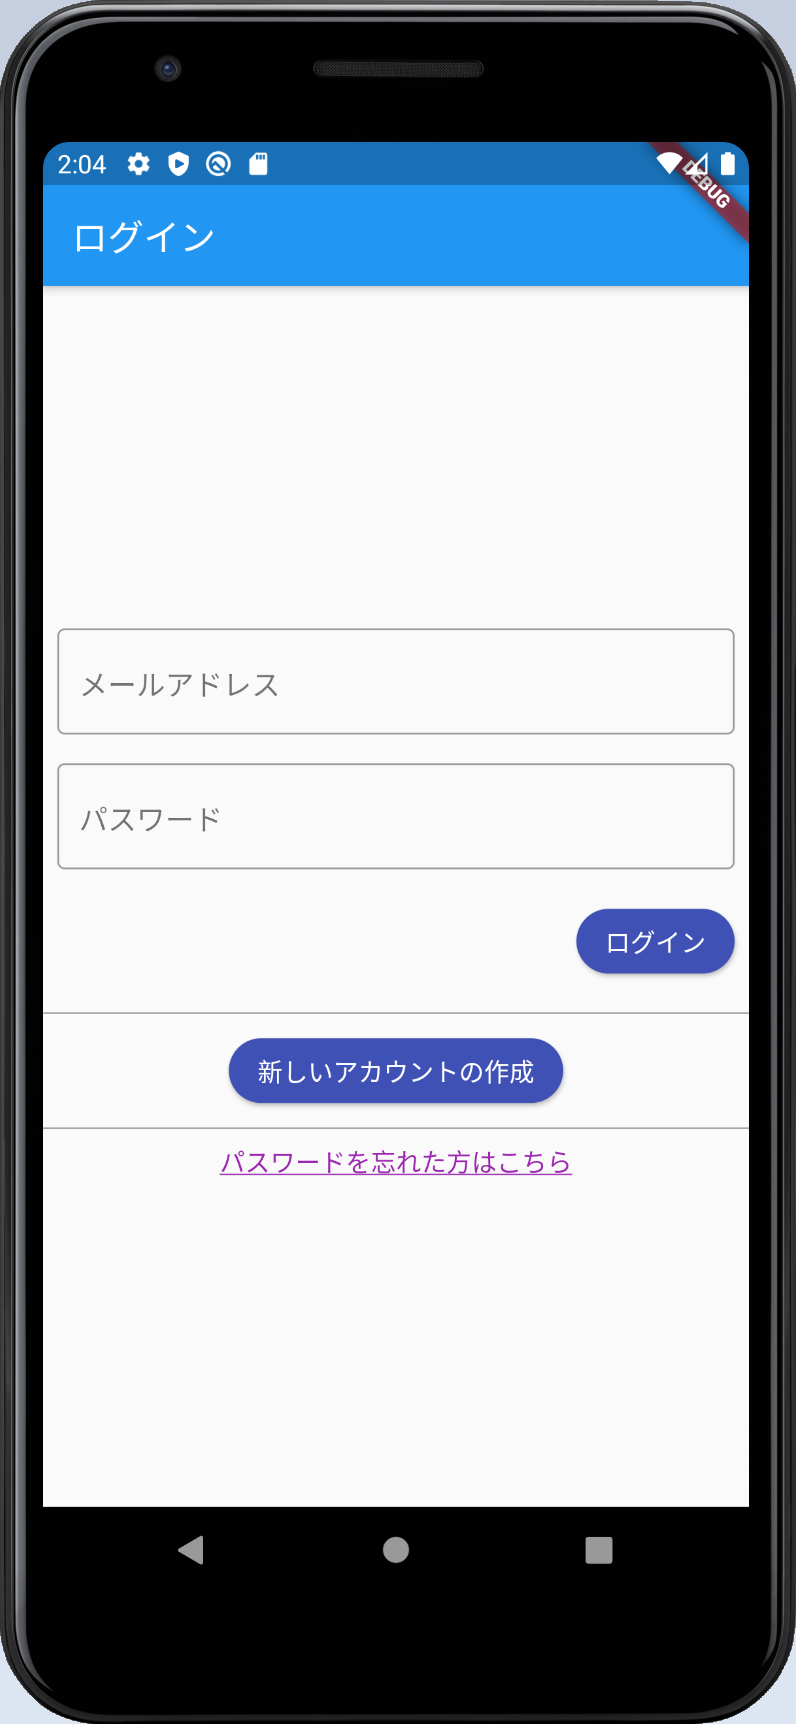
パスワードリセット画面に飛ぶためのリンクをInkWellで追加しました。デザイン的にもあまり主張しすぎないようにテキストにアンダーラインくらいで抑えめにしてみました。とはいえ全体のバランス悪いですね・・・。タップするとパスワードリセット画面に飛びます。
            Divider(color: Colors.black),
            InkWell(
              child: Text(
                'パスワードを忘れた方はこちら',
                style: TextStyle(
                    color: Colors.purple, decoration: TextDecoration.underline),
              ),
              onTap: () => Navigator.of(context).pushNamed('/ForgotPassword'),
            ),
パスワードリセット画面
パスワードリセットのためにメールアドレスで定義されたユーザーIDを入力する画面、リセット用のコードと新しいパスワードを入力する画面からなります。以下がコード一式です。エラー処理は相変わらず手抜きしています。この連載の目的が達成したら一通りリファクタして、体裁を整えたコードを公開したいなと思いますので、ここでは流れを抑えてください。
class ForgotPassword extends StatelessWidget {
  final _mailAddressController = TextEditingController();
  final _resetCodeController = TextEditingController();
  final _passwordController = TextEditingController();

  @override
  Widget build(BuildContext context) {
    return Scaffold(
      appBar: AppBar(
        title: Text('パスワードリセット'),
      ),
      body: Center(
        child: Column(
            mainAxisAlignment: MainAxisAlignment.center,
            children: <Widget>[
              Padding(
                padding: const EdgeInsets.all(8.0),
                child: TextField(
                  decoration: InputDecoration(
                    border: OutlineInputBorder(),
                    hintText: 'test@examle.com',
                    labelText: 'メールアドレス',
                  ),
                  controller: _mailAddressController,
                ),
              ),
              Container(
                alignment: Alignment.centerRight,
                padding: const EdgeInsets.all(8.0),
                child: RaisedButton(
                  child: Text('リセットコード送信'),
                  color: Colors.indigo,
                  shape: StadiumBorder(),
                  textColor: Colors.white,
                  onPressed: () => _forgotPassword(context),
                ),
              ),
            ]),
      ),
    );
  }

  void _forgotPassword(BuildContext context) async {
    final cognitoUser = new CognitoUser(_mailAddressController.text, userPool);
    try {
      var response = await cognitoUser.forgotPassword();
      print(response);
      await showDialog(
          context: context,
          barrierDismissible: false,
          builder: (BuildContext context) {
            return AlertDialog(
                title: Text('パスワードリセット'),
                content: SingleChildScrollView(
                  child: Column(
                      mainAxisAlignment: MainAxisAlignment.center,
                      crossAxisAlignment: CrossAxisAlignment.start,
                      children: <Widget>[
                        Text('メールで受信したリセット用のコードと新しいパスワードを入力してください。'),
                        Padding(
                          padding: const EdgeInsets.all(8.0),
                          child: TextField(
                            decoration: InputDecoration(
                              border: OutlineInputBorder(),
                              hintText: 'リセットコード',
                              labelText: 'リセットコード',
                            ),
                            obscureText: true,
                            controller: _resetCodeController,
                          ),
                        ),
                        Padding(
                          padding: const EdgeInsets.all(8.0),
                          child: TextField(
                            decoration: InputDecoration(
                              border: OutlineInputBorder(),
                              hintText: '新しいパスワード',
                              labelText: '新しいパスワード',
                            ),
                            obscureText: true,
                            controller: _passwordController,
                          ),
                        ),
                        ButtonBar(
                            buttonPadding: const EdgeInsets.all(8),
                            mainAxisSize: MainAxisSize.max,
                            alignment: MainAxisAlignment.center,
                            children: [
                              RaisedButton(
                                child: Text('リセット'),
                                color: Colors.indigo,
                                shape: StadiumBorder(),
                                textColor: Colors.white,
                                onPressed: () async {
                                  try {
                                    response =
                                        await cognitoUser.confirmPassword(
                                            _resetCodeController.text,
                                            _passwordController.text);
                                    Navigator.of(context)
                                        .popUntil(ModalRoute.withName('/'));
                                  } catch (e) {
                                    print(e);
                                  }
                                },
                              ),
                              RaisedButton(
                                child: Text('キャンセル'),
                                color: Colors.red,
                                shape: StadiumBorder(),
                                textColor: Colors.white,
                                onPressed: () => Navigator.of(context).pop(1),
                              )
                            ])
                      ]),
                ));
          });
    } catch (e) {
      await showDialog<int>(
        context: context,
        barrierDismissible: false,
        builder: (BuildContext context) {
          return AlertDialog(
            title: Text('エラー'),
            content: Text(e.message),
            actions: <Widget>[
              FlatButton(
                child: Text('OK'),
                onPressed: () => Navigator.of(context).pop(1),
              ),
            ],
          );
        },
      );
    }
  }
}
以下、リセットコードを送信するための画面です。

__ForgotPasswordクラス__の__buildメソッド__ではメールアドレスを入力し、リセットコード送信ボタンを押下したら**_forgotPasswordメソッドを実行します。_forgotPasswordメソッド**では、__CognitoUserクラス__を入力したメールアドレスと、__CognitoUserPoolクラス__のインスタンスから生成し、__CognitoUserクラス__の__forgotPassword__メソッドを呼び出します。これで入力したメールアドレスにリセット用のコードが飛びます。このメソッド自体はユーザー登録されていないメールアドレスであろうとも成功したようにレスポンスが帰ってきます(ユーザーの存在有無を調べられないようにするためのセキュリティ上の措置だと思います)ので、API呼び出し後、showDialogで、リセットコードと新しいパスワードを入力する画面を表示します。
以下、リセットコードと新しいパスワードの入力画面です。

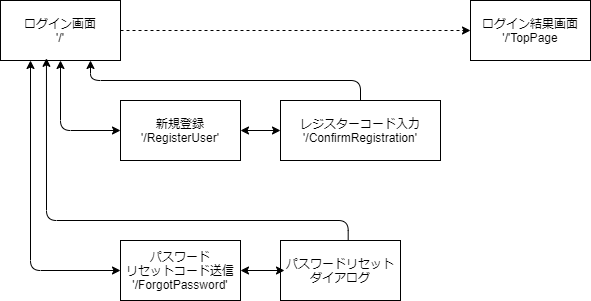
キャンセルボタンを押下したらひとつ前のリセット画面に戻る、リセットボタンを押下したら__CognitoUserクラス__のインスタンスの__confirmPasswordメソッド__にリセットコードと新しいパスワードをセットして呼び出します。成功したらパスワードがリセットされるので、Navigator.of(context).popUntil(ModalRoute.withName('/'));でログインページに遷移します。
画面遷移
今回の対応で追加した画面遷移も含め下記のようになっています。

まとめ
これで一通りUserPoolsを使った独自のログインIDによるログイン処理が一通り実装できました。次回「(7)AWS Cognito Googleでログイン」とし、GoogleのアカウントでログインしCognitoとフェデレーションする仕組みを見ていきたいと思います。
