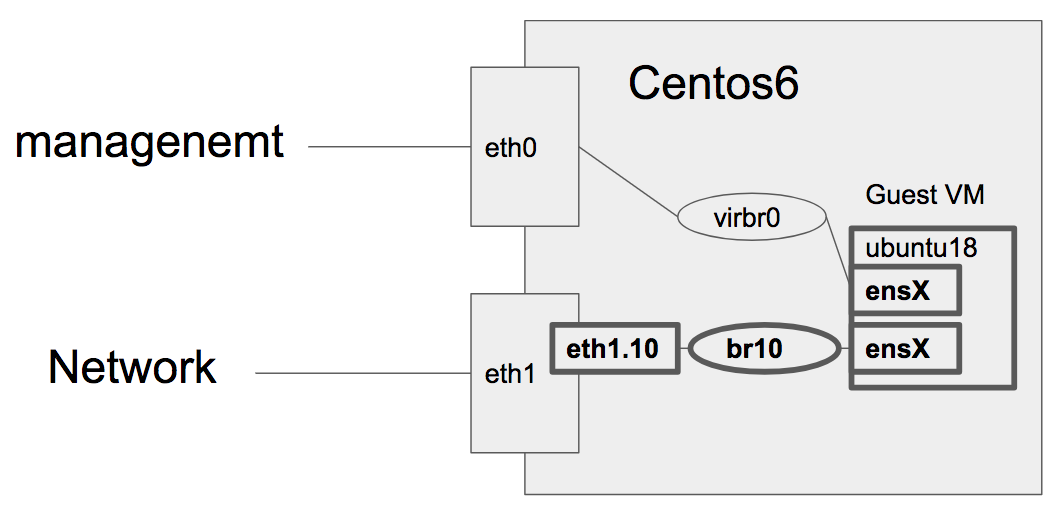
完成図
とりあえず、ubuntuの初期設定のため、default networkへの接続は残す
事前準備
vlanモジュール確認、なければロード
console
lsmod | grep 8021q # 802.1q が利用可能か確認
modprobe 8021q # 802.1q が利用可能か確認
IP forward有効化
/etc/sysctl.conf
# Controls IP packet forwarding
net.ipv4.ip_forward = 1
KVMインストール
# yum groupinstall "Virtualization Client" "Virtualization Platform" "Virtualization Tools"
ホスト側インターフェース作成
ブリッジインターフェース作成
/etc/sysconfig/network-scripts/ifcfg-br10
DEVICE=br10
BOOTPROTO=none
ONBOOT=yes
TYPE=Bridge
Vlanインターフェース作成
/etc/sysconfig/network-scripts/ifcfg-eth1.10
DEVICE=eth1.10
ONBOOT=yes
BOOTPROTO=none
BRIDGE=br10
Ubuntu18のインストール
console
virt-install --connect=qemu:///system --debug \
--name=ubuntu18 \
--vcpus=1 \
--ram=1024 \
--accelerate \
--hvm \
--disk path=/var/lib/libvirt/images/ubuntu18.img,size=20,format=qcow2 \
--location='http://us.archive.ubuntu.com/ubuntu/dists/bionic/main/installer-amd64/' \
--nographics \
--extra-args='console=tty0 console=ttyS0,115200n8'
- locationは任意のdistributionのnetwork install のURLを指定
- Intallerがproxyを聞いてきたら適切に指定
- 例: http://[proxy address]:[proxy port]
ubuntuへインターフェース追加
Interface追加
# virsh edit ubuntu18
    <interface type='bridge'>
      <mac address='52:54:00:00:00:01'/>
      <source bridge='br10'/>
      <model type='virtio'/>
    </interface>
# virsh destroy ubuntu18
# virsh define ubuntu18
# virsh start ubuntu18