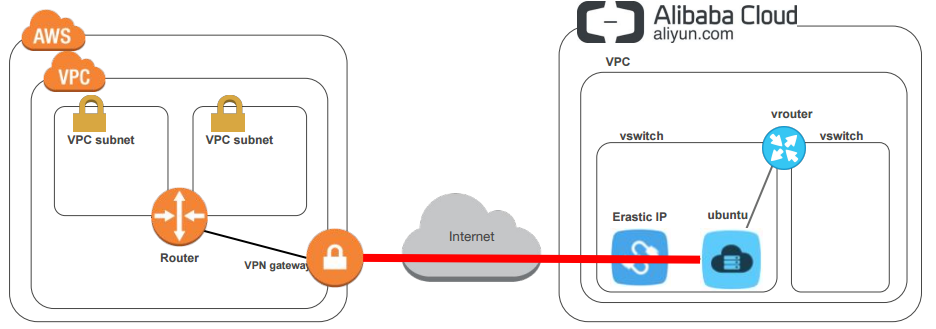
背景
AlibabaのIaaSであるAlibaba CloudのECSインスタンス(AWSでいうEC2,仮想サーバ)の性能自体は悪くはなさそうなので、AWSのVPCとの間にIPSec VPNによる閉域網接続したうえで使いたい。でもIPSecでVPC直結して経路交換は無理そう。そんなわけで、Linux(Alibaba cloudのinstance)をCustomer gatewayとしてVPCへ接続する方法のまとめ。NAT配下のオンプレLinuxでもほかのIaaSでも同様にいけるはず。
AWS側の準備
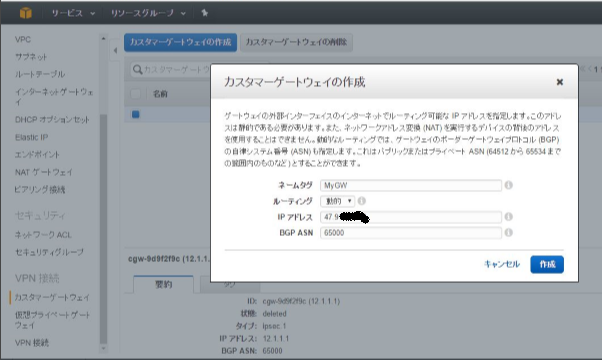
カスタマーゲートウェイの準備
CPE、今回はLinuxの情報を定義。Linuxはサポート対象外。静的ルーティングであればWndows Serverはサポート対象っぽいVPCのコンソールで操作。とりあえずBGP喋れるように、IPアドレスはNat後のグローバルIPアドレス。見た感じIPSecはNat traversalだけどMain modeのみっぽいのでグローバルアドレスが動的に変わる環境だとNGだと思われる。
cliならこんな感じ。
# cli
aws ec2 create-customer-gateway --type ipsec.1 --public-ip 47.91.xx.xx --bgp-asn 65000
# response
{
    "CustomerGateway": {
        "CustomerGatewayId": "cgw-0b7bxxxx",
        "IpAddress": "47.91.xx.xx",
        "State": "available",
        "Type": "ipsec.1",
        "BgpAsn": "65000"
    }
}
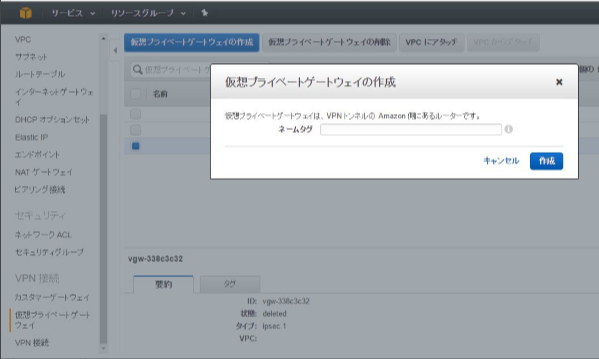
仮想プライベートゲートウエイ
次にAWS側の仮想プライベートゲートウエイを作成。
cliならこんなかんじ
# cli
aws ec2 create-vpn-gateway --type ipsec.1
# response
{
    "VpnGateway": {
        "State": "available",
        "Type": "ipsec.1",
        "VpnGatewayId": "vgw-328cxxxx",
        "VpcAttachments": []
    }
}
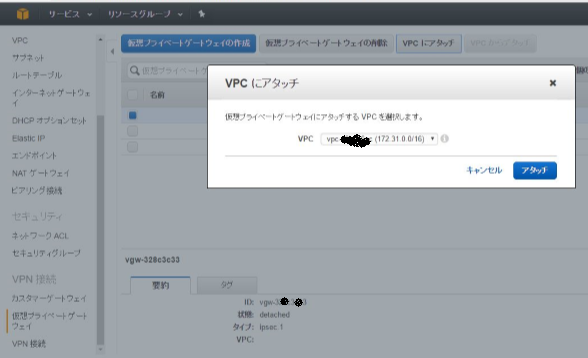
既存のVPCにアッタッチする
# cli
aws ec2 attach-vpn-gateway --vpn-gateway-id vgw-328cxxxx --vpc-id vpc-c9b0xxxx
# response
{
    "VpcAttachment": {
        "State": "attaching",
        "VpcId": "vpc-c9b0xxxx"
    }
}
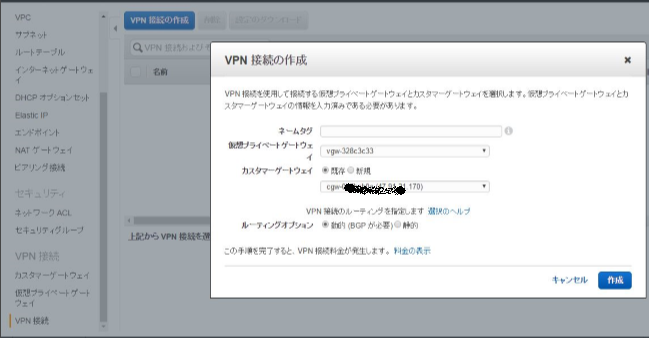
VPN接続を作成
先ほど作成したカスタマーゲートウエイと仮想プライベートゲートウエイを使用してVPN接続を作成。
# cli
 aws ec2 create-vpn-connection --type ipsec.1 --customer-gateway-id cgw-0b7bcb0a --
# output
vpn-gateway-id vgw-328c3c33
{
    "VpnConnection": {
        "VpnConnectionId": "vpn-30a2xxxx",
        "CustomerGatewayConfiguration": "<?xml・・・ ", //XML文省略

        "State": "pending",
        "VpnGatewayId": "vgw-328cxxxx",
        "CustomerGatewayId": "cgw-0b7bxxxx"
    }
}
IPSecVPN 2本の接続情報が上のoutputの中でXMLで記載されている。
	<vpn_connection id=\"vpn-30a2xxxx\">
		<ipsec_tunnel>
			<customer_gateway>
				<tunnel_outside_address>
					<ip_address>47.91.xx.xx</ip_address>
				</tunnel_outside_address>
				<tunnel_inside_address>
					<ip_address>169.254.xx.xx</ip_address>
					<network_mask>255.255.255.252</network_mask>
					<network_cidr>30</network_cidr>
				</tunnel_inside_address>
				<bgp>
					<asn>65000</asn>
					<hold_time>30</hold_time>
				</bgp>
			</customer_gateway>
			<vpn_gateway>
				<tunnel_outside_address>
					<ip_address>52.68.xx.xx</ip_address>
				</tunnel_outside_address>
				<tunnel_inside_address>
					<ip_address>169.254.xx.xx</ip_address>
					<network_mask>255.255.255.252</network_mask>
					<network_cidr>30</network_cidr>
				</tunnel_inside_address>
				<bgp>
					<asn>10124</asn>
					<hold_time>30</hold_time>
				</bgp>
			</vpn_gateway>
			<ike>
				<authentication_protocol>sha1</authentication_protocol>
				<encryption_protocol>aes-128-cbc</encryption_protocol>
				<lifetime>28800</lifetime>
				<perfect_forward_secrecy>group2</perfect_forward_secrecy>
				<mode>main</mode>
				<pre_shared_key>xxxxxxxxxx</pre_shared_key>
			</ike>
			<ipsec>
				<protocol>esp</protocol>
				<authentication_protocol>hmac-sha1-96</authentication_protocol>
				<encryption_protocol>aes-128-cbc</encryption_protocol>
				<lifetime>3600</lifetime>
				<perfect_forward_secrecy>group2</perfect_forward_secrecy>
				<mode>tunnel</mode>
				<clear_df_bit>true</clear_df_bit>
				<fragmentation_before_encryption>true</fragmentation_before_encryption>
				<tcp_mss_adjustment>1387</tcp_mss_adjustment>
				<dead_peer_detection>
				<interval>10</interval>
				<retries>3</retries>
				</dead_peer_detection>
			</ipsec>
		</ipsec_tunnel>
		<ipsec_tunnel>
			<customer_gateway>
				<tunnel_outside_address>
					<ip_address>47.91.xx.xx</ip_address>
				</tunnel_outside_address>
				<tunnel_inside_address>
					<ip_address>169.254.xx.xx</ip_address>
					<network_mask>255.255.255.252</network_mask>
					<network_cidr>30</network_cidr>
				</tunnel_inside_address>
				<bgp>
					<asn>65000</asn>
					<hold_time>30</hold_time>
				</bgp>
			</customer_gateway>
			<vpn_gateway>
				<tunnel_outside_address>
					<ip_address>54.64.xx.xx</ip_address>
				</tunnel_outside_address>
				<tunnel_inside_address>
					<ip_address>169.254.xx.xx</ip_address>
					<network_mask>255.255.255.252</network_mask>
					<network_cidr>30</network_cidr>
				</tunnel_inside_address>
				<bgp>
					<asn>10124</asn>
				<hold_time>30</hold_time>
				</bgp>
			</vpn_gateway>
			<ike>
				<authentication_protocol>sha1</authentication_protocol>
				<encryption_protocol>aes-128-cbc</encryption_protocol>
				<lifetime>28800</lifetime>
				<perfect_forward_secrecy>group2</perfect_forward_secrecy>
				<mode>main</mode>
				<pre_shared_key>xxxxxxxxx</pre_shared_key>
			</ike>
			<ipsec>
				<protocol>esp</protocol>
				<authentication_protocol>hmac-sha1-96</authentication_protocol>
				<encryption_protocol>aes-128-cbc</encryption_protocol>
				<lifetime>3600</lifetime>
				<perfect_forward_secrecy>group2</perfect_forward_secrecy>
				<mode>tunnel</mode>
				<clear_df_bit>true</clear_df_bit>
				<fragmentation_before_encryption>true</fragmentation_before_encryption>
				<tcp_mss_adjustment>1387</tcp_mss_adjustment>
				<dead_peer_detection>
					<interval>10</interval>
					<retries>3</retries>
				</dead_peer_detection>
			</ipsec>
		</ipsec_tunnel>
	</vpn_connection>
少なくとも変動値はひかえておく。
- カスタマーゲートウエイ
- IPsec外側のアドレス(自分のプライベートアドレス)
- IPsec内側のアドレス(VPCから払い出し)
- ASN(自分で指定)
- 仮想プライベートゲートウエイ
- IPsec外側のアドレス(VPCから払い出し)
- IPsec内側のアドレス(VPCから払い出し)
- ASN(10124固定?)
- IKE
- pre-shared key
WebUIから確認する方法は、VPN接続>設定のダウンロードでConfigurationの読めるタイプの機器の設定をダウンロードして分析する以外にないのかな?
ルート伝播
最後にルーティングテーブルで仮想プライベートゲートウエイからのルート伝播をオンに。これをしないと受け取ったPrefixがVPC側のルーティングテーブルに反映されない。
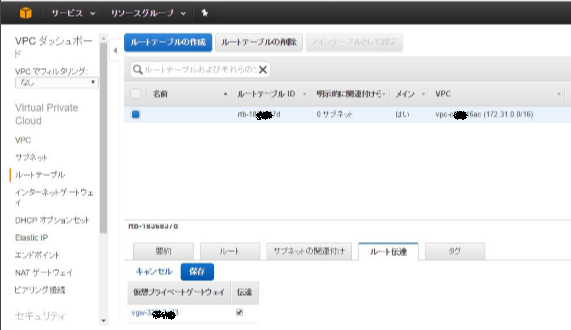
aws ec2 enable-vgw-route-propagation --route-table-id rtb-1836xxxx --gateway-id vgw-328cxxxx
memo
業務用途ならたいした金額ではないけど、個人的に遊ぶらなVPN接続が有効な間ずっと課金され続けるから、使う時だけ作成して対向のIPSec接続を抜くようにScript作っておくのがいいかも。そんなわけでcli大事。
ubuntu側準備
IPSec設定
apt-get install ipsec-tools racoon quagga
特定のトラフィックをIPsecトンネルの中へ。トンネルはLinuxのNAT前のプライベートIPと接続先のVPC仮想プライベートゲートウエイのグローバルIPアドレスのペアで指定。当然両端のプライベートアドレス空間だけでなく、IPSecの内側のアドレスも暗号化する必要あり。
# !/usr/sbin/setkey -f
flush;
spdflush;

# Tunnel1
spdadd 169.254.xx.xx/30 169.254.xx.xx/30 any -P out ipsec esp/tunnel/172.24.x.x-52.68.xx.xx/require;
spdadd 169.254.xx.xx/30 169.254.xx.xx/30 any -P in  ipsec esp/tunnel/52.68.xx.xx-172.24.x.x/require;
spdadd 169.254.xx.xx/30 172.31.0.0/16    any -P out ipsec esp/tunnel/172.24.x.x-52.68.xx.xx/require;
spdadd 172.31.0.0/16 169.254.xx.xx/30    any -P in  ipsec esp/tunnel/52.68.xx.xx-172.24.0.1/require;
spdadd 172.24.0.0/16 172.31.0.0/16    any -P out ipsec esp/tunnel/172.24.x.x-52.68.xx.xx/require;
spdadd 172.31.0.0/16 172.24.0.0/16    any -P in  ipsec esp/tunnel/52.68.xx.xx-172.24.0.1/require;

# Tunnel2 残念ながら2本目のトンネルは意味がないことが判明
# spdadd 169.254.xx.xx/30 169.254.xx.xx/30 any -P out ipsec esp/tunnel/172.24.0.1-54.64.xx.xx/require;
# spdadd 169.254.xx.xx/30 169.254.xx.xx/30 any -P in  ipsec esp/tunnel/54.64.xx.xx-172.24.0.1/require;
# spdadd 169.254.xx.xx/30 172.31.0.0/16    any -P out ipsec esp/tunnel/172.24.0.1-54.64.xx.xx/require;
# spdadd 172.31.0.0/16 169.254.xx.xx/30    any -P in  ipsec esp/tunnel/54.64.xx.xx-172.24.0.1/require;
# spdadd 172.24.0.0/16 172.31.0.0/16     any -P out ipsec esp/tunnel/172.24.0.1-54.64.xx.xx/require;
# spdadd 172.31.0.0/16 172.24.0.0/16     any -P in  ipsec esp/tunnel/54.64.xx.xx-172.24.0.1/require;
対向のpre-shared keyを指定
# 仮想プライベートゲートウエイの外側のアドレスとpre-shared keyのペア
52.68.xxx.xxx sDei_5KCLDC20CMf1tgSAbSEpeO8jVGM
# 2本目は意味がなさそう
# 54.64.xxx.xxx r77N2jG.CYnvIIr836.lk2ZBxp5CMH8g
IKEフェーズ1、2の情報。
path pre_shared_key "/etc/racoon/psk.txt";
path certificate "/etc/racoon/certs";

remote 52.68.xx.xx {
        exchange_mode main;
        lifetime time 28800 seconds;
        generate_policy off;
        nat_traversal force;
        exchange_mode main;
        proposal {
                encryption_algorithm aes128;
                hash_algorithm sha1;
                authentication_method pre_shared_key;
                dh_group 2;
        }
}

# remote 54.64.xx.xx {
#        exchange_mode main;
#        lifetime time 28800 seconds;
#        nat_traversal force;
#        generate_policy off;
#        exchange_mode main;
#        proposal {
#                encryption_algorithm aes128;
#                hash_algorithm sha1;
#                authentication_method pre_shared_key;
#                dh_group 2;
#       }
# }
sainfo address 169.254.xx.xx/30 any address 169.254.xx.xx/30 any {
        pfs_group 2;
        lifetime time 3600 seconds;
        encryption_algorithm aes128;
        authentication_algorithm hmac_sha1;
        compression_algorithm deflate;
}

# sainfo address 169.254.xx.xx/30 any address 169.254.xx.xx/30 any {
#        pfs_group 2;
#        lifetime time 3600 seconds;
#        encryption_algorithm aes128;
#        authentication_algorithm hmac_sha1;
#        compression_algorithm deflate;
# }
Linuxのネットワーク設定
# 経路がほしいだけでインターフェースは何でもよい。
# 実際にトンネルインターフェースとして使うわけではないのでRemoteのIPはなんでもいい
iptunnel add ipsec0 mode ipip remote xx.xx.xx.xx
# IPSec内側IPを指定
ip addr add 169.254.26.190/30  dev ipsec0
ip link set ipsec0 mtu 1427
ip link set ipsec0 up
# ルーティング有効可
echo 1 > /proc/sys/net/ipv4/ip_forward
Quagga設定
zebra=yes
bgpd=yes
hostname VR1
password zebra
enable password zebra

log file /var/log/quagga/zebra.log
hostname VR1
password zebra
router bgp 65000
network 172.24.0.0/16
 neighbor 169.254.xx.xx remote-as 10124
log file /var/log/quagga/bgpd.log
接続
service start setkey
service start racoon
service start quagga
これでquaggaでpeer上がればOK。AWSのVPCルーティングテーブルにローカルのPrefixも現れるはず。
問題
AWS側にできる仮想プライベートゲートウエイの2つのIPSec接続先アドレスを冗長化目的では利用できない。動的にSAを選べないから。BGPのPeerはあがる。でもパケット送信時に経路判断前にBGPの経路と関係なく静的なipsec-tools.confの設定によるSAの判定でどちらか一つのIP宛てのトンネルに確定される。さらに悪いことにこの宛先とBGPベストパスが不一致だと通信できない。
bgpdがVPCからもらうprefixに対してIPSecのトンネルに乗せるかどうかを判断できない。意味static routeと同じ。でもbgpdがprefixをVPCへアナウンスできる点は意味があるかも。
・・・・という若き頃通った行き止まりに再度気づかず再度到達。
未検証だけど考えられるソリューションは
- 同じグローバルIPでNATされるubuntuサーバをもう1個立てる。冗長化目的ならこれかも
- QUAGGAじゃなくてサポートされてるVyatta/vyosならもう少し上手にIPSecとルーティング扱えるかも
- ちょっと複雑になるけどAWS側は仮想プライベートゲートウエイじゃなくてC社仮想ルータ使ってIPsec tunnel modeより柔軟性高いトンネル使うともう少しキレイに行くかも