チュートリアルで作成したdjangoアプリケーションのdeploy方法.
OS: Ubuntu Linux 16.04 LTS Xenial Xerus Minimal Install 64 bit
最小構成のUbuntuサーバを立ち上げ,そこからwebアプリとして公開するまでの手順を説明していきます.
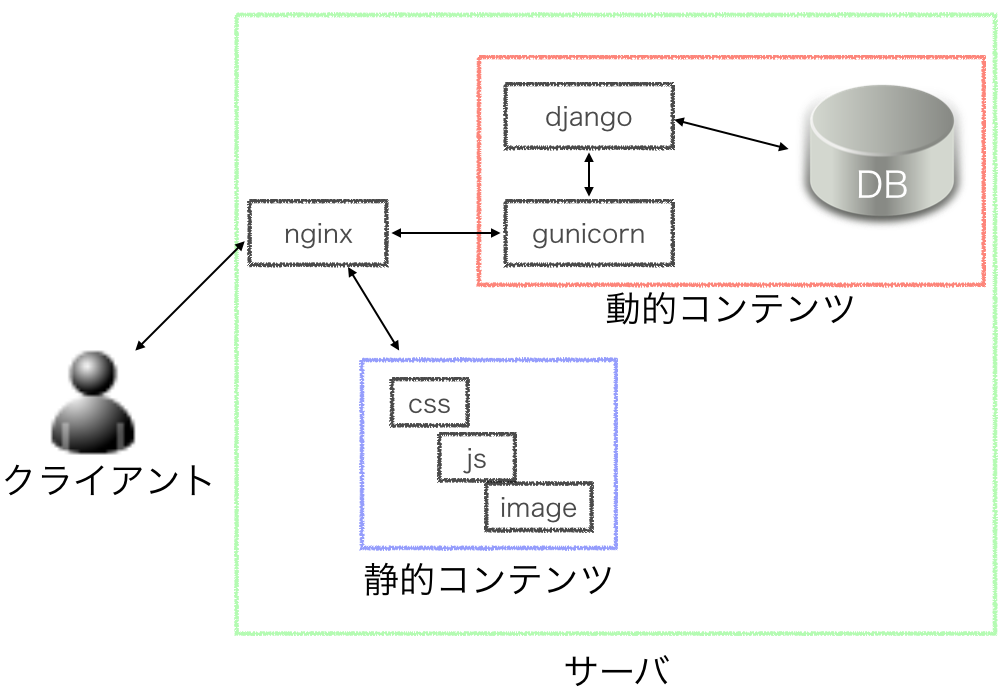
実行環境と動作イメージは以下の通り.
nginx
gunicorn
supervisor
mysql(mariaDB)
動かすdjangoプログラムはtutorialに使用している下記のものを使います.
https://github.com/usa-mimi/tutorial
本文中で説明しているnginx, supervisorの設定ファイルも入ってます.
プロジェクト名は tutorial
実行するユーザ名は mnu
になっているのでお試しの際は適宜名前を置き換えてください.
作業ユーザの作成
ユーザの追加
rootユーザで作業するのはよろしくないので,まずは作業用のユーザを作成しましょう.
ユーザの追加には adduser コマンドを使います.
よく似たコマンドで
useraddもあります → useradd / adduser
今回は mnu という名前のユーザを作成します.
途中でパスワードを聞かれるので同じパスワードを2回入力しましょう.
Full Nameとかは空でいいです.
root@tutorial:~# adduser mnu
Adding user `mnu' ...
Adding new group `mnu' (1000) ...
Adding new user `mnu' (1000) with group `mnu' ...
Creating home directory `/home/mnu' ...
Copying files from `/etc/skel' ...
Enter new UNIX password:
Retype new UNIX password:
passwd: password updated successfully
Changing the user information for mnu
Enter the new value, or press ENTER for the default
       	Full Name []:
       	Room Number []:
       	Work Phone []:
       	Home Phone []:
       	Other []:
Is the information correct? [Y/n] Y
sudo権限の付与
サーバ構築の作業にはroot権限が必要になることが多いので付けておきましょう.
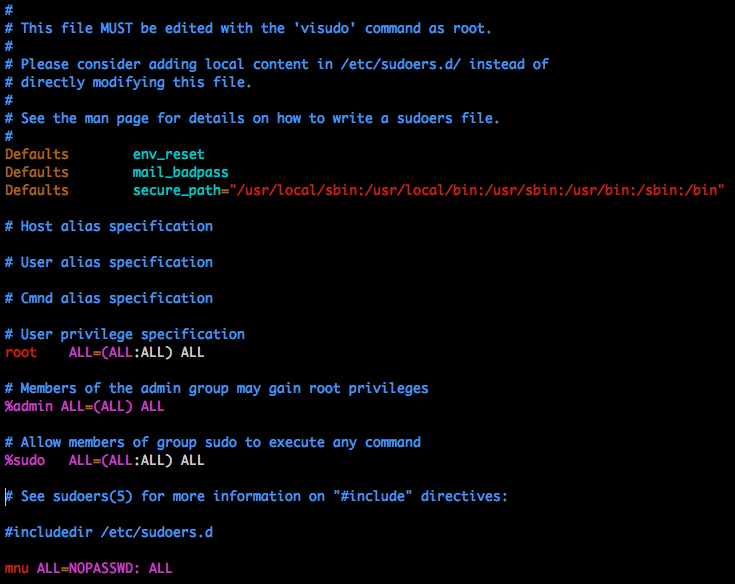
sudo権限編集にはvisudoコマンドを打つか,/etc/sudoersを直接編集すればいいです.
visudoを使用すると文法チェックとかしてくれるので推奨とのことです.
詳しい説明は既に記事を書いてくれているのでこちらを参考に → sudo のパスワードを入力なしで使うには
今回はめんどくさいのでvimで開いてさくっと編集しちゃいます.
vimでsudoersファイルを開いて,一番最後の行に mnu NOPASSWD: ALL を追加しましょう
root@tutorial:~# vim /etc/sudoers
sudorsファイルは直に開くと読み込み専用になっているので vimで開いた場合は
:w!コマンドで保存する必要があります.
sudoコマンド確認
編集が終わったら変更が反映されているか確認しましょう.
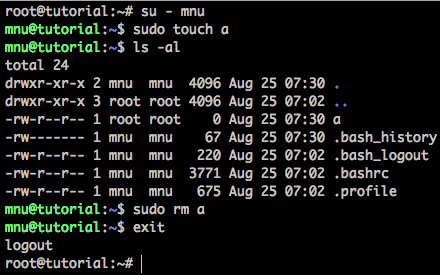
su コマンドを使ってユーザを切り替え,sudoコマンドを実行してみます.
適当なコマンドをsudoを頭に付けて実行してみましょう.
画像の例は 適当なファイル(
a)をsudo権限(=rootユーザ)で作成した例です.
lsした時に作成ユーザがrootになっているのが確認できます.
このファイルは削除するのにもsudo権限が必要になります.
ssh鍵設定
ユーザの作成,sudo権限の付与が完了したらsshの鍵をセットしましょう.
現状ではユーザのパスワードがバレると誰でもサーバにログインできてしまいます.
おまけにこのユーザはsudo権限を持ってるのでやりたい放題されちゃいます.
一般ユーザに限らずrootユーザとして直にログインされる危険もあります.
ですので,サーバを建てた時は作業ユーザ作成後,速やかに鍵をセットし,sshのパスワード認証を無効化することを推奨します.
鍵の用意
参考 →SSHの鍵認証設定
まずはローカルのマシンで鍵ファイルを作成します.
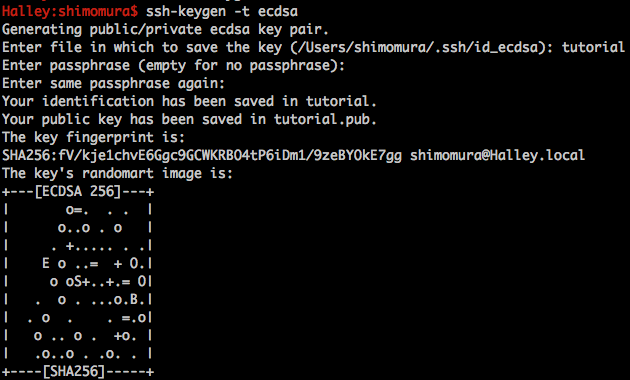
macユーザの場合はターミナルを開いて ssh-keygen コマンドを打てば秘密鍵と公開鍵のペアが作成できます.
鍵のファイルの名前はサーバの名前などわかりやすい名前をつけておきましょう.
パスワードはセキュリティを考慮するならつけといたほうがいいですが,何も打たずにエンターを押すと空に出来ます.
画像の
-t ecdsaオプションは楕円DSAと呼ばれる方式での鍵作成 →参考
コマンドが正常に完了すると 鍵名 鍵名.pub の2つのファイルが作成されます.
.pubがついてるほうが公開鍵なので,このファイルの内容をエディタで開くなりcatコマンドを使うなりして表示し,コピーしてください.
鍵の設置
先ほど作成した公開鍵をサーバ上に設置(登録)します.
設置する場所は鍵を使って認証したいユーザのホームディレクトリの.ssh/authorized_keys ファイルです.
.sshディレクトリはデフォルトでは存在しないので作成しましょう.
ディレクトリを作成したらその中にauthorized_keysファイルを作成し,先ほどコピーしていた公開鍵を貼り付けます.
公開鍵ファイルはパーミッションが600である必要があるので,chmod コマンドで変更しておきます.
中身,パーミッション共に問題なければ鍵の設置は完了です.
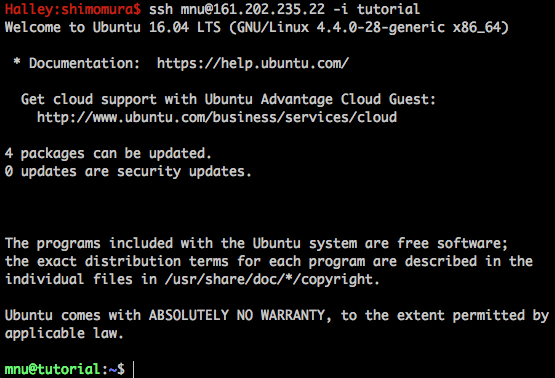
ローカルマシンから鍵を使ってログインしてみましょう.
設定があってればこんな感じにログインできるはずです.鍵を作成する時にパスワードを設定していた場合は鍵のパスワードを聞かれます.
パスワード認証の停止
鍵認証に成功したらパスワード認証を停止させましょう.
鍵認証に成功していると思ってたら実はパスワード認証だった,ということもあるので,
この作業を行った後は 現在のターミナルを接続したままで 別のターミナルで正常にログインできることを確認してください.
最悪サーバにログインできなくなる可能性があります.
sshdの設定は /etc/ssh/sshd_config にあります.
このファイルを開き,PasswordAuthenticationをnoにしましょう
root@tutorial:/etc/ssh# vim /etc/ssh/sshd_config
ローカルマシンで別ターミナルを開き,パスワードでログインしてみましょう.
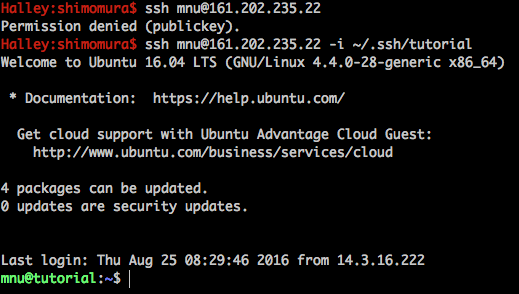
パスワード(秘密鍵の指定なし)でログインしようとして弾かれ,秘密鍵を指定してのログインが確認できれば設定完了です.
秘密鍵でもログイン出来ない場合は鍵の設置をミスしている可能性があります.
ログインできなくなると困るので速やかに設定ファイルを元に戻して sshd を再起動させましょう.
サーバ環境設定
日本語設定
参考 → (システムの文字コードを変更する)[https://www.server-world.info/query?os=Ubuntu_14.04&p=locale]
最小構成でインストールした場合,おそらく日本語が扱えないので日本語用のパッケージをインストールし,
デフォルトの文字コードを ja_JP.UTF-8 にしておきましょう.
参考サイトのコマンドをそのまま実行して下記のようなエラーが出ます.
Unable to locate package language-pack-ja-base
先にapt-get updateコマンドを実行し,aptをアップデートしておきましょう.
mnu@tutorial:~$ sudo apt-get update
Get:1 http://mirrors.service.networklayer.com/ubuntu xenial InRelease [247 kB]
...
Get:40 http://mirrors.service.networklayer.com/ubuntu xenial-security/multiverse Translation-en [628 B]
Fetched 24.8 MB in 6s (3,815 kB/s)
Reading package lists... Done
mnu@tutorial:~$ sudo apt-get -y install language-pack-ja-base language-pack-ja
Reading package lists... Done
...
Generating locales (this might take a while)...
  ja_JP.UTF-8... done
Generation complete.
mnu@tutorial:~$ sudo update-locale LANG=ja_JP.UTF-8 LANGUAGE="ja_JP:ja"
ここまで完了したら再度ログインするか,source /etc/default/locale というコマンドを打てば言語が日本語になります.
適当なコマンドを打って確認してみましょう.
↑ 設定前 ↓ 設定後
タイムゾーン設定
デフォルトではタイムゾーンがUTCになっているので日本時間に変更する
mnu@tutorial:~$ sudo cp /etc/localtime /etc/localtime.org
mnu@tutorial:~$ sudo ln -sf /usr/share/zoneinfo/Japan /etc/localtime
必要なアプリのインストール
nginx
webサーバです.
apacheより高速です.
2016年4月の時点でウェブサイトの50%くらいはapacheらしいです.
nginxは全アクティブサイトの17%くらいらしいですが,上位サイトのシェアをジワジワ伸ばしており,
アクセス数上位100万の割合で見ると25%だそうで.
参考→ 2016年4月時点のシェア比較
インストールコマンド
apt-getでサクッと入ります.
mnu@tutorial:~$ sudo apt-get install nginx
supervisor
プロセスをデーモン化するためのプログラムです.
導入しておくとサーバの再起動時などに自動的に起動してくれます.
インストールコマンド
これもapt-getでインストールできます.
mnu@tutorial:~$ sudo apt-get install supervisor
これはサーバが再起動した時に自動起動しないと困るので登録もしておきます.
$ sudo update-rc.d supervisor defaults
mysql (mariaDB)
チュートリアルでは簡単に実行できるのでsqliteを使ってきましたが,
deploy時にはちゃんとしたデータベースサーバを建てておきましょう.
djangoはpostgresqlを推奨してた気がしますが,
個人的にmysqlのほうが好きなのでmysqlの派生であるmariaDBを使うことにします.
参考 → 長年の議論に終止符 -- MySQL、MariaDB、PostgreSQLのオプティマイザ/エクゼキュータ比較
インストールコマンド
これもapt-getです.
mnu@tutorial:~$ sudo apt-get install mariadb-server
mnu@tutorial:~$ sudo apt-get install libmariadbd-dev
gunicorn
python WSGI HTTPサーバ.
WSGI(Web Server Gateway Interface, ウィズギー)はhttpリクエスト(レスポンス)とpythonを繋ぐためのインターフェース定義.
httpとpythonの繋ぎの部分ってことでふんわり理解しといてくれたらいいです.
今回の構成ではこいつにdjangoを実行させます.
参考→ gunicorn 公式サイト
参考→ WSIG(wikipedia)
pythonパッケージなのでpipでインストールできます.
似たようなのでuwsgiってのもあって,そっちのほうが細かくチューニングできて性能も良さげなので
そのうち別解として記事修正するかも.
インストールコマンド
こいつはpythonパッケージなのでpipで入りますが,
virtualenv下に入れるので後ほど説明します.
pip
pythonのパッケージ管理システムです.
標準では入ってないと思うのでこれもapt-getで入れておきましょう.
インストールコマンド
mnu@tutorial:~$ sudo apt-get install python-pip
仮想環境
pipがインストールできたら今度は
virtualenv と virtualenvwrapper を入れましょう.
インストールコマンド
今まではapt-getでしたが,今度はpipコマンドでインストールします.
mnu@tutorial:~$ sudo pip install virtualenv
mnu@tutorial:~$ sudo pip install virtualenvwrapper
設定
virtualenvwrapperを使うには専用のshファイルを読み込ませ,
環境変数にWORKON_HOMEをセットする必要があるので~/.bashrcを編集しておきます.
mnu@tutorial:~$ vim ~/.bashrc
ファイルの一番下に下記2行を追加
source /usr/local/bin/virtualenvwrapper.sh
export WORKON_HOME=~/.virtualenvs
編集が完了したら .bashrc を読み直すか,サーバから一度ログアウトして再度ログインします.
mnu@tutorial:~$ source .bashrc
virtualenvwrapper.user_scripts creating /home/mnu/.virtualenvs/premkproject
virtualenvwrapper.user_scripts creating /home/mnu/.virtualenvs/postmkproject
virtualenvwrapper.user_scripts creating /home/mnu/.virtualenvs/initialize
virtualenvwrapper.user_scripts creating /home/mnu/.virtualenvs/premkvirtualenv
virtualenvwrapper.user_scripts creating /home/mnu/.virtualenvs/postmkvirtualenv
virtualenvwrapper.user_scripts creating /home/mnu/.virtualenvs/prermvirtualenv
virtualenvwrapper.user_scripts creating /home/mnu/.virtualenvs/postrmvirtualenv
virtualenvwrapper.user_scripts creating /home/mnu/.virtualenvs/predeactivate
virtualenvwrapper.user_scripts creating /home/mnu/.virtualenvs/postdeactivate
virtualenvwrapper.user_scripts creating /home/mnu/.virtualenvs/preactivate
virtualenvwrapper.user_scripts creating /home/mnu/.virtualenvs/postactivate
virtualenvwrapper.user_scripts creating /home/mnu/.virtualenvs/get_env_details
コマンド実行後(もしくは再ログイン後),mkvirtualコマンドが使えるようになっているはずです.
プロジェクト用の仮想環境の作成
今回はtutorialという名前で作ります.
プログラムはpython3系で動かす必要があるので,-p python3 という引数を付けて使用するpythonを指定します.
mnu@tutorial:~$ mkvirtualenv tutorial -p python3
Running virtualenv with interpreter /usr/bin/python3
Using base prefix '/usr'
New python executable in /home/mnu/.virtualenvs/tutorial/bin/python3
Also creating executable in /home/mnu/.virtualenvs/tutorial/bin/python
Installing setuptools, pip, wheel...done.
virtualenvwrapper.user_scripts creating /home/mnu/.virtualenvs/tutorial/bin/predeactivate
virtualenvwrapper.user_scripts creating /home/mnu/.virtualenvs/tutorial/bin/postdeactivate
virtualenvwrapper.user_scripts creating /home/mnu/.virtualenvs/tutorial/bin/preactivate
virtualenvwrapper.user_scripts creating /home/mnu/.virtualenvs/tutorial/bin/postactivate
virtualenvwrapper.user_scripts creating /home/mnu/.virtualenvs/tutorial/bin/get_env_details
コマンド実行後,ターミナルの表示の左側に (tutorial) がついているはずです.
これは現在有効になっている環境が表示されています.
この状態でpythonのバージョンとインストールされているpythonパッケージを確認してみましょう.
(tutorial) mnu@tutorial:~$ python -V
Python 3.5.2
(tutorial) mnu@tutorial:~$ pip freeze
(tutorial) mnu@tutorial:~$
pythonのバージョンが3になっており,installされているpythonパッケージがないことが確認できます.
プログラムの配置
必要なソフトが大体インストールできたので,djangoのプログラムを設置しましょう.
実行する場所に特に制約はないですが,今回は ~/work ディレクトリを作ってそこに配置します.
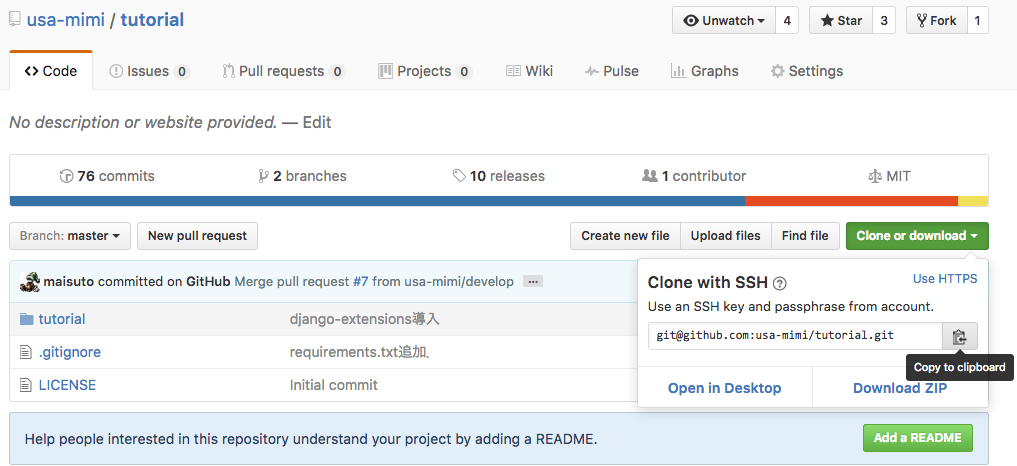
今回のプログラムはgithubで管理しているのでページを開き,
clone or downloadをクリックしてsshのパスをコピーしましょう.
必要ライブラリのインストール
ncurses
例で使用するtutorialアプリの中のrequirements.txtの中に ipython が入っているので
ncursesが必要です.
(tutorial) mnu@tutorial:~/work/tutorial/tutorial$ sudo apt-get install libncurses5-dev
mysqlclient-dev
pythonからmariaDBにアクセスするために mysqlclient をインストールする必要がありますが,
そのためにmysqlの開発用ライブラリが必要になるのでインストールしておきます.
(tutorial) mnu@tutorial:~$ sudo apt-get install libmysqlclient-dev
今回のdbはmaridDBですが,
mysqlclientを入れれば問題なくアクセスできます.
requirements.txt
tutorialプロジェクトで必要なライブラリをインストールします.
requirements.txt があるのでそれを読み込ませます.
(tutorial) mnu@tutorial:~/work/tutorial/tutorial$ pip install -r requirements.txt
mysqlclient
ローカルの開発ではsqliteを使ってたので requirements.txt に入ってないので入れておきます.
(tutorial) mnu@tutorial:~/work/tutorial/tutorial$ pip install mysqlclient
gunicorn
同じくgunicornmも入れておきます.
(tutorial) mnu@tutorial:~/work/tutorial/tutorial$ pip install gunicorn
mysqlclient, gunicornを個別に入れる手間をなくすために
requirements_production.txt
のようなファイルを作って置くといいかもしれないです.
DBの用意
dbの初期化
(tutorial) mnu@tutorial:~/work/tutorial/tutorial$ sudo mysql_secure_installation

NOTE: RUNNING ALL PARTS OF THIS SCRIPT IS RECOMMENDED FOR ALL MariaDB
      SERVERS IN PRODUCTION USE!  PLEASE READ EACH STEP CAREFULLY!

In order to log into MariaDB to secure it, we'll need the current
password for the root user.  If you've just installed MariaDB, and
you haven't set the root password yet, the password will be blank,
so you should just press enter here.

Enter current password for root (enter for none):
OK, successfully used password, moving on...

Setting the root password ensures that nobody can log into the MariaDB
root user without the proper authorisation.

Set root password? [Y/n] n
 ... skipping.

By default, a MariaDB installation has an anonymous user, allowing anyone
to log into MariaDB without having to have a user account created for
them.  This is intended only for testing, and to make the installation
go a bit smoother.  You should remove them before moving into a
production environment.

Remove anonymous users? [Y/n] Y
 ... Success!

Normally, root should only be allowed to connect from 'localhost'.  This
ensures that someone cannot guess at the root password from the network.

Disallow root login remotely? [Y/n] Y
 ... Success!

By default, MariaDB comes with a database named 'test' that anyone can
access.  This is also intended only for testing, and should be removed
before moving into a production environment.

Remove test database and access to it? [Y/n] Y
 - Dropping test database...
 ... Success!
 - Removing privileges on test database...
 ... Success!

Reloading the privilege tables will ensure that all changes made so far
will take effect immediately.

Reload privilege tables now? [Y/n] Y
 ... Success!

Cleaning up...

All done!  If you've completed all of the above steps, your MariaDB
installation should now be secure.

Thanks for using MariaDB!
ログインユーザの用意
mariaDBにアクセスするためのユーザを用意します.
今回はID, password共に python として作成します.
(tutorial) mnu@tutorial:~/work/tutorial/tutorial$ sudo mysql
Welcome to the MariaDB monitor.  Commands end with ; or \g.
Your MariaDB connection id is 51
Server version: 10.0.27-MariaDB-0ubuntu0.16.04.1 Ubuntu 16.04

Copyright (c) 2000, 2016, Oracle, MariaDB Corporation Ab and others.

Type 'help;' or '\h' for help. Type '\c' to clear the current input statement.

MariaDB [(none)]> grant all on *.* to python@localhost identified by 'python';
Query OK, 0 rows affected (0.00 sec)
接続用DBの作成
pythonユーザが作られたことの確認も兼ねて,一旦mysqlを切断してpythonユーザで接続し,
tutorial用のデータベースを作成します.
(tutorial) mnu@tutorial:~/work/tutorial/tutorial$ mysql -u python -p
Enter password:
Welcome to the MariaDB monitor.  Commands end with ; or \g.
Your MariaDB connection id is 52
Server version: 10.0.27-MariaDB-0ubuntu0.16.04.1 Ubuntu 16.04

Copyright (c) 2000, 2016, Oracle, MariaDB Corporation Ab and others.

Type 'help;' or '\h' for help. Type '\c' to clear the current input statement.

MariaDB [(none)]> create database tutorial character set utf8;
Query OK, 1 row affected (0.00 sec)

MariaDB [(none)]> show databases;
+--------------------+
| Database           |
+--------------------+
| information_schema |
| mysql              |
| performance_schema |
| tutorial           |
+--------------------+
4 rows in set (0.00 sec)
deploy用各種設定用意
必要なものは揃ったはずなので各アプリの設定を書いていきます.
django
settings.py は開発用のものなので本番用の設定ファイルを用意します.
(tutorial) mnu@tutorial:~/work/tutorial/tutorial/tutorial$ ls
__init__.py  settings.py  settings_production.py  urls.py  wsgi.py
from .settings import *  # noqa


DEBUG = False
TEMPLATE_DEBUG = DEBUG

ALLOWED_HOSTS = ['*']

DATABASES = {
    'default': {
        'ENGINE': 'django.db.backends.mysql',
        'NAME': 'tutorial',
        'USER': 'python',
        'PASSWORD': 'python',
        'HOST': 'localhost',
    }
}

STATIC_ROOT = '/home/mnu/public_html/tutorial/static/'
DATABASEの設定に先ほど用意したデータベース名,ユーザ,パスワードをセットします.
サーバは mariaDB でしたが,ENGINEは mysql で大丈夫です.
STATIC_ROOT として静的ファイルの置き場所も指定します.
万が一エラーが発生した場合に,詳細な内容を見られると困るので
DEBUG と TEMPLATE_DEBUG は False をセットしておきましょう.
DEBUG が Falseの場合は ALLOWED_HOSTS に ['*'] をセットするのを忘れないように.
これがないと400エラーが出ます.
DBの作成
記述したsettingsファイルを指定して migrate コマンドを実行すると必要なテーブルが作成されます.
(tutorial) mnu@tutorial:~/work/tutorial/tutorial$ ./manage.py migrate --settings=tutorial.settings_production
Operations to perform:
  Apply all migrations: admin, sessions, polls, contenttypes, auth
Running migrations:
  Rendering model states... DONE
  Applying contenttypes.0001_initial... OK
...(省略)...
テーブルができてるか確認してみます.
mnu@tutorial:~$ mysql -u python -ppython tutorial
Reading table information for completion of table and column names
You can turn off this feature to get a quicker startup with -A

Welcome to the MariaDB monitor.  Commands end with ; or \g.
Your MariaDB connection id is 73
Server version: 10.0.27-MariaDB-0ubuntu0.16.04.1 Ubuntu 16.04

Copyright (c) 2000, 2016, Oracle, MariaDB Corporation Ab and others.

Type 'help;' or '\h' for help. Type '\c' to clear the current input statement.

MariaDB [tutorial]> show tables;
+----------------------------+
| Tables_in_tutorial         |
+----------------------------+
| auth_group                 |
| auth_group_permissions     |
| auth_permission            |
| auth_user                  |
| auth_user_groups           |
| auth_user_user_permissions |
| django_admin_log           |
| django_content_type        |
| django_migrations          |
| django_session             |
| polls_choice               |
| polls_question             |
+----------------------------+
12 rows in set (0.00 sec)
静的ファイルの設置
DBの時と同じくsettingsファイルを指定して collectstatic を実行すると指定した場所に
cssやjsやimageなどの静的ファイルが設置されます.
(tutorial) mnu@tutorial:~/work/tutorial/tutorial$ ./manage.py collectstatic --settings=tutorial.settings_production

You have requested to collect static files at the destination
location as specified in your settings:

    /home/mnu/public_html/tutorial/static

This will overwrite existing files!
Are you sure you want to do this?

Type 'yes' to continue, or 'no' to cancel: yes
Copying '/home/mnu/work/tutorial/tutorial/static/js/bootstrap.js'
...(省略)...
Copying '/home/mnu/.virtualenvs/tutorial/lib/python3.5/site-packages/django_extensions/static/django_extensions/img/indicator.gif'

77 static files copied to '/home/mnu/public_html/tutorial/static'.
supervisor
続いてsupervisorにgunicornの起動コマンドを設定します.
/etc/supervisor/conf.d/ に tutorial.conf という名前で設定ファイルを置きます.
内容はこんな感じです.
[program:tutorial]
user=mnu
command=/home/mnu/.virtualenvs/tutorial/bin/gunicorn -w 2 tutorial.wsgi:application --bind=unix:///tmp/tutorial.sock
directory=/home/mnu/work/tutorial/tutorial
stdout_logfile=/var/log/tutorial/info.log
stderr_logfile=/var/log/tutorial/error.log
numprocs = 1
stdout_logfile_maxbytes = 10MB
stderr_logfile_maxbytes = 10MB
stdout_logfile_backups = 5
stderr_logfile_backups = 5
autostart = true
autorestart = true
environment = LANG=ja_JP.UTF-8,LC_ALL=ja_JP.UTF-8,LC_LANG=ja_JP.UTF-8,DJANGO_SETTINGS_MODULE="tutorial.settings_production"
mnu の部分や tutorial の部分はユーザやプロジェクトに合わせて適切に変更してください.
なんとなくでわかると思いますが, command= から始まってる行がsupervisorで実行するコマンドです.
pipでinstallした gunicorn コマンドを実行するため, .virtualenvs/(仮想環境名)/bin/ というpathになってます.
--bind=unix:// オプションを指定することでsocketを使用してくれるようになるのでport番号の衝突や
外から直にアクセスされた際のセキュリティなどを考えなくてよくなります.
directory はコマンドを実行する場所です. gunicornのオプションでwsgiファイルの場所を指定する必要があるので
manage.py があるディレクトリを指定します.
最後の行の environment に DJANGO_SETTINGS_MODULE="tutorial.settings_production" を指定してますが,
こう書くと DJANGO_SETTINGS_MODULE という環境変数にデフォルトで使用する設定ファイルをセットしてくれます.
ここに書かずにコマンドで直に --settings=tutorial.settings_production という引数を指定してもいいです.
ログファイルの書き出し場所として /var/log/tutorial/ を指定していますが,
実行ユーザが mnu なので /var/log/tutorial/ を mnu ユーザが書き込めるように用意する必要があります.
$ cd /var/log
$ sudo mkdir tutorial
$ sudo chown mnu tutorial
nginx
続いてnginxの設定ファイルです.
これは /etc/nginx/site-available/ 以下に用意します.
内容は以下のような感じです.
upstream tutorial-app {
    server unix:///tmp/tutorial.sock;
}

server {
    listen 80;
    server_name tutorial.usa-mimi.jp;

    access_log /var/log/nginx/tutorial.log;
    error_log /var/log/nginx/tutorial_error.log;

    proxy_pass_header Server;
    proxy_set_header Host $host;
    proxy_set_header REMOTE_ADDR $remote_addr;

    location /static {
        root /home/mnu/public_html/tutorial/;
    }

    location / {
        proxy_pass http://tutorial-app;
    }
}
今回はhostとして tutorial.usa-mimi.jp を指定したアクセスがあった場合に,先ほどsupervisorで作成した
/tmp/tutorial.sock に繋ぐように書いてます.
別途DNS設定をする必要があります.
設定が書けたら今度は /etc/nginx/sites-enabled/ に移動し,先ほどの設定ファイルにシンボリックリンクを貼ります.
$ cd /etc/nginx/sites-enabled
$ sudo ln -s ../sites-available/tutorial.conf tutorial.conf
起動
最後に各種設定ファイルを反映させていきます.
supervisor
$ sudo supervisorctl
でsupervisorctlを実行し,reload コマンドを実行して設定ファイルを反映させます.
status でtutorialが RUNNING になっていれば起動が成功しています.
たまに起動してすぐにエラーが出て再起動... を繰り返して正常に動いてるように見える場合もあるので起動時間(uptime)にも注目しましょう
unix:///var/run/supervisor.sock no such file
と出る場合はsupervisorが起動していないので一度下記コマンドを実行してsupervisordを起動しましょう
$ sudo supervisord
設定ファイルが正常に反映されていれば
/tmp/tutorial.sock にファイルができているはずです.
nginx
下記コマンドで設定が反映されます.
$ sudo nginx -s reload
確認
最後にブラウザからアクセスしてみましょう.
無事表示されたら設定完了です.
djangoアプリの作り方は[チュートリアル](http://qiita.com/maisuto/items/17653f344d1f64afa019)を参考にしてください.
