はじめに
前回投稿したwebrtcデモはOCI上のVMインスタンス上で構築しました。
今回はOKE+redisにてwebrtcサーバを構築します。
OKEでのwebrtcサーバ構築
livekitをkubernatesで動作するにあたっては、下記公式ページに情報があります。

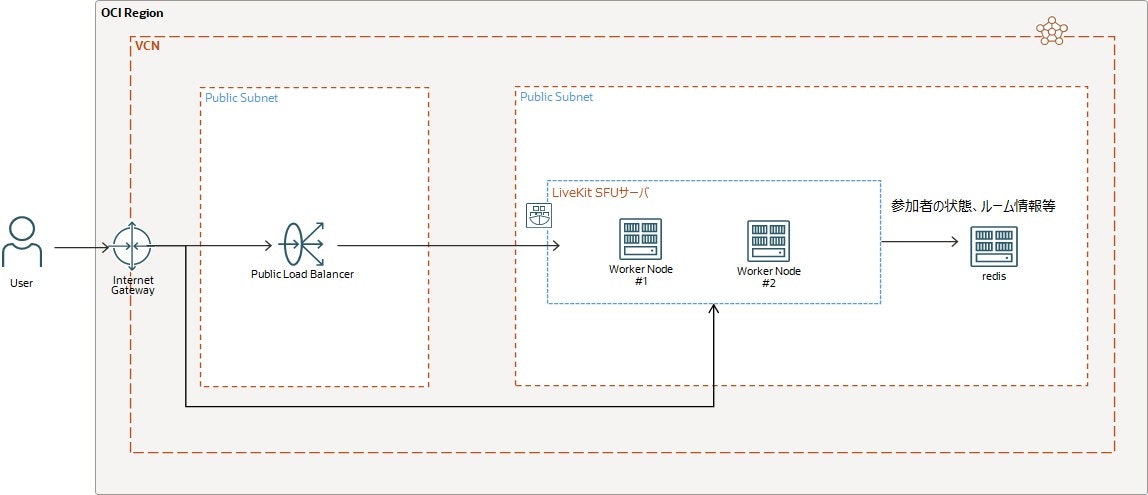
この図のように、ServiceをデプロイするとOCIではLoadBalancerが作成されます。
Ingressは最初LoadBalancerにより各node,podに振り分けられますが、
その後のwebrtc通信はLoadBalancerを介さず、(おそらく初期に振り分けられた際の)各node,podにダイレクトに通信します。また参加者の情報等、リアルタイムでnode間で共有すべき情報はredisを用いてpub/subします。
構成図
こちらです。
クラスタ作成
まず最初にVCNを含むOKEクラスタを構築します。
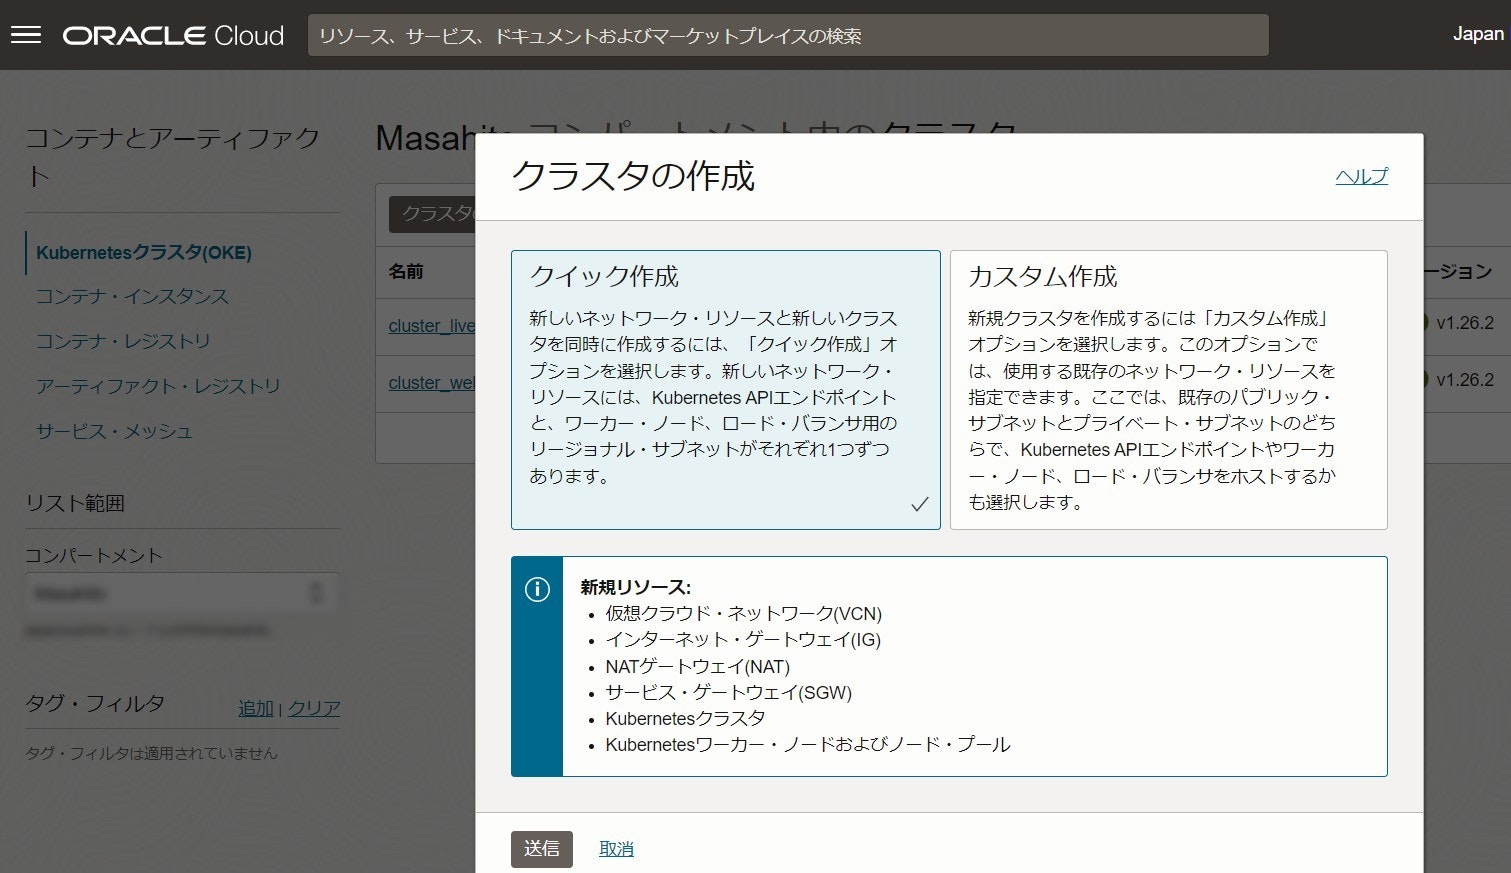
クイック作成よりVCN、ワーカーノードが簡単に作成できます。
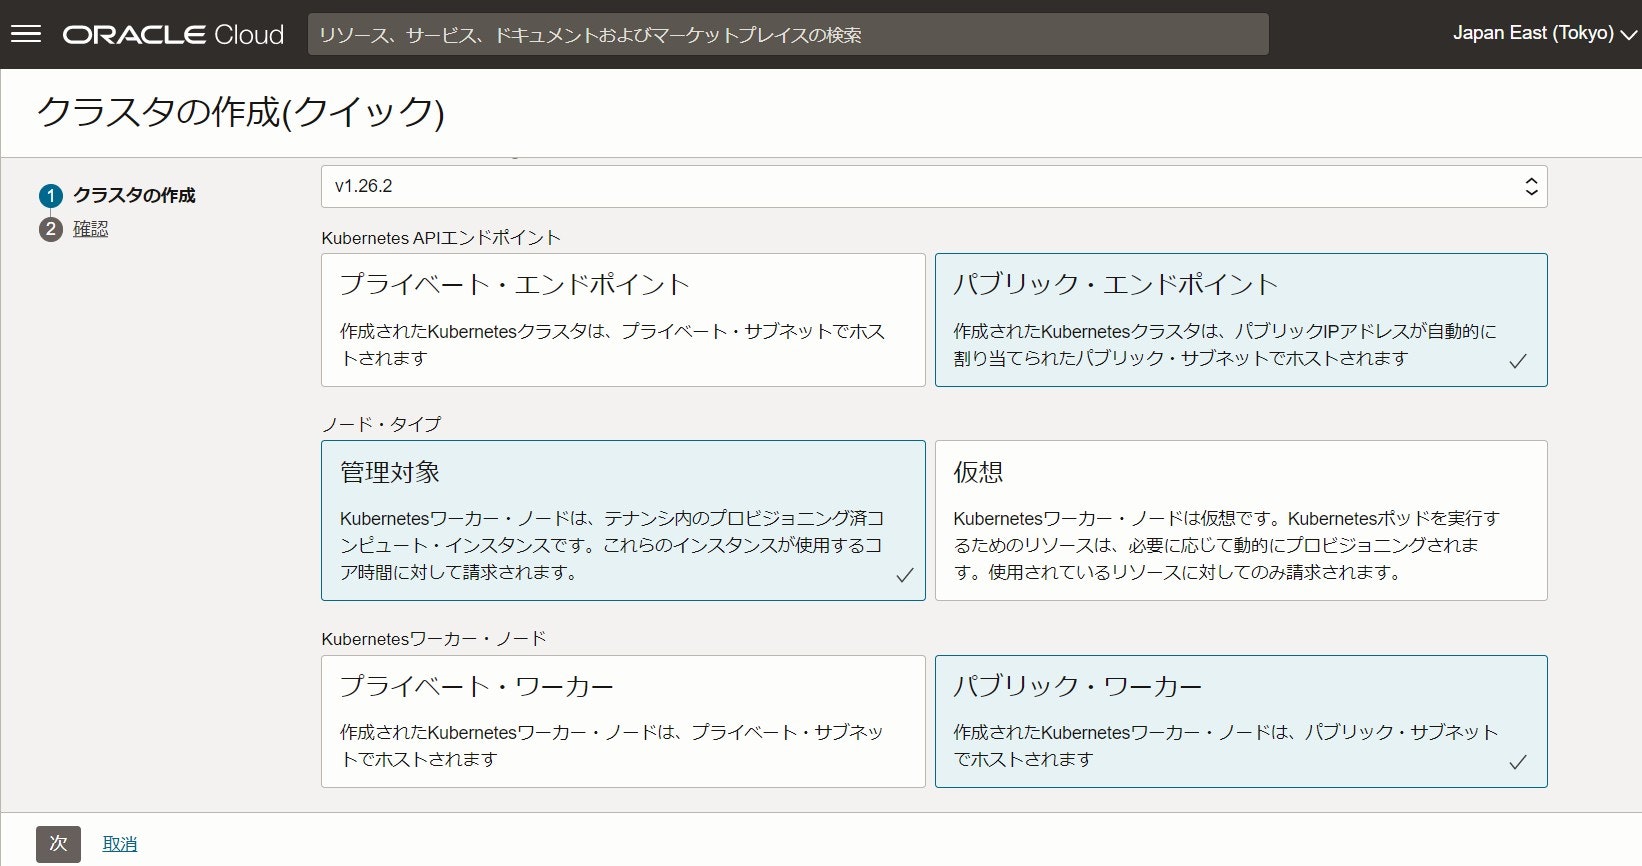
livekitを使う今回は各ノードにパブリックIPを割り当てるため上記の設定にします。
最後にワーカーノードがあるサブネットのセキュリティリスト・イングレスルールに外部ANYからのTCP 7880-7881疎通許可設定を追加します。

redis構築
ここでは手順を省略しますが、redisサーバを構築します。
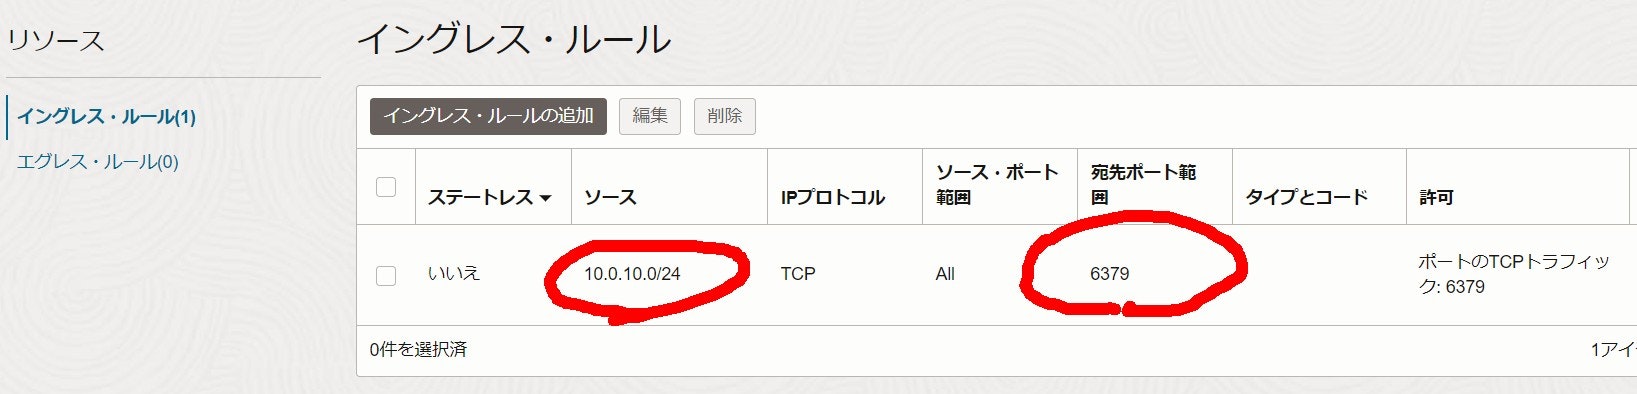
tlsモードとし、ポートは標準の6379を使用します。
VCNのセキュリティリストを作成し、redisサーバのあるサブネットに適用します。
dockerイメージ作成
Dockerefile, configファイルをを作成します。
FROM oraclelinux:8

RUN dnf update -y && \
    dnf install -y curl && \
    curl -sSL https://get.livekit.io | bash && \
    dnf clean all

# ソフトウェアのインストール後に不要なファイルを削除し、イメージのサイズを小さくする
RUN rm -rf /var/cache/dnf

# configファイル(後述)を指定します
COPY config.yaml /home/opc/config.yaml

# Dockerfile内でEXPOSEを使用して、ポートを明示的に公開する
EXPOSE 7880 7881 7882

# CMD命令はDockerがコンテナーを実行するために使用するデフォルトの実行可能ファイルを設定します
# LiveKitサーバを起動します
CMD ["/bin/sh", "-c", "livekit-server --dev --config /home/opc/config.yaml --bind 0.0.0.0"]
port: 7880
log_level: info
rtc:
  tcp_port: 7881
  port_range_start: 50000
  port_range_end: 60000
  # use_external_ip should be set to true for most cloud environments where
  # the host has a public IP address, but is not exposed to the process.
  # LiveKit will attempt to use STUN to discover the true IP, and advertise
  # that IP with its clients
  use_external_ip: true
redis:
  # redis is recommended for production deploys
  address: <your_redis_domain>:6379
  use_tls: true
keys:
  # key value pairs
  # your_api_key: <api_secret>
  devkey: secret
# when enabled, LiveKit will expose prometheus metrics on :6789/metrics
#prometheus_port: 6789
turn:
  enabled: false
  # domain must match tls certificate
  # defaults to 3478. If not using a load balancer, must be set to 443.
  tls_port: 3478
dockerコマンドを使用してコンテナレジストリにdockerイメージをpushします。
docker image build -t livekit/server:v1.0 .
docker image tag livekit/server:v1.0 <your_ocir_endpoint>/livekit/server:v1.0
docker image push <your_ocir_endpoint>/livekit/server:v1.0
pod, serviceをapply
まずdeployment.yaml, service.yamlを作成します。
kind: Deployment
apiVersion: apps/v1
metadata:
  name: livekit
spec:
  replicas: 2
  selector:
    matchLabels:
      app: livekit
  template:
    metadata:
      labels:
        app: livekit
        version: v1
    spec:
      hostNetwork: true
      containers:
        - name: livekit
          image: <your_ocir_endpoint>/livekit/server:v1.0
          imagePullPolicy: IfNotPresent
          ports:
            - name: port-7880
              containerPort: 7880
            - name: port-7881
              containerPort: 7881
          env:
            - name: REDIS_TLS
              value: "true"
kind: Service
apiVersion: v1
metadata:
  name: livekit
  labels:
    app: livekit
  annotations:
    oci.oraclecloud.com/load-balancer-type: "lb"
    service.beta.kubernetes.io/oci-load-balancer-shape: "flexible"
    service.beta.kubernetes.io/oci-load-balancer-shape-flex-min: "10"
    service.beta.kubernetes.io/oci-load-balancer-shape-flex-max: "50"
spec:
  type: LoadBalancer
  selector:
    app: livekit
  ports:
    - name: app-7880
      protocol: TCP
      port: 7880
      targetPort: 7880
    - name: app-7881
      protocol: TCP
      port: 7881
      targetPort: 7881
その後、applyします。
kubectl apply -f ./deployment.yaml
kubectl apply -f ./service.yaml
ここまできたらpodが動作していることを確認します。
podがRunningとなっていればひとまずOKです。
masahito_i@codeeditor:work (ap-tokyo-1)$ kubectl get node,pod,svc
NAME             STATUS   ROLES   AGE    VERSION
node/10.0.10.3   Ready    node    5h7m   v1.26.2
node/10.0.10.7   Ready    node    5h7m   v1.26.2

NAME                           READY   STATUS    RESTARTS   AGE
pod/livekit-84b748756b-ntgms   1/1     Running   0          4h38m
pod/livekit-84b748756b-tqm9n   1/1     Running   0          4h38m

NAME                 TYPE           CLUSTER-IP     EXTERNAL-IP      PORT(S)                         AGE
service/kubernetes   ClusterIP      10.96.0.1      <none>           443/TCP,12250/TCP               5h12m
service/livekit      LoadBalancer   10.96.53.178   <lb_global_ip>   7880:32414/TCP,7881:30339/TCP   4h37m
動作検証
ここまででlivekitのwebrtcサーバが構築できました。
動作検証には前回記事で作成したデモアプリで確認します。
※バックエンドのみVM->OKE+redisに変えたためデモとしては全く見栄えが変わりません。。
1点マルチノードで動作させるために今回redisを導入しました。
デモ実行後、redisの中身を覗くとlivekitがpub/subしているのが確認できます。
<redis_endpoint>:6379> keys *
 1) "rooms"
 2) "participant_signal:CO_kNCJVmkgWdE4"
 3) "participant_rtc:isvtest|27brjq1fang"
 4) "participant_signal:CO_FgATGsY2mvJu"
 5) "nodes"
 6) "participant_rtc:0NXZ0Z3cpB|vZzczQnYhdGN3cD"
 7) "participant_rtc:0NXZ0Z3cpB|10WO0YXNvVmcxA"
 8) "participant_rtc:isvtest|774gabt3s6o"
 9) "room_node_map"
10) "participant_rtc:isvtest|1reo5v49m5"
11) "participant_rtc:0NXZ0Z3cpB|nZGMyVmZrJzawRD"
12) "participant_rtc:isvtest|4pk2kfer0fg"
13) "participant_rtc:0NXZ0Z3cpB|n5WYmFTcqJnY3ID"
14) "participant_signal:CO_DX5Zef44WYUQ"
15) "participant_signal:CO_Q9qDsYHbKJgG"
おわりに
webrtcのossであるlivekitを使用してOKE+redisでマルチノードのサーバを構築しました。
livekitは非常に魅力的なOSSですので、また新しい検証結果をpostしたいと思います。