概要
タイトルの通りです。
文字認識自体は、Google の [Vision API] (https://cloud.google.com/vision/?hl=ja) でしたいと思っていました。
Vision API の実力
ここに車のナンバープレートの画像があります。

これをVision API にかけると、、、
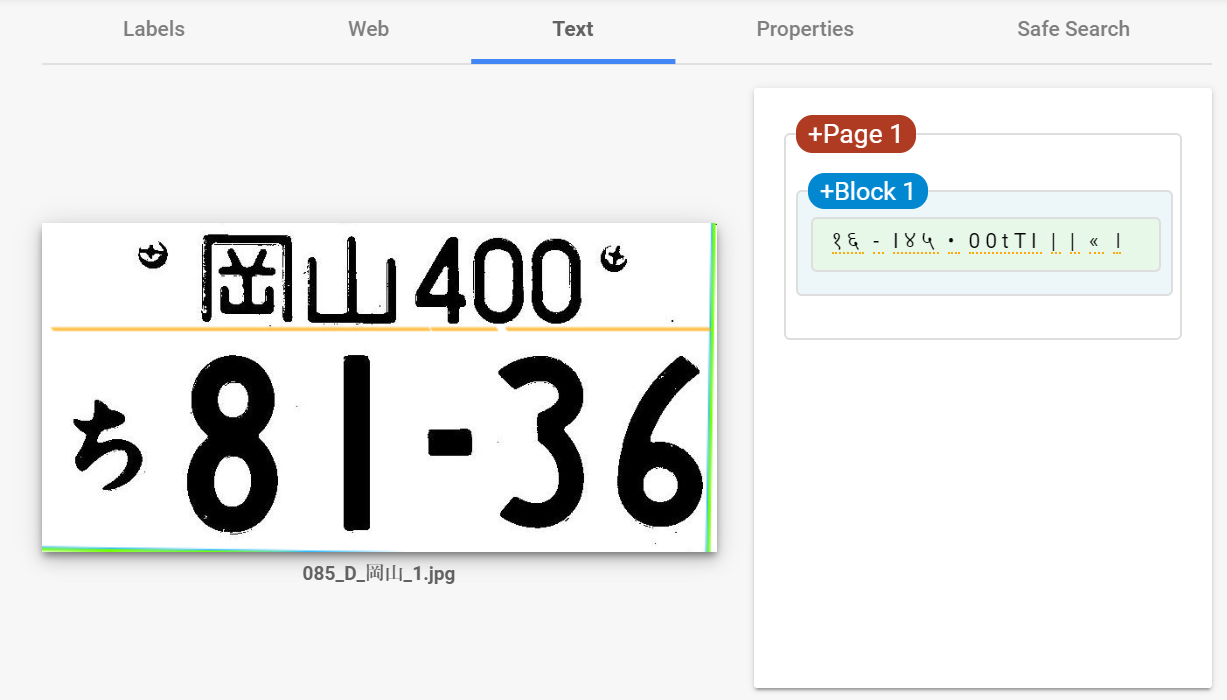
( ,,`・ω・´)ンンン?
どうやらVision API は二列の文字列を読み取るのが苦手らしい。。。
そこで、車のナンバープレート画像を、
- 二列の文字列→一列の文字列に
- ただ画像を切って接合しただけでは大きさがおかしくなるので、文字のサイズを調整
してみることにしました!
やってみたこと
処理したいナンバープレート画像がたくさんあったので、
ここはPythonの力をかります。
技術要件
- Windows 10
- Python 3.6.5
- numpy 1.16.4
- opencv-python 4.1.0.25
- Pillow 6.1.0
- pip 19.1.1
プログラム
from PIL import Image, ImageChops
import cv2, matplotlib, sys
import numpy as np

# 余白を消す関数
def delete_margin(img):
    img2 = img.convert("RGB")
    bg = Image.new("RGB", img2.size, img2.getpixel((0, 0)))
    diff = ImageChops.difference(img2, bg)
    croprange = diff.convert("RGB").getbbox()
    nim = img.crop(croprange)
    return nim

# 画像の接合を行う関数
def resize_connect(im1, im2, resample=Image.BICUBIC, resize_big_image=True):
    if im1.height == im2.height:
        _im1 = im1
        _im2 = im2
    elif (((im1.height > im2.height) and resize_big_image) or
          ((im1.height < im2.height) and not resize_big_image)):
        _im1 = im1.resize((int(im1.width * im2.height / im1.height), im2.height), resample=resample)
        _im2 = im2
    else:
        _im1 = im1
        _im2 = im2.resize((int(im2.width * im1.height / im2.height), im1.height), resample=resample)
    dst = Image.new('RGB', (_im1.width + _im2.width, _im1.height))
    dst.paste(_im1, (0, 0))
    dst.paste(_im2, (_im1.width, 0))
    return dst

# コマンドラインから処理する画像名を格納
read_command = sys.argv
if len(read_command) <= 1 :
    sys.exit(' "python [このプログラム名] " の後に、処理する画像を指定・入力してください。')
elif len(read_command) <= 2 :
    image_name = read_command[1]
else:
    sys.exit('画像は一つだけ指定してください。')

# 元画像の読み込み
original_image = Image.open(image_name)
width = original_image.size[0]
height = original_image.size[1]

# 元画像のピクセルごとの色を読み込み、BGRからRGBに変換
pix_img = cv2.imread(image_name)
pix_img = cv2.cvtColor(pix_img, cv2.COLOR_BGR2RGB)

# 地名とナンバーとの間から、全て白の列を抽出
all_white = np.full((width ,3), 255)
white_index = []
for i in range(int(height*0.2), int(height*0.8)):
    if (pix_img[i]==all_white).all(axis=0).any() == True:
        white_index.append(i)

# 白い列のうち、最上列と最下列を格納
try:
    upper_white_index = min(white_index)
    lower_white_index = max(white_index)
# 全て白の列が存在しない場合 → 処理できないとして中断
except ValueError:
    print(image_name + " は処理できません。")
    sys.exit()

# 上部:地名のトリミング
box = (int(width*0.2), 1, int(width*0.8), upper_white_index)
place_image = original_image.crop(box)
place_image = delete_margin(place_image)

# 下部:ひらがな(小)・ナンバーのトリミング
box = (1, lower_white_index, width, height)
num_hiragana_image = original_image.crop(box)

# ひらがなのみトリミング
bottom_height = height - lower_white_index
box = (1, int(bottom_height*0.2), int(width*0.2), int(bottom_height*0.8))
hiragana_image = num_hiragana_image.crop(box)
hiragana_image = delete_margin(hiragana_image)

# ナンバーのみトリミング
box = (int(width*0.2), 1, width, bottom_height)
number_image = num_hiragana_image.crop(box)
number_image = delete_margin(number_image)

# 画像の接合・保存
bottom_image = resize_connect(hiragana_image, number_image)
resize_connect(place_image, bottom_image).save(image_name + '_edited.jpg', quality=95)
print(image_name + 'の画像加工が終了しました。')
いざ実行
コマンドライン
$ python adjust.py 085_D_okayama_1.jpg
085_D_okayama_1.jpgの画像加工が終了しました。
出力された画像がこちら。

Vision API へ
頼みますよ…!

うーんおしい!!!(+o+)
思ったこと
まず、失敗してしまった原因として考えられることは、
- 文字の間隔が狭い
- 下段のひらがな一文字が、数字の間に出てくるので、認識されにくい
といったところでしょうか。
もう少し改善の余地はありそうです。
欲を言えば、Vision API の性能がもうちょっと向上してくれないかなぁ…。(小声)