概要
KtorでJWT認証(RS256)を試してみた際に、日本語の記事が少なくいくつかつまるところがあったため、記事にしてみようと思います。
今回作成したソースコード
https://github.com/magatakohei/ktor-jwt-rs256-sample
動作環境
macOS Montery
バージョン
Kotlin: 1.7.21
Ktor: 2.2.1
そもそもKtorとは?
そもそもKtorとはKotlin製の軽量フレームワークです。開発元はJetBrainsになります。
次のような特徴があります。
- 非同期処理に強い
- 軽量で拡張性が高い
KtorのJWT承認の大まかなフロー
- POSTでユーザー情報など渡して認証する
- 認証OK⇨サーバーでJWTを生成して指定されたアルゴリズムで署名。HS256やRS256など
※今回はRS256による署名をします。それぞれの違いはこちらの記事などが参考になるかと思います。 - 生成したJWTをクライアントに送る
- Bearerスキーマを使用してAuthorizationヘッダーでJWTを渡す
- サーバ側でJWTを検証。JWTペイロードに追加の検証。
- 検証OK→サーバー側の処理
Ktorのプロジェクトを作成してみる
Ktorのプロジェクトを作成するためには、以下の方法があります。
- IntelliJ IDEAの有償版で「New Project」で作成する
-
Webベースのジェネレータで作成する
今回は2の方法で作成します!
Webベースジェネレータでの雛形の作成
- Webベースのジェネレータ にアクセスします
- 「Project Name」を
ktor-jwt-rs256-sampleにしてAdd pluginsをクリックします - 「Routing」,「ContentNegotiation」,「kotlinx.serialization」を検索して追加します
- 「Generate Project」でプロジェクトの作成
- プロジェクトがダウンロードされるので、雛形の準備は完了です

動作確認
- IntelliJ IDEAでダウンロードしたプロジェクトを開き、「Run 'ApplicationKt'」をクリック

- ターミナルでリクエストして、「Hello World!」が表示されればここまではOKです
❯ curl -X GET --location "http://127.0.0.1:8080/"
Hello World!
application.confを読み込むようにする
実はダウンロードしたプロジェクトでは、設定ファイルを読み込むようになっていません。
このままだと、色々と不便なのでapplication.confを読み込めるようにします。
-
Application.ktを下記のように変更し、application.confを作成します
package com.example

import com.example.plugins.configureRouting
import com.example.plugins.configureSerialization
import io.ktor.server.application.Application

fun main(args: Array<String>): Unit = io.ktor.server.netty.EngineMain.main(args)

fun Application.module() {
    configureSerialization()
    configureRouting()
}
ktor {
    deployment {
        port = 8080
        port = ${?PORT}
        watch = [ classes ]
    }
    application {
        modules = [ com.example.ApplicationKt.module ]
    }
    development = true
}
JWT認証の導入
dependenciesの追加
build.gradle.ktsを開き、dependenciesに以下を追加します
//jwt
implementation("io.ktor:ktor-server-auth:$ktor_version")
implementation("io.ktor:ktor-server-auth-jwt:$ktor_version")
実装
application.confにJWT関連の設定を追加します
jwt {
    privateKey = "MIIBVQIBADANBgkqhkiG9w0BAQEFAASCAT8wggE7AgEAAkEAtfJaLrzXILUg1U3N1KV8yJr92GHn5OtYZR7qWk1Mc4cy4JGjklYup7weMjBD9f3bBVoIsiUVX6xNcYIr0Ie0AQIDAQABAkEAg+FBquToDeYcAWBe1EaLVyC45HG60zwfG1S4S3IB+y4INz1FHuZppDjBh09jptQNd+kSMlG1LkAc/3znKTPJ7QIhANpyB0OfTK44lpH4ScJmCxjZV52mIrQcmnS3QzkxWQCDAiEA1Tn7qyoh+0rOO/9vJHP8U/beo51SiQMw0880a1UaiisCIQDNwY46EbhGeiLJR1cidr+JHl86rRwPDsolmeEF5AdzRQIgK3KXL3d0WSoS//K6iOkBX3KMRzaFXNnDl0U/XyeGMuUCIHaXv+n+Brz5BDnRbWS+2vkgIe9bUNlkiArpjWvX+2we"
    issuer = "http://0.0.0.0:8080/"
    audience = "http://0.0.0.0:8080/hello"
    realm = "Access to 'hello'"
    expireMinute = 60
}
以下のようにして、keyの生成ができます。
openssl genrsa -out private.key 2048
openssl rsa -in private.key -pubout -out public.key
cat private.key.pk8 | tr -d "\n" | sed -e "s/-----BEGIN PRIVATE KEY-----//" -e "s/-----END PRIVATE KEY-----//"
今回はローカルでの動作確認のみのため、秘密情報をそのままapplication.confに記載しています。本来は環境変数を使用するなどしてプレーンテキストで保存しないようにしてください。
JWTトークンを生成
まずは、ユーザー情報を受け取るための User.ktを作成します。
package com.example.models

import kotlinx.serialization.Serializable

@Serializable
data class User(val username: String, val password: String)
JwtAuthentication.ktを作成します。
処理
- 設定ファイルの読み込み。
- POSTの
/loginで認証完了後にcall.respondでJWTトークンを返却。
※今回はユーザーの認証はスキップしています。
package com.example.plugins

import com.auth0.jwk.JwkProviderBuilder
import com.auth0.jwt.JWT
import com.auth0.jwt.algorithms.Algorithm
import com.example.models.User
import io.ktor.server.application.Application
import io.ktor.server.application.call
import io.ktor.server.request.receive
import io.ktor.server.response.respond
import io.ktor.server.routing.post
import io.ktor.server.routing.routing
import java.security.KeyFactory
import java.security.interfaces.RSAPrivateKey
import java.security.interfaces.RSAPublicKey
import java.security.spec.PKCS8EncodedKeySpec
import java.util.Base64
import java.util.Date
import java.util.concurrent.TimeUnit

fun Application.configureJwt() {
    // 設定ファイルの読み込み
    val privateKeyString = environment.config.property("jwt.privateKey").getString()
    val issuer = environment.config.property("jwt.issuer").getString()
    val audience = environment.config.property("jwt.audience").getString()
    val myRealm = environment.config.property("jwt.realm").getString()
    val expireMinute = environment.config.property("jwt.expireMinute").getString().toIntOrNull() ?: 1;
    val jwkProvider = JwkProviderBuilder(issuer)
        .cached(10, 24, TimeUnit.HOURS)
        .rateLimited(10, 1, TimeUnit.MINUTES)
        .build()

    routing {
        post("/login") {
            val user = call.receive<User>()
            // ここで、userとpasswordが合っているかなどのログイン認証(今回はスキップ)
            // ...
            val publicKey = jwkProvider.get("6f8856ed-9189-488f-9011-0ff4b6c08edc").publicKey
            val keySpecPKCS8 = PKCS8EncodedKeySpec(Base64.getDecoder().decode(privateKeyString))
            val privateKey = KeyFactory.getInstance("RSA").generatePrivate(keySpecPKCS8)

            val token = JWT.create()
                .withAudience(audience)
                .withIssuer(issuer)
                .withClaim("username", user.username)
                .withExpiresAt(Date(System.currentTimeMillis() + expireMinute * 60 * 1000)) // 有効期限の設定
                .sign(Algorithm.RSA256(publicKey as RSAPublicKey, privateKey as RSAPrivateKey))
            call.respond(hashMapOf("token" to token))
        }

        // issuer + /.well-known/jwks.json
        // http://0.0.0.0:8080/.well-known/jwks.jsonのリクエストが来た際に、
        // certsフォルダ内のjwks.jsonからjwksを取得する
        static(".well-known") {
            staticRootFolder = File("certs")
            file("jwks.json")
        }
    }
}
jwksを作成します。
{
  "keys": [
    {
      "kty": "RSA",
      "e": "AQAB",
      "kid": "6f8856ed-9189-488f-9011-0ff4b6c08edc",
      "n": "tfJaLrzXILUg1U3N1KV8yJr92GHn5OtYZR7qWk1Mc4cy4JGjklYup7weMjBD9f3bBVoIsiUVX6xNcYIr0Ie0AQ"
    }
  ]
}
Application.ktでconfigureJwtを読み込みます。
fun main(args: Array<String>): Unit = io.ktor.server.netty.EngineMain.main(args)

fun Application.module() {
    configureSerialization()
    configureJwt()
    configureRouting()
}
動作確認
ここまで作成すると、http://127.0.0.1:8080/loginにリクエストするとJWTトークンが発行されることが確認できます。
❯ curl --location --request POST 'http://127.0.0.1:8080/login' --header 'Content-Type: application/json' --data-raw '{
    "username": "user",
    "password": "password"
}'
{"token":"<生成されたトークン>"}
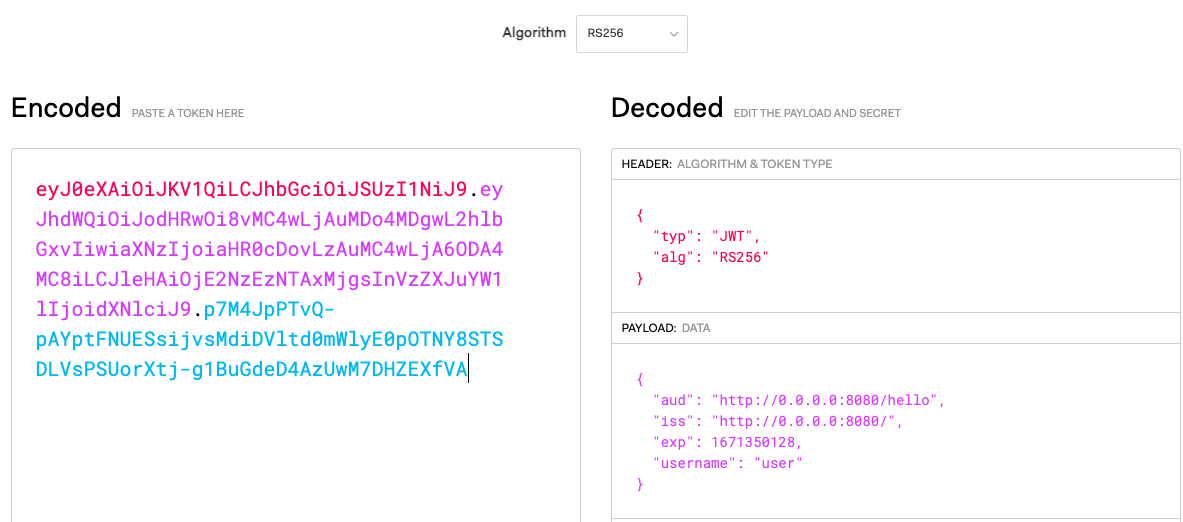
発行されたJWTトークンを jwt.ioで確認ができます。

JWTトークンの検証
src/main/kotlin/com/example/plugins/JwtAuthentication.ktに認証時の処理を追加します
install(Authentication) {
    jwt("auth-jwt") {
        realm = myRealm
        verifier(jwkProvider, issuer) {
            acceptLeeway(3)
        }
        // JWTペイロードへの追加の検証
        validate { credential ->
            if (credential.payload.getClaim("username").asString() != "") {
                JWTPrincipal(credential.payload)
            } else {
                null
            }
        }
        // 認証に失敗した場合に送信する応答
        challenge { defaultScheme, realm ->
            call.respond(HttpStatusCode.Unauthorized, "Token is not valid or has expired")
        }
    }
}
認証後にアクセスできるパスを追加
src/main/kotlin/com/example/plugins/Routing.ktを開き、認証後にアクセスできるパスを追加します。
authenticate("auth-jwt")をつけるだけです。
fun Application.configureRouting() {
    routing {
        route("/") {
            get {
                call.respondText("Hello World!")
            }
            authenticate("auth-jwt") {
                get("/user") {
                    val principal = call.principal<JWTPrincipal>()
                    val username = principal!!.payload.getClaim("username").asString()
                    val expiresAt = principal.expiresAt?.time?.minus(System.currentTimeMillis())
                    call.respondText("Hello, $username! Token is expired at $expiresAt ms.")
                }
            }
        }
    }
}
動作確認
認証の追加まで完了したので、動作確認してみましょう!
# ログインせずにアクセスしてみる
❯ curl -X GET --location "http://127.0.0.1:8080/user"
Token is not valid or has expired

# tokenの発行
❯ curl --location --request POST 'http://127.0.0.1:8080/login' --header 'Content-Type: application/json' --data-raw '{
    "username": "user",
    "password": "password"
}'
{"token":"<生成されたトークン>"}

# JWTを設定してリクエストする
❯ curl --location --request GET 'http://127.0.0.1:8080/user' \
--header 'Authorization: Bearer <ここにトークン>'
Hello, user! Token is expired at 3508310 ms.
これで、KtorでJWT認証が完了しました!
最後に
今回はKtorでJWT認証をやってみました。実際にユーザーの認証などはしていないので、今後追加していければと思います。
Ktorは非常に軽く、起動が早いなーと感じました。今後も色々試していければと思います。
明日は、@Yu_yukk_Y さんの記事になります!
お楽しみに〜 ![]()
参考サイト