はじめに
ディープラーニングというワードは聞いたことがあるけどどこから手を出したら良いかわからないという人向け。
PythonとかCNNとかKerasとかさわったことない初心者が画像分類やるぞという記事です。
SIGNATE Data Science Competitionに参加して初めてディープラーニングを触ってみたところとっつきやすかったので知見を残したいというのが本記事投稿のきっかけです。
Google Colaboratoryとは
Google Colaboratory(以下、Colab)は、クラウドで実行されるJupyterノートブック環境である。
機械学習などの基本的な環境構築は設定済みで、Tesla系のK80 GPUを無料で最大12時間まで使えるという神環境。
機械学習初心者からそれなりの規模までの学習の実行を行うのに適している。
今回やること
Colabを初めて使うときの設定を行い、自前の訓練データ(.tifファイル)で画像分類を行う。
データの受け渡しはGoogle Driveを利用するので、Colab上でマウントの設定も行う。
Kerasを用いた簡単なSequentialモデルを構築し、学習を行い、結果を出力する。モデルと重みのファイル保存も行う。
自前で用意したテストデータに対して分類を行い、tsvファイルで出力する。
最初の設定
「ファイル」から「Python3の新しいノートブック」を選択。
しばらくすると読み込むので、上部の"Untitled0.ipynb"というタイトルをクリックして好きな名前に変更する。
次に、GPUの設定を行う。
「ランタイム」から「ランタイムの変更」を選択。
ノートブックの設定のハードウェアアクセラレータをNoneからGPUに変更。
これでGPUを利用して計算が行えるようになる。
続いて、「挿入」から「目次セル」を選択し、目次セルを挿入する。
上部メニューの「↑セル」「↓セル」となっている部分を押すと、現在アクティブになっているセルが上下に移動する。
「挿入」から「セクション ヘッダーセル」を選択し、セクション ヘッダーセルを挿入する。
セクション ヘッダーセルはセクションのタイトルを管理するのに使うと便利で、目次セルを更新すると目次セルに各セクションへのジャンプリンクが貼られる。
「挿入」から「コードセル」を選択し、コードセルを挿入する。
このコードセルにコマンドやコードを記述する。

上図のように使うことができます。
1つのコードセルに全てのコードを記述するのではなく、部分ごとに分割して順番に実行すれば良いよう工夫することで、修正も楽にできます。
Google Driveとの連携
まず、Colab上で自前のファイルを利用する環境を設定する。
コードセルに以下を記述して実行。
from google.colab import drive
drive.mount('/content/drive')
実行するとリンクが出てくるのでアクセスした先でアカウントの認証を行い、認証コードを空欄にコピー&ペースト。
"Mounted at /content/drive"と表示されればうまくいっています。
各種import
Pythonのコード内で使うモジュールをimportしておく。
例えばこんな感じ。
# TensorFlowとKerasまわりのimport
import tensorflow as tf
from tensorflow import keras
from keras.utils import np_utils
from keras.layers.convolutional import Conv2D, MaxPooling2D
from keras.models import Sequential
from keras.layers.core import Dense, Dropout, Activation, Flatten
from keras.layers.normalization import BatchNormalization
from keras.preprocessing.image import array_to_img, img_to_array, list_pictures, load_img

# ヘルパーライブラリのimport
import numpy as np
import pandas as pd
import matplotlib.pyplot as plt
import seaborn as sns
import matplotlib.image as mpimg
from sklearn.model_selection import train_test_split
import cv2
import os
import glob
from PIL import Image

print(tf.__version__)
print(cv2.__version__)

# GPUの使用を確認
print(tf.test.gpu_device_name())
GPUがちゃんと使用できているか確認しました。
/device:GPU:0などと表示されていればうまくできています。
学習データの読み込み
自前で用意した学習データをColab上に展開します。今回は簡単のため"1"と"0"のラベルがついた画像の2値分類を想定します。
"train"というフォルダに"True"フォルダ、"False"フォルダを作成し、それぞれ"1"と"0"に対応する画像を入れ、zipに圧縮してGoogle Driveにアップロードします。
Colab上では以下のコマンドでGoogle DriveよりColab上の資源に画像ファイルを展開できます。
# zipファイルの解凍
!date -R
!unzip -qq drive/My\ Drive/train.zip
!date -R
!ls
Colab上では"!"をつけることでLinuxコマンドを使用できます。
Google Drive上のファイルへは"drive/My \Drive/"でアクセスできます。
続いて、訓練データを読み込みます。今回は.tif形式の画像ファイルを読み込むコードを以下に示します。
.jpg .pngなどメジャーな拡張子は他の記事を参考にしてください。
# 訓練データを読み込む

X_train = []
Y_train = []

notify_steps = 1000 # 1000ファイルごとに進捗を出力

# 正例
print("Reading True images...")
files = glob.glob("./train/True/*.tif")
number = 0
for picture in files:
  tmp_img = Image.open(picture)
  img = img_to_array(tmp_img)
  X_train.append(img)
  Y_train.append(1)
  number+=1
  if number % notify_steps == 0:
    print("Reading "+str(number)+" / "+str(len(files))+"True images...")

# 負例
print("Reading False images...")
files = glob.glob("./train/False/*.tif")
number = 0
for picture in files:
  tmp_img = Image.open(picture)
  img = img_to_array(tmp_img)
  X_train.append(img)
  Y_train.append(0)
  number+=1
  if number % notify_steps == 0:
    print("Reading "+str(number)+" / "+str(len(files))+"False images...")

# arrayに変換
X_train = np.asarray(X_train)
Y_train = np.asarray(Y_train)

# クラスの形式を変換: One-Hot表現
Y_train = np_utils.to_categorical(Y_train, 2)

print("Complete.")
Kerasにはload_img関数という非常に便利な画像の読み込み関数があり、.jpg .pngであればこれを利用すれば良いでしょう。
一方.tif形式の場合は正しく配列に値を読み込むことができないため、PILを利用して読み込み、img_to_array関数で配列へと変形します。
X_trainには画像の情報を、Y_trainには画像のラベル(1 or 0)を格納します。
Y_trainはKerasで利用するためにOne-Hot表現と呼ばれる形式へと変換します。
学習モデルの構築
さて、いよいよ学習モデルを構築します。
今回は割と簡単な作りのモデルを構築してみましょう。
# CNNを構築
model = Sequential()

model.add(Conv2D(32, (3, 3), padding='same',
                 input_shape=X_train.shape[1:]))
model.add(Activation('relu'))
model.add(Conv2D(32, (3, 3)))
model.add(Activation('relu'))
model.add(MaxPooling2D(pool_size=(2, 2)))
model.add(Dropout(0.25))

model.add(Conv2D(64, (3, 3), padding='same'))
model.add(Activation('relu'))
model.add(Conv2D(64, (3, 3)))
model.add(Activation('relu'))
model.add(MaxPooling2D(pool_size=(2, 2)))
model.add(Dropout(0.25))

model.add(Flatten())
model.add(Dense(512))
model.add(Activation('relu'))
model.add(Dropout(0.5))
model.add(Dense(2)) # クラスは2個
model.add(Activation('softmax'))

# コンパイル
print("Model compiling...")
model.compile(loss='binary_crossentropy',
              optimizer='SGD',
              metrics=['accuracy'])

# 実行。出力はありで設定(verbose=1)。
print("fitting...")
history = model.fit(X_train, Y_train, batch_size=30, epochs=10,
                   validation_split=0.2, shuffle=True, verbose = 1)

# モデルを保存
print("Model saving... at ./drive/My Drive/model.json")
from keras.utils import plot_model
model_json = model.to_json()
with open("./drive/My Drive/model.json", mode='w') as f:
  f.write(model_json)

# 学習済みの重みを保存
print("Weight saving... at ./drive/My Drive/weights.hdf5")
model.save_weights("./drive/My Drive/weights.hdf5")

# 精度をプロットして表示
print("plotting...")
plt.plot(history.history['acc'])
plt.plot(history.history['val_acc'])
plt.title('model accuracy')
plt.xlabel('epoch')
plt.ylabel('accuracy')
plt.legend(['acc', 'val_acc'], loc='lower right')
plt.show()
model=Sequential()でSequentialモデルを定義し、あとはaddで後ろにつなげていくだけです。
最後の出力はsoftmaxを使っていて、"0"である確率と"1"である確率をそれぞれ出力し、識別を行います。
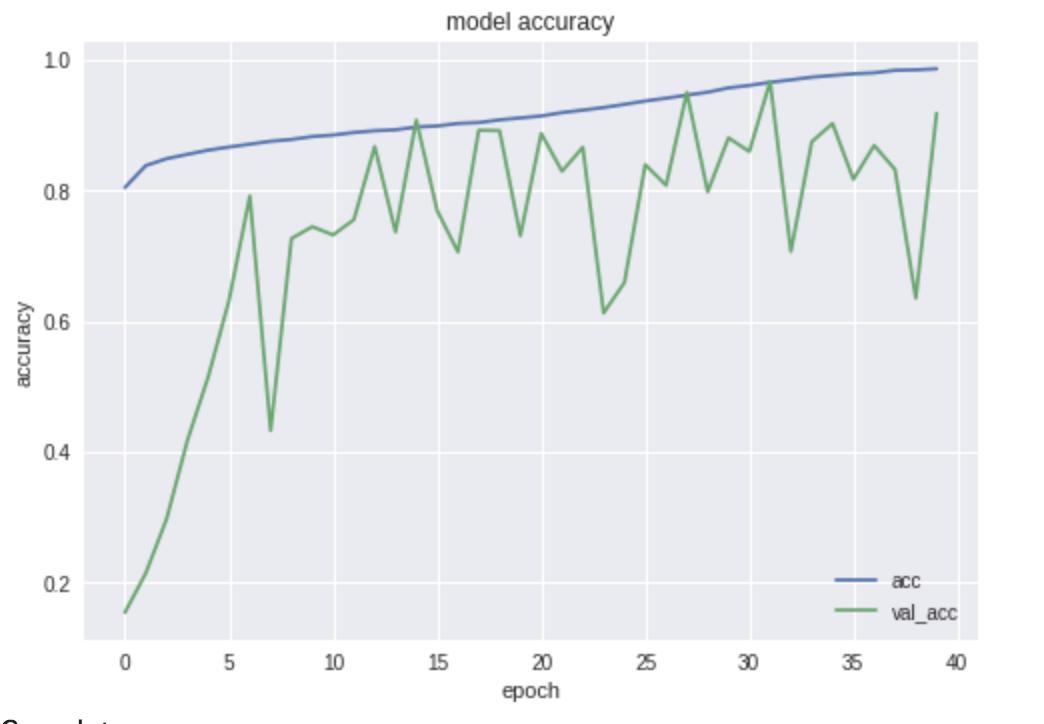
また、今回は訓練データのうち20%を検証データとして利用し、訓練データにフィットした際の検証データの識別精度を出力するようにしています。
実行すると、進捗と識別精度が表示され、最後に以下のような学習曲線が表示されます。モデルと重みもGoogle Drive上にファイルとして保存しています。

新しいデータの予測
訓練データに用いたデータとは別に新しいデータをどのように識別するのか試してみましょう。
訓練データに用いたtrainと同様に"test"フォルダを作成し、その中に"True"、"False"フォルダを作成、各フォルダにデータを格納します。
test.zipに圧縮し、Google Driveにアップロードします。
# テストデータzipファイルの展開
!date -R
!unzip -qq drive/My\ Drive/test.zip
!date -R
!ls
続いて、データの読み込みです。
# テストデータzipファイルの展開
# テストデータの読み込み

X_test = []

notify_steps = 100 # 100ファイルごとに進捗を出力

print("Reading test images...")
files = glob.glob("./test/*.tif")

# ファイルリストをソート
files_test = sorted(files)

number = 0
for picture in files_test:
  tmp_img = Image.open(picture)
  img = img_to_array(tmp_img)
  X_test.append(img)
  number += 1
  if number % notify_steps == 0:
    print("Reading "+str(number)+" / "+str(len(files_test))+"test images...")

# arrayに変換
X_test = np.asarray(X_test)

print("complete.")
ファイルからモデルと保存された重みを読み込み、先ほど読み込んだテストデータの予測を行います。
from keras.models import model_from_json
from keras.utils import plot_model

# ファイルからモデルを読み込み
print("Loading model...")
model = None
with open("./drive/My Drive/model.json") as f:
  model = model_from_json(f.read())

# ファイルから重みを読み込み
print("Loading weights...")
model.load_weights("./drive/My Drive/weights.hdf5")

print("Predict test data...")
y_pred = model.predict(X_test, verbose=1)
print("complete.")
モデルの予測結果を.tsvファイルに保存します。
"画像ファイル名 1"のように結果が.tsvファイルに出力されます。
# TSVファイルの作成
print("create TSV file...")
path = './drive/My Drive/predict.tsv'
with open(path, mode='w') as f:
  for i in range(len(files_test)):
    tmp_f = files_test[i].replace("./test/", "")
    tmp_p = "0"
    if y_pred[i][0] > 0.5:
      tmp_p = "0"
    else:
      tmp_p = "1"
    out_str = tmp_f + '\t' + tmp_p + '\n'
    f.write(out_str)

print("complete.")
最後に
初心者でも比較的簡単にディープラーニングを試してみることができるのでぜひやってみてください。
Google Drive上にzipを保存してColab上で展開することに関してですが、
私情で訓練データとして14万枚の画像ファイル、テストデータとして29万枚の画像ファイルを処理する必要があった際に
今回紹介した方法を使うとColab上に展開できた上に爆速だったのでオススメです。ただし、あまりやりすぎると資源を食い尽くしてしまい、肝心な学習に割くことができるメモリが少なくなってしまうので注意が必要です。