はじめに
- SageMakerは、モデルの構築、トレーニング、デプロイの仕組みを提供しています。
- 今回は、KerasのMNIST CNNを最小限の修正で実行し、SageMakerの基本を理解します。
- よって、モデルの構築とトレーニングの処理にフォーカスします。
- デプロイ、モデルチューニングや分散深層学習等は、別の機会に確認します。
- 参考
概要
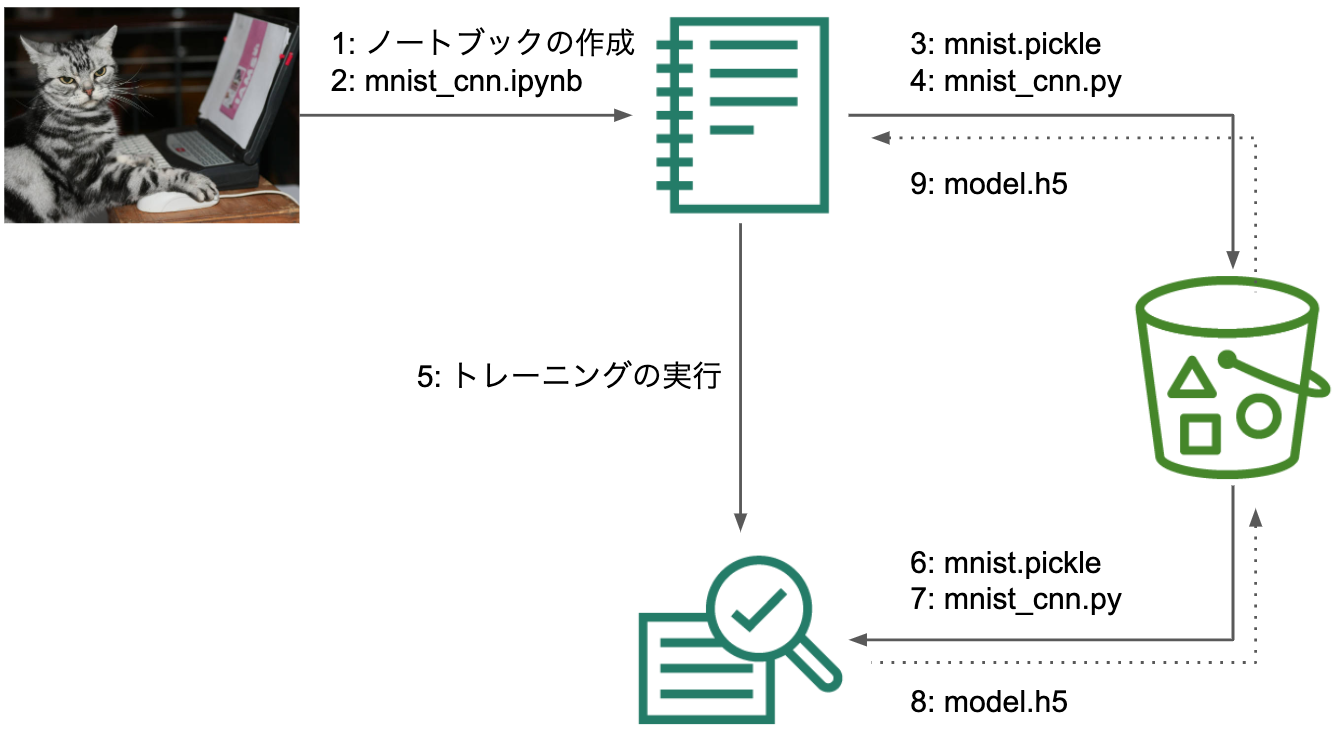
詳細
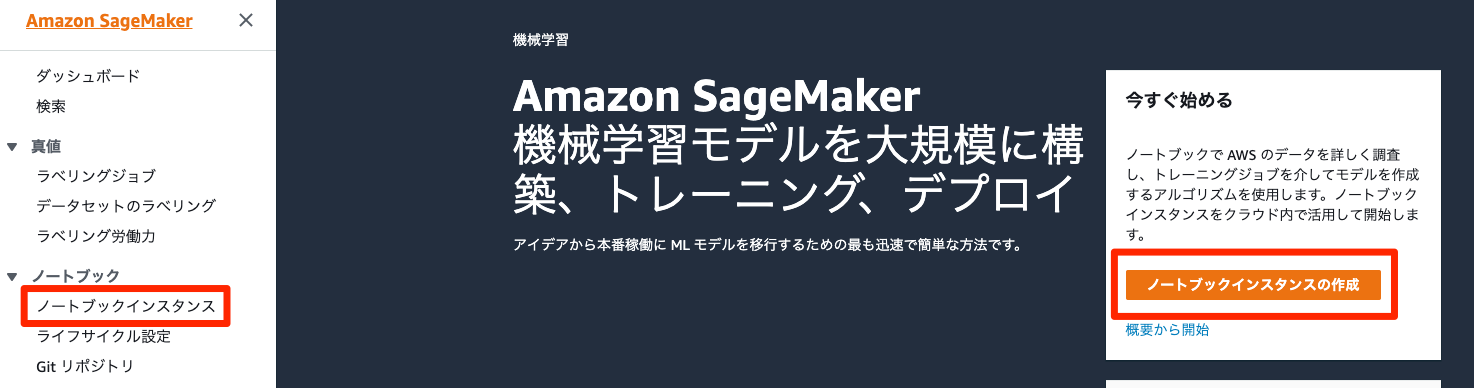
ノートブックインスタンスの作成
-
いずれかからノートブックインスタンスの作成を開始します。
-
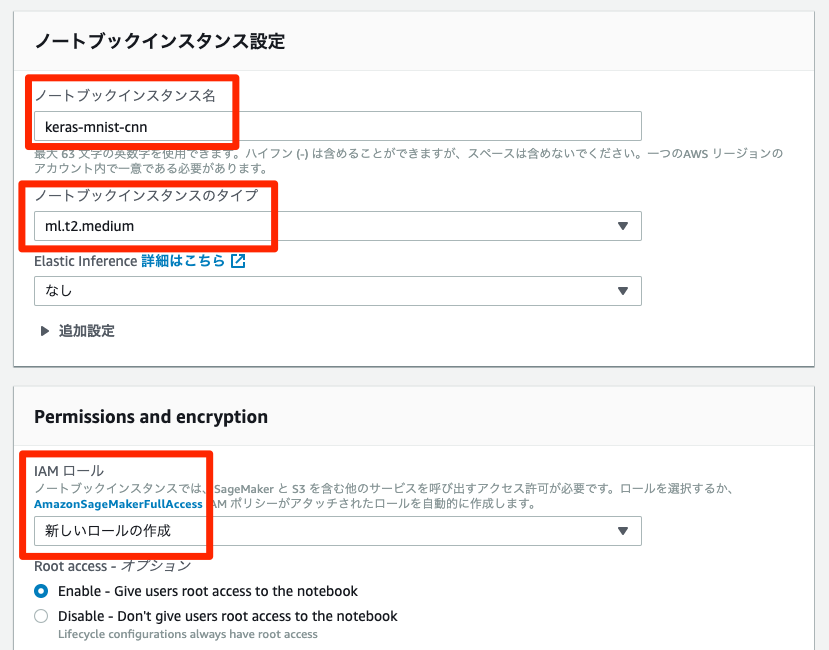
ノートブックインスタンス名は、
keras-mnist-cnn等のお好みの名前で作成します。 -
ノートブックインスタンスのタイプは、
ml.t2.mediumにします。一番安いです。今回はこれで十分です。 -
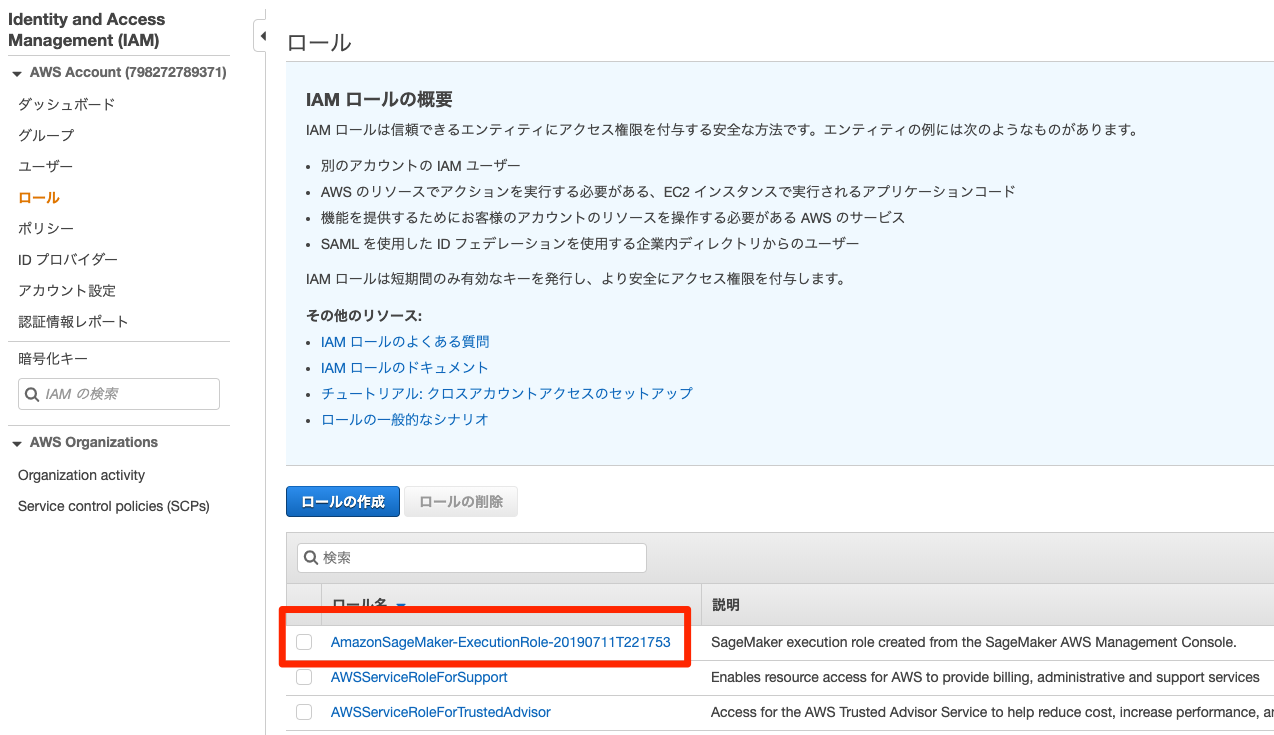
IAMロールは、新しいロールの作成を選びます。
-
指定するS3バケット - オプションは、なしにします。
-
今回は、自動作成されるS3バケット名に「sagemaker」が含まれるので問題ないです。

-
IAMロールは、
AmazonSageMaker-ExecutionRole-20190711T221753で作成されました。これは、作成時間が自動的に含まれます。
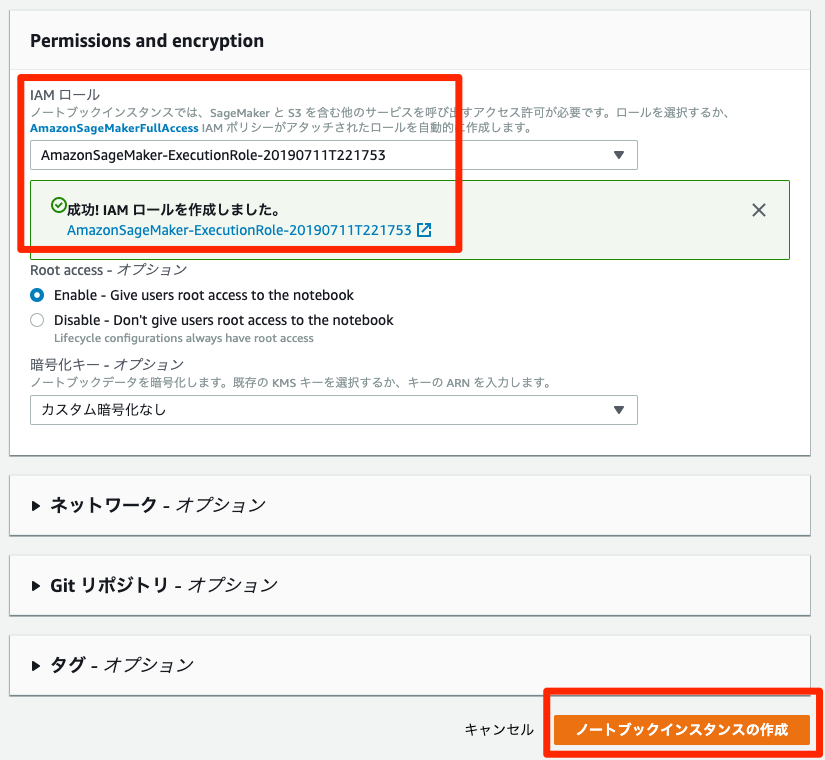
-
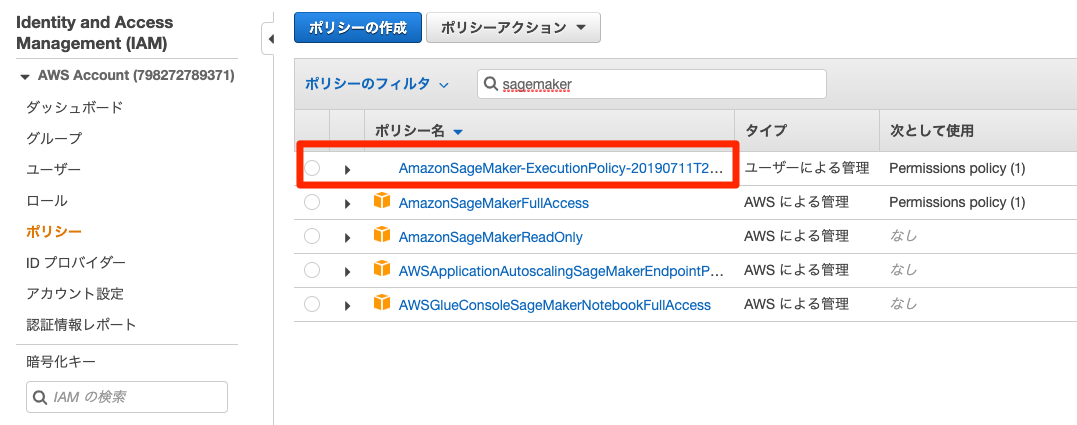
今回の作業がすべて終わったら、該当のIAMロールとIAMポリシーを削除して構いません。
-
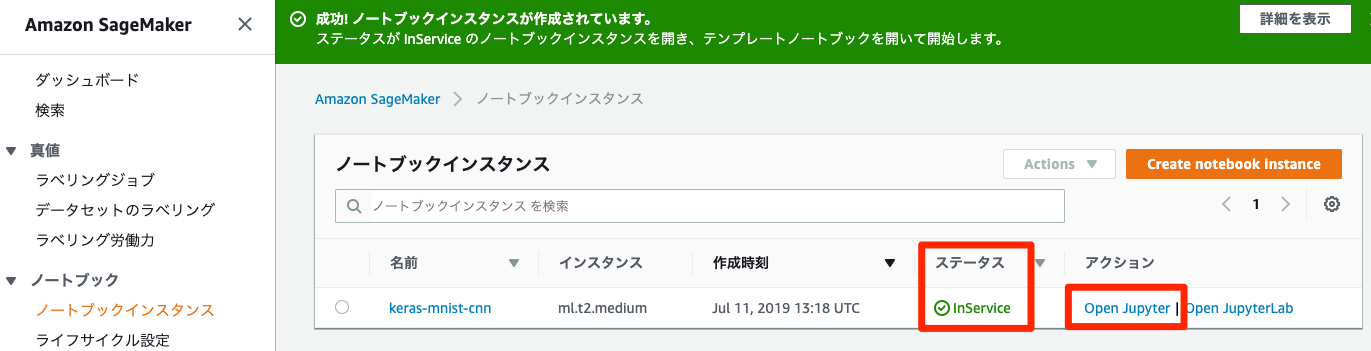
しばらくすると、ノートブックインスタンスが
InServiceになります。では、Open Jupyterでノートブックインスタンスを開きましょう。

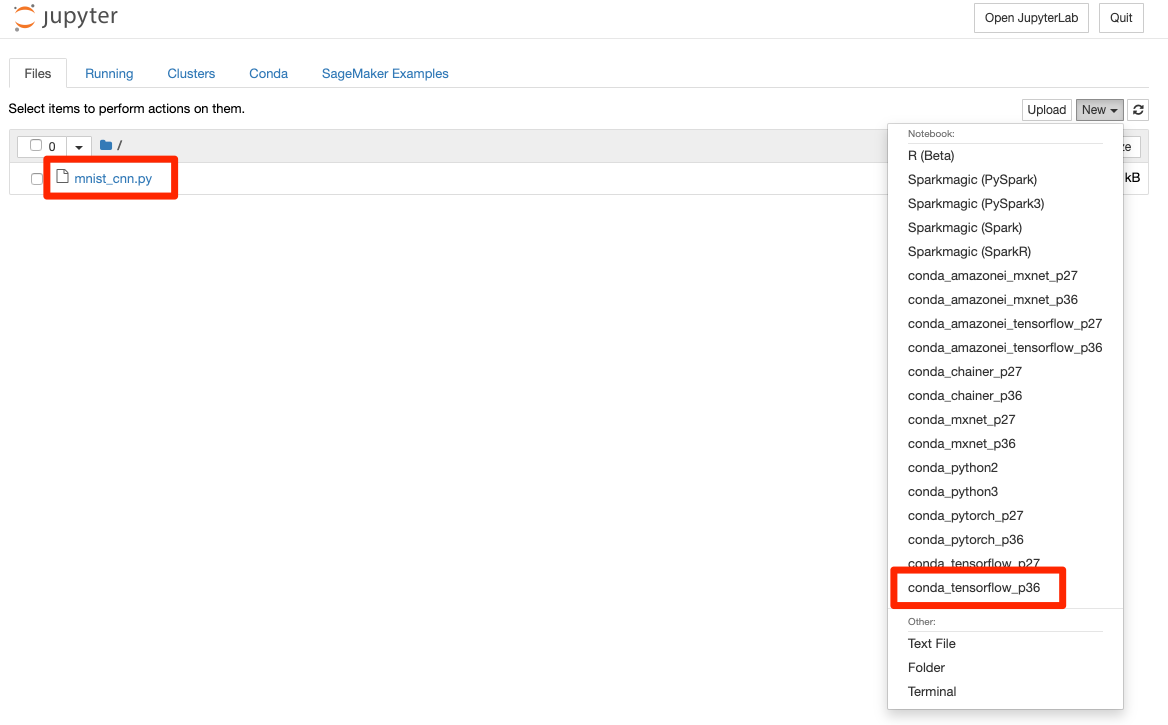
mnist_cnn.py
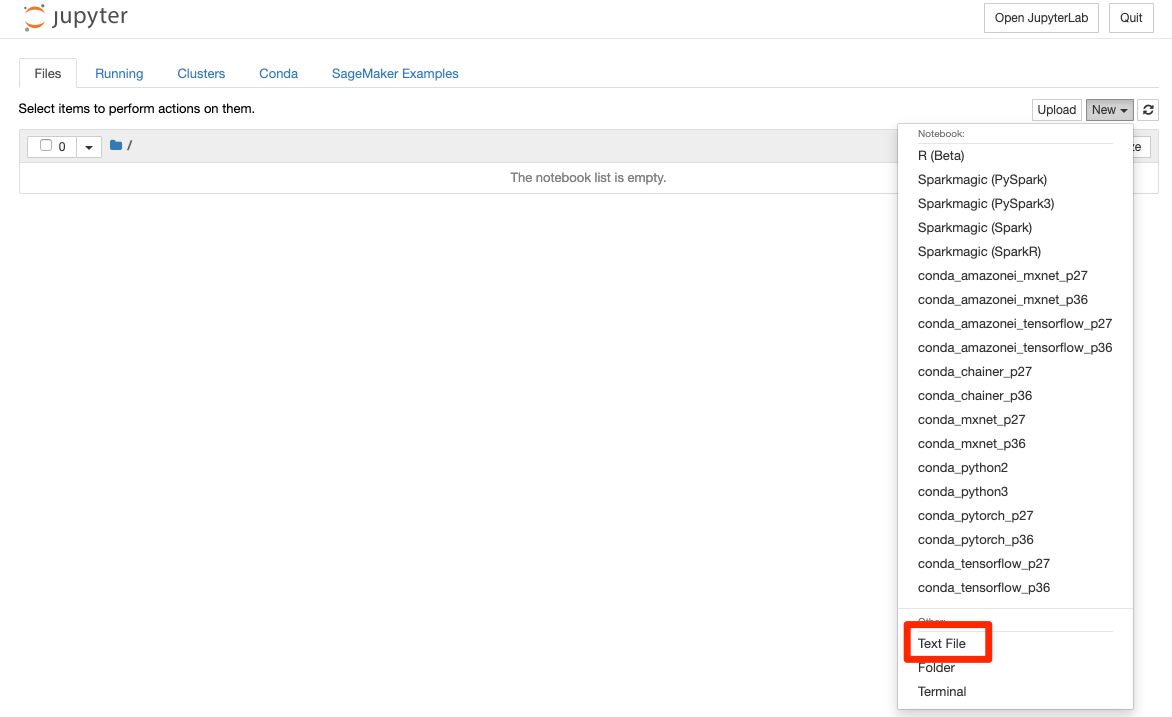
-
Text Fileで
mnist_cnn.pyを作成します。
-
https://raw.githubusercontent.com/keras-team/keras/master/examples/mnist_cnn.pyの内容をペーストします。
ファイル名は、mnist_cnn.pyにします。

-
SageMaker用に作成するS3からMNISTデータをダウンロードする為の修正です。
from __future__ import print_function
import os
import pickle
import keras
# from keras.datasets import mnist
from keras.models import Sequential
from keras.layers import Dense, Dropout, Flatten
from keras.layers import Conv2D, MaxPooling2D
from keras import backend as K
- S3からpickle化したMNISTデータをダウンロードして、x_train、y_train、x_testとy_testを作成します。
-
SM_CHANNEL_TRAININGのデフォルトは、/opt/ml/input/data/trainingです。こちらに、S3からデータがダウンロードされます。
# the data, split between train and test sets
# (x_train, y_train), (x_test, y_test) = mnist.load_data()
fin = open(os.path.join(os.environ['SM_CHANNEL_TRAINING'], 'mnist.pickle'), 'rb')
(x_train, y_train), (x_test, y_test) = pickle.load(fin)
- 最後にトレーニング結果の
model.h5を保存します。 -
SM_OUTPUT_DATA_DIRのデフォルトは、/opt/ml/output/dataです。こちらから、S3へデータがアップロードされます。
print('Test loss:', score[0])
print('Test accuracy:', score[1])

model.save(os.path.join(os.environ['SM_OUTPUT_DATA_DIR'], 'model.h5'))
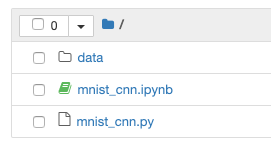
mnist_cnn.ipynb
-
mnist_cnn.pyを実行するためのmnist_cnn.ipynbを作成します。 -
conda_tensorflow_p36で作成します。 -
先ほど作成した
mnist_cnn.pyもありますね。
-
ノートブックの名前を
mnist_cnnへ修正してください。 -
念の為、
conda_tensorflow_p36なっているか確認してください。

-
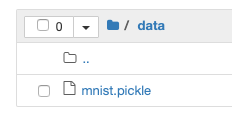
ノートブックにデータ保存用のフォルダを作成し、MNISTデータを公式S3からダウンロードし、pickle化して保存を行います。

-
SageMakerのSessionを作成し、データをS3へアップロードします。
-
pathは、上記で作成した
dataを指定します。 -
bucket_nameは、default_bucketを使います。慣れてきたら、IAMロール、IAMポリシーを作成した箇所で、任意のバケットを指定してください。
-
default_bucketは
sagemaker-ap-northeast-1-アカウントIDの様になります。 -
key_prefixは、上記で作成した
dataと同じにした方が、混乱しないでしょう。 -
inputsは
s3://sagemaker-ap-northeast-1-アカウントID/dataの様になります。

-
S3にバケットが出来て、データがアップロードされます。

-
IAMロールを取得します。
-
roleは、
arn:aws:iam::アカウントID:role/service-role/AmazonSageMaker-ExecutionRole-20190707T224950でした。 -
entory_pointに
mnist_cnn.pyを指定します。 -
train_instance_countは
1にします。 -
train_instance_typeは
ml.p2.xlargeにします。もし、GPUインスタンスが使えない場合は、申請するか、申請不要のml.m5.xlarge等にします。 -
framework_versionは
1.12.0にします。もっと新しいものもありますが、試していません。 -
py_versionは
py3にします。 -
最後に
tf_estimator.fit(inputs)でトレーニングが開始されます!

-
トレーニング開始のメッセージです。
-
開始から、GPUインスタンス起動まで4分弱かかりました。
-
S3からGPUインスタンスへ
mnist_cnn.pickleとmnist_cnn.pyのダウンロードが行われます。 -
最後に、
framework_versionとpy_versionで指定したコンテナがGPUインスタンスで起動します。
2019-07-11 14:41:42 Starting - Starting the training job...
2019-07-11 14:41:43 Starting - Launching requested ML instances......
2019-07-11 14:42:54 Starting - Preparing the instances for training.........
2019-07-11 14:44:29 Downloading - Downloading input data...
2019-07-11 14:45:02 Training - Downloading the training image..
2019-07-11 14:45:24,413 sagemaker-containers INFO     Imported framework sagemaker_tensorflow_container.training
2019-07-11 14:45:24,809 sagemaker-containers INFO     Invoking user script
- 下記のメッセージは、トレーニング環境の様々な情報です。
- 解説はしませんが、
job_nameのsagemaker-tensorflow-scriptmode-2019-07-11-14-41-39-562は覚えておいてください。
Training Env:

{
    "additional_framework_parameters": {},
    "channel_input_dirs": {
        "training": "/opt/ml/input/data/training"
    },
    "current_host": "algo-1",
    "framework_module": "sagemaker_tensorflow_container.training:main",
    "hosts": [
        "algo-1"
    ],
    "hyperparameters": {
        "model_dir": "s3://sagemaker-ap-northeast-1-アカウントID/sagemaker-tensorflow-scriptmode-2019-07-11-14-41-39-562/model"
    },
    "input_config_dir": "/opt/ml/input/config",
    "input_data_config": {
        "training": {
            "TrainingInputMode": "File",
            "S3DistributionType": "FullyReplicated",
            "RecordWrapperType": "None"
        }
    },
    "input_dir": "/opt/ml/input",
    "is_master": true,
    "job_name": "sagemaker-tensorflow-scriptmode-2019-07-11-14-41-39-562",
    "log_level": 20,
    "master_hostname": "algo-1",
    "model_dir": "/opt/ml/model",
    "module_dir": "s3://sagemaker-ap-northeast-1-アカウントID/sagemaker-tensorflow-scriptmode-2019-07-11-14-41-39-562/source/sourcedir.tar.gz",
    "module_name": "mnist_cnn",
    "network_interface_name": "eth0",
    "num_cpus": 4,
    "num_gpus": 1,
    "output_data_dir": "/opt/ml/output/data",
    "output_dir": "/opt/ml/output",
    "output_intermediate_dir": "/opt/ml/output/intermediate",
    "resource_config": {
        "current_host": "algo-1",
        "hosts": [
            "algo-1"
        ],
        "network_interface_name": "eth0"
    },
    "user_entry_point": "mnist_cnn.py"
}
- 下記のメッセージは、上記の環境変数です。
mnist_cnn.py内で取得することが出来ます。 - 今回は、
SM_CHANNEL_TRAININGとSM_OUTPUT_DATA_DIRを利用していることを、上記のmnist_cnn.pyで解説しました。
Environment variables:

SM_HOSTS=["algo-1"]
SM_NETWORK_INTERFACE_NAME=eth0
SM_HPS={"model_dir":"s3://sagemaker-ap-northeast-1-アカウントID/sagemaker-tensorflow-scriptmode-2019-07-11-14-41-39-562/model"}
SM_USER_ENTRY_POINT=mnist_cnn.py
SM_FRAMEWORK_PARAMS={}
SM_RESOURCE_CONFIG={"current_host":"algo-1","hosts":["algo-1"],"network_interface_name":"eth0"}
SM_INPUT_DATA_CONFIG={"training":{"RecordWrapperType":"None","S3DistributionType":"FullyReplicated","TrainingInputMode":"File"}}
SM_OUTPUT_DATA_DIR=/opt/ml/output/data
SM_CHANNELS=["training"]
SM_CURRENT_HOST=algo-1
SM_MODULE_NAME=mnist_cnn
SM_LOG_LEVEL=20
SM_FRAMEWORK_MODULE=sagemaker_tensorflow_container.training:main
SM_INPUT_DIR=/opt/ml/input
SM_INPUT_CONFIG_DIR=/opt/ml/input/config
SM_OUTPUT_DIR=/opt/ml/output
SM_NUM_CPUS=4
SM_NUM_GPUS=1
SM_MODEL_DIR=/opt/ml/model
SM_MODULE_DIR=s3://sagemaker-ap-northeast-1-アカウントID
/sagemaker-tensorflow-scriptmode-2019-07-11-14-41-39-562/source/sourcedir.tar.gz
SM_TRAINING_ENV={"additional_framework_parameters":{},"channel_input_dirs":{"training":"/opt/ml/input/data/training"},"current_host":"algo-1","framework_module":"sagemaker_tensorflow_container.training:main","hosts":["algo-1"],"hyperparameters":{"model_dir":"s3://sagemaker-ap-northeast-1-アカウントID/sagemaker-tensorflow-scriptmode-2019-07-11-14-41-39-562/model"},"input_config_dir":"/opt/ml/input/config","input_data_config":{"training":{"RecordWrapperType":"None","S3DistributionType":"FullyReplicated","TrainingInputMode":"File"}},"input_dir":"/opt/ml/input","is_master":true,"job_name":"sagemaker-tensorflow-scriptmode-2019-07-11-14-41-39-562","log_level":20,"master_hostname":"algo-1","model_dir":"/opt/ml/model","module_dir":"s3://sagemaker-ap-northeast-1-アカウントID/sagemaker-tensorflow-scriptmode-2019-07-11-14-41-39-562/source/sourcedir.tar.gz","module_name":"mnist_cnn","network_interface_name":"eth0","num_cpus":4,"num_gpus":1,"output_data_dir":"/opt/ml/output/data","output_dir":"/opt/ml/output","output_intermediate_dir":"/opt/ml/output/intermediate","resource_config":{"current_host":"algo-1","hosts":["algo-1"],"network_interface_name":"eth0"},"user_entry_point":"mnist_cnn.py"}
SM_USER_ARGS=["--model_dir","s3://sagemaker-ap-northeast-1-アカウントID/sagemaker-tensorflow-scriptmode-2019-07-11-14-41-39-562/model"]
SM_OUTPUT_INTERMEDIATE_DIR=/opt/ml/output/intermediate
SM_CHANNEL_TRAINING=/opt/ml/input/data/training
SM_HP_MODEL_DIR=s3://sagemaker-ap-northeast-1-アカウントID/sagemaker-tensorflow-scriptmode-2019-07-11-14-41-39-562/model
PYTHONPATH=/opt/ml/code:/usr/local/bin:/usr/lib/python36.zip:/usr/lib/python3.6:/usr/lib/python3.6/lib-dynload:/usr/local/lib/python3.6/dist-packages:/usr/lib/python3/dist-packages
- いよいよ、
mnist_cnn.pyが実行されます。pythonでmnist_cnn.pyが引数付きで実行されてますね。 - 引数は、
tf_estimatorのハイパーパラメータで自由に指定できます。 - 別の機会に実施したいと考えているので、今回はシンプルを重視し、省きました。
Invoking script with the following command:

/usr/bin/python mnist_cnn.py --model_dir s3://sagemaker-ap-northeast-1-アカウントID/sagemaker-tensorflow-scriptmode-2019-07-11-14-41-39-562/model
- あとは、おなじみのトレーニングメッセージになります。
Using TensorFlow backend.
x_train shape: (60000, 28, 28, 1)
60000 train samples
10000 test samples
Train on 60000 samples, validate on 10000 samples
Epoch 1/12

2019-07-11 14:45:21 Training - Training image download completed. Training in progress.  128/60000 [..............................] - ETA: 31:50 - loss: 2.3156 - acc: 0.0547
  640/60000 [..............................] - ETA: 6:24 - loss: 2.0624 - acc: 0.2797
 1152/60000 [..............................] - ETA: 3:35 - loss: 1.8726 - acc: 0.3568
省略
59776/60000 [============================>.] - ETA: 0s - loss: 0.0270 - acc: 0.9917
60000/60000 [==============================] - 8s 129us/step - loss: 0.0270 - acc: 0.9917 - val_loss: 0.0285 - val_acc: 0.9913
Test loss: 0.0284580502319081
Test accuracy: 0.9913
- 最後に、課金時間のメッセージが出ます。今回は、164秒でした。東京のp2.xlargeだと、8円くらいでしょうか?
- また、WARNINGは、TensorFlowのSavedModelが保存されていない件になります。
- SavedModelで保存すると、推論APIのデプロイなどで利用することができます。
- 今回はKerasのMNIST CNNでSageMakerのトレーニングまで確認し、基本を理解することを主眼としています。
2019-07-11 14:47:05,472 sagemaker_tensorflow_container.training WARNING  No model artifact is saved under path /opt/ml/model. Your training job will not save any model files to S3.
For details of how to construct your training script see:
https://github.com/aws/sagemaker-python-sdk/tree/master/src/sagemaker/tensorflow#adapting-your-local-tensorflow-script
2019-07-11 14:47:05,473 sagemaker-containers INFO     Reporting training SUCCESS
Billable seconds: 164
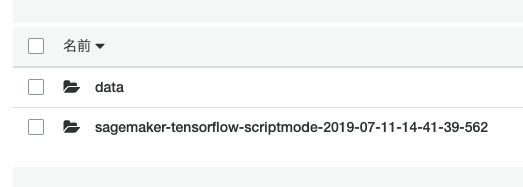
- S3には、
job_nameのsagemaker-tensorflow-scriptmode-2019-07-11-14-41-39-562が作成されています。 - デフォルトでは、各ジョブを区別するために、日時等を加えて自動的に決定されます。もちろん、事前に指定することもできます。
- そして、
sagemaker-tensorflow-scriptmode-2019-07-11-14-41-39-562のoutputにoutput.tar.gzが保存されます。 - この中に、
model.h5が保存されています。
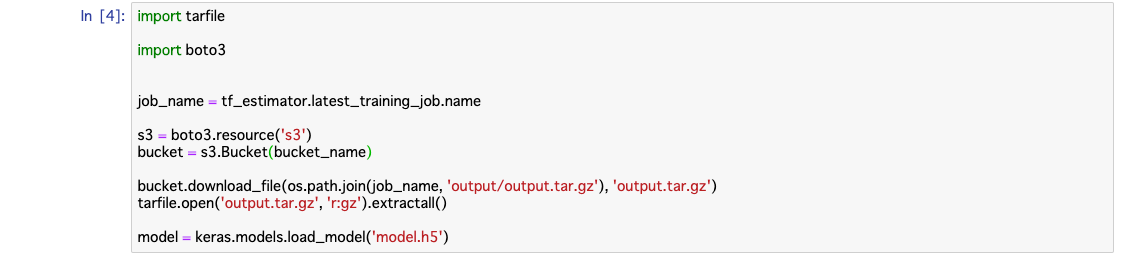
- 下記で取り出して、ノートブックに保存しましょう。
- tf_estimatorからjob_nameを取得できます。
- 今回は
sagemaker-tensorflow-scriptmode-2019-07-10-14-00-37-039ですね。 - そして、boto3を使ってS3から
output.tar.gzをダウンロードして、tarファイルを解凍します。 - kerasのload_modelで読み込み完了です!
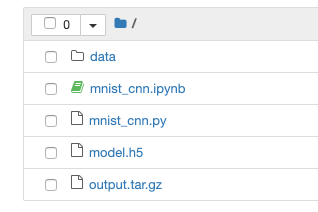
- 最終的なノートブックのファイルの状態です。
おわりに
- SageMakerでKerasのMNIST CNNを最小限の修正で実行しました。
-
ml.p2.xlargeを使うことで、約8円でトレーニングが出来ます。トレーニング時間は、3分弱でした。 - ただし、GPUインスタンスの起動に4分弱かかります。この辺りは、作業によって許容出来る場合と出来ない場合はあると思います。
- 今後は、PyTorch、KerasとHorovodなどを利用して、分散深層学習に取り組みたいを考えています。
- 今回のファイルは https://github.com/maedamikio/public/tree/master/sagemaker_keras においておきます。