はじめに
- HerokuでFlaskとOpenCVの環境構築をしてみます。
- ソース一式は ここ です。
Python
- OpenCVは、
apt install python3-opencvを使う方法とpip install opencv-pythonを使う方法があります。 - Herokuの場合は、
opencv-pythonを使います。 - 現時点では、
python3-opencvは使えない様です。
requirements.txt
- まず、最低限必要なパッケージを記載します。
requirements.txt
flask
gunicorn
numpy
opencv-python
Flask main.py
- POSTで画像と処理回数を受信します。
- 画像は、numpyを経由し、OpenCV形式へ変換します。その後、通常通り顔認識を実行します。最後に、OpenCV形式からバイナリ形式へ戻します。
- OpenCVのバージョンと処理時間を出力しています。
main.py
import time

import cv2
import numpy as np

from flask import Flask, make_response, render_template, request
app = Flask(__name__)


face_cascade = cv2.CascadeClassifier("haarcascade_frontalface_default.xml")
eye_cascade = cv2.CascadeClassifier("haarcascade_eye.xml")


@app.route("/", methods=["GET", "POST"])
def index():

    if request.method == "POST":

        start = time.time()

        count = int(request.form.get("count", 1))
        image = request.files.get("image")
        data = image.read()

        for _ in range(count):
            img = np.fromstring(data, np.uint8)
            img = cv2.imdecode(img, 1)
            gray = cv2.cvtColor(img, cv2.COLOR_BGR2GRAY)

            faces = face_cascade.detectMultiScale(gray, 1.3, 5)
            for (x,y,w,h) in faces:
                cv2.rectangle(img,(x,y),(x+w,y+h),(255,0,0),2)
                roi_gray = gray[y:y+h, x:x+w]
                roi_color = img[y:y+h, x:x+w]
                eyes = eye_cascade.detectMultiScale(roi_gray)
                for (ex,ey,ew,eh) in eyes:
                    cv2.rectangle(roi_color,(ex,ey),(ex+ew,ey+eh),(0,255,0),2)

        data = cv2.imencode(".jpeg", img)[1].tostring()

        response = make_response()
        response.data = data
        response.mimetype = "image/jpeg"

        end = time.time()

        print("opencv version: {}, elapsed second: {}".format(cv2.__version__, end - start))

        return response

    return render_template("index.html")
OpenCV Haar Cascades
- 顔認識のためのXMLをダウンロードします。
$ wget https://raw.githubusercontent.com/opencv/opencv/master/data/haarcascades/haarcascade_frontalface_default.xml
$ wget https://raw.githubusercontent.com/opencv/opencv/master/data/haarcascades/haarcascade_eye.xml
Heroku
- Herokuのアカウントを作成しておいてください。
Heroku CLI
- 今回は、Mac用の手順です。UbuntuやWindowsは、公式ページを参照してください。
$ brew install heroku/brew/heroku
heroku login
- 下記を実行すると、ブラウザに転送され、認証が行われます。
$ heroku login
heroku: Press any key to open up the browser to login or q to exit:
$ heroku login
heroku: Press any key to open up the browser to login or q to exit:
Opening browser to https://cli-auth.heroku.com/auth/browser/xxxxxxxx-xxxx-xxxx-xxxx-xxxxxxxxxxxx
Logging in... done
Logged in as admin@example.com
heroku create
- 新規アプリ環境(Dyno)を作成します。
- Heroku Dyno とは、「アプリを実行するための軽量コンテナ」の事です。
- 今回の Dyno は、「30 分間アクセスがなかった場合はスリープ、それ以外の場合は当該月の無料 dyno 時間が残っている限り常時稼動」なので、確認等に良いですね。
$ heroku create
Creating app... done, ⬢ frozen-sea-18935
https://frozen-sea-18935.herokuapp.com/ | https://git.heroku.com/frozen-sea-18935.git
Heroku Git リポジトリの連携
- フォルダを Git リポジトリとして初期化します。
- その後、Heroku の Git リポジトリと連携します。
- 連携する Git リポジトリは、上記では
frozen-sea-18935ですね。
$ git init
Initialized empty Git repository in /Users/maeda_mikio/flask_opencv/.git/
$ heroku git:remote -a frozen-sea-18935
set git remote heroku to https://git.heroku.com/frozen-sea-18935.git
heroku stack
- Heroku Stack とは、Dyno 上で動くコンテナの為のイメージの雛形と思っていただければOKです。
- Heroku-18 がデフォルトです。これは、Ubuntu 18.04 ですね。Heroku-16もあります。
- 今回は、Container へ切り替えます。
opencv-pythonを使うために必要な apt パッケージをインストールするためです。
$ heroku stack:set container
Stack set. Next release on ⬢ frozen-sea-18935 will use container.
Run git push heroku master to create a new release on ⬢ frozen-sea-18935.
runtime.txt
- Dyno で利用する Python のバージョンを指定します。
- 3.8.0、3.7.5、3.6.9、2.7.17等が利用できます。
- https://devcenter.heroku.com/articles/python-support
runtime.txt
python-3.7.5
heroku.yml
- Stack で Container を使う場合に必要です。
- build:languages: に python を指定します。バージョンは、上記の
runtime.txtが利用されます。 - build:packages: に
opencv-pythonが依存する apt パッケージlibopencv-devを記載します。 - デフォルトで利用する
Procfileは不要です。その代わり、run:web に転記する必要があります。
heroku.yml
build:
  languages:
    - python
  packages:
    - libopencv-dev
run:
  web: gunicorn main:app --log-file -
Gitへファイルを追加し、コミットする
$ git add .

$ git commit -am "Create Flask OpenCV App"
[master (root-commit) 1f4bc49] Create Flask OpenCV App
 7 files changed, 45605 insertions(+)
 create mode 100644 haarcascade_eye.xml
 create mode 100644 haarcascade_frontalface_default.xml
 create mode 100644 heroku.yml
 create mode 100644 main.py
 create mode 100644 requirements.txt
 create mode 100644 runtime.txt
 create mode 100644 templates/index.html
Heroku へデプロイ
- Stack が Container だと、イメージのビルド等に結構な時間がかかります。
- Heroku 側の状況によりますが、20分強かかりました。
$ git push heroku master
動作確認
CPU の確認
- Heroku Dyno にログインして CPU を確認してみます。
- model name は Intel(R) Xeon(R) CPU E5-2670 v2 @ 2.50GHz ですね。これが8コアありました。
$ heroku run bash
Running bash on ⬢ frozen-sea-18935... up, run.1940 (Free)
~ $ cat /proc/cpuinfo
processor	: 0
vendor_id	: GenuineIntel
cpu family	: 6
model		: 62
model name	: Intel(R) Xeon(R) CPU E5-2670 v2 @ 2.50GHz
stepping	: 4
microcode	: 0x42e
cpu MHz		: 2494.072
cache size	: 25600 KB
physical id	: 0
siblings	: 8
core id		: 0
cpu cores	: 4
apicid		: 0
initial apicid	: 0
fpu		: yes
fpu_exception	: yes
cpuid level	: 13
wp		: yes
flags		: fpu vme de pse tsc msr pae mce cx8 apic sep mtrr pge mca cmov pat pse36 clflush mmx fxsr sse sse2 ht syscall nx rdtscp lm constant_tsc rep_good nopl xtopology pni pclmulqdq ssse3 cx16 pcid sse4_1 sse4_2 x2apic popcnt tsc_deadline_timer aes xsave avx f16c rdrand hypervisor lahf_lm kaiser fsgsbase smep erms xsaveopt
bugs		: cpu_meltdown spectre_v1 spectre_v2 spec_store_bypass l1tf mds
bogomips	: 4988.14
clflush size	: 64
cache_alignment	: 64
address sizes	: 46 bits physical, 48 bits virtual
power management:
topの確認
- 8コアありますね。共用環境なので、ロードアベレージが常に高いです。
$ top
top - 09:34:10 up 5 days, 11:43,  0 users,  load average: 5.58, 4.87, 4.80
Tasks:   3 total,   1 running,   2 sleeping,   0 stopped,   0 zombie
%Cpu0  : 32.5 us,  8.8 sy,  0.0 ni, 22.4 id,  0.0 wa,  0.0 hi, 35.9 si,  0.3 st
%Cpu1  : 30.2 us, 20.0 sy,  0.0 ni, 48.1 id,  0.4 wa,  0.0 hi,  1.1 si,  0.4 st
%Cpu2  : 36.5 us, 16.2 sy,  0.0 ni, 45.9 id,  0.3 wa,  0.0 hi,  0.7 si,  0.3 st
%Cpu3  : 29.5 us, 14.0 sy,  0.0 ni, 54.8 id,  0.3 wa,  0.0 hi,  1.0 si,  0.3 st
%Cpu4  : 37.1 us, 15.1 sy,  0.0 ni, 46.4 id,  0.3 wa,  0.0 hi,  1.0 si,  0.0 st
%Cpu5  : 30.3 us, 13.1 sy,  0.0 ni, 56.2 id,  0.0 wa,  0.0 hi,  0.3 si,  0.0 st
%Cpu6  : 27.0 us, 11.6 sy,  0.0 ni, 60.4 id,  0.4 wa,  0.0 hi,  0.7 si,  0.0 st
%Cpu7  : 22.9 us, 17.4 sy,  0.3 ni, 58.3 id,  0.0 wa,  0.0 hi,  0.7 si,  0.3 st
KiB Mem : 62914724 total,  1056428 free, 36872396 used, 24985900 buff/cache
KiB Swap: 63963132 total, 62911960 free,  1051172 used. 25496104 avail Mem

  PID USER      PR  NI    VIRT    RES    SHR S  %CPU %MEM     TIME+ COMMAND
    1 nobody    20   0    1252    948    900 S   0.0  0.0   0:00.01 ps-run
    3 u24441    20   0   21472   3688   3252 S   0.0  0.0   0:00.00 bash
    8 u24441    20   0   41664   3656   3144 R   0.0  0.0   0:00.00 top
顔認識アプリ
- https://frozen-sea-18935.herokuapp.com へアクセスします。
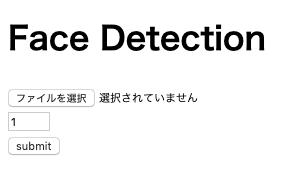
- 画像(jpeg)と処理回数(1〜100)を送信し、顔認識の画像を受信します。
- 処理回数は、性能評価用に準備したものです。今回は、10回にします。
送信画像
- 顔認識に使う画像は、一部界隈ではおなじみの顔画像を使いました。
- 以前、ラズパイの評価でも使ったやつです。
ログの確認
- 今回は、約6秒でした。1回あたり 0.6 秒ですね。まぁ、こんなもんでしょうか ?
- ちなみに、Heroku アプリの応答は、30秒以上かかるとエラーになります。
- OpenCVのバージョンは 4.1.1 ですね。
$ heroku logs --tail
2019-10-24T09:26:50.519695+00:00 app[web.1]: opencv version: 4.1.1, elapsed second: 6.042149543762207
受信画像
おわりに
- HerokuでFlaskとOpenCVを使う方法と性能評価をしました。
- AWS、AzureやGCPでも簡単にOpenCVを使う方法があると思うのですが、余裕がなくて、最新情報を把握出来てません。。。
- もし、ご存知でしたら、ご教示頂ければ幸いです !


