【2025年10月追記】
本ブログは、2025年10月に下記環境にて動作確認済みです。
- Raspberry Pi 4
Raspberry Pi OS (bookworm) Lite 64bit - slee-Pi 3
https://github.com/mechatrax/slee-pi3/blob/main/os/sleepi3-bookworm-lite-arm64-20250520.md
sleepi3-utils (1.0.9) bookworm
はじめに
弊社製品 slee-Pi 3 は電源管理・死活監視モジュールとして広く用いられています。
slee-Pi 3 は基板上に外部入力端子 (CN4) と外部出力端子 (CN5) を備えているため外部の機器を接続することが可能です。
また、外部入力端子は設定を行うことで外部信号による強制的な電源断が可能です。
そのため、CN4 と CN5 を互いに接続して STONITH1 する、物理的にフェンシング可能な HA (High Availability) クラスタをラズベリーパイで構築できます。
本記事は slee-Pi 3 の外部入力機能と外部出力機能を使用して STONITH によるフェンシングを行う方法を紹介します。
やりたいこと
-
1日1回程度 Raspberry Pi を再起動させたいが、その間サービス (Docker コンテナ) を停止させないようにする (具体的には以下のようなシナリオになります)
- (Raspberry Pi A 側) 再起動のためにコンテナを停止
- (Raspberry Pi B 側) Raspberry Pi B のコンテナを起動してフェイルオーバー
- (Raspberry Pi A 側) 再起動が完了してコンテナを起動
- (Raspberry Pi B 側) Raspberry Pi B のコンテナを停止してフェイルバック
-
Raspberry Pi A または B がハードウェア障害によって生存確認ができなくなった場合に再起動させる
-
上記のシナリオで Raspberry Pi B がフェイルバックに失敗してスプリットブレインになってしまった場合に Raspberry Pi B を再起動させる (具体的には以下のようなシナリオになります)
- クラスタのノードに問題が発生したことを検知して、STONITH によるフェンシングを行う
使用するもの
- Raspberry Pi 4 model B + slee-Pi 3: 2台
- micro SD カード: 2枚
- AC アダプタ (12V/2A): 2台
- 外部入力/出力接続用ハーネス: 2本
- slee-Pi 3 の外部入力/出力用コネクタには EHR-2 が嵌合します
- LAN ケーブル: 2本
OS は Raspberry Pi OS Debian GNU/Linux 12 (bookworm) 64bit 版を使用しています。
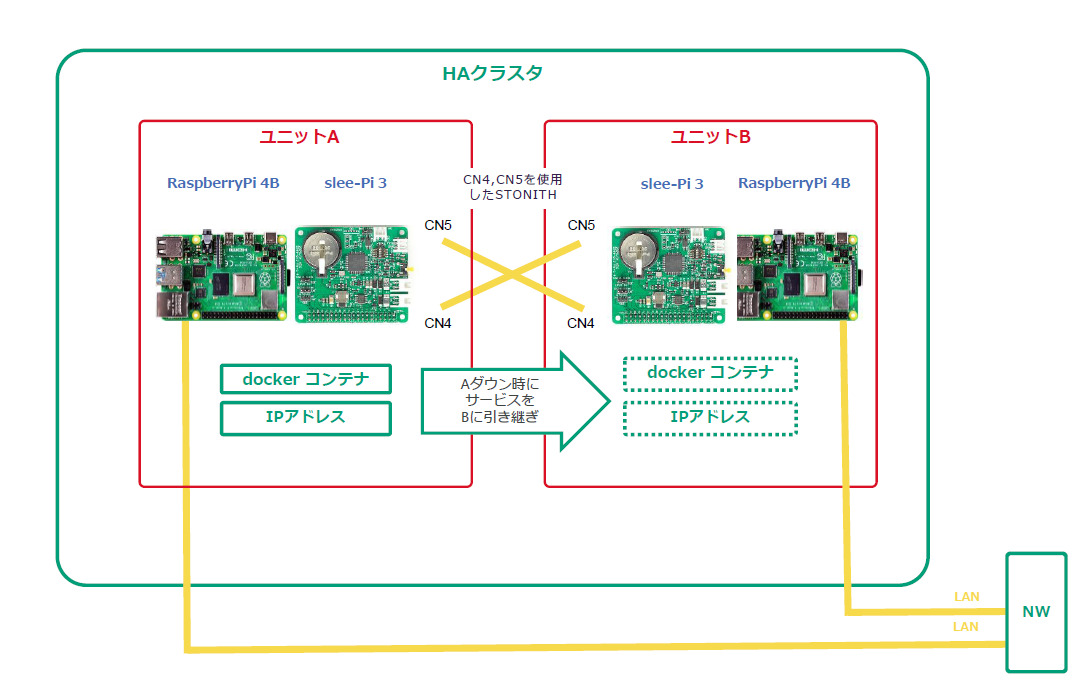
機器構成
2台の slee-Pi 3 の CN4 と CN5 をハーネスで接続します。
Raspberry Pi 2台ともに同一セグメントの IP アドレスが割り当てられるように有線 LAN を接続します。
機器構成の図としては以下のようになります。
slee-Pi 3 のセットアップ
以下のリンクに従って slee-Pi 3 のセットアップを行います。
クラスタ作成
Raspberry Pi 2台を区別するため、ホスト名 (ノード名) をそれぞれ raspberrypi-1, raspberrypi-2 としています。
パッケージのインストール
raspberrypi-1, raspberrypi-2 の両方で行います。
sudo apt install -y pacemaker corosync pcs
pacemaker をインストールするとユーザー hacluster が追加されるのでパスワードを設定します。
mtx@raspberrypi-1:~ $ sudo passwd hacluster
New password:
Retype new password:
pcs のサービスを有効化します。
mtx@raspberrypi-1:~ $ sudo systemctl enable pcsd
Pacemaker, Corosync の詳細については以下をご参照ください。
pcs コマンドの詳細は以下のドキュメントをご参照ください。
hosts の設定
raspberrypi-1, raspberrypi-2 の両方で行います。
クラスタに登録するノード (Raspberry Pi のホスト名) を /etc/hosts に記述します。
自ホスト名 (raspberrypi-1, raspberrypi-2) が127.0.0.1に存在しないように注意してください。
mtx@raspberrypi-1:~ $ cat /etc/hosts
127.0.0.1       localhost
::1             localhost ip6-localhost ip6-loopback
ff02::1         ip6-allnodes
ff02::2         ip6-allrouters

192.168.11.211  raspberrypi-1
192.168.11.179  raspberrypi-2
クラスタの設定
デフォルトのクラスタなどがすでに存在する場合はクラスタを削除してください。
mtx@raspberrypi-1:~ $ sudo pcs cluster destroy
mtx@raspberrypi-2:~ $ sudo pcs cluster destroy
ユーザー hacluster がノード raspberrypi-1, raspberrypi-2 に対してログインできるように認証をします。
mtx@raspberrypi-1:~ $ sudo pcs host auth raspberrypi-1 raspberrypi-2 -u hacluster
Password:
raspberrypi-1: Authorized
raspberrypi-2: Authorized
新しいクラスタを作成していきます。
クラスタ名は apachecluster とし、ノード raspberrypi-1, raspberrypi-2 を追加します。
mtx@raspberrypi-1:~ $ sudo pcs cluster setup apachecluster raspberrypi-1 raspberrypi-2
No addresses specified for host 'raspberrypi-1', using 'raspberrypi-1'
No addresses specified for host 'raspberrypi-2', using 'raspberrypi-2'
Destroying cluster on hosts: 'raspberrypi-1', 'raspberrypi-2'...
raspberrypi-2: Successfully destroyed cluster
raspberrypi-1: Successfully destroyed cluster
Requesting remove 'pcsd settings' from 'raspberrypi-1', 'raspberrypi-2'
raspberrypi-1: successful removal of the file 'pcsd settings'
raspberrypi-2: successful removal of the file 'pcsd settings'
Sending 'corosync authkey', 'pacemaker authkey' to 'raspberrypi-1', 'raspberrypi-2'
raspberrypi-1: successful distribution of the file 'corosync authkey'
raspberrypi-1: successful distribution of the file 'pacemaker authkey'
raspberrypi-2: successful distribution of the file 'corosync authkey'
raspberrypi-2: successful distribution of the file 'pacemaker authkey'
Sending 'corosync.conf' to 'raspberrypi-1', 'raspberrypi-2'
raspberrypi-1: successful distribution of the file 'corosync.conf'
raspberrypi-2: successful distribution of the file 'corosync.conf'
Cluster has been successfully set up.
すべてのノードでクラスタを起動します。
mtx@raspberrypi-1:~ $ sudo pcs cluster start --all
raspberrypi-1: Starting Cluster...
raspberrypi-2: Starting Cluster...
クラスタの設定をしていきます。
stonith-enabled=false として、STONITH を一旦無効化し、リソースの作成を行います。
3ノード以上のクラスタの場合はクォーラムポリシーの設定も行います。今回は no-quorum-policy=ignore としてノード数がクォーラム数以下になった場合もリソースを起動状態にします。
mtx@raspberrypi-1:~ $ sudo pcs property set stonith-enabled=false
mtx@raspberrypi-1:~ $ sudo pcs property set no-quorum-policy=ignore
クラスタのステータスは以下のコマンドで確認できます。
mtx@raspberrypi-1:~ $ sudo pcs status
Cluster name: apachecluster

WARNINGS:
No stonith devices and stonith-enabled is not false

Status of pacemakerd: 'Pacemaker is running' (last updated 2024-06-21 16:43:27 +09:00)
Cluster Summary:
  * Stack: corosync
  * Current DC: raspberrypi-1 (version 2.1.5-a3f44794f94) - partition with quorum
  * Last updated: Fri Jun 21 16:43:28 2024
  * Last change:  Fri Jun 21 16:42:59 2024 by hacluster via crmd on raspberrypi-1
  * 2 nodes configured
  * 0 resource instances configured

Node List:
  * Online: [ raspberrypi-1 raspberrypi-2 ]

Full List of Resources:
  * No resources

Daemon Status:
  corosync: active/disabled
  pacemaker: active/disabled
  pcsd: active/enabled
これでクラスタの作成は完了です。
リソースの作成
ここではリソース (コンテナと IP アドレス) を作成してクラスタに割り当てます。
Docker コンテナ
以下の URL を参考に Docker をインストールします。
コンテナは、今回は Apache のコンテナを使用します。
以下のコマンドで Apache のコンテナをダウンロードします。
sudo docker pull httpd
ダウンロードしたコンテナに名前を付けます。
今回は「httpd-test」という名前とします。
sudo docker run -d -p 80:80 --name httpd-test httpd
このコンテナ httpd-test をクラスタのリソースとして割り当てます。
リソース名は Apache_container としました。
sudo pcs resource create Apache_container ocf:heartbeat:docker image="httpd" name="httpd-test" run_opts="--name httpd-test -p 80:80"
割り当てが完了するとコンテナが起動します。
ブラウザから Raspberry Pi が持っているローカルの IP アドレスにアクセスし、Apache のデフォルトページが表示されれば OK です。

仮想 IP アドレス
ここではクラスタのノード間で共有して使用する仮想的な IP アドレスを作成します。
raspberrypi-1, raspberrypi-2 のどちらのノードでコンテナが稼働していてもこの仮想 IP アドレスから Web ページにアクセスが可能になります。
以下のコマンドでクラスタに仮想 IP を作成して割り当てます。
割り当てる IP アドレスは 192.168.11.215/24 です。
mtx@raspberrypi-1:~ $ sudo pcs resource create VIP ocf:heartbeat:IPaddr2 ip=192.168.11.215 cidr_netmask=24
割り当てが完了したことを確認します。
リソースに仮想 IP (VIP という名前) があれば OK です。
mtx@raspberrypi-1:~ $ sudo pcs status
Cluster name: apachecluster
Status of pacemakerd: 'Pacemaker is running' (last updated 2024-06-25 10:59:04 +09:00)
Cluster Summary:
  * Stack: corosync
  * Current DC: raspberrypi-1 (version 2.1.5-a3f44794f94) - partition WITHOUT quorum
  * Last updated: Tue Jun 25 10:59:05 2024
  * Last change:  Tue Jun 25 10:58:56 2024 by root via cibadmin on raspberrypi-1
  * 2 nodes configured
  * 2 resource instances configured

Node List:
  * Online: [ raspberrypi-1 ]
  * OFFLINE: [ raspberrypi-2 ]

Full List of Resources:
  * Apache_container    (ocf:heartbeat:docker):  Started raspberrypi-1
  * VIP (ocf:heartbeat:IPaddr2):         Started raspberrypi-1

Daemon Status:
  corosync: active/disabled
  pacemaker: active/enabled
  pcsd: active/enabled
このとき、ノード raspberrypi-1 ではルーターから割り当てられた IP アドレスと作成した仮想 IP アドレスが存在します。
また、作成した仮想 IP にブラウザからアクセスすると Apache のデフォルトページが表示されます。
mtx@raspberrypi-1:~ $ ip a show dev eth0
2: eth0: <BROADCAST,MULTICAST,UP,LOWER_UP> mtu 1500 qdisc mq state UP group default qlen 1000
    link/ether xx:xx:xx:xx:xx:xx brd ff:ff:ff:ff:ff:ff
    inet 192.168.11.211/24 brd 192.168.11.255 scope global noprefixroute eth0
       valid_lft forever preferred_lft forever
    inet 192.168.11.215/24 brd 192.168.11.255 scope global secondary eth0
       valid_lft forever preferred_lft forever
    inet6 2400:xxxx:xxxx:xxxx:xxxx:xxxx:xxxx:xxxx/64 scope global dynamic noprefixroute
       valid_lft 14335sec preferred_lft 12535sec
    inet6 fe80::xxxx:xxxx:xxxx:xxxx/64 scope link noprefixroute
       valid_lft forever preferred_lft forever
Apache コンテナと仮想 IP を必ず同じノードで稼働させるように設定します。
mtx@raspberrypi-1:~ $ sudo pcs constraint colocation add VIP with Apache_container INFINITY
クラスタの動作検証
ノードをオンラインからスタンバイ状態に設定
現在コンテナが稼働しているノード raspberrypi-1 をスタンバイ状態にします。
mtx@raspberrypi-1:~ $ sudo pcs node standby raspberrypi-1
コマンド実行後、ノード raspberrypi-1 がスタンバイ状態になり、ノード raspberrypi-2 でコンテナが稼働します。
mtx@raspberrypi-1:~ $ sudo pcs status
Cluster name: apachecluster

WARNINGS:
No stonith devices and stonith-enabled is not false

Status of pacemakerd: 'Pacemaker is running' (last updated 2024-06-26 09:50:37 +09:00)
Cluster Summary:
  * Stack: corosync
  * Current DC: raspberrypi-1 (version 2.1.5-a3f44794f94) - partition with quorum
  * Last updated: Wed Jun 26 09:50:38 2024
  * Last change:  Wed Jun 26 09:50:35 2024 by root via cibadmin on raspberrypi-1
  * 2 nodes configured
  * 2 resource instances configured

Node List:
  * Node raspberrypi-1: standby
  * Online: [ raspberrypi-2 ]

Full List of Resources:
  * Apache_container    (ocf:heartbeat:docker):  Started raspberrypi-2
  * VIP (ocf:heartbeat:IPaddr2):         Started raspberrypi-2

Daemon Status:
  corosync: active/disabled
  pacemaker: active/enabled
  pcsd: active/enabled
スタンバイ状態のノードをオンライン状態にするには以下のコマンドを実行します。
mtx@raspberrypi-1:~ $ sudo pcs node unstandby raspberrypi-1
仮想 IP とコンテナリソースの付け替え (手動)
オンライン状態のノード間でリソースを付け替えるには以下のコマンドを実行します。
ノード raspberrypi-1 からノード raspberrypi-2 にコンテナと仮想 IP を付け替えます。
mtx@raspberrypi-1:~ $ sudo pcs resource move VIP raspberrypi-2
付け替えが完了したことを確認します。
mtx@raspberrypi-1:~ $ sudo pcs status
Cluster name: apachecluster

WARNINGS:
No stonith devices and stonith-enabled is not false

Status of pacemakerd: 'Pacemaker is running' (last updated 2024-06-26 09:51:09 +09:00)
Cluster Summary:
  * Stack: corosync
  * Current DC: raspberrypi-1 (version 2.1.5-a3f44794f94) - partition with quorum
  * Last updated: Wed Jun 26 09:51:10 2024
  * Last change:  Wed Jun 26 09:51:06 2024 by root via cibadmin on raspberrypi-1
  * 2 nodes configured
  * 2 resource instances configured

Node List:
  * Online: [ raspberrypi-1 raspberrypi-2 ]

Full List of Resources:
  * Apache_container    (ocf:heartbeat:docker):  Started raspberrypi-2
  * VIP (ocf:heartbeat:IPaddr2):         Started raspberrypi-2

Daemon Status:
  corosync: active/disabled
  pacemaker: active/enabled
  pcsd: active/enabled
仮想 IP とコンテナリソースの付け替え (自動)
やりたいことの1つ目を行う手順になります。
- 1日1回程度 Raspberry Pi を再起動させたいが、その間サービス (Docker コンテナ) を停止させないようにする (具体的には以下のようなシナリオになります)
- (Raspberry Pi A 側) 再起動のためにコンテナを停止
- (Raspberry Pi B 側) Raspberry Pi B のコンテナを起動してフェイルオーバー
- (Raspberry Pi A 側) 再起動が完了してコンテナを起動
- (Raspberry Pi B 側) Raspberry Pi B のコンテナを停止してフェイルバック
Raspberry Pi A はノード raspberrypi-1、Raspberry Pi B はノード raspberrypi-2とします。
raspberrypi-1 の定期的な再起動にはsystemd.timer などで実装します。
再起動前に以下の一連の流れを raspberrypi-1 で実行させます。
リソースを raspberrypi-2 に割り当てて raspberrypi-1 を再起動
mtx@raspberrypi-1:~ $ sudo pcs resource move VIP raspberrypi-2
mtx@raspberrypi-1:~ $ sudo shutdown -r now
raspberrypi-1 の再起動が完了したらリソースを raspberrypi-1 に戻す
mtx@raspberrypi-1:~ sudo pcs resource move VIP raspberrypi-1
これを raspberrypi-1 再起動完了時に実行できるようにサービス化
[Unit]
Description=Move resource to raspberrypi-1
After=multi-user.target

[Service]
Type=oneshot
User=root
ExecStartPre=/bin/sleep 10
ExecStart=pcs resource move VIP raspberrypi-1

[Install]
WantedBy=multi-user.target
サービスの有効化
mtx@raspberrypi-1:~ $ sudo systemctl enable move-resource
これでコンテナを停止させずに raspberrypi-1 を再起動することが可能になります。
STONITH 設定
やりたいことの2つ目、3つ目を行う手順になります。
- Raspberry Pi A または B がハードウェア障害によって生存確認ができなくなった場合に再起動させる
- 上記のシナリオで Raspberry Pi B がフェイルバックに失敗してスプリットブレインになってしまった場合に Raspberry Pi B を再起動させる (具体的には以下のようなシナリオになります)
- クラスタのノードに問題が発生したことを検知して、STONITH によるフェンシングを行う
外部入力による強制電源断の有効化
slee-Pi 3 はデフォルトでは外部入力による強制電源断は無効化されています。
有効化するためには /etc/default/sleepi3 を編集して EXTIN_FORCED_SHUTDOWN=1 とします。
略)
#
# Forced shutdown by external input
#
# EXTIN_FORCED_SHUTDOWN=0 : disabled
# EXTIN_FORCED_SHUTDOWN=1 : external input has been detected 10s and shutdown
#
EXTIN_FORCED_SHUTDOWN=1
編集したら OS を再起動して /etc/default/sleepi3 の変更を反映させます。
外部入力による強制電源断が有効化されていると、外部入力が 10秒以上検出された場合に強制電源断が発生します。
fence agent の作成
slee-Pi 3 の fence agent を作成します。
ClusterLabs が提供してる fence agent の中の fence_ipmilan をベースに作成します。
以下が slee-Pi 3 の外部入力と外部出力を使用して fencing を行う agent のサンプルです。
/usr/sbin/fence_sleepi3 というファイルを作成します。
#!/bin/python3

import sys
import atexit
import time
from pathlib import Path
from importlib import machinery, util

sys.path.append("/usr/share/fence")

from fencing import *
from fencing import (fail, run_delay, EC_LOGIN_DENIED, EC_STATUS)

import sleepi

state = {"POWERED_ON": "on", 'POWERED_OFF': "off", 'SUSPENDED': "off"}

path = Path('/usr/share/sleepi3-utils/sleepi3_util.py')
path_sleepi_status = '/run/fence_sleepi3.status'

loader = machinery.SourceFileLoader(str(path), str(path))
spec = util.spec_from_file_location(str(path), path, loader=loader)
sleepi3_util = util.module_from_spec(spec)
spec.loader.exec_module(sleepi3_util)

ENVIRONMENT_FILE = '/etc/default/sleepi3'

def get_power_status(_, options):
    status = "on"
    try:
        with open(path_sleepi_status, 'r') as file:
            status = file.read()
    except:
        pass
    return status

def set_power_status(_, options):
    action = options["--action"]
    with open(path_sleepi_status, 'w') as file:
        file.write(action)
    if action == "on":
        cli.set(['extout', 1])
        time.sleep(1)
        cli.set(['extout', 0])
    elif action == "off":
        cli.set(['extout', 1])
        time.sleep(12)
        cli.set(['extout', 0])
    else:
        cli.set(['extout', 0])
    return

def reboot_cycle(_, options):
    return True

def main():
    atexit.register(atexit_handler)

    all_opt["power_wait"]["default"] = "10"

    device_opt = ["no_login", "no_password", "no_port"]
    options = check_input(device_opt, process_input(device_opt))

    docs = {}
    docs["shortdesc"] = "Fence agent for slee-Pi 3"
    docs["longdesc"] = """fence_sleepi3 is an I/O Fencing agent which can be \
used with slee-Pi 3"""
    docs["vendorurl"] = "https://mechatrax.com"
    show_docs(options, docs)

    run_delay(options)

    result = fence_action(None, options, set_power_status, get_power_status, None, reboot_cycle)

    sys.exit(result)

if __name__ == "__main__":
    env = sleepi3_util.parse_environment(ENVIRONMENT_FILE)
    bus = int(env['I2C_BUS'])
    addr = int(env['I2C_ADDRESS'], 16)
    cli = sleepi3_util.Sleepi3Cli(sleepi.Sleepi3(bus, addr))

    main()
弊社提供の slee-Pi 3 のユーティリティの中の sleepi3_util.py を使用して slee-Pi 3 の外部出力の制御をします。
cli.set(['extout', 1]) とすると外部出力がオンになり、cli.set(['extout', 0]) とすると外部出力がオフになります。
fence agent を作成したら実行権限を付与します。
mtx@raspberrypi-1:~ $ sudo chmod 755 /usr/sbin/fence_sleepi3
sleepi3_util.py では I2C を使用するため、pacemaker を実行するユーザー hacluster を i2c グループに追加します。
mtx@raspberrypi-1:~ $ sudo usermod hacluster -aG i2c
mtx@raspberrypi-1:~ $ groups hacluster
hacluster : haclient i2c
リソースの割り当て
作成した fence agent をクラスタに割り当てます。
リソース名は fence_raspi としました。
mtx@raspberrypi-1:~ $ sudo pcs stonith create fence_raspi fence_sleepi3 pcmk_host_list="raspberrypi-1 raspberrypi-2" pcmk_host_check=static-list
クラスタのステータスを確認して、割り当てが完了したことを確認します。
mtx@raspberrypi-1:~ $ sudo pcs status
Cluster name: apachecluster
Status of pacemakerd: 'Pacemaker is running' (last updated 2024-06-26 09:52:07 +09:00)
Cluster Summary:
  * Stack: corosync
  * Current DC: raspberrypi-1 (version 2.1.5-a3f44794f94) - partition with quorum
  * Last updated: Wed Jun 26 09:52:08 2024
  * Last change:  Wed Jun 26 09:52:01 2024 by root via cibadmin on raspberrypi-1
  * 2 nodes configured
  * 3 resource instances configured

Node List:
  * Online: [ raspberrypi-1 raspberrypi-2 ]

Full List of Resources:
  * Apache_container    (ocf:heartbeat:docker):  Started raspberrypi-1
  * VIP (ocf:heartbeat:IPaddr2):         Started raspberrypi-1
  * fence_raspi (stonith:fence_sleepi3):         Started raspberrypi-2

Daemon Status:
  corosync: active/disabled
  pacemaker: active/enabled
  pcsd: active/enabled
また無効化していた STONITH も有効化します。
mtx@raspberrypi-1:~ $ sudo pcs property set stonith-enabled=true
フェンシングのテスト
pcs コマンドでのテスト
登録した fence agent が機能するかテストを行います。
ノード raspberrypi-1 をフェンシングします。
mtx@raspberrypi-2:~ $ sudo pcs stonith fence raspberrypi-1
このコマンドを実行すると、raspberrypi-1 が再起動します。
slee-Pi 3 では自身の起動要因を確認できます。
今回は raspberrypi-1 の外部入力検出によって起動したので wakeup-flag が extin となるはずです。
mtx@raspberrypi-1:~ $ sudo sleepi3ctl get wakeup-flag
extin
OOM からの復帰テスト
以下の記事を参考に、コンテナが稼働しているノードで OOM (Out Of Memory) を発生させます。
今回はノード raspberrypi-1 で OOM を発生させます。
※ コード中に (&t) のような HTML エンティティが含まれています。コードを使用する際は該当部分を取り除いてご利用ください。
もしくは意図的にカーネルパニックを発生させます。
以下のコマンドを実行するとカーネルパニックが発生します。
mtx@raspberrypi-1:~ $ sudo su
mtx@raspberrypi-1:~ $ echo c > /proc/sysrq-trigger
正しくフェンシングの設定ができているとリソースがノード raspberrypi-2 に渡され、ノード raspberrypi-1 が再起動します。
この場合も raspberrypi-1 の外部入力検出によって起動したので wakeup-flag が extin となるはずです。
mtx@raspberrypi-1:~ $ sudo sleepi3ctl get wakeup-flag
extin
※ 通常、OOM 発生時はウォッチドッグタイマが動作して再起動が発生します。
フェンシング単体のテストを行う際はこのウォッチドッグタイマを無効化してください。
ウォッチドッグタイマを無効化するには /etc/default/sleepi3 を編集して HEARTBEAT_TIMEOUT=0 とします。
略)
#
# Reboot if heartbeat signal is not received more than HEARTBEAT_TIMEOUT seconds
#
# HEARTBEAT_TIMEOUT=0 : disabled
# HEARTBEAT_TIMEOUT=N : N[1..255] seconds
#
HEARTBEAT_TIMEOUT=0
略)
編集したら OS を再起動して /etc/default/sleepi3 の変更を反映させます。
これでウォッチドッグタイマが無効化されます。
おわりに
slee-Pi 3 の外部入力と外部出力を使用してフェンシングを行う方法を紹介しました。
コンテナなどのサービスの安定運用が可能になるので参考にしていただけると幸いです。
-
STONITH とは Shoot-The-Other-Node-In-The-Head の略です。問題のあるノードや同時アクセスによるデータ破損を防止します。 ↩