はじめに
先日 Raspberry Pi 5 で AI 処理を高速に行える AI Kit が発売されました。
本記事ではこの AI Kit のセットアップ方法と実際にデモを作成して動かす方法をご紹介します。
AI Kit とは
Raspberry Pi 公式では以下のように説明されています。
The Raspberry Pi AI Kit bundles the Raspberry Pi M.2 HAT+ with a Hailo AI acceleration module for use with Raspberry Pi 5. It provides an accessible, cost-effective, and power- efficient way to integrate high-performance AI.
(引用元: https://www.raspberrypi.com/products/ai-kit/)
Raspberry Pi M.2 HAT+ に AI アクセラレーションモジュールをバンドルし、高性能 AI を効率的に使用することができるそうです。
AI モジュールは Hailo-8L チップを中心に構築された、13 テラオペレーション/秒 (TOPS) のニューラルネットワーク推論アクセラレータです。
モジュールと Raspberry Pi5 は M.2 HAT+ を通して PCIe で通信しています。
その他 AI Kit の詳細については以下をご参照ください。
使用するもの
-
Raspberry Pi 5 (RAM 8GB)
- 使用 OS: Raspberry Pi OS (64bit) Bookworm
- 負荷低減のため、アクティブクーラー を使用しています
-
micro SD カード (32 GB)
-
AI Kit
以下のものが付属しています- Hailo 8L AIアクセラレーター モジュール (M.2 HAT+に取付済み): 1個
- M.2 HAT+: 1個
- スタッキングGPIOヘッダー 16mm: 1個
- スペーサー : 4本
- ネジ M2.6 4mm: 4本
- ネジ M2.6 10mm: 4本
-
slee-Pi3 : Raspberry Pi 用電源管理/死活監視モジュール (詳細は こちら)
- slee-Pi3 は必須ではありませんが、Raspberry Pi への安定した電源供給のために使用しています
- slee-Pi3 のセットアップについては弊社 GitHub ページ をご参照ください
-
DCジャック – XHP-2コネクタ変換ハーネス: 1本
-
AC アダプタ (12V/2A)
※ slee-Pi3 を使用せずに 5V5A の AC アダプタを使用することも可能です
先日、PD 対応の 5V5A の AC アダプタが発売されました。本記事執筆時には入手できていなかったため slee-Pi3 を使用しています。
Raspberry Pi 5 で使用できる 5V5A の AC アダプタはこちらから購入できます。
AI Kit の HAT と付属品

AI Kit を接続する前の準備
以下を参考にファームウェアの更新を行います。
ファームウェアが最新版か確認します。
sudo rpi-eeprom-update
2023年12月6日以前のバージョンを使用している場合は Raspi-config から Bootloader を最新のものを使用するように設定します。
sudo raspi-config
Advanced Options > Bootloader Version と進み、Latest を選択します。
ファームウェアを最新バージョンに更新します。
sudo rpi-eeprom-update -a
更新が終わったら再起動します。
sudo reboot
組立て手順
Raspberry Pi 5 に40ピンヘッダを接続します

40ピンヘッダに AI Kit の HAT をスタックし、FFC を Raspberry Pi 5 の PCIe2.0 コネクタに接続します。


さらに電源管理用に slee-Pi 3 をスタックします。

ソフトウェアのセットアップ
必要に応じて PCIe の速度を Gen 3.0 に設定します。
ただし、現状 Raspberry Pi 5 では PCIe Gen 2.0 (5GT/sec) の対応であり、Gen 3.0 (10GT/sec) は認定されていません。
Gen 3.0 を使用した場合は動作が不安定になる可能性があります。
https://www.raspberrypi.com/documentation/computers/raspberry-pi.html#pcie-gen-3-0
Gen 3.0 を設定するには /boot/firmware/config.txt に以下の行を追加します。
dtparam=pciex1_gen=3
記述が終わったら再起動して設定を反映させます。
Gen3.0 が設定されているかの確認
mtx@raspberrypi:~ $ sudo lspci -vvv
略)
0000:01:00.0 Co-processor: Hailo Technologies Ltd. Hailo-8 AI Processor (rev 01)
	Subsystem: Hailo Technologies Ltd. Hailo-8 AI Processor
	Control: I/O- Mem+ BusMaster+ SpecCycle- MemWINV- VGASnoop- ParErr- Stepping- SERR- FastB2B- DisINTx+
	Status: Cap+ 66MHz- UDF- FastB2B- ParErr- DEVSEL=fast >TAbort- <TAbort- <MAbort- >SERR- <PERR- INTx-
	Latency: 0
	Interrupt: pin A routed to IRQ 188
	Region 0: Memory at 1800000000 (64-bit, prefetchable) [size=16K]
	Region 2: Memory at 1800008000 (64-bit, prefetchable) [size=4K]
	Region 4: Memory at 1800004000 (64-bit, prefetchable) [size=16K]
	Capabilities: [80] Express (v2) Endpoint, MSI 00
		DevCap:	MaxPayload 256 bytes, PhantFunc 0, Latency L0s <64ns, L1 unlimited
			ExtTag+ AttnBtn- AttnInd- PwrInd- RBE+ FLReset+ SlotPowerLimit 0W
		DevCtl:	CorrErr+ NonFatalErr+ FatalErr+ UnsupReq+
			RlxdOrd+ ExtTag+ PhantFunc- AuxPwr- NoSnoop+ FLReset-
			MaxPayload 256 bytes, MaxReadReq 512 bytes
		DevSta:	CorrErr- NonFatalErr- FatalErr- UnsupReq- AuxPwr- TransPend-
		LnkCap:	Port #0, Speed 8GT/s, Width x4, ASPM L0s L1, Exit Latency L0s <1us, L1 <2us
			ClockPM- Surprise- LLActRep- BwNot- ASPMOptComp+
		LnkCtl:	ASPM L1 Enabled; RCB 64 bytes, Disabled- CommClk+
			ExtSynch- ClockPM- AutWidDis- BWInt- AutBWInt-
		LnkSta:	Speed 8GT/s, Width x1 (downgraded)
			TrErr- Train- SlotClk+ DLActive- BWMgmt- ABWMgmt-
		DevCap2: Completion Timeout: Not Supported, TimeoutDis+ NROPrPrP- LTR+
			 10BitTagComp- 10BitTagReq- OBFF Not Supported, ExtFmt+ EETLPPrefix-
			 EmergencyPowerReduction Not Supported, EmergencyPowerReductionInit-
			 FRS- TPHComp- ExtTPHComp-
			 AtomicOpsCap: 32bit- 64bit- 128bitCAS-
		DevCtl2: Completion Timeout: 50us to 50ms, TimeoutDis- LTR+ 10BitTagReq- OBFF Disabled,
			 AtomicOpsCtl: ReqEn-
		LnkCap2: Supported Link Speeds: 2.5-8GT/s, Crosslink- Retimer- 2Retimers- DRS-
		LnkCtl2: Target Link Speed: 8GT/s, EnterCompliance- SpeedDis-
			 Transmit Margin: Normal Operating Range, EnterModifiedCompliance- ComplianceSOS-
			 Compliance Preset/De-emphasis: -6dB de-emphasis, 0dB preshoot
		LnkSta2: Current De-emphasis Level: -6dB, EqualizationComplete+ EqualizationPhase1+
			 EqualizationPhase2+ EqualizationPhase3+ LinkEqualizationRequest-
			 Retimer- 2Retimers- CrosslinkRes: unsupported
	Capabilities: [e0] MSI: Enable+ Count=1/1 Maskable- 64bit+
		Address: 000000ffffffe000  Data: 0008
	Capabilities: [f8] Power Management version 3
		Flags: PMEClk- DSI- D1- D2- AuxCurrent=0mA PME(D0-,D1-,D2-,D3hot+,D3cold-)
		Status: D0 NoSoftRst+ PME-Enable- DSel=0 DScale=1 PME-
	Capabilities: [100 v1] Vendor Specific Information: ID=1556 Rev=1 Len=008 <?>
	Capabilities: [108 v1] Latency Tolerance Reporting
		Max snoop latency: 0ns
		Max no snoop latency: 0ns
	Capabilities: [110 v1] L1 PM Substates
		L1SubCap: PCI-PM_L1.2+ PCI-PM_L1.1+ ASPM_L1.2+ ASPM_L1.1+ L1_PM_Substates+
			  PortCommonModeRestoreTime=10us PortTPowerOnTime=10us
		L1SubCtl1: PCI-PM_L1.2- PCI-PM_L1.1- ASPM_L1.2- ASPM_L1.1-
			   T_CommonMode=0us LTR1.2_Threshold=26016ns
		L1SubCtl2: T_PwrOn=10us
	Capabilities: [128 v1] Alternative Routing-ID Interpretation (ARI)
		ARICap:	MFVC- ACS-, Next Function: 0
		ARICtl:	MFVC- ACS-, Function Group: 0
	Capabilities: [200 v2] Advanced Error Reporting
		UESta:	DLP- SDES- TLP- FCP- CmpltTO- CmpltAbrt- UnxCmplt- RxOF- MalfTLP- ECRC- UnsupReq- ACSViol-
		UEMsk:	DLP- SDES- TLP- FCP- CmpltTO- CmpltAbrt- UnxCmplt- RxOF- MalfTLP- ECRC- UnsupReq- ACSViol-
		UESvrt:	DLP+ SDES- TLP- FCP+ CmpltTO- CmpltAbrt- UnxCmplt- RxOF+ MalfTLP+ ECRC- UnsupReq- ACSViol-
		CESta:	RxErr- BadTLP- BadDLLP- Rollover- Timeout- AdvNonFatalErr-
		CEMsk:	RxErr- BadTLP- BadDLLP- Rollover- Timeout- AdvNonFatalErr+
		AERCap:	First Error Pointer: 00, ECRCGenCap+ ECRCGenEn- ECRCChkCap+ ECRCChkEn-
			MultHdrRecCap- MultHdrRecEn- TLPPfxPres- HdrLogCap-
		HeaderLog: 00000000 00000000 00000000 00000000
	Capabilities: [300 v1] Secondary PCI Express
		LnkCtl3: LnkEquIntrruptEn- PerformEqu-
		LaneErrStat: 0
	Kernel driver in use: hailo
	Kernel modules: hailo_pci
略)
リンク状態欄 (LnkSta欄) の速度が8 GT/s と表示されていれば PCIe 3.0 相当が設定されています。
AI Kit を使用するためのパッケージをインストールします。
sudo apt install hailo-all
このコマンドを実行すると Hailo のカーネルデバイスドライバーとファームウェア、Hailo RT ミドルウェアなどの必要なパッケージがインストールされます。
インストールが完了したら再起動します。
sudo reboot
サンプルコードの実行
コンパイル済みのモデルも含まれる物体検出や骨格検出のサンプルコードが Hailo から公開されているのでそれを動かしてみます。
このリポジトリをクローンします。
git clone https://github.com/hailo-ai/hailo-rpi5-examples.git
このドキュメントを参考にサンプルコードを動かす準備をします。
仮想環境を activate します。リポジトリ中にある setup_env.sh を実行すると必要な設定が自動的に完了します。
source setup_env.sh
仮想環境内に必要なパッケージをインストールします。
pip install -r requirements.txt
AI Kit で使用可能な学習済みモデル (.hef) やサンプルのビデオファイルをインストールします。
./download_resources.sh
TAPPAS (Template Applications And Solutions) に必要なパッケージをインストールします。
./compile_postprocess.sh
※ TAPPAS とは、Hailo のプラットフォームに基づくソリューションを簡単に立ち上げられるようにすることを目標に開発されたフレームワークです。
フレーム表示やデータのパイプライン処理、ビデオ キャプチャ、ビデオ操作などの機能を含む標準アプリケーション用の既製のテンプレートを提供し、これを利用することで独自のアプリケーションを簡単に構築できます。
TAPPAS の詳細や使用例については以下のリポジトリやブログをご参照ください。
今回は物体検出のコードを実行してみます。
本記事では USB カメラを使用します。
slee-Pi3 を使用する場合、ピンヘッダ経由で Raspberry Pi 5 に電源供給することになるので USB PD 非対応での電源供給モードとなり、USB ポートからの電流は 600mA に制限されます。カメラを接続した際にこの制限に引っかかる可能性があるため、上限値を 1.2A に変更します。
※上述のPD 対応の 5V5A の AC アダプタを使用する場合は、この変更は不要です。
raspi-config を開きます。
sudo raspi-config
Performance Options > P4 USB Current と進み、USB current limit を有効にします。
設定が完了したら再起動します。
仮想環境内でファイル detection.py を実行します。
python3 detection.py
ウィンドウが表示され、person や book などの label が検出されました。
フレームレートは 30fps ほど出ており、体感かなり早いです。

検出にはデフォルトでは yolov6n.hef が使用されます。ほかの用意されたモデルを使用する場合は --network オプションで指定します。
例) yolov8s モデルを使用する場合
python3 detection.py --network yolov8s
デフォルトのビデオストリームを使用せず、OpenCV で作成したフレームをビデオで表示する場合は --use-frame, -u オプションを使用します。
python3 detection.py -u
デフォルトのビデオストリームを出力しないようにするには GStreamer パイプラインのキューを変更し、fpsdisplaysink の代わりに fakesink を渡します。
<             + f"fpsdisplaysink video-sink={self.video_sink} name=hailo_display sync={self.sync} text-overlay={self.options_menu.show_fps} signal-fps-measurements=true "
---
>             + f"fakesink "
また、フレームの編集はコールバック関数 app_callback() 内で行います。
以下は単一のスマートフォン (label: cell phone) を検出し、bounding box の中心に点を描画したフレームを出力するコードの例です。
cell phone 検出コード例
import gi
gi.require_version('Gst', '1.0')
from gi.repository import Gst, GLib
import os
import argparse
import multiprocessing
import numpy as np
import setproctitle
import cv2
import time
import hailo
from hailo_rpi_common import (
    get_default_parser,
    QUEUE,
    get_caps_from_pad,
    get_numpy_from_buffer,
    GStreamerApp,
    app_callback_class,
)
import imutils

# -----------------------------------------------------------------------------------------------
# User-defined class to be used in the callback function
# -----------------------------------------------------------------------------------------------
# Inheritance from the app_callback_class
class user_app_callback_class(app_callback_class):
    def __init__(self):
        super().__init__()
        self.new_variable = 42  # New variable example
        self._data = None

    def new_function(self):  # New function example
        return "The meaning of life is: "

# -----------------------------------------------------------------------------------------------
# User-defined callback function
# -----------------------------------------------------------------------------------------------

# This is the callback function that will be called when data is available from the pipeline
def app_callback(pad, info, user_data):
    # Get the GstBuffer from the probe info
    buffer = info.get_buffer()
    # Check if the buffer is valid
    if buffer is None:
        return Gst.PadProbeReturn.OK

    # Using the user_data to count the number of frames
    user_data.increment()
    # string_to_print = f"Frame count: {user_data.get_count()}\n"

    # Get the caps from the pad
    format, width, height = get_caps_from_pad(pad)
    if format is None or width is None or height is None:
        print("Failed to get format, width, or height from pad")
        return Gst.PadProbeReturn.OK

    # If the user_data.use_frame is set to True, we can get the video frame from the buffer
    frame = None
    if user_data.use_frame and format is not None and width is not None and height is not None:
        # Get video frame
        frame = get_numpy_from_buffer(buffer, format, width, height)
        frame = cv2.flip(frame, 1)
        frame = imutils.resize(frame, width=width)

    # Get the detections from the buffer
    roi = hailo.get_roi_from_buffer(buffer)
    detections = roi.get_objects_typed(hailo.HAILO_DETECTION)

    # Parse the detections
    detection_count = 0
    for detection in detections:
        label = detection.get_label()
        bbox = detection.get_bbox()
        confidence = detection.get_confidence()

        if label == "cell phone":
            # string_to_print += f"Detection: {label} {confidence:.2f}\n"
            detection_count += 1
            xmax = bbox.xmax() * width
            ymax = bbox.ymax() * width
            xmin = bbox.xmin() * height
            ymin = bbox.ymin() * height
            centerX = int((xmax + xmin) / 2)
            centerY = int((ymax + ymin) / 2)
            cv2.circle(frame, (centerX, centerY), 10, (0, 255, 0), -1)
    if user_data.use_frame:
        # Note: using imshow will not work here, as the callback function is not running in the main thread
        # Let's print the detection count to the frame
        cv2.putText(frame, f"Detections: {detection_count}", (10, 30), cv2.FONT_HERSHEY_SIMPLEX, 1, (0, 255, 0), 2)
        # Example of how to use the new_variable and new_function from the user_data
        # Let's print the new_variable and the result of the new_function to the frame
        # cv2.putText(frame, f"{user_data.new_function()} {user_data.new_variable}", (10, 60), cv2.FONT_HERSHEY_SIMPLEX, 1, (0, 255, 0), 2)
        # Convert the frame to BGR
        frame = cv2.cvtColor(frame, cv2.COLOR_RGB2BGR)
        user_data.set_frame(frame)

    # print(string_to_print)
    return Gst.PadProbeReturn.OK


# -----------------------------------------------------------------------------------------------
# User Gstreamer Application
# -----------------------------------------------------------------------------------------------

# This class inherits from the hailo_rpi_common.GStreamerApp class
class GStreamerDetectionApp(GStreamerApp):
    def __init__(self, args, user_data):
        # Call the parent class constructor
        super().__init__(args, user_data)
        # Additional initialization code can be added here
        # Set Hailo parameters these parameters should be set based on the model used
        self.batch_size = 2
        self.network_width = 640
        self.network_height = 640
        self.network_format = "RGB"
        nms_score_threshold = 0.3
        nms_iou_threshold = 0.45

        # Temporary code: new postprocess will be merged to TAPPAS.
        # Check if new postprocess so file exists
        new_postprocess_path = os.path.join(self.current_path, '../resources/libyolo_hailortpp_post.so')
        if os.path.exists(new_postprocess_path):
            self.default_postprocess_so = new_postprocess_path
        else:
            self.default_postprocess_so = os.path.join(self.postprocess_dir, 'libyolo_hailortpp_post.so')

        if args.hef_path is not None:
            self.hef_path = args.hef_path
        # Set the HEF file path based on the network
        elif args.network == "yolov6n":
            self.hef_path = os.path.join(self.current_path, './resources/yolov6n.hef')
        elif args.network == "yolov8s":
            self.hef_path = os.path.join(self.current_path, './resources/yolov8s_h8l.hef')
        elif args.network == "yolox_s_leaky":
            self.hef_path = os.path.join(self.current_path, './resources/yolox_s_leaky_h8l_mz.hef')
        else:
            assert False, "Invalid network type"

        # User-defined label JSON file
        if args.labels_json is not None:
            self.labels_config = f' config-path={args.labels_json} '
            # Temporary code
            if not os.path.exists(new_postprocess_path):
                print("New postprocess so file is missing. It is required to support custom labels. Check documentation for more information.")
                exit(1)
        else:
            self.labels_config = ''

        self.app_callback = app_callback

        self.thresholds_str = (
            f"nms-score-threshold={nms_score_threshold} "
            f"nms-iou-threshold={nms_iou_threshold} "
            f"output-format-type=HAILO_FORMAT_TYPE_FLOAT32"
        )

        # Set the process title
        setproctitle.setproctitle("Hailo Detection App")

        self.create_pipeline()

    def get_pipeline_string(self):
        if self.source_type == "rpi":
            source_element = (
                "libcamerasrc name=src_0 auto-focus-mode=2 ! "
                f"video/x-raw, format={self.network_format}, width=1536, height=864 ! "
                + QUEUE("queue_src_scale")
                + "videoscale ! "
                f"video/x-raw, format={self.network_format}, width={self.network_width}, height={self.network_height}, framerate=30/1 ! "
            )
        elif self.source_type == "usb":
            source_element = (
                f"v4l2src device={self.video_source} name=src_0 ! "
                "video/x-raw, width=640, height=480, framerate=30/1 ! "
            )
        else:
            source_element = (
                f"filesrc location={self.video_source} name=src_0 ! "
                + QUEUE("queue_dec264")
                + " qtdemux ! h264parse ! avdec_h264 max-threads=2 ! "
                " video/x-raw, format=I420 ! "
            )
        source_element += QUEUE("queue_scale")
        source_element += "videoscale n-threads=2 ! "
        source_element += QUEUE("queue_src_convert")
        source_element += "videoconvert n-threads=3 name=src_convert qos=false ! "
        source_element += f"video/x-raw, format={self.network_format}, width={self.network_width}, height={self.network_height}, pixel-aspect-ratio=1/1 ! "

        pipeline_string = (
            "hailomuxer name=hmux "
            + source_element
            + "tee name=t ! "
            + QUEUE("bypass_queue", max_size_buffers=20)
            + "hmux.sink_0 "
            + "t. ! "
            + QUEUE("queue_hailonet")
            + "videoconvert n-threads=3 ! "
            f"hailonet hef-path={self.hef_path} batch-size={self.batch_size} {self.thresholds_str} force-writable=true ! "
            + QUEUE("queue_hailofilter")
            + f"hailofilter so-path={self.default_postprocess_so} {self.labels_config} qos=false ! "
            + QUEUE("queue_hmuc")
            + "hmux.sink_1 "
            + "hmux. ! "
            + QUEUE("queue_hailo_python")
            + QUEUE("queue_user_callback")
            + "identity name=identity_callback ! "
            + QUEUE("queue_hailooverlay")
            + "hailooverlay ! "
            + QUEUE("queue_videoconvert")
            + "videoconvert n-threads=3 qos=false ! "
            + QUEUE("queue_hailo_display")
            + f"fakesink "
        )
        # print(pipeline_string)
        return pipeline_string

if __name__ == "__main__":
    # Create an instance of the user app callback class
    user_data = user_app_callback_class()
    parser = get_default_parser()
    # Add additional arguments here
    parser.add_argument(
        "--network",
        default="yolov6n",
        choices=['yolov6n', 'yolov8s', 'yolox_s_leaky'],
        help="Which Network to use, default is yolov6n",
    )
    parser.add_argument(
        "--hef-path",
        default=None,
        help="Path to HEF file",
    )
    parser.add_argument(
        "--labels-json",
        default=None,
        help="Path to costume labels JSON file",
    )
    args = parser.parse_args()
    app = GStreamerDetectionApp(args, user_data)
    app.run()
AI Kit を使用したデモ
前章のスマートフォンを検出するコードを活用して物体検出を利用したデモ (ゲーム) を作成してみたいと思います。
OpenCV とカスケード分類器を使用して正面顔を検出して、顔の位置でキャラクターを操作するコードがすでに存在しました。
これをもとにスマホの位置でキャラクターを動かせるようにしてみます。
ゲームのコード
import argparse
import cv2
import imutils
import libevdev
import multiprocessing
import numpy as np
import os
import queue
import setproctitle
import threading
import time
from flask import Flask, render_template, Response, send_from_directory
import gi
gi.require_version('Gst', '1.0')
from gi.repository import Gst, GLib
import hailo
from hailo_rpi_common import (
get_default_parser,
QUEUE,
get_caps_from_pad,
get_numpy_from_buffer,
GStreamerApp,
app_callback_class,
)
app = Flask(__name__)
device = libevdev.Device()
device.name = 'virtual keybord'
device.enable(libevdev.EV_KEY.KEY_UP)
device.enable(libevdev.EV_KEY.KEY_DOWN)
device.enable(libevdev.EV_KEY.KEY_RIGHT)
device.enable(libevdev.EV_KEY.KEY_LEFT)
uinput = device.create_uinput_device()
frame_queue = queue.Queue()
# -----------------------------------------------------------------------------------------------
# User-defined class to be used in the callback function
# -----------------------------------------------------------------------------------------------
# Inheritance from the app_callback_class
class user_app_callback_class(app_callback_class):
def __init__(self):
super().__init__()
self.new_variable = 42 # New variable example
self._data = None
def new_function(self): # New function example
return "The meaning of life is: "
def save_center(self, val_x, val_y):
self.center_pos_x = val_x
self.center_pos_y = val_y
def return_center(self):
return self.center_pos_x, self.center_pos_y
def save_totalFrames(self, frame):
self.totalframe = frame
def return_totalFrames(self):
return self.totalframe
# -----------------------------------------------------------------------------------------------
# User-defined callback function
# -----------------------------------------------------------------------------------------------
# This is the callback function that will be called when data is available from the pipeline
def app_callback(pad, info, user_data):
# Scale factor to resize the frame for faster processing
scale = 1
# Define the boundaries
up = 200 // scale
down = 440 // scale
left = 200 // scale
right = 440 //scale
# total number of frames processed thus far and skip frames
skip_frames = 10
detection_count = 0
# Get the GstBuffer from the probe info
buffer = info.get_buffer()
# Check if the buffer is valid
if buffer is None:
return Gst.PadProbeReturn.OK
# Using the user_data to count the number of frames
user_data.increment()
# string_to_print = f"Frame count: {user_data.get_count()}\n"
# Get the caps from the pad
format, width, height = get_caps_from_pad(pad)
if format is None or width is None or height is None:
print("Failed to get format, width, or height from pad")
return Gst.PadProbeReturn.OK
center_img_X = width / 2
# If the user_data.use_frame is set to True, we can get the video frame from the buffer
frame = None
if user_data.use_frame and format is not None and width is not None and height is not None:
# Get video frame
frame = get_numpy_from_buffer(buffer, format, width, height)
frame = cv2.flip(frame, 1)
frame = imutils.resize(frame, width=width)
totalFrames = user_data.return_totalFrames()
if totalFrames % skip_frames == 0:
# Get the detections from the buffer
roi = hailo.get_roi_from_buffer(buffer)
detections = roi.get_objects_typed(hailo.HAILO_DETECTION)
action = None
# Parse the detections
for detection in detections:
label = detection.get_label()
bbox = detection.get_bbox()
confidence = detection.get_confidence()
if label == "cell phone":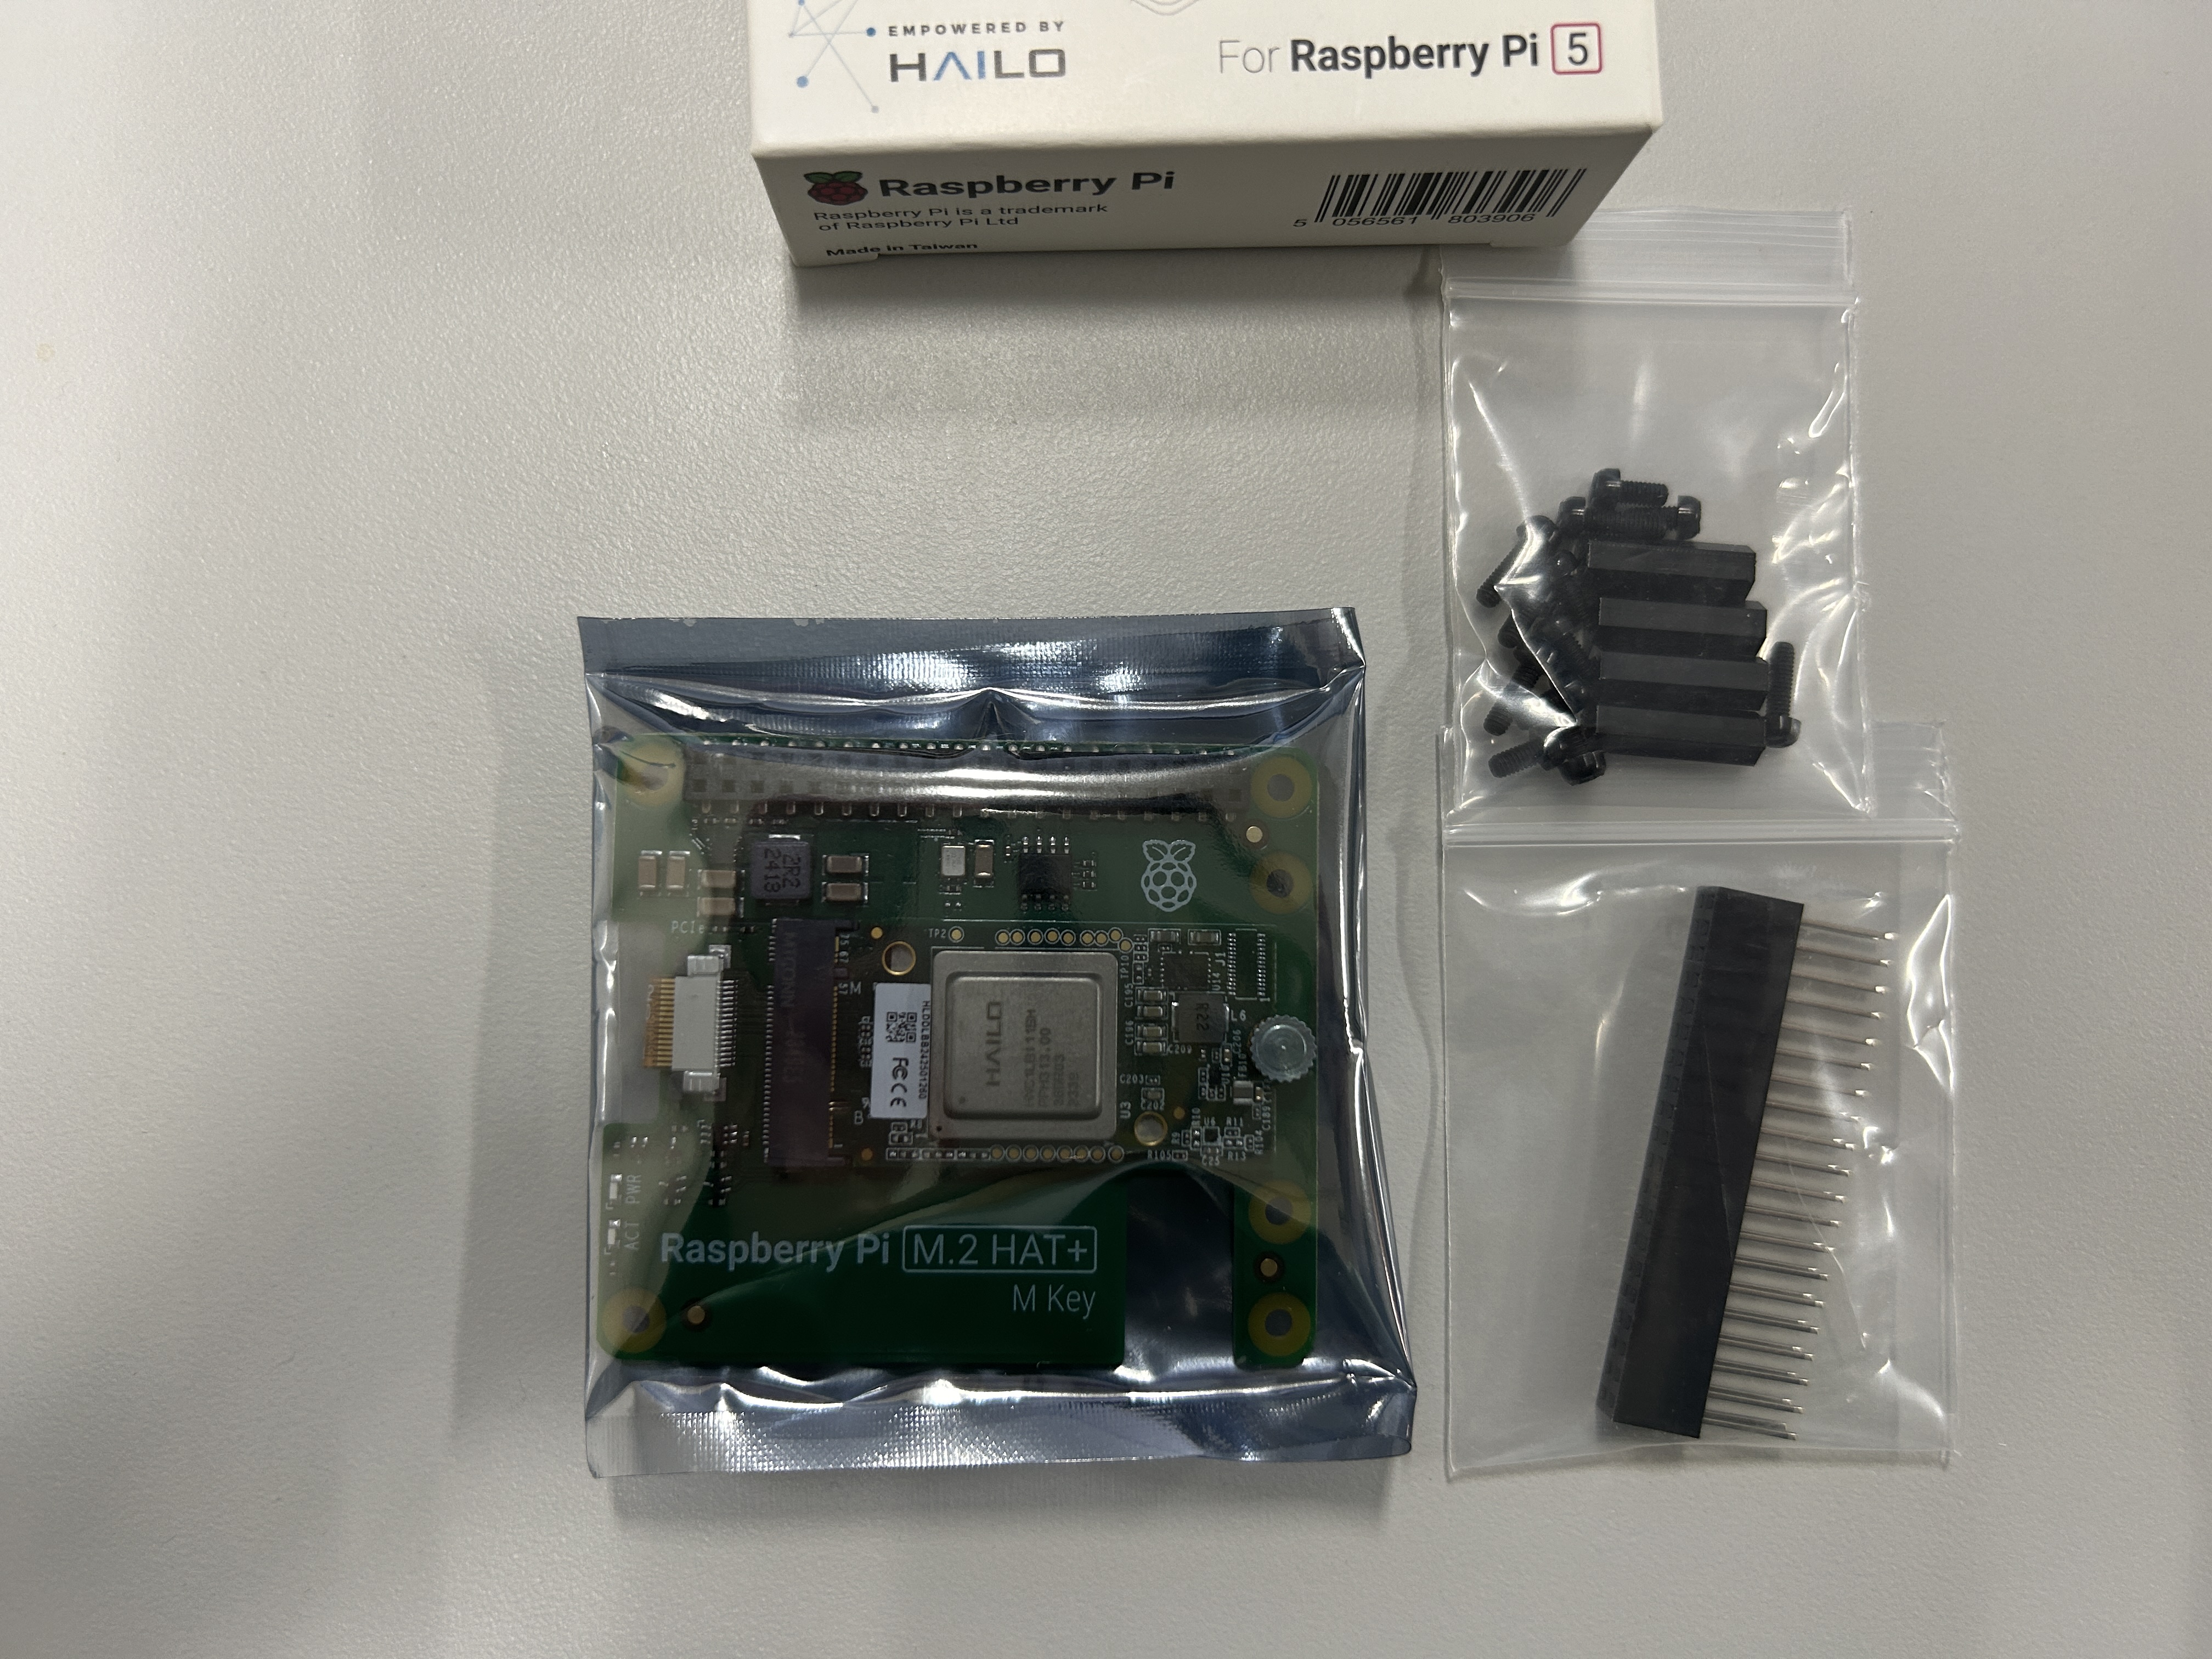
# string_to_print += f"Detection: {label} {confidence:.2f}\n"
detection_count += 1
xmax = bbox.xmax() * width
ymax = bbox.ymax() * width
xmin = bbox.xmin() * height
ymin = bbox.ymin() * height
centerX = int((xmax + xmin) / 2)
centerY = int((ymax + ymin) / 2)
centerX = int(2 * center_img_X - centerX)
user_data.save_center(centerX, centerY)
if centerY < up:
action = 'up'
elif centerY > down:
action = 'down'
elif centerX < left:
action = 'left'
elif centerX > right:
action = 'right'
else: pass
# press the key
if action is not None:
# print(action)
if action == 'up':
uinput.send_events([libevdev.InputEvent(libevdev.EV_KEY.KEY_UP, 1), libevdev.InputEvent(libevdev.EV_SYN.SYN_REPORT, 0)])
time.sleep(0.012)
uinput.send_events([libevdev.InputEvent(libevdev.EV_KEY.KEY_UP, 0), libevdev.InputEvent(libevdev.EV_SYN.SYN_REPORT, 0)])
elif action == 'down':
uinput.send_events([libevdev.InputEvent(libevdev.EV_KEY.KEY_DOWN, 1), libevdev.InputEvent(libevdev.EV_SYN.SYN_REPORT, 0)])
time.sleep(0.012)
uinput.send_events([libevdev.InputEvent(libevdev.EV_KEY.KEY_DOWN, 0), libevdev.InputEvent(libevdev.EV_SYN.SYN_REPORT, 0)])
elif action == 'right':
uinput.send_events([libevdev.InputEvent(libevdev.EV_KEY.KEY_RIGHT, 1), libevdev.InputEvent(libevdev.EV_SYN.SYN_REPORT, 0)])
time.sleep(0.012)
uinput.send_events([libevdev.InputEvent(libevdev.EV_KEY.KEY_RIGHT, 0), libevdev.InputEvent(libevdev.EV_SYN.SYN_REPORT, 0)])
elif action == 'left':
uinput.send_events([libevdev.InputEvent(libevdev.EV_KEY.KEY_LEFT, 1), libevdev.InputEvent(libevdev.EV_SYN.SYN_REPORT, 0)])
time.sleep(0.012)
uinput.send_events([libevdev.InputEvent(libevdev.EV_KEY.KEY_LEFT, 0), libevdev.InputEvent(libevdev.EV_SYN.SYN_REPORT, 0)])
else:
pass
if user_data.use_frame:
# Note: using imshow will not work here, as the callback function is not running in the main thread
# Let's print the detection count to the frame
cv2.putText(frame, f"Detections: {detection_count}", (10, 30), cv2.FONT_HERSHEY_SIMPLEX, 1, (0, 255, 0), 2)
# Example of how to use the new_variable and new_function from the user_data
# Let's print the new_variable and the result of the new_function to the frame
# cv2.putText(frame, f"{user_data.new_function()} {user_data.new_variable}", (10, 60), cv2.FONT_HERSHEY_SIMPLEX, 1, (0, 255, 0), 2)
# Convert the frame to BGR
try:
center_X, center_Y = user_data.return_center()
if center_X is not None and center_Y is not None:
cv2.circle(frame, (center_X, center_Y), 10, (0, 255, 0), -1)
except AttributeError:
pass
cv2.line(frame, (0, up), (width, up), (255, 255, 255), 2) #UP
cv2.line(frame, (0, down), (width, down), (255, 255, 255), 2) #DOWN
cv2.line(frame, (left, up), (left, down), (255, 255, 255), 2) #LEFT
cv2.line(frame, (right, up), (right, down), (255, 255, 255), 2) #RIGHT
frame = cv2.cvtColor(frame, cv2.COLOR_RGB2BGR)
frame_queue.put(frame)
# print(string_to_print)
totalFrames += 1
user_data.save_totalFrames(totalFrames)
return Gst.PadProbeReturn.OK
# -----------------------------------------------------------------------------------------------
# User Gstreamer Application
# -----------------------------------------------------------------------------------------------
# This class inherits from the hailo_rpi_common.GStreamerApp class
class GStreamerDetectionApp(GStreamerApp):
def __init__(self, args, user_data):
# Call the parent class constructor
super().__init__(args, user_data)
# Additional initialization code can be added here
# Set Hailo parameters these parameters should be set based on the model used
self.batch_size = 2
self.network_width = 640
self.network_height = 640
self.network_format = "RGB"
nms_score_threshold = 0.3
nms_iou_threshold = 0.45
# Temporary code: new postprocess will be merged to TAPPAS.
# Check if new postprocess so file exists
new_postprocess_path = os.path.join(self.current_path, './resources/libyolo_hailortpp_post.so')
if os.path.exists(new_postprocess_path):
self.default_postprocess_so = new_postprocess_path
else:
self.default_postprocess_so = os.path.join(self.postprocess_dir, 'libyolo_hailortpp_post.so')
if args.hef_path is not None:
self.hef_path = args.hef_path
# Set the HEF file path based on the network
elif args.network == "yolov6n":
self.hef_path = os.path.join(self.current_path, './resources/yolov6n.hef')
elif args.network == "yolov8s":
self.hef_path = os.path.join(self.current_path, './resources/yolov8s_h8l.hef')
elif args.network == "yolox_s_leaky":
self.hef_path = os.path.join(self.current_path, './resources/yolox_s_leaky_h8l_mz.hef')
else:
assert False, "Invalid network type"
# User-defined label JSON file
if args.labels_json is not None:
self.labels_config = f' config-path={args.labels_json} '
# Temporary code
if not os.path.exists(new_postprocess_path):
print("New postprocess so file is missing. It is required to support custom labels. Check documentation for more information.")
exit(1)
else:
self.labels_config = ''
self.app_callback = app_callback
self.thresholds_str = (
f"nms-score-threshold={nms_score_threshold} "
f"nms-iou-threshold={nms_iou_threshold} "
f"output-format-type=HAILO_FORMAT_TYPE_FLOAT32"
)
# Set the process title
setproctitle.setproctitle("Hailo Detection App")
self.create_pipeline()
def get_pipeline_string(self):
if self.source_type == "rpi":
source_element = (
"libcamerasrc name=src_0 auto-focus-mode=2 ! "
f"video/x-raw, format={self.network_format}, width=1536, height=864 ! "
+ QUEUE("queue_src_scale")
+ "videoscale ! "
f"video/x-raw, format={self.network_format}, width={self.network_width}, height={self.network_height}, framerate=30/1 ! "
)
elif self.source_type == "usb":
source_element = (
f"v4l2src device={self.video_source} name=src_0 ! "
"video/x-raw, width=640, height=480, framerate=30/1 ! "
)
else:
source_element = (
f"filesrc location={self.video_source} name=src_0 ! "
+ QUEUE("queue_dec264")
+ " qtdemux ! h264parse ! avdec_h264 max-threads=2 ! "
" video/x-raw, format=I420 ! "
)
source_element += QUEUE("queue_scale")
source_element += "videoscale n-threads=2 ! "
source_element += QUEUE("queue_src_convert")
source_element += "videoconvert n-threads=3 name=src_convert qos=false ! "
source_element += f"video/x-raw, format={self.network_format}, width={self.network_width}, height={self.network_height}, pixel-aspect-ratio=1/1 ! "
pipeline_string = (
"hailomuxer name=hmux "
+ source_element
+ "tee name=t ! "
+ QUEUE("bypass_queue", max_size_buffers=20)
+ "hmux.sink_0 "
+ "t. ! "
+ QUEUE("queue_hailonet")
+ "videoconvert n-threads=3 ! "
f"hailonet hef-path={self.hef_path} batch-size={self.batch_size} {self.thresholds_str} force-writable=true ! "
+ QUEUE("queue_hailofilter")
+ f"hailofilter so-path={self.default_postprocess_so} {self.labels_config} qos=false ! "
+ QUEUE("queue_hmuc")
+ "hmux.sink_1 "
+ "hmux. ! "
+ QUEUE("queue_hailo_python")
+ QUEUE("queue_user_callback")
+ "identity name=identity_callback ! "
+ QUEUE("queue_hailooverlay")
+ "hailooverlay ! "
+ QUEUE("queue_videoconvert")
+ "videoconvert n-threads=3 qos=false ! "
+ QUEUE("queue_hailo_display")
# + f"fpsdisplaysink video-sink={self.video_sink} name=hailo_display sync={self.sync} text-overlay={self.options_menu.show_fps} signal-fps-measurements=true "
+ f"fakesink "
)
# print(pipeline_string)
return pipeline_string
def make_frame():
user_data = user_app_callback_class()
parser = get_default_parser()
# Add additional arguments here
parser.add_argument(
"--network",
default="yolov8s",
choices=['yolov6n', 'yolov8s', 'yolox_s_leaky'],
help="Which Network to use, default is yolov6n",
)
parser.add_argument(
"--hef-path",
default=None,
help="Path to HEF file",
)
parser.add_argument(
"--labels-json",
default=None,
help="Path to costume labels JSON file",
)
args = parser.parse_args()
user_data.save_totalFrames(frame=0)
app = GStreamerDetectionApp(args, user_data)
app.run()
def gen():
while True:
if not frame_queue.empty():
frame = frame_queue.get()
_, buffer = cv2.imencode('.jpg', frame)
frame = buffer.tobytes()
yield (b'--frame\r\n'
b'Content-Type: image/jpeg\r\n\r\n' + frame + b'\r\n')
# Home Page
@app.route('/')
def index():
return render_template('index.html')
# Video streaming route
@app.route('/video_feed')
def video_feed():
user_data = user_app_callback_class()
threading.Thread(target=make_frame, daemon=True).start()
return Response(gen(), mimetype='multipart/x-mixed-replace; boundary=frame')
if __name__ == "__main__":
app.run(debug=True, threaded=True)
ベースにしたゲームからの変更点は以下の通りです。
- bookworm では display system は Wayland がデフォルトで使用されるようになっており、pyautogui モジュールが使用できません。そのため libevdev モジュールを使用して矢印キーのシミュレートを行っています
Hailo のサンプルコード detection.py からの主な変更点は以下の通りです。
-
GStreamer が Flask とは別のスレッドで動くため、OpenCV で作成したフレームをキューに格納、Flask のアプリケーションを実行しているスレッドでキューの中身の取得を行っています
-
ユーザー独自のコールバッククラス user_app_callback_class の関数 save_center() に bbox の中心座標を保存し、コールバック関数 app_callback() が呼び出されるたびに関数 return_center() から中心座標を呼び出し、点を描画しています
-
毎フレーム物体検出を行い出力すると Web アプリケーション内でのカメラの遅延が発生するため、5フレームに1回のみ物体検出と出力を行っています
このプログラム app.py を仮想環境内で実行し、ブラウザから 127.0.0.1:5000 にアクセスするとゲーム画面に入ります。
ゲームを開始したらスマートフォンを動かしてキャラクターを動かします。

独自モデルのコンパイル
Hailo が用意したモデルに限らず、Keras や PyTorch を使って training したモデルも使用可能になれば便利です。
下記のように学習済みパラメータファイル (.h5, .pt) を Open Neural Network Exchange ファイル (.onnx) に変換し、Hailo Executable Format (.hef) に変換する必要があると思われますが、現段階でコンパイルに成功していません。
コンパイルに成功したらこの章に追記しようと思います。
おわりに
Hailo のモジュールで使用可能なモデルがあれば簡単に物体検出のタスクを行うことができました。
サンプルコードも活用すれば様々なシステムに応用できそうです。
注意点として、物体検出などの処理を行うと Raspberry Pi 5 からの発熱が多くなります。
クーラーや放熱シートなどで放熱対策を行うことをおすすめします。