前書き
サービスには、決済がつきものです。
特にサービスで多いかなと思うのが、月〇〇円などの月額プラン
開発中のWebアプリにその月額プランを実装する必要があったので
今一番熱い決済APIである、Stripeを利用してみたのでまとめます。
おしゃれな公式サイト
https://stripe.com/jp
前準備
Stripeのアカウントが必要なので、取得してダッシュボードが見える段階まで行っておいてください。
ダッシュボードのAPIから、Publishable keyとSecret keyを控えておいてください。
実装
はじめに
Stripeでいう、Subscriptionは「定額課金」になります。
Subscription = Customer + Plan
とあるCustomer(顧客)が毎月千円のPlanに登録すれば
そのCustomerは毎月千円を課金するというSubscriptionが生成されます。
そういう仕組みです。
まず、今回実装した構成を軽く解説します。
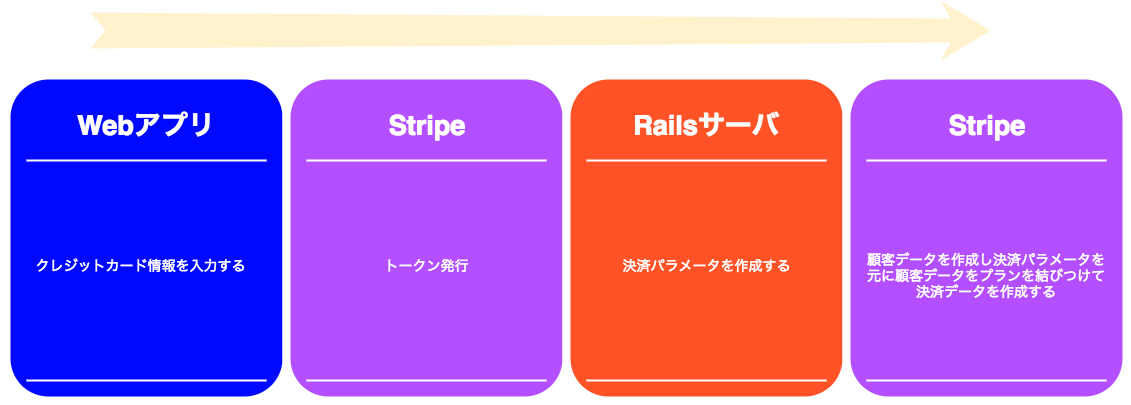
(簡易な画像になってしまいました...)
順に解説していくと
まず、Webアプリ(React)でクレジットカード入力の画面を作成し、ユーザが入力します。
一度Stripeにクレジットカード情報を渡します。
その際にもらったTokenを保持してRailsで作ったStripe用APIを呼び出します。
基本的に、顧客情報やカード情報のI/OはRails側で行います。
Rails側でStripeにTokenと契約するプランを渡すことで
あとはStripeが顧客情報の作成と該当するプランを結びつけてくれ Subscriptionsを作成してくれます。
これで、毎月指定した額の決済が行われるようになります。
少し助長な箇所あるかもしれませんが、実装自体はすごく簡単です!
Stripe
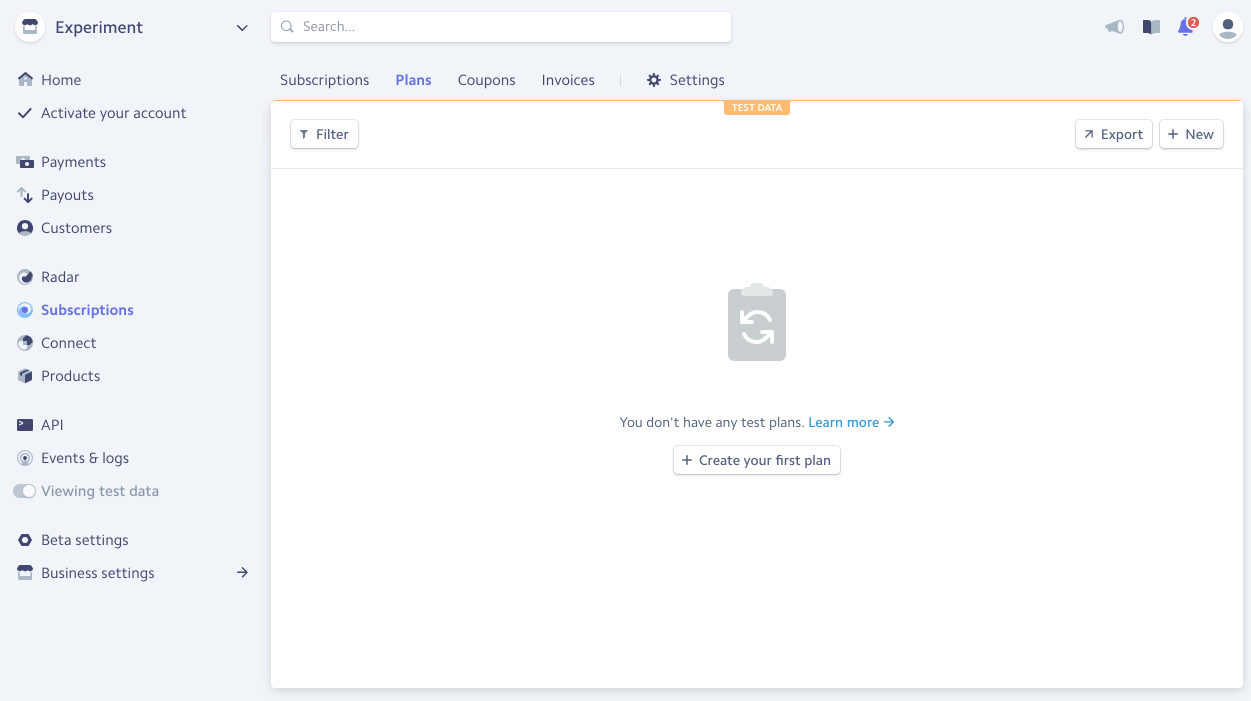
Stripe側にプランを作成します。
ダッシュボードのSubscriptions -> Plansから新規プランを作成します。
作成の際に入力する値を説明すると....
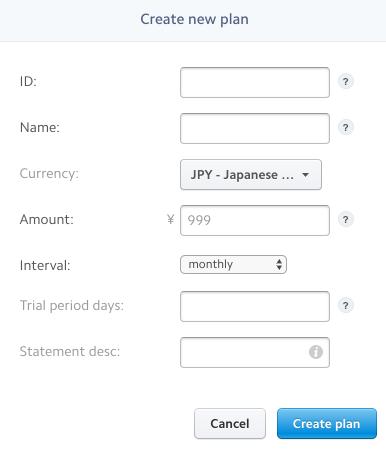
- IDはプランの中で一意の値です。上の図で言うRailsからStripeへ渡す情報になります。
- Nameはプラン名です。スタンダードプランなどがよくあります。
- Currencyはお金の単位です。jpyが日本ですね。
- Amountが値段です。
- Intervalが重要です。毎月なのか毎年なのかを選択します。
- Trial period daysで日を入れると、その日間は課金されません、お試しってやつですね。
- Statement descは請求書に表示される文字です。プラン名を入れるのが普通ですかね
プランを作成すれば、Stripe側の作業は終わりです。(正直作業の50%が終わりました笑)
Rails
Railsサーバ側で、Stripeとのやりとりを作成します。
前準備
今回はSubsctiptionの登録だけなので、コントローラは一つです。
その前に、Stripeを利用するためのgemをインストールします。
gem 'stripe'
インストール後、config/initializersにstripe.rbを作成し、初期化を行います。
# config/initializers/stripe.rb

Rails.configuration.stripe = {
  :publishable_key => ENV['STRIPE_PUBLISHABLE_KEY'],
  :secret_key => ENV['STRIPE_SECRET_KEY'],
  :client_id => ENV['STRIPE_CONNECT_CLIENT_ID'],
}

Stripe.api_key = Rails.configuration.stripe[:secret_key]
client_idは、ダッシュボード内のConnectタブのSettingsに表示されていますが
特に、今回は利用していません。
コントローラの作成
では早速、Stripeのコントローラを作成しAPIを作ります。
# app/controllers/stripe_controller.rb
class StripeController < ApplicationController
  protect_from_forgery with: :null_session

  def index
    # パラメータ取得
    # Stripeのトークン
    token = params[:stripeToken]
    # ユーザ情報(メールアドレスなど一意なもの)
    client = params[:client]
    # 顧客の詳細情報
    detail = params[:detail]
    # 契約するプラン
    plan = params[:plan]

    # 顧客情報の作成
    customer = Stripe::Customer.create(
      :email => client,
      :source => token,
      :description => detail
    )

    # 作成された顧客のIDを取得
    customer_id = customer.id

    # Subsctiptionの作成
    Stripe::Subscription.create(
     customer: customer_id,
     plan: plan
    )

  end
end
ざっくりこんな感じです。
これを呼ぶだけで顧客情報とSubsctiptionを作成できます。
想定としては、最初のサインアップ時にプランを選択する系のサービスです。
(自分の場合は、サインアップ時はStripeとの連携を行わず、有料プランに切り替えた際に初めてStripeと連携するようにしています)
ちなみに...
すでにSubsctiptionを持っている顧客を別のプランに切り替える場合は以下の処理を行います。
# 顧客情報取得
customer = Stripe::Customer.retrieve(CUSTOMER_ID)

# 現在のサブスクリプション取得
subscription = Stripe::Subscription.retrieve(customer.subscriptions.data[0].id)
# 契約中のプランを取得
item_id = subscription.items.data[0].id
# 新しい情報を作成
items =[{
  id: item_id,
  plan: plan_id
  }]
# サブスクリプションの更新
subscription.items = items
subscription.save
顧客IDとプランIDがあればプランが変更できます。
DB更新的な感じで、簡単ですね。
これで、Rails側は完了です。(ここで大体、80%ぐらいです)
他部から呼べるようにRoutesを繋げることをお忘れなく。
React
React側では、クレジットカード情報を入力するフォームを作ります。
前準備
いい感じの画面を作るために、react-stripe-elementsを利用しましたので
インストールします。
# npm
npm install react-stripe-elements
# yarn
yarn add react-stripe-elements
それと、stripeのAPIを利用するためにindex.htmlに以下のタグを挿入します。
<!-- Stripe -->
<script src="https://js.stripe.com/v3/"></script>
次に、index.jsxにreact-stripe-elementsのProviderを記述します。
stripeのAPIがthis.props.stripeで渡ってくるようになります。
// src/index.jsx
import React from 'react';
import {
  render,
} from 'react-dom';

// Polyfill
import 'babel-polyfill';

// Stripe
import {
  StripeProvider
} from 'react-stripe-elements';

// CSS
import 'csspin/csspin.css';
import 'bootstrap/dist/css/bootstrap.min.css';
import 'react-bootstrap-table/dist/react-bootstrap-table-all.min.css';
import 'semantic-ui-css/semantic.min.css';

import injectTapEventPlugin from 'react-tap-event-plugin';

// Redux
import {
  Provider,
} from 'react-redux';
import store from './../store/storeSettings';

// AppRoute
import AppRoute from './../route';

injectTapEventPlugin();


render((
  <Provider
    store={store}
  >
    <StripeProvider apiKey={STRIPE_PUBLISHIBLE_KEY}>
      <AppRoute />
    </StripeProvider>
  </Provider>
), document.getElementById('root'));
STRIPE_PUBLISHIBLE_KEYには、Railsで設定したのと同じものを記述してください。
これで、前準備終わりです。
実際に画面を作っていきましょう
Component作成
まず作成するのは、react-stripe-elementsとElementsというラッピングコンポーネントがあるので
その部分を作成します。
// components/Parent/index.jsx
import React from 'react';

import {
  Elements
} from 'react-stripe-elements';

import Form from './Form';

class Parent extends React.Component {
  render() {
    return (
      <Elements>
        <Form />
      </Elements>
    );
  }
}

export default Parent;
ただ、フォームをラッピングするだけです。(同じクラス内でできるかと思いましたが、エラーが出たのでこの形です)
では、実フォームを作成しましょう。
// components/Parent/Form/index.jsx

import React from 'react';
import axios from 'axios';
import {
  CardElement,
  injectStripe
} from 'react-stripe-elements';

import {
  Button
} from 'semantic-ui-react';

import './scss/index.scss';

const createOptions = () => {
  return {
    style: {
      base: {
        fontSize: '18px',
        color: '#424770',
        letterSpacing: '0.025em',
        fontFamily: 'Source Code Pro, monospace',
        '::placeholder': {
          color: '#aab7c4',
        },
      },
      invalid: {
        color: '#9e2146',
      },
    },
  };
};

class Form extends React.Component {
  constructor(props) {
    super(props);

    this.state = {
      planId: 'sample_plan',
      planName: 'サンプルプラン',
      planAmount: 2000,
      email: "hogehoge@hoge.com"
    };

    this.handleSubmit = this.handleSubmit.bind(this);
  }

  handleSubmit(ev) {
    ev.preventDefault();

    this.props.stripe.createToken({ name: this.state.email }).then(({ token }) => {
    // Railsで作成したAPIのエンドポイント
      axios.post(STRIPE_API,
        {
          stripeToken: token.id,
          client: this.state.email,
          plan: this.state.planId
        }
      );
    });
  }

  render() {
    return (
      <div className="Checkout">
        <form
          className="stripe-form"
          onSubmit={this.handleSubmit}
        >
          <CardElement
            {...createOptions()}
          />
          <Button fluid className="stripe-pay-button">契約する</Button>
        </form>
      </div>
    );
  }
}

// 重要!
export default injectStripe(Form);
.stripe-pay-button {
  white-space: nowrap !important;
  border: 0 !important;
  outline: 0 !important;
  display: inline-block !important;
  height: 40px !important;
  line-height: 40px !important;
  padding: 0 14px !important;
  box-shadow: 0 4px 6px rgba(50, 50, 93, .11), 0 1px 3px rgba(0, 0, 0, .08)  !important;
  color: #fff !important;
  border-radius: 4px !important;
  font-size: 15px !important;
  font-weight: 600 !important;
  text-transform: uppercase !important;
  letter-spacing: 0.025em !important;
  background-color: #6772e5 !important;
  text-decoration: none !important;
  -webkit-transition: all 150ms ease !important;
  transition: all 150ms ease !important;
  margin-top: 10px !important;
}

.stripe-pay-button:hover {
  color: #fff !important;
  cursor: pointer !important;
  background-color: #7795f8 !important;
  transform: translateY(-1px) !important;
  box-shadow: 0 7px 14px rgba(50, 50, 93, .10), 0 3px 6px rgba(0, 0, 0, .08) !important;
}

.stripe-form {
  margin-bottom: 40px;
  padding-bottom: 40px;
  border-bottom: 3px solid #e6ebf1;
}
.StripeElement {
  display: block;
  margin: 10px 0 20px 0;
  max-width: 500px;
  padding: 10px 14px;
  box-shadow: rgba(50, 50, 93, 0.14902) 0px 1px 3px, rgba(0, 0, 0, 0.0196078) 0px 1px 0px;
  border-radius: 4px;
  background: white;
}
.StripeElement--focus {
  box-shadow: rgba(50, 50, 93, 0.109804) 0px 4px 6px, rgba(0, 0, 0, 0.0784314) 0px 1px 3px;
  -webkit-transition: all 150ms ease;
  transition: all 150ms ease;
}
.StripeElement.PaymentRequestButton {
  padding: 0;
}
上のコードで表示されるフォームが以下です。

ボタンはともかく、入力欄がイケてます!
カード番号を入力すれば、カードの種類を表示してくれます。
おしゃれなサイトのAPIを利用するなら、おしゃれな入力欄がいいですね

Stripeのテスト用のクレジットカードは、基本的に「4242 4242 4242 4242」です。
他にも、各カードごとのテスト番号があるので、見ておけばいいと思います。
フォーム部分は、react-stripe-elementsの提供を利用しています。
その入力欄が含まれているフォームのサブミットで
this.props.stripe.createTokenを呼び出せば、nameと一緒にカード情報が送信されます。
以下の部分になります。
  handleSubmit(ev) {
    ev.preventDefault();

    this.props.stripe.createToken({ name: this.state.email }).then(({ token }) => {
    // Railsで作成したAPIのエンドポイント
      axios.post(STRIPE_API,
        {
          stripeToken: token.id,
          client: this.state.email,
          plan: this.state.planId
        }
      ).then(() => {
        console.log("Success!!");
      });
    });
  }
大まかな実装は以上になります。
これで、クレジットカードを入力して、契約するを押すだけで
Subscriptionが作られます。
実装は以上です!
ダッシュボードを見てみると、Payments、Subscription、Customerが増えていて、指定した金額の課金が行われていることが確認できます。
後書き
サービスにおいて、決済は結構重要な部分ですが
Stripeを使うことで、そう言う重要部分を簡単にかついい感じに決済が実装できます。
また次回で、Stripeのダッシュボード部を解説していこうと思います。