さっそく問題を解いてみましょう
本日取り込む問題は「Introductory Networking created by MuirlandOracle<---GOD!」です。
Introductory Networking
An introduction to networking theory and basic networking tools
(ネットワーキング理論および基本的なネットワーキングツール入門)
このRoomには以下の9つのTaskがあります。それぞれに数問の問題があり問題に対する答えをテキストボックスに入力してCompletedボタンをクリックして回答します。
- [Task 1 Introduction]
- [Task 2 The OSI Model: An Overview]
- [Task 3 Encapsulation]
- [Task 4 The TCP/IP Model ]
- [Task 5 Networking Tools Ping]
- [Task 6 Networking Tools Traceroute]
- [Task 7 Networking Tools WHOIS]
- [Task 8 Networking Tools Dig]
- [Task 9 Further Reading]
今回のRoomの概要は以下のとおりです。
導入:Task1
理論解説:Task2,3,4
ツール紹介および演習:Task5,6,7,8
結論:Task9
まず導入と結論から見ていきましょう
導入
導入部分ではこのRoomで習得できる知識や技術についての概要を解説しています。
このroomでは以下のトピックについて扱っています。
- OSI参照モデル
- TCP/IPモデル
- これらのモデルが実際にはどのように見えるのか
- 基本的なネットワーキングのツールの紹介
[Task 1 Introduction]
Task1はテキストボックスに記入する問題がありません。文章を読んでCompletedボタンをクリックして回答します。
結論
結論部分はたいてい文章を読んで回答をクリックする形式なので侮り(あなどり)がちですがここもしっかり読んで作問者の思いを感じ取るのも大人の楽しみ方と言えます。
[Task 9 Further Reading]
Task9も文章を読んでCompletedボタンをクリックして回答します。
Networking is one of those things that you just need to learn. We've covered the very basics, but it would be a very good idea to continue to learn by yourself.
(ネットワーキングはあなたが必ず学ぶべき知識のうちの一つです。ここではほんの基礎を取り上げましたがぜひご自身で継続して学んでください。)
継続して学ぶことは大事なんですね。
In terms of further information, feel free to reach out in the TryHackMe Discord if you want any help with the contents of this room.
(このRoomの内容についてより多くの情報が必要な場合はぜひTryHackMe Discordにアクセスしてください。)
画面右上より少し下の緑色のHelpボタンをクリックすると「Ask Community」ボタンが表示されるのでそれをクリックするとDiscordにつながりますので必要に応じて活用してみてください。

Additionally, if you want to expand your knowledge of networking theory, the CISCO Self Study Guide by Steve McQuerry is a great resource to work from. There may be a more up to date version available; however, this edition is cheap, readily available, and most importantly, still very relevant. Whilst it is designed to as a study guide for the CCNA exam, that book serves equally well as a very rounded introduction to networking principles.
(ネットワーキング理論についてもっと詳しい知識を得たいなら「Interconnecting Cisco Network Devices, Part 1 (ICND1): CCNA Exam 640-802 and ICND1 Exam 640-822」がおすすめです。これは古いバージョンですが今でも十分価値がある内容であり、しかも値段がお得です。CCNA試験勉強のための内容ですが、ネットワーキングの原理について総合的入門書としても同様にすぐれています。)
入手できる方は挑戦してみてもいいかも。
理論解説
以下の理論について概要を学びます。
- [Task 2 The OSI Model: An Overview]
- [Task 3 Encapsulation]
- [Task 4 The TCP/IP Model ]
[Task 2 The OSI Model: An Overview]
The OSI (Open Systems Interconnection) Model is a standardised model which we use to demonstrate the theory behind computer networking.
(OSI(Open Systems Interconnection)参照モデルはコンピューターネットワーキングの背後にある理論を表現するのに使う標準化モデルです。)
OSI参照モデルは以下の7つのレイヤーで構成されています。

[図]抜粋:Introductory Networking
それぞれのレイヤーの説明は以下を参照しながら読んでみてください。
OSI参照モデル
OSI参照モデルとは?TCP/IPとの違いを図解で解説/OSI参照モデルとTCP/IPの違いを比較
問題を解くにあたり「Which layer ...」という問題はレイヤー番号で回答します。
「[Research]...」という問題はroom内には記載されていないのでインターネットなどを使って調べます。
[Task 3 Encapsulation]
Task3ではデータ伝送時のカプセル化について解説されています。
The processes of encapsulation and de-encapsulation are very important -- not least because of their practical use, but also because they give us a standardised method for sending data. This means that all transmissions will consistently follow the same methodology, allowing any network enabled device to send a request to any other reachable device and be sure that it will be understood -- regardless of whether they are from the same manufacturer; use the same operating system; or any other factors.
(カプセル化と非カプセル化は実用的であるばかりでなく、データ伝送時のガイドラインを提供しているという点でも非常に重要なプロセスです。製造業者が一致するか、OSが一致するかなどもろもろの要因とは無関係に、あらゆるデータ伝送は一貫して同一の方法に従うことで、あるネットワーク対応機器がネットワークに接続された他の機器にリクエストを送り正しく解釈されるということを意味しているのです。)
以下はTaskで使用されているカプセル化の図です。こちらを参考にして問題に回答します。

[図]抜粋:Introductory Networking
また以下の図と解説もわかりやすいので参考にしてください。

[図]抜粋:OSI参照モデルとは?TCP/IPとの違いを図解で解説/データのカプセル化(アイティーエム株式会社 (ITM Inc.))
以下はTryHackMe内でたまに見かける回答を選ぶ時の選択肢です。
Aye = Yes
Nay = No
参考:nayの意味 - 小学館 プログレッシブ英和中辞典
以上を踏まえて[Task 3 Encapsulation]に挑戦してみましょう。
[Task 4 The TCP/IP Model]
Task4ではTCP/IPモデルについて解説されています。
TCP/IPモデルは以下の4つのレイヤーで構成されています。(表の右側部分)
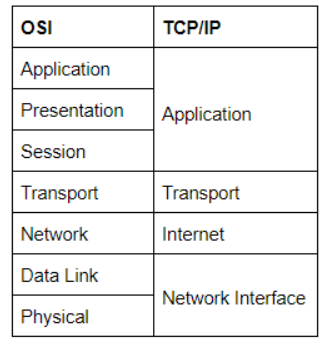
[図]抜粋:Introductory Networking
4つのレイヤーについては最近は5つのレイヤーと表現されている場合もあるそうですが公式ではないようです。
Note: Some recent sources split the TCP/IP model into five layers -- breaking the Network Interface layer into Data Link and Physical layers (as with the OSI model). This is accepted and well-known; however, it is not officially defined.
As mentioned earlier, TCP is a connection-based protocol. In other words, before you send any data via TCP, you must first form a stable connection between the two computers. The process of forming this connection is called the three-way handshake.
(TCPはコネクションベースのプロトコルです。TCPを用いてデータ伝送する場合データを送る前にまず2者間でコネクションを確立しなければなりません。このプロセスは3ウェイハンドシェイクと呼ばれます。)
3ウェイハンドシェイクについてはこちらを参考にしてください。
「スリーウェイハンドシェイク」の手順、わかっていますか?/TCPコネクションの確立(ASCII)
また以下の解説もわかりやすいので参考にしてください。
TCP/IPプロトコル通信のネットワークアーキテクチャを図解で解説
以上を踏まえて[Task 4 The TCP/IP Model]に挑戦してみましょう。
ツール紹介および演習
以下のツールについての機能を学び演習をする問題です。
- [Task 5 Networking Tools Ping]
- [Task 6 Networking Tools Traceroute]
- [Task 7 Networking Tools WHOIS]
- [Task 8 Networking Tools Dig]
ツールの演習は楽しい方のTaskなのでぜひワクワクしながら取り組みましょう。
以降はLinuxを使っての演習になります。
もしもLinux環境がない場合は画面の右上より少し下のStart AttackBoxボタンをクリックしてブラウザーで利用できるLinux環境(Web-based Kali Machine)を起動して演習を進めてください。

[Task 5 Networking Tools Ping]
The ping command is used when we want to test whether a connection to a remote resource is possible. Usually this will be a website on the internet, but it could also be for a computer on your home network if you want to check if it's configured correctly.
(pingコマンドはサーバー(インターネットのウェブサイトなど)や自宅のPC含めたリモート機器への接続テストのために利用されます。)
Ping works using the ICMP protocol, which is one of the slightly less well-known TCP/IP protocols that were mentioned earlier. The ICMP protocol works on the Network layer of the OSI Model, and thus the Internet layer of the TCP/IP model.
(pingコマンドはICMPプロトコルを利用します。ICMPプロトコルはOSI参照モデルのネットワークレイヤー/TCP/IPモデルのインターネットレイヤーで動作します。)
以下の図と解説がわかりやすいので参考にしてください。

[図]抜粋:OSI参照モデルとは?TCP/IPとの違いを図解で解説/OSI参照モデルとTCP/IPの違いを比較-OSI参照モデルとTCP/IPの関係図(アイティーエム株式会社 (ITM Inc.))
One of the big advantages of ping is that it's pretty much ubiquitous to any network enabled device. All operating systems support it out of the box, and even most embedded devices can use ping!
(pingは多くのOSや組込み機器でサポートされているのが大きな利点です。)
pingはping <target>のように使用します。
pingのコマンドオプションは以下のコマンドラインで調べられます。
└─$ ping -h
Usage
  ping [options] <destination>
Options:
  <destination>      dns name or ip address
(以下省略)
実際にコマンドを使って接続テストしてみましょう。以下ではgoogle.comに接続できるかのテストを1回だけしています。(-cは指定回数の応答を受信後終了するオプション)
└─$ ping -c 1 google.com
PING google.com (142.250.196.142) 56(84) bytes of data.
64 bytes from nrt12s36-in-f14.1e100.net (142.250.196.142): icmp_seq=1 ttl=116 time=10.9 ms
--- google.com ping statistics ---
1 packets transmitted, 1 received, 0% packet loss, time 0ms
rtt min/avg/max/mdev = 10.887/10.887/10.887/0.000 ms
pingの結果google.comに接続できることが確認できました。またウェブサイトをホスティングしているサーバーのIPアドレス(142.250.196.142)が一緒に返ってきています。
以上を踏まえて[Task 5 Networking Tools Ping]に挑戦してみましょう。
[Task 6 Networking Tools Traceroute]
tracerouteコマンドを使うとリクエストがターゲットマシンに至るまでのルート情報を調べることができます。
The internet is made up of many, many different servers and end-points, all networked up to each other. This means that, in order to get to the content you actually want, you first need to go through a bunch of other servers.
(インターネット上には非常に多くのサーバーやエンドポイントがありそれぞれがつながっていて欲しいコンテンツを得るまでに非常に多くのサーバーを経由する必要があります。)
Traceroute allows you to see each of these connections -- it allows you to see every intermediate step between your computer and the resource that you requested.
(tracerouteコマンドを使うと対象サーバーまでに経由するそれぞれの接続情報を調べることができます。)
tracerouteはtraceroute <target>のように使用します。
tracerouteのコマンドオプションは以下のコマンドラインで調べられます。
└─$ traceroute --help
Usage:
  traceroute [ -46dFITnreAUDV ] [ -f first_ttl ] [ -g gate,... ] [ -i device ] [ -m max_ttl ] [ -N squeries ] [ -p port ] [ -t tos ] [ -l flow_label ] [ -w MAX,HERE,NEAR ] [ -q nqueries ] [ -s src_addr ] [ -z sendwait ] [ --fwmark=num ] host [ packetlen ]
Options:
(以下省略)
実際にコマンドを使って接続テストしてみましょう。以下ではgoogle.comまでのルート情報を調べてみます。
└─$ traceroute google.com
traceroute to google.com (142.250.207.46), 30 hops max, 60 byte packets
 1  10.0.2.2 (10.0.2.2)  0.921 ms  1.068 ms  0.404 ms
 2  * * *
 3  * * *
 4  * * *
 5  * * *
(以下30まであり省略)
私の環境ではうまく結果が返ってこなかったのでTaskの画像を参考に貼っておきます。

[図]抜粋:Introductory Networking
[Lateral Thinking]問題のヒントはこれで。
Traceroute works on which layer?
以上を踏まえて[Task 6 Networking Tools Traceroute]に挑戦してみましょう。
[Task 7 Networking Tools WHOIS]
Domain Names -- the unsung saviours of the internet.
(ドメイン名 -- インターネットの縁の下の力持ち)
「the unsung saviours」ってなんだか格好いいワードですね。
We'll talk a little bit more about how this works in the next task, but for now suffice to know that a domain translates into an IP address so that we don't need to remember it (e.g. you can type tryhackme.com, rather than the TryHackMe IP address). Domains are leased out by companies called Domain Registrars. If you want a domain, you go and register with a registrar, then lease the domain for a certain length of time.
(ドメインはIPアドレスに変換されるのでいちいち覚えておく必要はありません。ドメインは「レジストラ」から一定期間リースします。)
Whoisを使ってみましょう。気軽に試すにはウェブで提供されているサービスを利用します。
google.comで検索してみます。
Whois Domain Lookup

google.comのドメインに関する様々な情報が返ってきます。

他にもbbc.co.ukやnhk.co.jpなど国(レジストラ)が変わると返ってくる内容も変わったりするのでいろいろ試してみてください。
コマンドの場合はwhois <target>のように使用します。
whoisのコマンドオプションは以下のコマンドラインで調べられます。
└─$ whois --help
Usage: whois [OPTION]... OBJECT...

-h HOST, --host HOST   connect to server HOST
-p PORT, --port PORT   connect to PORT
-I                     query whois.iana.org and follow its referral
-H                     hide legal disclaimers
      --verbose        explain what is being done
      --no-recursion   disable recursion from registry to registrar servers
      --help           display this help and exit
      --version        output version information and exit

(以下省略)
実際にコマンドを使ってDNS(ネームサーバー)情報を取得してみましょう。以下ではgoogle.comについて問い合わせています。
└─$ whois google.com
   Domain Name: GOOGLE.COM
   Registry Domain ID: 2138514_DOMAIN_COM-VRSN
   Registrar WHOIS Server: whois.markmonitor.com
   Registrar URL: http://www.markmonitor.com
   Updated Date: 2019-09-09T15:39:04Z
   Creation Date: 1997-09-15T04:00:00Z
   Registry Expiry Date: 2028-09-14T04:00:00Z
   Registrar: MarkMonitor Inc.
   Registrar IANA ID: 292
(以下省略)
[OSINT] 問題のヒントは「(一つ上の問題で答えた内容) the golf course microsoft」で検索してみるです。
以上を踏まえて[Task 7 Networking Tools WHOIS]に挑戦してみましょう。
[Task 8 Networking Tools Dig]
We talked about domains in the previous task -- now lets talk about how they work.
Ever wondered how a URL gets converted into an IP address that your computer can understand? The answer is a TCP/IP protocol called DNS (Domain Name System).
(ではドメインはどのような仕組みになっているのでしょう。どのようにURLがIPアドレスに変換されるのでしょうか。その答えはDNSと呼ばれるTCP/IPプロトコルにあります。)
名前解決の仕組みはTaskの解説を読んでもらうとして、以下の図がわかりやすいのでご紹介します。
1つ目はJPRSの用語辞典に掲載されている図です。スタブリゾルバーなどの用語とともに名前解決の仕組みの概要を理解することができます。
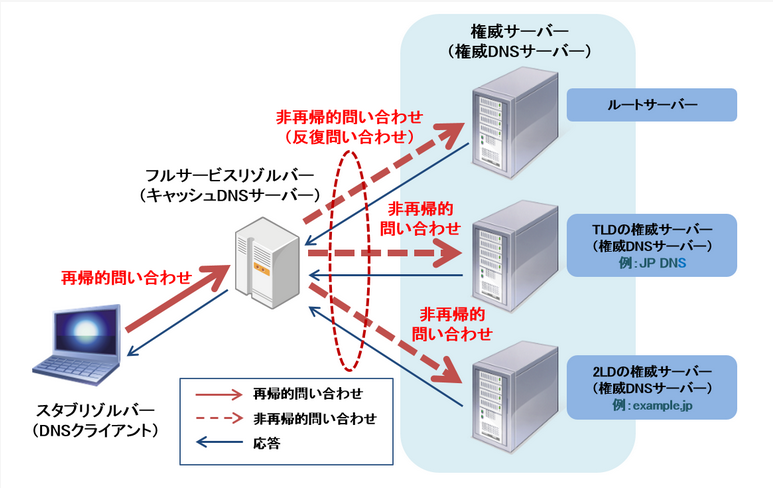
[図]抜粋:用語辞典/問い合わせ(株式会社日本レジストリサービス(JPRS))
2つ目はLinux道場ネットワーク編(LPI-Japan)に掲載されている図です。ブラウザに入力されたURLが名前解決されるまでの仕組みをより詳しく解説した図になります。

[図]抜粋:DNSを利用した名前解決の仕組み/DNSを利用した名前解決の仕組み(Linux技術者認定機関 LPI-Japan)
資料では、「SECCON 2014 長野大会 DNS Security Challenge」も非常にわかりやすかったのでこちらもご紹介します。ビギナー向けです。digコマンドの使い方の例や「キャッシュDNSサーバーは再帰問い合わせを受信し、非再帰問い合わせを再帰的に実行する」などビギナーが分かりづらい用語類を解説してくれています。
30分で学ぶDNSの基礎の基礎 ~DNSをこれから勉強する人のために~
再帰的とは見つかるまで探し続ける状態で、非再帰的とは自分が知っている情報だけ返す状態とざっくり理解しましょう。
参考:「再帰問い合わせ」と「非再帰問い合わせ」の違いを教えてください
「初学者が特にはまりやすいポイント」はなるほどです。(「使われている名称の例」P.13など)
今まさにこのTaskで使われている用語もさまざまです。a recursive DNS serverはキャッシュDNSサーバーのことだと思われます。ROOT~TL~SLDを再帰的に検索するからそう呼ぶのかな?
さてここでやっとdigコマンドについての解説になります。
When you visit a website in your web browser this all happens automatically, but we can also do it manually with a tool called dig . Like ping and traceroute, dig should be installed automatically on Linux systems.
(ブラウザーは自動で名前解決をしてくれますがpingやtracerouteのようにLinuxに標準で搭載されているdigと呼ばれるツールを使うと手動でこれを行うことができます。)
digコマンドはdig <domain> @<dns-server-ip>のように使用します。
digのコマンドオプションは以下のコマンドラインで調べられます。
└─$ dig -h
Usage:  dig [@global-server] [domain] [q-type] [q-class] {q-opt}
            {global-d-opt} host [@local-server] {local-d-opt}
            [ host [@local-server] {local-d-opt} [...]]
Where:  domain    is in the Domain Name System
        q-class  is one of (in,hs,ch,...) [default: in]
        q-type   is one of (a,any,mx,ns,soa,hinfo,axfr,txt,...) [default:a]
                 (Use ixfr=version for type ixfr)
        q-opt    is one of:
                 -4                  (use IPv4 query transport only)
                 -6                  (use IPv6 query transport only)
                 -b address[#port]   (bind to source address/port)
(以下省略)
以下の例ではIPアドレスが1.1.1.1のDNSサーバーにドメイン名google.comのIPアドレス情報を要求しています。
└─$ dig google.com @1.1.1.1
; <<>> DiG 9.18.7-1-Debian <<>> google.com @1.1.1.1
;; global options: +cmd
;; Got answer:
;; ->>HEADER<<- opcode: QUERY, status: NOERROR, id: 2128
;; flags: qr rd ra; QUERY: 1, ANSWER: 1, AUTHORITY: 0, ADDITIONAL: 1

;; OPT PSEUDOSECTION:
; EDNS: version: 0, flags:; udp: 1232
;; QUESTION SECTION:
;google.com.                    IN      A

;; ANSWER SECTION:
google.com.             193     IN      A       142.250.196.110

;; Query time: 12 msec
;; SERVER: 1.1.1.1#53(1.1.1.1) (UDP)
;; WHEN: Fri Dec 16 17:49:06 JST 2022
;; MSG SIZE  rcvd: 55
以上を踏まえて[Task 8 Networking Tools Dig]に挑戦してみましょう。
最後に
今回のroomは内容が盛り沢山で予想以上に記事まとめに時間がかかったのと文章量が多くなってしまいました。今後も解説の翻訳も含め過不足な点を手直ししていこうと思います。
ビギナーがネットワークの学習をする場合、文章だと用語が難しかったり呼び名が統一されていなかったりしてなかなか敷居が高いと感じます。私は図や表を見たりツールを使って実際に情報を取得してみる方が理解できます。今回ご紹介したようなよくまとめられた図表を見つけるとうれしくなってしまいます。
自分のお気に入りの方法で楽しくネットワークの学習を続けましょう。
最後まで読んでいただきありがとうございました。
この連載があなたのサイバーセキュリティ学習のお役に立てれば幸いです。