やること
ビジュアルプログラミングツールNoodlから、LINEにメッセージを送信したかったので調べてみました。
結果として、RESTノードを使えば手間なく実装できることがわかりました。
LINE Notifyについてはアクセストークンの取得以外は説明しません。LINE Notifyを初めて使われる方は下記の記事などを参考として確認してください。
- @youtoyさんの記事
- Qiitaの記事:LINE Notifyタグ
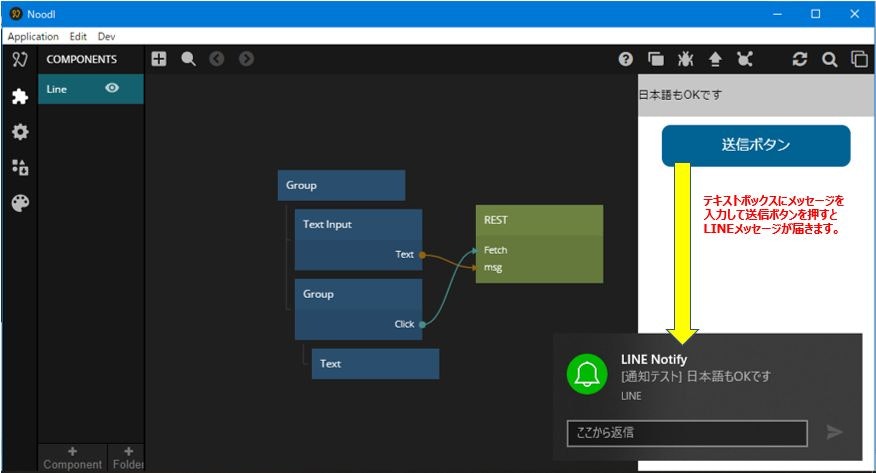
今回の成果物
下記のNoodlのサンプルでは送信ボタンを押すとTextInputの内容をLINEに送信します。
事前準備(LINE Notify)
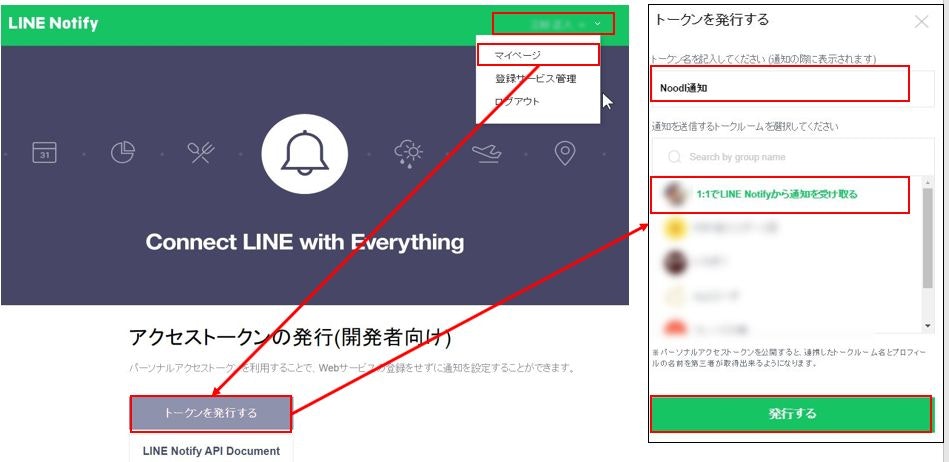
下記手順でLINE Notifyのアクセストークンを取得しておきます。
- LINE Notifyにアクセスし、自身のLINE IDでログインをします。
- 右上のLINE ID名をクリックしてマイページに移動します。
- アクセストークンの発行(開発者向け)でトークンを発行するを選択します。
- トークン名:任意(通知時に発信元として表示されます)
- 送信するトークルームを選択:1:1でLINE Notifyから通知を受け取るを選択します。
- 発行するを選択します。
- これでサービスが連携し、アクセストークンが発行される。
発行されたアクセストークンをメモしておいてください。
Noodlの設定
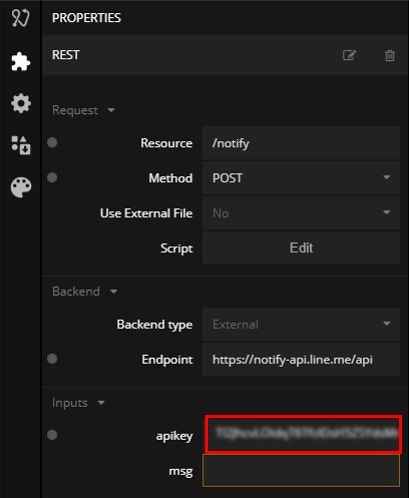
RESTノードの設定
Resource: /api/notify
Method: POST
Endpoint: https://notify-api.line.me
RESTノードのScriptを記述
REST-Script
define({
	// The input ports of the REST node, name of input and type
	inputs:{
	    //ExampleInput:'number',
	    apikey:'string',
	    msg:'string'
	},

	outputs:{
	},

	request:function(inputs,request) {
	    request.headers={"Authorization":'Bearer '+inputs.apikey};
	    request.parameters.message=inputs.msg;
	},

	response:function(outputs,response) {
	}
})
### Nodeの接続とAPIキーの設定
RESTノードに送信ボタンのシグナルと、テキストインプットのテキストを接続します
- 送信ボタンGrouup:ClickをREST:Fetchに接続します
- TextInput:TextをREST:msgに接続します
アクセストークンの設定
LINE Notifyで発行したアクセストークンをREST:Inputsにあるapikeyに記入します。
完成!
NoodlのRESTノードを使うことで、LINEへのメッセージ送信を簡単に実装することができました。
ちなみにステッカーや画像も送付することができました。
ステッカーや画像を送信する例
define({
	// The input ports of the REST node, name of input and type
	inputs:{
	    //ExampleInput:'number',
	    apikey:'string',
	    msg:'string',
	    img:'string'
	},

	outputs:{
	},

	request:function(inputs,request) {
	    request.headers={"Authorization":'Bearer '+inputs.apikey};
	    request.parameters.message=inputs.msg;
	    //ステッカーを送信する場合
	    request.parameters.stickerPackageId=1;
	    request.parameters.stickerId=403;
	    //画像を送信する場合
	    request.parameters.imageThumbnail=inputs.img;//サムネール画像は最大240x240
	    request.parameters.imageFullsize=inputs.img;//メイン画像は最大1024x1024
	},

	response:function(outputs,response) {
	}
})
使用できるステッカーの一覧はこちらを確認してください。
画像の場合はimgのところに表示したい画像のURLを記載してください。
例えばhttps://s3-ap-northeast-1.amazonaws.com/qiita-tag-image/41b89d5d2067df05ce0e71d60deb4fe6ffdd1add/large.jpg?1565416440
とした場合、下記が送信されます。