概要
Swiftで文字列の輪郭に線をつける という記事を書いたんだけど、仕上がりに納得がいかなかったので別のアプローチで実現してみた。
ブログから転記
ゴール
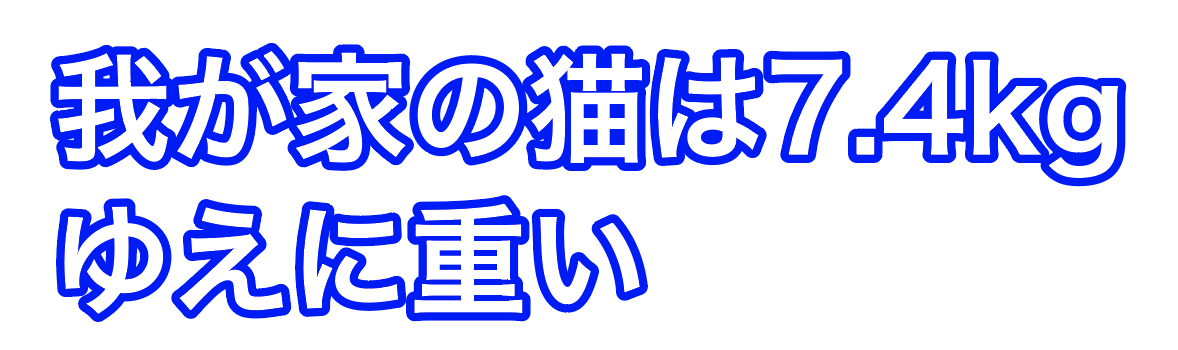
Illustratorのアピアランス機能で作って画像化したものと近い感じにする。
問題点
-
NSAttributedStringのattributesで直接線をつけていたため、線の太さに応じて塗りの範囲が狭くなってしまった - 文字が角ばり、丸くできない
実現方法
文字を UIBezierPath に変換して描画するようにした。
実装は 【iOS】テキストの輪郭パスを取得する を参考にさせていただき、Swiftに書き直した。
あわせて TextOutlineShapeView というカスタムViewを作って、その中で描画するようにした。
構造としては文字列を UIBezierPath に変換して、そのPathをセットした CAShapeLayer を3つ重ねて、それぞれ「塗り」「線」「影」の設定を適用した。
TextOutlineShapeView の実装は以下の通り。
import UIKit

class TextOutlineShapeView: UIView {
    struct TextOptions {
        let text: String
        let font: UIFont
        let lineSpacing: CGFloat
        let textAlignment: NSTextAlignment
    }

    struct ShapeOptions {
        let lineJoin: CAShapeLayerLineJoin
        let fillColor: CGColor
        let strokeColor: CGColor
        let lineWidth: CGFloat
        let shadowColor: CGColor
        let shadowOffset: CGSize
        let shadowRadius: CGFloat
        let shadowOpacity: Float
    }

    private var textOptions: TextOptions?
    private var shapeOptions: ShapeOptions?

    init(textOptions: TextOptions, shapeOptions: ShapeOptions) {
        self.textOptions = textOptions
        self.shapeOptions = shapeOptions
        super.init(frame: .zero)
        configure()
    }

    override init(frame: CGRect) {
        super.init(frame: frame)
    }

    required init?(coder aDecoder: NSCoder) {
        super.init(coder: aDecoder)
    }
}

extension TextOutlineShapeView {
    private func configure() {
        guard let textOptions = self.textOptions,
            let shapeOptions = self.shapeOptions else {
                return
        }
        let textArray = textOptions.text.components(separatedBy: "\n")
        let attibutes: [NSAttributedString.Key: Any] = [.font: textOptions.font]
        let attibutedStrings = textArray.map { text -> NSAttributedString in
            return NSAttributedString(string: text, attributes: attibutes)
        }
        guard let bezier = makePathfromText(attibutedStrings: attibutedStrings, lineSpacing: textOptions.lineSpacing, textAlignment: textOptions.textAlignment) else { return }
        bezier.flip(direction: .y)

        let shadowLayer = CAShapeLayer()
        shadowLayer.lineJoin = shapeOptions.lineJoin
        shadowLayer.frame = self.bounds
        shadowLayer.shadowPath = bezier.cgPath
        shadowLayer.shadowColor = shapeOptions.shadowColor
        shadowLayer.shadowOffset = shapeOptions.shadowOffset
        shadowLayer.shadowRadius = shapeOptions.shadowRadius
        shadowLayer.shadowOpacity = shapeOptions.shadowOpacity
        self.layer.addSublayer(shadowLayer)

        let strokeLayer = CAShapeLayer()
        strokeLayer.lineJoin = shapeOptions.lineJoin
        strokeLayer.frame = self.bounds
        strokeLayer.strokeColor = shapeOptions.strokeColor
        strokeLayer.lineWidth = shapeOptions.lineWidth
        strokeLayer.path = bezier.cgPath
        self.layer.addSublayer(strokeLayer)

        let fillLayer = CAShapeLayer()
        fillLayer.lineJoin = shapeOptions.lineJoin
        fillLayer.frame = self.bounds
        fillLayer.fillColor = shapeOptions.fillColor
        fillLayer.path = bezier.cgPath
        self.layer.addSublayer(fillLayer)
    }

    private func makePathfromText(attibutedStrings: [NSAttributedString], lineSpacing: CGFloat, textAlignment: NSTextAlignment) -> UIBezierPath? {
        let path = UIBezierPath()
        path.move(to: .zero)

        var maxWidth: CGFloat = 0
        for attibutedString in attibutedStrings {
            let line = CTLineCreateWithAttributedString(attibutedString)
            let rect = CTLineGetBoundsWithOptions(line, .useGlyphPathBounds)
            let width = rect.width

            if maxWidth < width {
                maxWidth = width
            }
        }

        for (i, attibutedString) in attibutedStrings.reversed().enumerated() {
            let letters = CGMutablePath()

            let line = CTLineCreateWithAttributedString(attibutedString)
            let rect = CTLineGetBoundsWithOptions(line, .useGlyphPathBounds)
            let width = rect.width

            var margin: CGFloat = 0
            switch textAlignment {
            case .center:
                margin = (maxWidth - width) / 2
            case .right:
                margin = maxWidth - width
            default:
                break
            }

            let runArray: [CTRun] = cfArraytoArray(sourceArray: CTLineGetGlyphRuns(line))
            for run in runArray {
                let fontPointer = CFDictionaryGetValue(CTRunGetAttributes(run), Unmanaged.passUnretained(kCTFontAttributeName).toOpaque())
                let runFont = unsafeBitCast(fontPointer, to: CTFont.self)

                for index in 0..<CTRunGetGlyphCount(run) {
                    let thisGlyphRange = CFRange(location: index, length: 1)
                    var glyph = CGGlyph()
                    var position = CGPoint()
                    CTRunGetGlyphs(run, thisGlyphRange, &glyph)
                    CTRunGetPositions(run, thisGlyphRange, &position)

                    guard let letter = CTFontCreatePathForGlyph(runFont, glyph, nil) else { continue }
                    let px = position.x + margin
                    let py = position.y + path.bounds.height + ((i == 0) ? 0 : lineSpacing)
                    let t = CGAffineTransform(translationX: px, y: py)
                    letters.addPath(letter, transform: t)
                }
            }

            path.append(UIBezierPath(cgPath: letters))
        }

        return path
    }

    private func cfArraytoArray<T>(sourceArray: CFArray) -> [T] {
        var destinationArray = [T]()
        let count = CFArrayGetCount(sourceArray)
        destinationArray.reserveCapacity(count)
        for index in 0..<count {
            let untypedValue = CFArrayGetValueAtIndex(sourceArray, index)
            let value = unsafeBitCast(untypedValue, to: T.self)
            destinationArray.append(value)
        }
        return destinationArray
    }
}
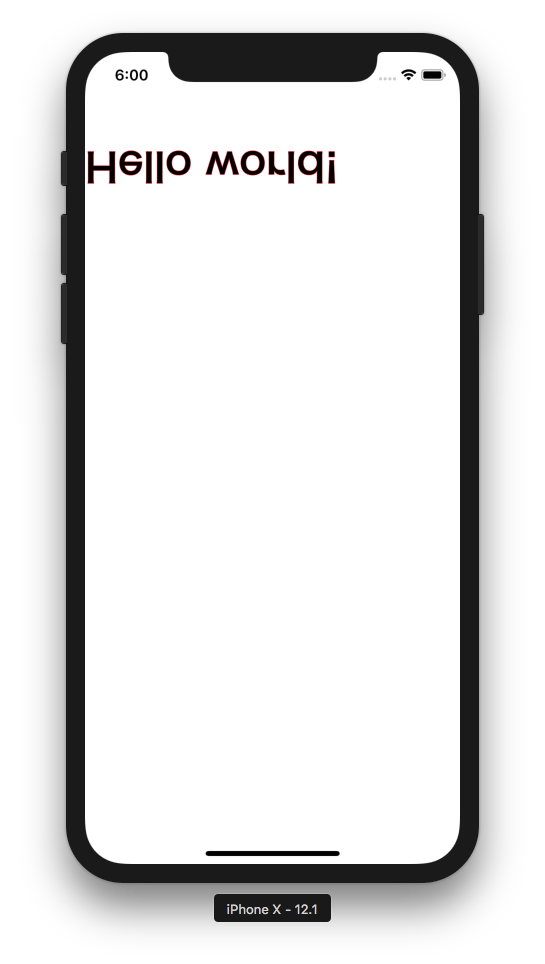
最初実装したときになぜか上下反転して表示されてしまった。
transformがうまくいっていなかったようなので、 UIBezierPathのextensionを実装した。
extensionの実装は以下の通り。
import UIKit

extension UIBezierPath {
    enum InvertDirection {
        case none
        case x
        case y
        case both
    }

    func flip(direction: InvertDirection) {
        let rect = self.bounds
        switch direction {
        case .none:
            break
        case .x:
            self.apply(CGAffineTransform(translationX: -rect.origin.x, y: 0))
            self.apply(CGAffineTransform(scaleX: -1, y: 1))
            self.apply(CGAffineTransform(translationX: rect.origin.x + rect.width, y: 0))
        case .y:
            self.apply(CGAffineTransform(translationX: 0, y: -rect.origin.y))
            self.apply(CGAffineTransform(scaleX: 1, y: -1))
            self.apply(CGAffineTransform(translationX: 0, y: rect.origin.y + rect.height))
        case .both:
            self.apply(CGAffineTransform(translationX: -rect.origin.x, y: -rect.origin.y))
            self.apply(CGAffineTransform(scaleX: -1, y: -1))
            self.apply(CGAffineTransform(translationX: rect.origin.x + rect.width, y: rect.origin.y + rect.height))
        }
    }
}
使い方
import UIKit

class ViewController: UIViewController {

    override func viewDidLoad() {
        super.viewDidLoad()

        // For example
        let str = "我が家の猫は7.4kg\nゆえに重い"
        guard let font = UIFont(name: "HiraKakuProN-W6", size: 36) else { return }

        let textOptions = TextOutlineShapeView.TextOptions(text: str,
                                                           font: font,
                                                           lineSpacing: 10,
                                                           textAlignment: .left)
        let shapeOptions = TextOutlineShapeView.ShapeOptions(lineJoin: .round,
                                                             fillColor: UIColor.white.cgColor,
                                                             strokeColor: UIColor.blue.cgColor,
                                                             lineWidth: 5,
                                                             shadowColor: UIColor.black.cgColor,
                                                             shadowOffset: CGSize(width: 3, height: 3),
                                                             shadowRadius: 5,
                                                             shadowOpacity: 0.6)
        let shapeView = TextOutlineShapeView(textOptions: textOptions, shapeOptions: shapeOptions)
        self.view.addSubview(shapeView)

        shapeView.translatesAutoresizingMaskIntoConstraints = false
        let top = shapeView.topAnchor.constraint(equalTo: self.view.safeAreaLayoutGuide.topAnchor, constant: 10)
        let bottom = shapeView.bottomAnchor.constraint(equalTo: self.view.safeAreaLayoutGuide.bottomAnchor, constant: 10)
        let leading = shapeView.leadingAnchor.constraint(equalTo: self.view.safeAreaLayoutGuide.leadingAnchor, constant: 10)
        let trailing = shapeView.trailingAnchor.constraint(equalTo: self.view.safeAreaLayoutGuide.trailingAnchor, constant: 10)
        NSLayoutConstraint.activate([top, bottom, leading, trailing])
    }
}
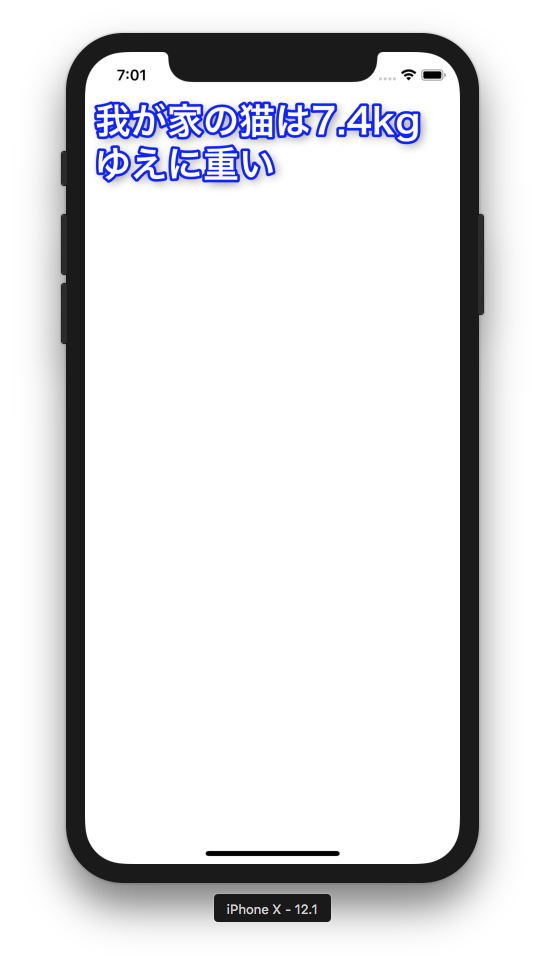
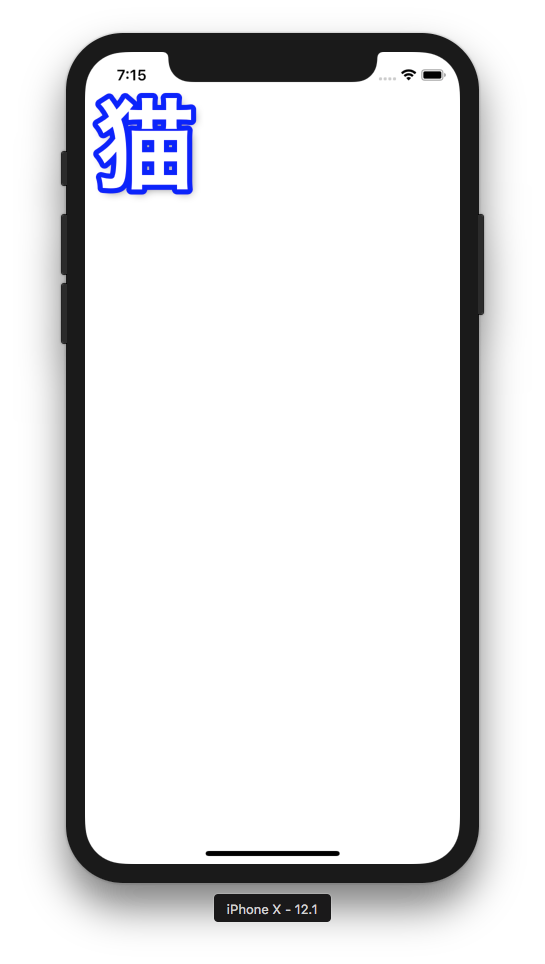
いい感じ。
実用するなら描画後に画像化したほうがパフォーマンスがいいと思う。
大きく表示したサンプル
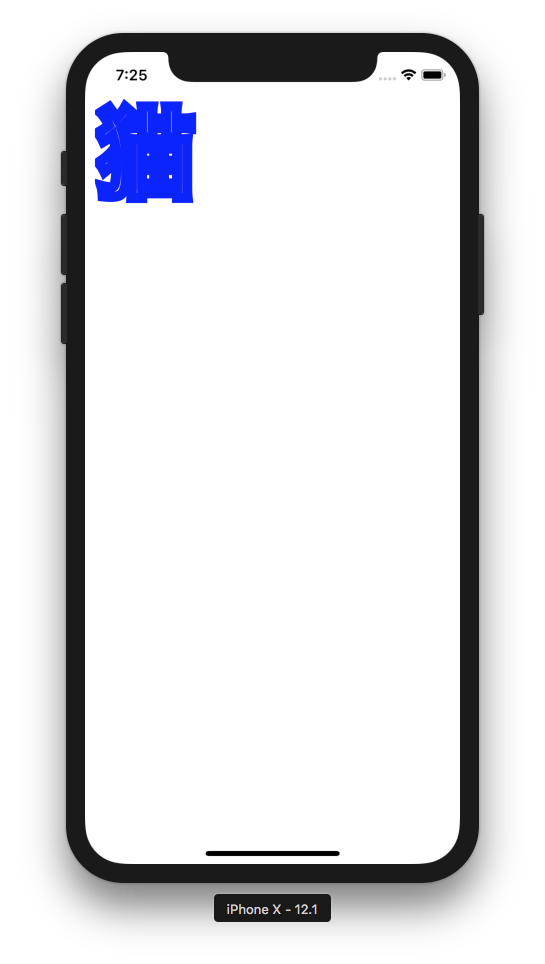
角の処理結果が見づらいので、文字サイズを大きくした。
NSAttributedString で作ったもの。美しくない…。
UIBezierPath で作ったもの。美しい。
ソースコード